xTool M1 Ultra User Guide
Before starting the user guide of xTool M1 Ultra, go to xTool M1 Ultra Unboxing & First Use to see the video tutorial first.
Download PDF file (multi-language)
|
|
|
|
|
|
|
|
|
|
|
|


List of items
Unbox xTool M1 Ultra and check the items inside the pack. If you find items missing or broken, please contact us for after-sales support.
xTool M1 Ultra |
Laser module |
Smoke exhaust module |
USB cable |
Power cable and adapter |
Fine-cutting blade |
Fine-point pen |
Pen holder |
Triangular prism holder × 4 |
Triangular prism × 10 |
Cutting mat (LightGrip) |
Cutting mat (FabricGrip) |
Filter × 8 |
Key × 2 |
Grease |
Material pack |
Lens mount (spare part) × 2 |
Lens mount rotating piece |
Screwdriver |
Multi-function carriage |
Cutting blade |
Thumb screw for the baseplate (spare parts) × 2 |
Quick start guide |
Safety instructions |


Meet your xTool M1 Ultra
Product structure
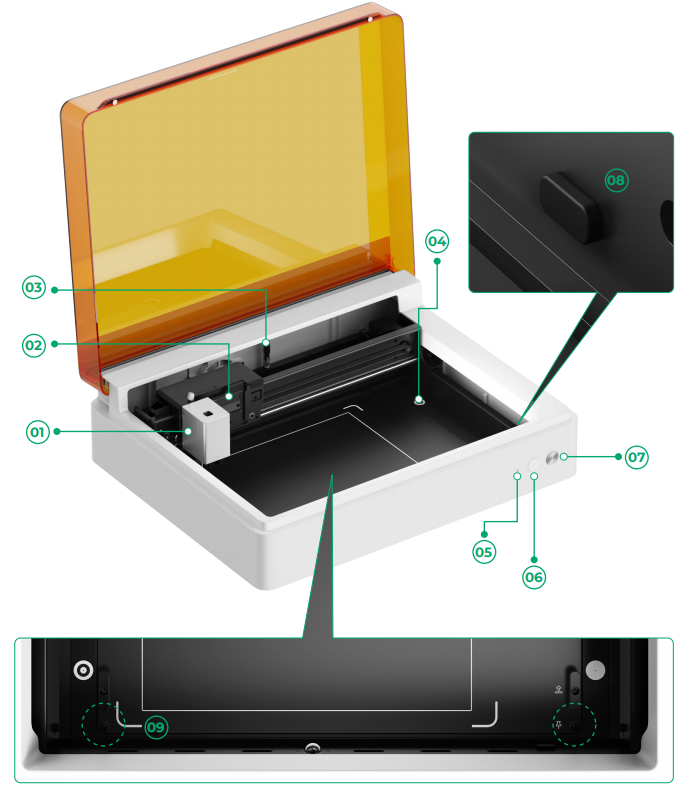
① Basic carriage | ② Multi-function holder |
③ Wi-Fi antenna | ④ Camera viewfinder point |
⑤ Indicator | ⑥ Point marking button |
⑦ Start/Stop button | ⑧ Rotary Attachment port |
⑨ Thumb screw for the baseplate |
|
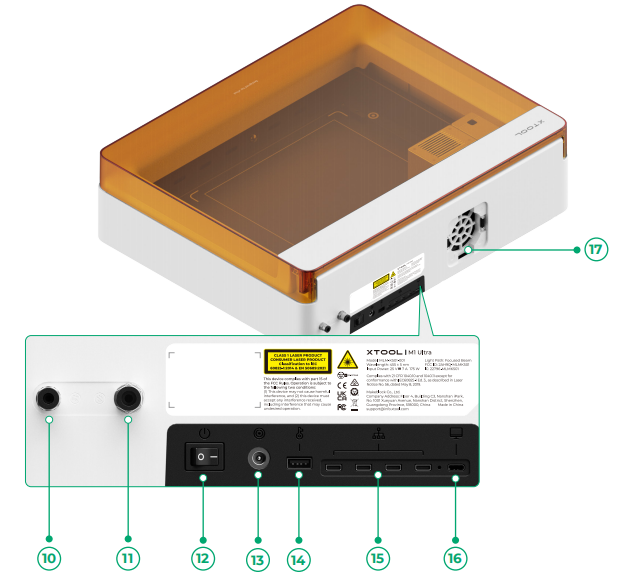
⑩ Tube fitting for the air assist set | ⑪ Tube fitting for the fire safety set |
⑫ Power switch | ⑬ Power port |
⑭ Port for the key | ⑮ Extension port × 4 |
⑯ USB port | ⑰ Smoke outlet |
Specifications
Product name | xTool M1 Ultra |
Safety Classification | Class 1 Laser Safety |
Size | 620 mm × 498 mm × 178 mm |
Weight | 17 kg |
Processing mode | Laser mode, blade mode, inkjet printing, pen drawing, multi-module processing |
Processing area | Laser engraving and laser cutting - 300 mm × 300 mm Blade cutting (fine-point blade, rotary blade, and foil transfer tip) - 300 mm × 300 mm Blade cutting (cutting blade) - 295 mm × 295 mm Inkjet printing - 294 mm × 298 mm |
Maximum processing speed | 400 mm/s (for bitmap) |
Input power | 25 V⎓ 8 A, 200 W |
Laser module | 455 nm blue-light laser |
Laser power | 10 W 20 W |
Connection mode | Wi-Fi, USB, IP |
Indicator description

Indicator status | Buzzer status | Device status |
Solid white | / | Standby, not connected to XCS |
Solid light blue | / | Standby, not connected to XCS |
Solid purple | Sounding once | Standby, connected to XCS |
Breathing white | / | Sleeping, not connected to XCS |
Breathing purple | / | Sleeping, connected to XCS |
Blinking purple slowly | / | Firmware updating |
Solid green | / | Processing area marking on XCS / |
Blinking blue slowly | Sounding once | Ready for framing / Ready to process |
Solid blue | / | Task paused |
Blinking yellow | Sounding once | The lid is open or not fully closed |
Blinking yellow | Keep sounding | Flame detected (small flame) / |
Blinking red | Keep sounding | Flame detected (large flame) |
Blinking yellow | Sounding three times | Exceptions occur |
Blinking red | Sounding three times | Major exceptions occur |
Get xTool M1 Ultra ready
1. Remove the limit screws
Note: xTool M1 Ultra has limit screws before both sides of the beam. The limit screws are used to prevent slipping gears during shipping. Before using xTool M1 Ultra, you need to remove the limit screws first.
(1) Open the lid of xTool M1 Ultra.
(2) Use your hands to rotate and remove the limit screws on the left side, right side, and multi-function holder.

2. Install the laser module
(1) Align the slot of the laser module and the slot of the multi-function holder, slide the laser module, and install it on the multi-function holder.


(2) Push down the laser module until you feel it sits snugly on the holder.

(3) Toggle the locking bar to lock the module.

💡 Note: If you want to use other functions, you can switch the module or carriage accordingly.
3. Install the smoke exhaust module
(1) Put one piece of filter on the smoke exhaust module.


💡 Note: Do not use the smoke exhaust module without the filter. Or it may absorb smoke and dust and get damaged.
(2) On the back of xTool M1 Ultra, install the smoke exhaust module in the smoke outlet.

4. Insert the key
Insert the key to the corresponding port on the back of xTool M1 Ultra and unlock the processing and related functions. You can remove the key to lock the processing and related functions.


5. Connect to a power supply
Use the power cable and power adapter to connect xTool M1 Ultra with a power supply.


6. Download and install xTool software
Go to s.xtool.com/software to download and install xTool Studio / xTool Creative Space (XCS).
7. Connect xTool M1 Ultra to a computer
Use the USB cable to connect xTool M1 Ultra to your computer. Turn on xTool M1 Ultra, and connect it to the software.
Refer to Connect and Setup xTool M1 Ultra with xTool Studio for instructions on connecting xTool M1 Ultra to xTool Studio.
Refer to Operate xTool M1 Ultra with XCS (V2.1) on Your Computer for instructions on connecting xTool M1 Ultra to XCS.


Operate xTool M1 Ultra through xTool Studio
- To process flat materials, go to (xTool Studio) Lasering on Flat Surface with xTool M1 Ultra
- To process cylindrical materials, go to (xTool Studio) Use Rotary Attachment 2 (RA2) in Roller Mode with xTool M1 Ultra and (xTool Studio) Use Rotary Attachment 2 (RA2) in Chuck Mode with xTool M1 Ultra
- To process materials by using the cutting blade, go to (xTool Studio) Use Cutting Blade with xTool M1 Ultra
- To process materials by using the rotary blade, go to (xTool Studio) Use Rotary Blade with xTool M1 Ultra
- To process materials by using the fine-point blade, go to (xTool Studio) Process Materials with the Fine-point Blade
- To process materials by using the foil transfer tip, go to (xTool Studio) Use Foil Transfer Tip to Process Materials with xTool M1 Ultra
- To process materials by using the hot foil pen, go to (xTool Studio) Use xTool Hot Foil Pen with xTool M1 Ultra
- To process materials by using the fine-point pen, go to (xTool Studio) Process Materials with Fine-Point Pen
- To process materials by using the ink module, go to (xTool Studio) Inkjet Printing on Materials with xTool M1 Ultra
- To process materials by using the multi-modules, go to (xTool Studio) Multi-Module Processing via Ink Module and Fine-Point Blade with xTool M1 Ultra and (xTool Studio) Multi-Module Processing via Ink Module and Laser Module with xTool M1 Ultra
- To process materials by using the electrostatic mat, go to (xTool Studio) Use xTool Electrostatic Mat with M1 Ultra
- To process materials by using the riser base, go to (xTool Studio) Use the Riser Base for xTool M1 Ultra
Operate xTool M1 Ultra through XCS
- To process flat materials, go to Process on Flat Surface on XCS.
- To process cylindrical materials, go to Use the Rotary Attachment with xTool M1 Ultra.
- To process materials by using the cutting blade, rotary blade, and fine-point blade, go to Process Materials with Blade Cut Using xTool M1 Ultra.
- To process materials by using the foil transfer tip, go to Process Materials with Foil Transfer Tip Using xTool M1 Ultra.
- To process by using the fine-point pen, go to Process Materials with Fine-Point Pen Using xTool M1 Ultra.
- To process by using the ink module, go to Process Materials with Inkjet Printing Using xTool M1 Ultra.
- To process by using the multi-modules, go to Process Materials with Multi-module Using xTool M1 Ultra.
- For details about how to xTool Screen Printer and prepare the screens, see xTool Screen Printer.
