Disclaimer
LightBurn is a third-party software, and therefore Makeblock Co., Ltd. shall bear no responsibility for any loss caused due to the operation of LightBurn.
The firmware of xTool F1 Ultra has been tested in detail by Makeblock Co., Ltd, but incompatibility with the software or hardware may still occur. You can contact our after-sales service for technical support if errors occur due to incompatibility.
Download and install LightBurn
Go to https://lightburnsoftware.com/pages/trial-version-try-before-you-buy to download the latest version of LightBurn and install it. If you are a new user, you have a 30-day free trial.
Notes:
- Ensure that your LightBurn is licensed and its version is of or above 1.6.00. If the software is of an earlier version or a cracked or pirated version, the device connection may fail.
- Lightburn, as third-party software, supports xTool F1 Ultra in using the basic workflow to start laser processing. However, it does not fully support all the features of xTool F1 Ultra. Features such as real-time framing and embossing on materials are not supported. To fully explore all the features of xTool F1 Ultra, please use XCS (xTool Creative Space), the official software of xTool.
Connect xTool F1 Ultra with LightBurn
- Download the configuration file for xTool F1 Ultra: xTool_F1 Ultra-V1.2.lbdev

- Open LightBurn. In the bottom-right corner, click Devices on the Laser panel.

Note: Ensure that you start to configure xTool F1 Ultra in this way instead of choosing Import Prefs from the menu. If you choose Import Prefs, the original configuration is overridden.
- On the Devices window, click Import to import the file xTool_F1 Ultra-V1.2.lbdev.

- xTool F1 Ultra is displayed in the device list. Click OK and xTool F1 Ultra is selected as the device.

- Connect your computer with xTool F1 Ultra by using the USB cable.

- On the right side of LightBurn, click Console. On the Console panel, you can see "ok", which means that your connection is successful.

Process flat materials
1. Place the material
Lift the protective enclosure, and place the material on the baseplate, allowing the blue light spot to fall on the surface of the material.

Note:
- To cut a material, you are advised to place the slatted panel under the material, so as to reduce the burned area on the back of the material and protect the baseplate.
- If the material is too light, you are advised to use tools such as tape to fix the material. Otherwise, the airflow of the exhaust fan may cause the material to move during processing.
2. Perform laser focusing
Hold down on the Up/Down button for laser module to lift or lower the laser module. When the red and blue light spots overlap, the focus is successfully set.
Note: The blue light spot does not move. If the laser module moves up, the red light spot moves towards the left. If the laser module moves down, the red light spot moves towards the right.


3. Design objects for processing
Use the toolbar on the left to design processing patterns on the canvas.

4. Set processing parameters
(1) On the Cuts / Layers panel, double click a layer to open the setting window. Set processing parameters on the window.

(2) On the Laser panel, set Start From to Absolute Coords.
5. Preview the processing area
On the right of LightBurn, click Frame and the laser spot will move along the boundary of the processing pattern on the material, so that you can preview the processing area.
If the area is not ideal, you can adjust the material position or the object positions in the software, and then click Frame to preview the processing area again.

6. Start processing
Pull down the protective enclosure of xTool F1 Ultra. Then, click Start in LightBurn to start processing.

Note: By default, xTool F1 Ultra uses the blue-light laser for processing. If you want to switch to fiber infrared (IR) laser, see Switch between blue-light and fiber IR lasers in More operations of this article.
Process cylindrical materials
1. Connect xTool F1 Ultra with the rotary attachment
Connect xTool F1 Ultra with the rotary attachment. For more information on how to connect xTool F1 Ultra with the rotary attachment, see Use xTool F1 Ultra with the Rotary Attachment.

2. Place the material and perform laser focusing
(1) If you use the rotary attachment in Roller mode, place the material between the two rollers; If you use the rotary attachment in Chuck mode, fix the material on the jaws.

(2) Check whether the red and blue light spots are both on the top surface of the material. If not, readjust the position of the rotary attachment.

(3) Hold down on the Up/Down button for laser module to lift or lower the laser module. When the red and blue light spots overlap, the focus is successfully set.

3. Set up for cylindrical mode
(1) On the top of LightBurn, click the general settings icon  > toggle on Show rotary enable in main window > click OK. Then, restart LightBurn and you can see the Enable Rotary option on the Laser panel.


(2) On the top of LightBurn, click the device settings icon  > the GCode tab.
At the end of Start GCode, enter the following instructions:
G100
M116A2B-4
Before the first line of End GCode, insert the following instruction:
G101
Then, click OK to save your settings.

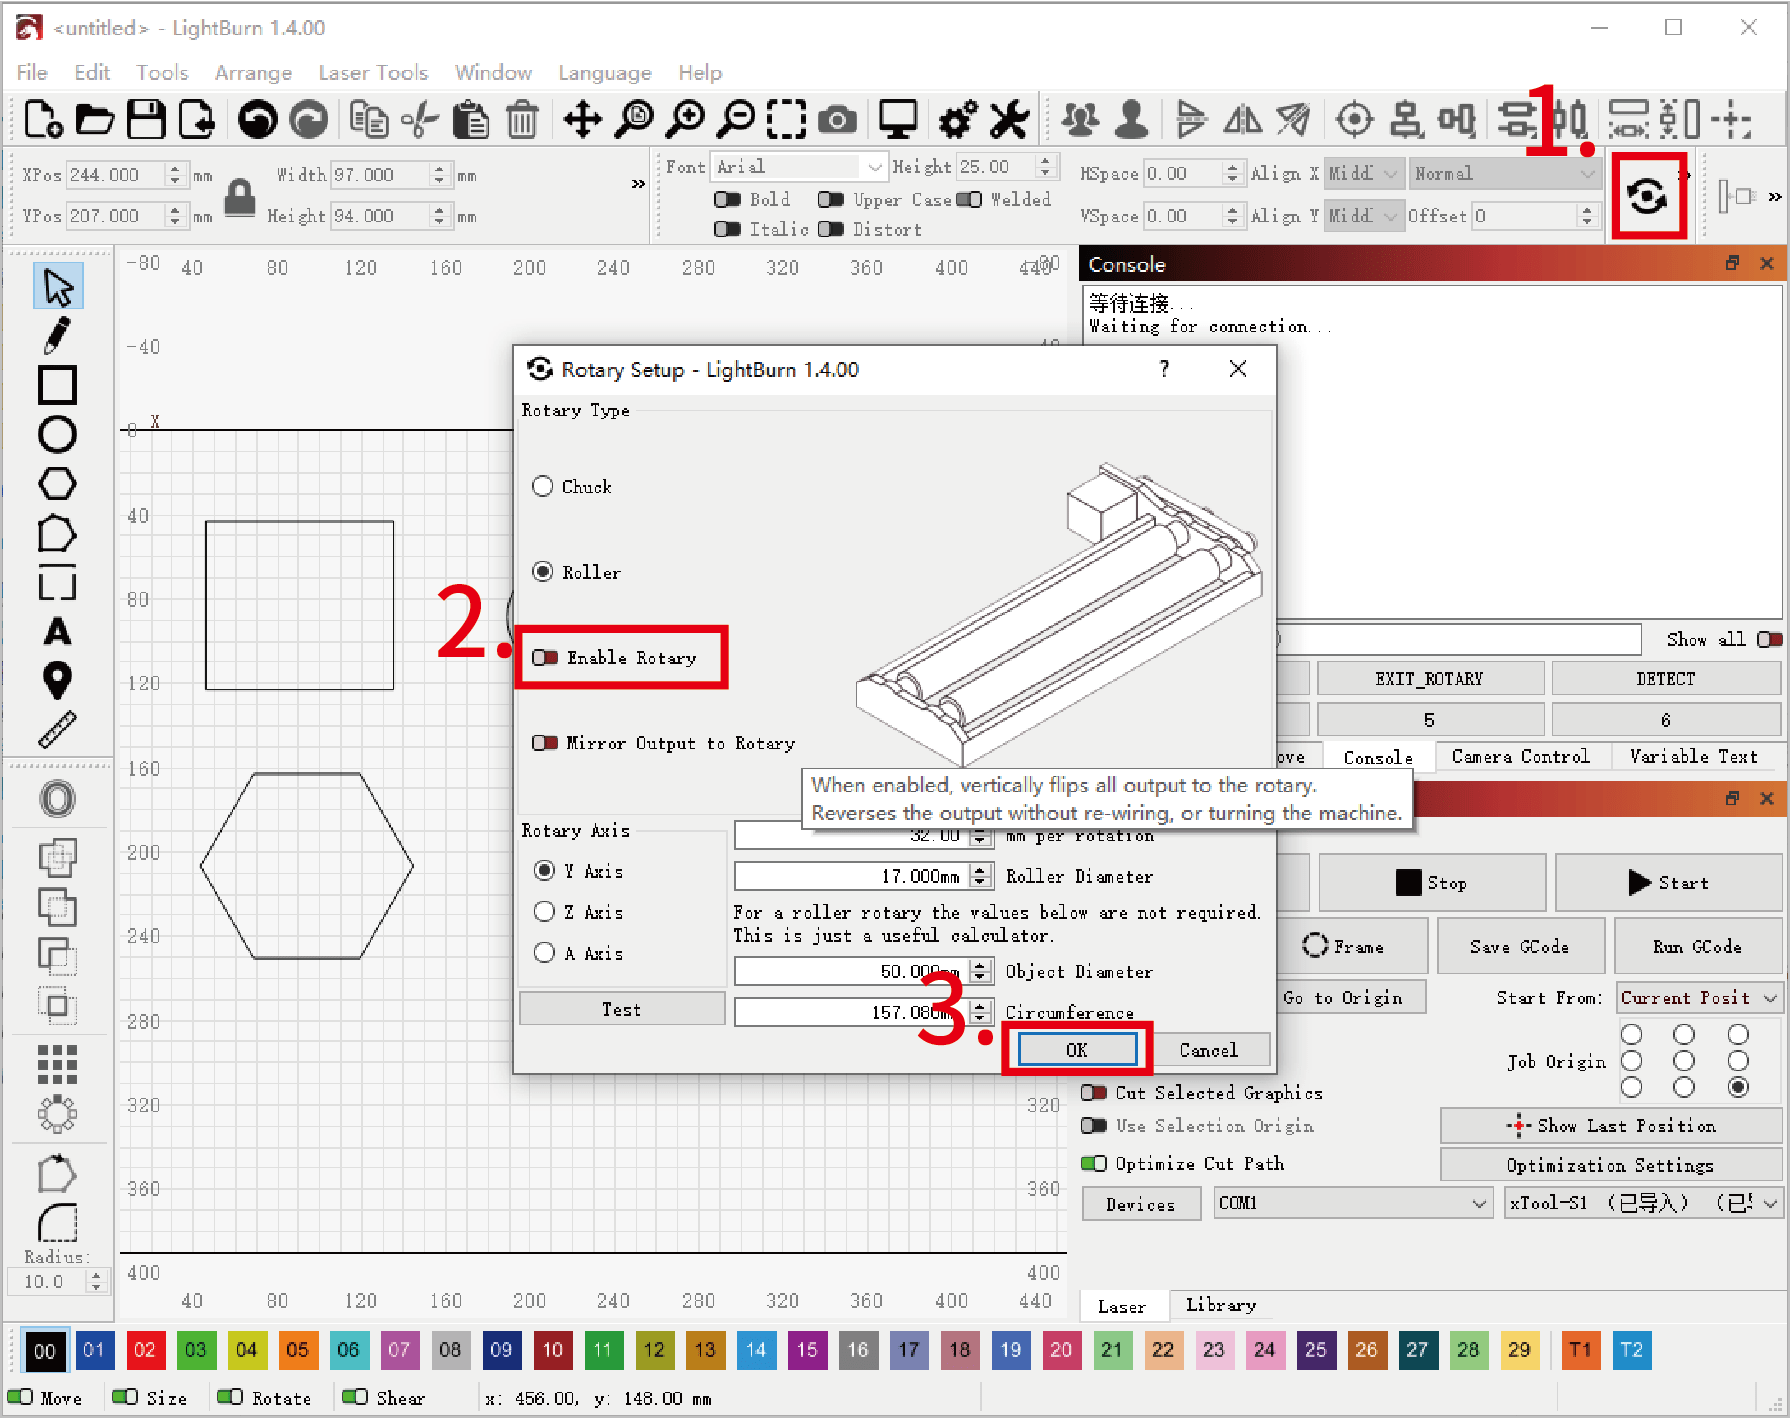
(3) On the top of LightBurn, click Laser Tools > Rotary Setup.

(4) Set parameters for the rotary attachment and the material to be processed. After you finish setting, click OK.
- If you select Chuck, toggle on Enable Rotary and Mirror Output to Rotary. Set Rotary Axis to Y Axis, 128.00 mm per rotation for the rotary attachment, and enter the diameter or circumference of your material.

- If you select Roller, toggle on Enable Rotary. Set Rotary Axis to Y Axis, 32.00 mm per rotation and 17.000 mm Roller Diameter for the rotary attachment, and enter the diameter or circumference of your material.

4. Design objects and set parameters
(1) Use the toolbar on the left to design processing patterns on the canvas.
(2) On the Cuts / Layers panel, double click a layer to open the setting window. Set processing parameters on the window.
5. Preview the processing area
(1) On the Console panel, click Enable Cylindrical Frame. Then, click Frame on the Laser panel below.
The laser spot will move along the boundary of the processing pattern on the material so that you can preview the processing area. If the area is not ideal, you can adjust the material position or the object positions in the software, and then click Frame to preview the processing area again.

(2) After you confirm that the processing area is as expected, click the Disable Cylindrical Frame button on the console to exit the rotary framing mode.

6. Start processing
(1) Wear a pair of goggles that can shield laser beams of 455 nm and 1064 nm wavelengths.

Note:
- When xTool F1 Ultra is used with the rotary attachment, its protective enclosure cannot be fully closed. For your safety, it is recommended that you wear goggles during processing.
- Safety goggles are not included with xTool F1 Ultra or the rotary attachment. Please purchase them separately.
(2) Click Start in LightBurn to start processing.

Disable rotary mode and reset the focusing spots
(1) Open the Rotary Setup window, turn off Enable Rotary, and click OK.
(2) On the top of LightBurn, click the device settings icon > the GCode tab.
At the end of Start GCode, delete the following instructions:
G100
M116A2B-4
At the start of End GCode, delete the following instruction:
G101
Then, click OK to save your settings.

(3) On the console panel, click Laser Position Reset first and then click Focus Indicator Light, so as to reset the blue and red light spots used in laser focusing.

Note:
- To switch back to flat material processing mode, you must reset the blue and red light spots after performing framing or processing in rotary mode.
- Do not reset the blue and red light spots during laser processing.
More operations
Switch between blue-light and fiber IR lasers
By default, LightBurn uses the blue-light laser for material processing. To switch to the fiber IR laser, take the following steps:
Note: After the processing task is finished, LightBurn automatically switches back to the blue-light laser.
(1) After you have designed the processing patterns and set the processing parameters, click Save GCode to save the GCode file to your computer.
(2) Open the GCode file using text software, such as Microsoft Notepad and Apple TextEdit. At the start of the third paragraph, replace “G00 G17 G40 G21 G54” with the following commands:
G4M1000
G22

(Optional) (3) Set the fiber IR frequency.
By default, xTool F1 Ultra uses a frequency of 30KHz. You can adjust the laser output frequency by inserting the following command after “G22”:
G0Q + Value (Valid value: [30,60])
For example, if you want to set the frequency to 45, enter G0Q45.

Note: After setting the fiber IR frequency, the setting takes effect unless you restart the machine or manually change the frequency in a GCode file.
(4) Save the GCodie file. In LightBurn, click Run Gcode. Select the edited GCode file, click Open and LightBurn will start processing the file with fiber IR laser.

Set the laser power for framing
To set the laser power used in framing, click the device settings icon  > change the number after Laser on when framing.
You are recommended to set a value between 3% to 10%. Do not set a value too large, or the laser beams may burn the material during framing.

More information
You can visit the website of LightBurn to view more information on how to use LightBurn.
- Video tutorials: https://lightburnsoftware.com/pages/tutorials
- Documentations: https://docs.lightburnsoftware.com/index.html
Services & Help
Learn & Education

Copyright © 2025 xTool All Rights Reserved.