xTool Creative Space (XCS) is an all-in-one software for graphic designing and editing, laser process setting, and machine controlling.
Connect xTool S1 to XCS
Minimum and recommended requirements for mobile phones
Item | Minimum configuration | Recommended configuration |
Operating system | Android 10.0 or later iOS 15 or later | |
RAM | 2 GB | 3 GB or more |
Storage | 32 GB | 64 GB or more |
- With the minimum configurations, all the functions of XCS can be used properly. When you import a complex image, however, XCS may fail to run smoothly.
- With the recommended configurations, XCS can run more smoothly when you import and edit a complex image, the software delay may be shorter, and the performance is better.
Download and install XCS
(1) Search for "xTool Creative Space" in App Store or Google Play or visit xtool.com/software to download the app and install it on your mobile phone.

(2) Open XCS. On the top-left corner, tap the icon to go to the Settings screen and select the language you use.

Connect xTool S1 to Wi-Fi
You can connect xTool S1 to a Wi-Fi network by using XCS on your mobile phone or your computer.
- On the mobile phone
(1) Open XCS on your phone, and tap Connect device. On the Connect device screen, tap the "+" icon in the top-right corner. Then, select S1 and tap Next.

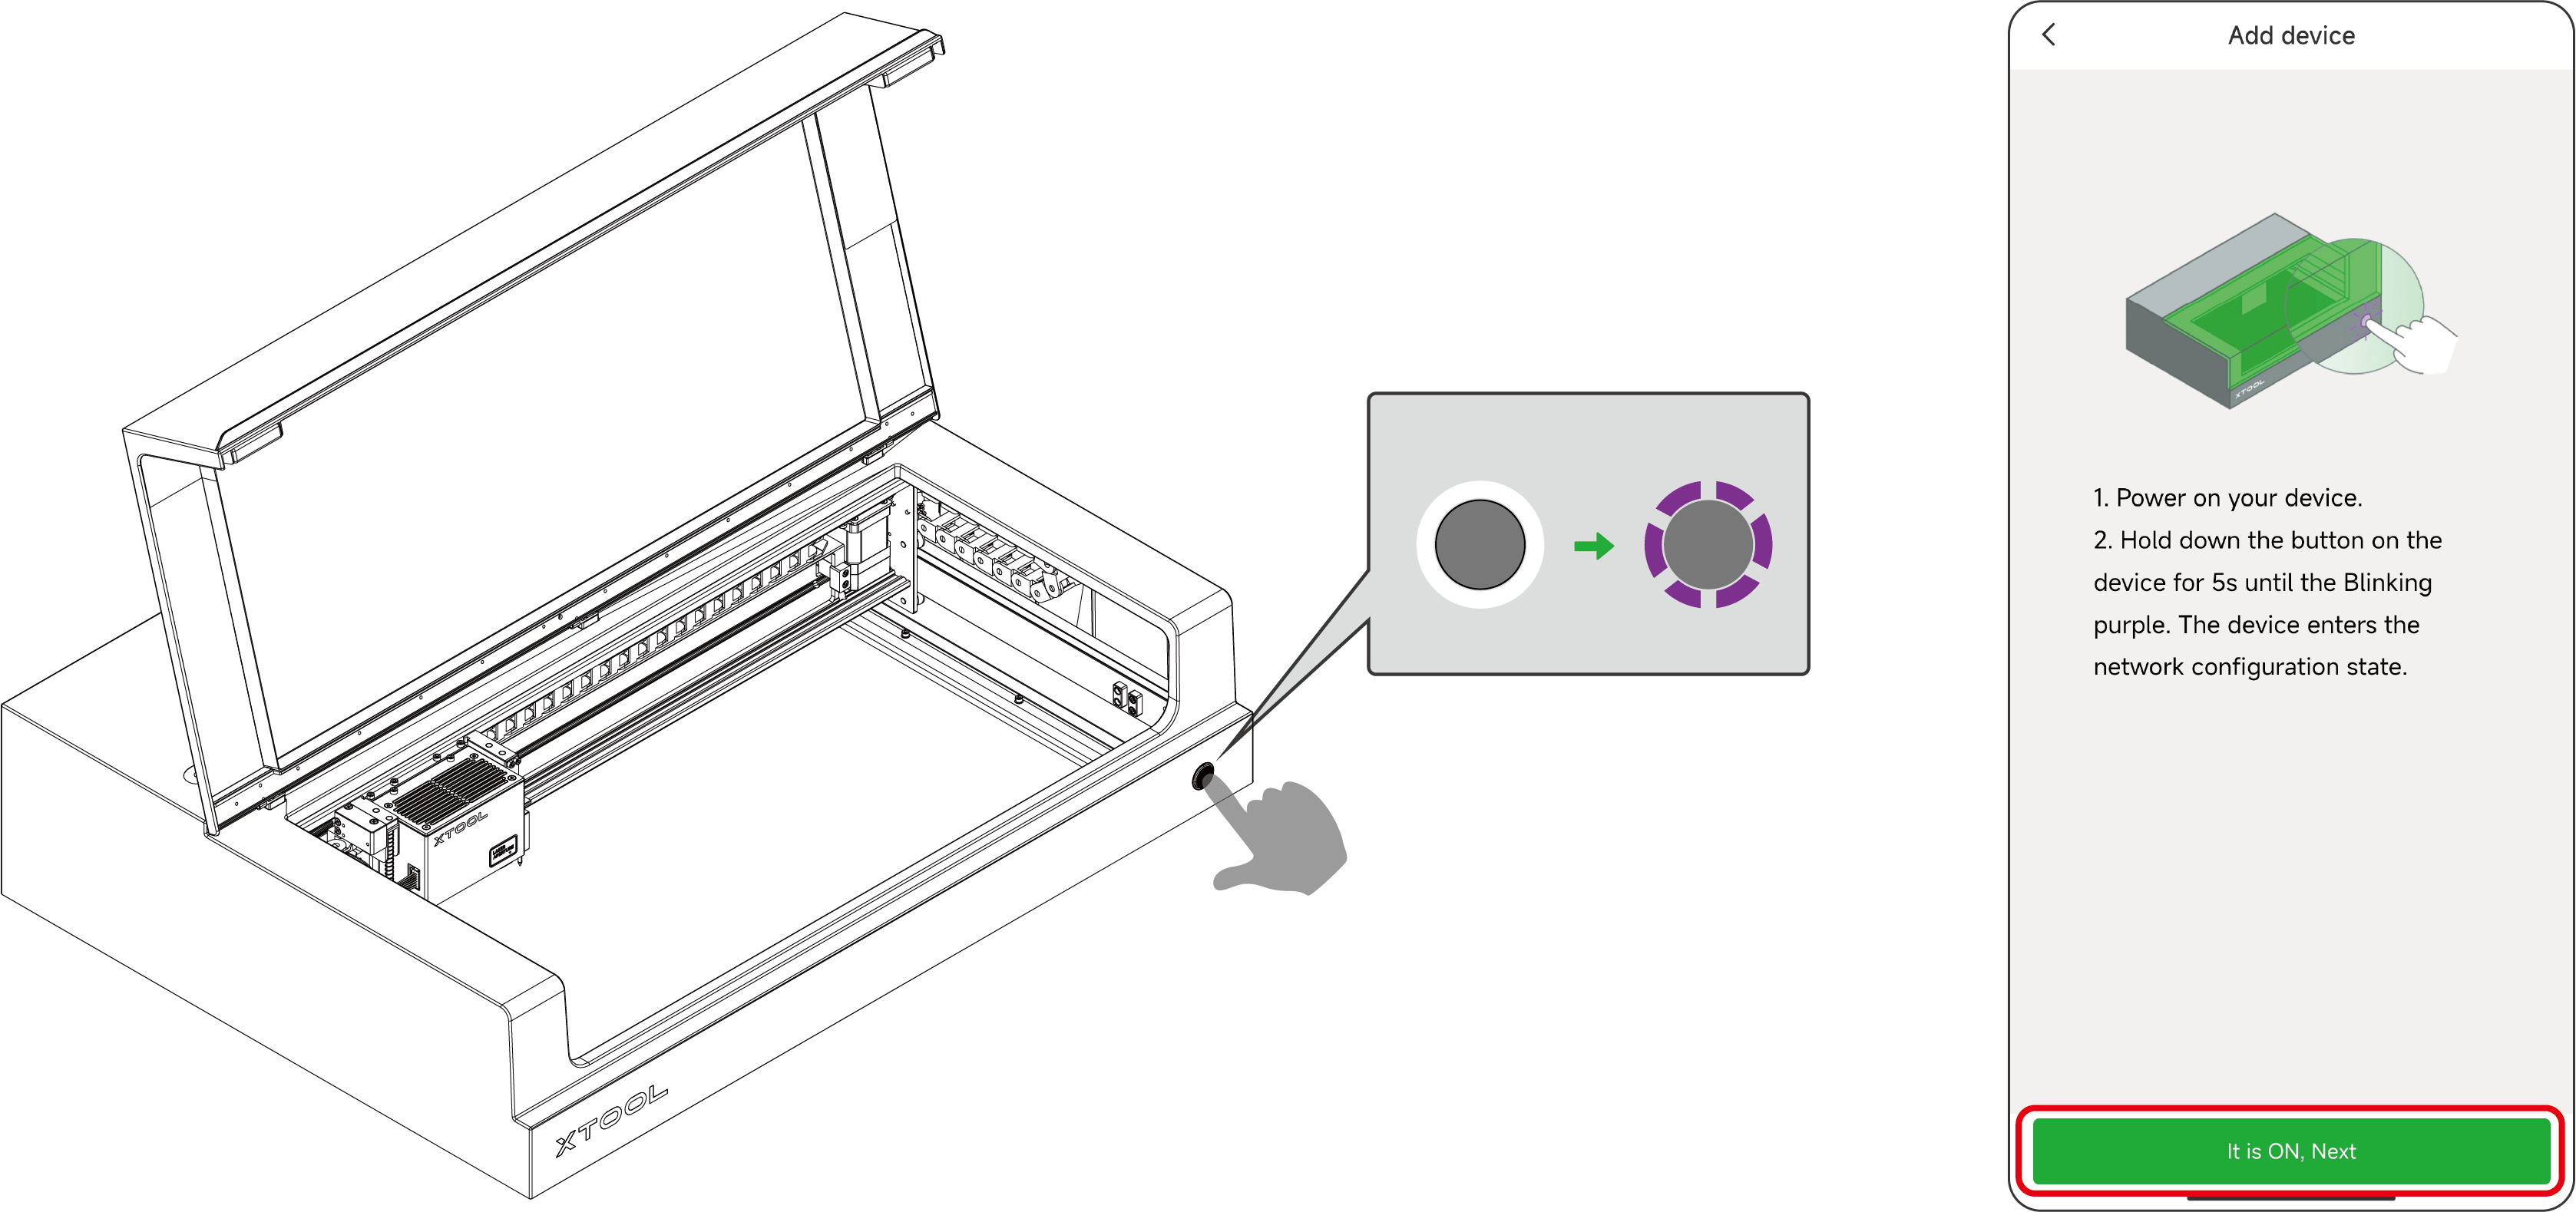
(2) Long press the button on xTool S1 until the annular indicator blinks purple. On XCS, tap It is ON, Next.

(3) Follow the instructions of the software to configure the network for xTool S1 and connect it to a Wi-Fi network.
Note: The device supports only 2.4 GHz Wi-Fi networks.

- On the computer
(1) Follow the instructions on "Operate xTool S1 with XCS on Your Computer" to connect xTool S1 with XCS on the computer through a USB cable.

(2) On the computer, click the icon on the top-right corner of XCS.

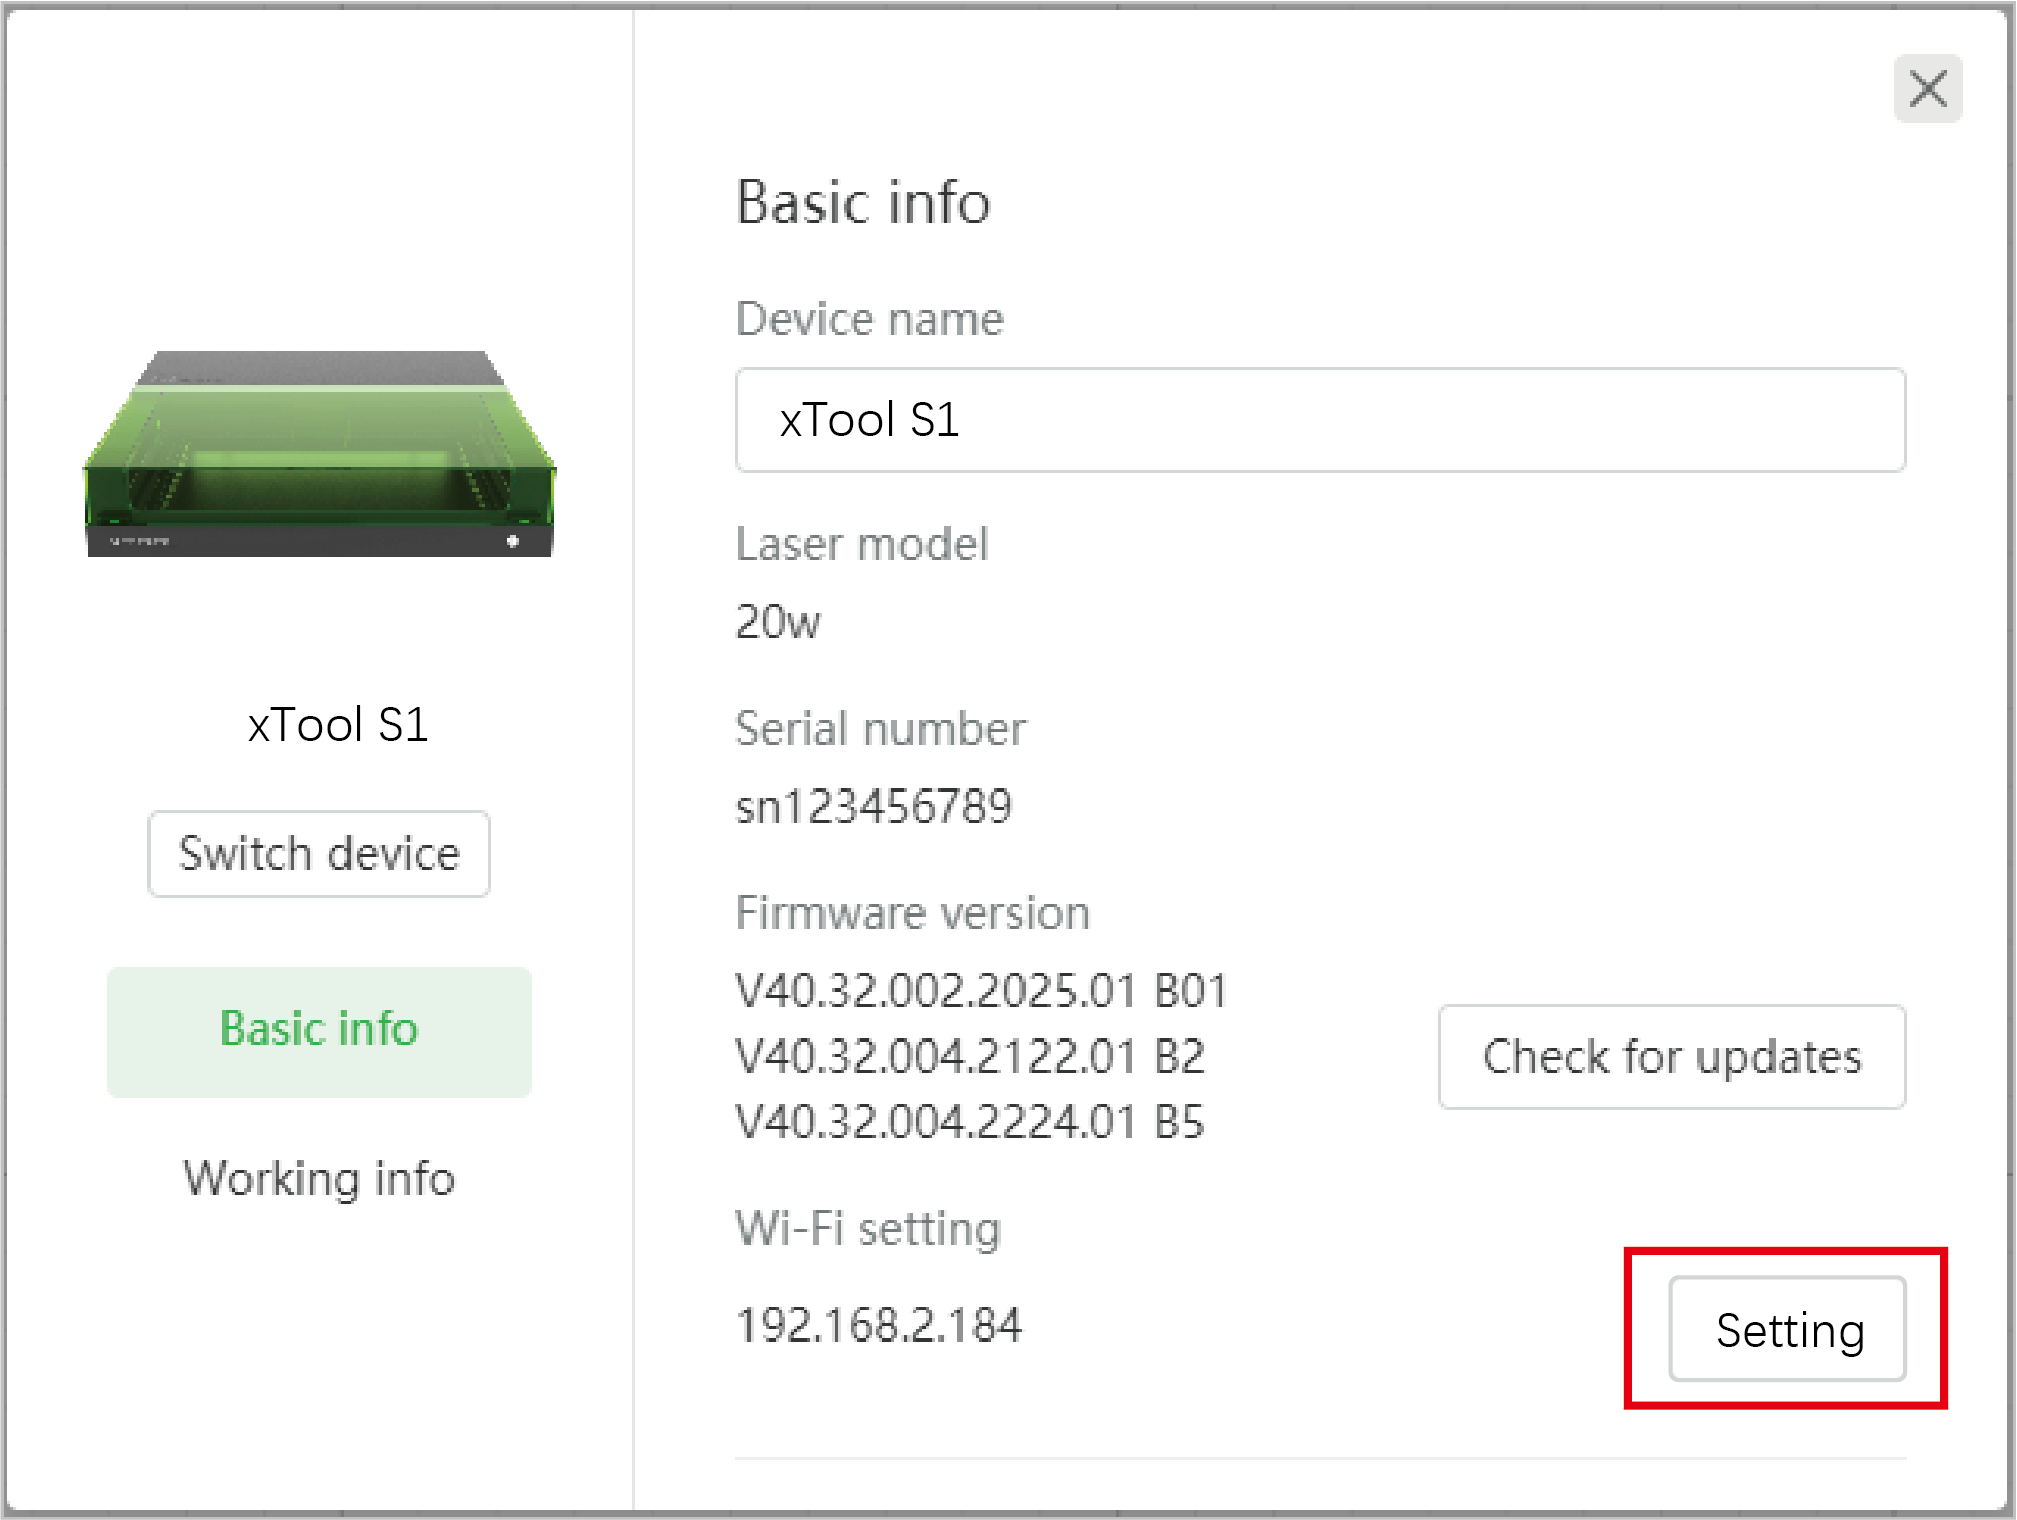
(3) View the device name and click Setting in the Wi-Fi setting section.

(4) Select a Wi-Fi network and enter the password. Then, click Next to connect xTool S1 to the Wi-Fi.
Note: The device supports only 2.4 GHz Wi-Fi networks.

Connect xTool S1 to XCS
(1) Ensure that your phone and xTool S1 are connected to the same Wi-Fi network. On your phone, open XCS and tap Connect device.

(2) On the device list, tap the name of your xTool S1 to connect it. After xTool S1 is connected, its annular indicator turns solid purple.

Set up xTool S1 in XCS
- On the home screen of XCS, tap Device setting.

- Tap to unfold the Working parameters section, and set up xTool S1 based on your need.
- Device name: Set a new name for your xTool S1.
- Flame alarm: If a flame is detected, xTool S1 will pause processing and raise the alarm.
- Stops when moved: If xTool S1 is moved or tilted during processing, it will pause processing.
- Fill light brightness: Adjust the brightness of the fill light in the working area.
- Time the purifier continues to work:
If you connect xTool S1 with the smoke purifier, you can set the duration at which the smoke purifier continues to work after xTool S1 stops processing. By setting this parameter, you can make the smoke purifier work longer to absorb the remaining smoke. - Auto-adjustment for the air assist set:
If you connect xTool S1 with the air assist set (updated version), you can turn on Auto-adjustment for the air assist set.
Set the airflow levels respectively for engraving and cutting. The airflow increases from 1 to 4, and 0 means no airflow. During processing, XCS adjusts the airflow based on your setting.
Note:
For an air assist set that is not of the updated version, you cannot set Auto-adjustment for the air assist set for it.
You are advised to use a small airflow for engraving and a large airflow for cutting.

The supported processing modes
XCS that runs on the mobile phone supports the following processing modes:
- Laser flat: processes flat materials
- Laser cylindrical: processes regular or irregular cylindrical materials
To use this mode, you need to use xTool S1 with the rotary attachment and the riser base (the ordinary version or the version that supports the conveyer feeder).
For more information on how to use xTool S1 with the rotary attachment in Laser cylindrical mode, see Use xTool S1 with the Rotary Attachment.
Note: XCS that runs on the mobile phone or iPad does not support the Laser curve and Conveyor feeder modes. If you need to use these two modes, please use XCS on your computer.
Process materials with flat surfaces
Notes
xTool S1 supports different material thicknesses when working with different accessories.
Combinations of xTool S1 and accessories | Supported material thickness (H) |
xTool S1 | 0 mm < H ≤ 42 mm |
xTool S1 + slats | 0 mm < H ≤ 34 mm |
xTool S1 + honeycomb panel | 0 mm < H ≤ 15 mm |
xTool S1 + riser base | 70 mm ≤ H ≤ 125 mm |
xTool S1 + riser base + honeycomb panel | 0 mm < H ≤ 99 mm |
xTool S1 + riser base supporting conveyor feeder | 15.5 mm ≤ H ≤ 133.5 mm |
xTool S1 + riser base supporting conveyor feeder + honeycomb panel | 0 mm < H ≤ 106.5 mm |
1. Place the material
Open the lid of xTool S1, and place the material to be processed on the baseplate.
.png)
Note: To cut a material, you are advised to place the slats or honeycomb panel on the baseplate before placing the material. The slats or honeycomb panel can reduce the burned area on the back of the material and protect the baseplate..png)
2. Open or create a project
You can open a project to start processing or create a new project. If you create a new project, you need to design patterns and set parameters from scratch.
- Open a project
On the home screen of XCS, tap My projects, and then select the project you want to use in the list.

Note:
XCS supports only the project files in .xcs format.
The project file can contain information such as processing patterns, processing modes, and processing parameters. However, if the machine model, processing mode, or material thickness used in the project varies from the current situation, you need to reset the corresponding parameters.
- Create a new project
To create a new project, you can tap Create project, Camera, or Album on the home screen of XCS.
- Create project: creates a blank project
- Camera: allows you to take a photo with your smartphone camera and use it as a processing pattern
- Album: allows you to choose a photo from your smartphone album and use it as a processing pattern

3. Select the processing mode and material name
(1) On the project screen, select Laser flat for the Processing mode.

(2) Select the name of your material.

Note 1: If you can't find the name of your material, you can select User-defined material.
Note 2: After you select a material name, the software will automatically focus and set other parameters for laser processing. The default settings apply to xTool materials. You can adjust the settings based on your needs.
(3) Turn on or off Laser module position based on your need.
Note: If you turn on Laser module position, XCS will display the position of the laser module on the canvas in real time. The red cross on the canvas indicates the laser module, and the coordinates of the laser module are shown in the upper right corner.

4. Set the laser focus
xTool S1 has a distance sensor, which can measure the distance between the laser module and the material surface. You can also manually measure and calculate the distance between the laser module and the material surface, and input the obtained values into XCS. Before processing, xTool S1 will perform auto-focus based on the Distance parameter.
- Auto measure
(1) Move the laser module over the material. Ensure that the locating spot falls on the surface of the material.

(2) On XCS, click the .png) icon in the Distance section, and xTool S1 will automatically measure the distance from the laser module to the material surface.
icon in the Distance section, and xTool S1 will automatically measure the distance from the laser module to the material surface.

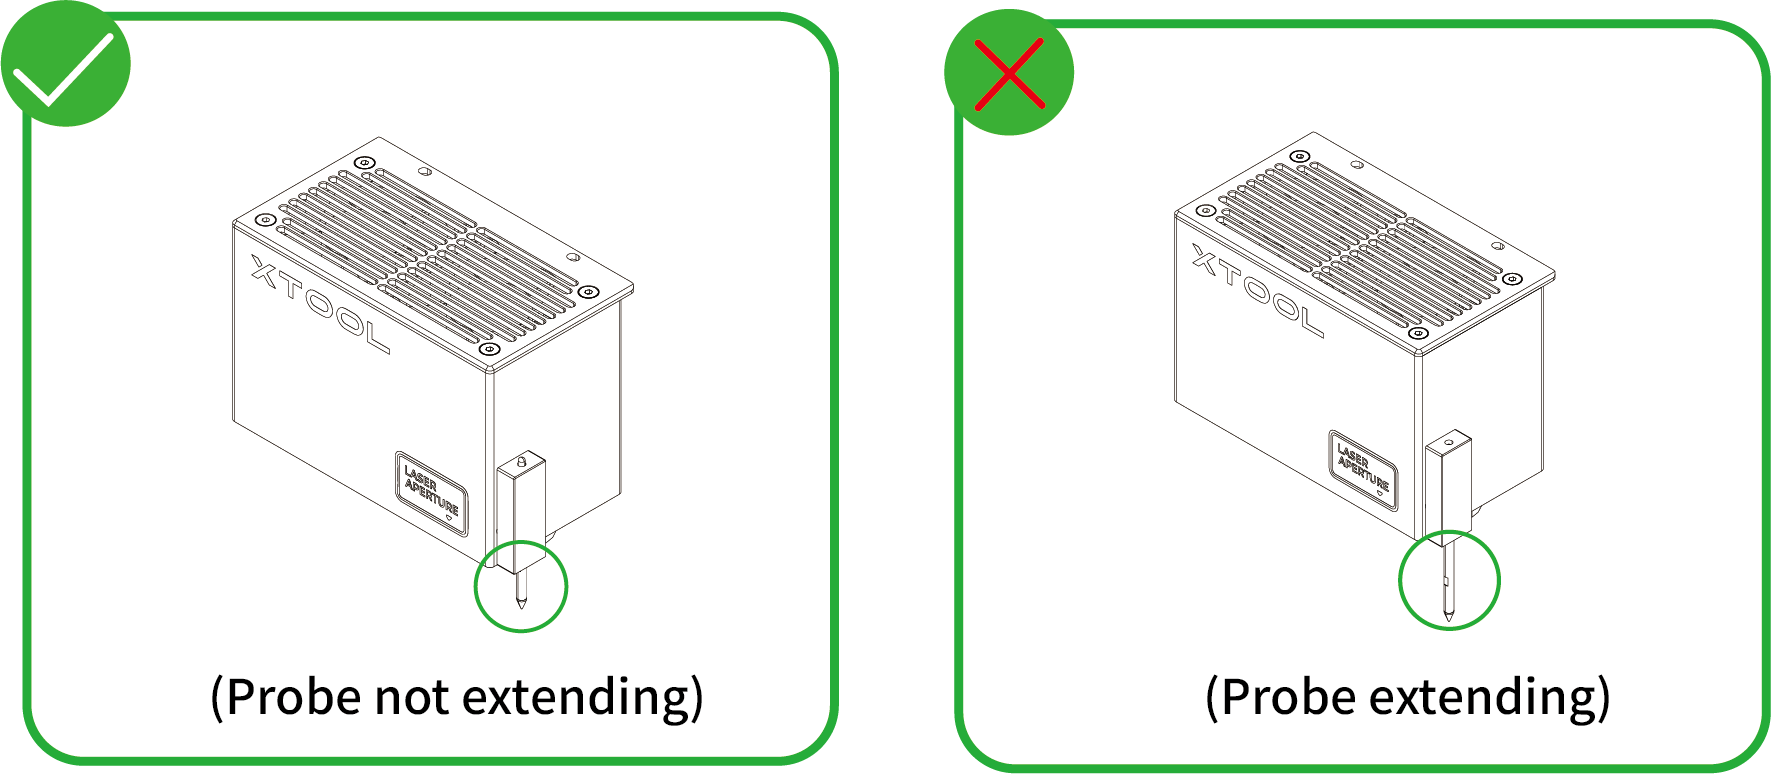
Note: Before auto-measure, ensure that the probe of the distance sensor is not extending.
- Manual measure
(1) Use a ruler to measure the distance from the surface of the material to the top of the laser module.

(2) Subtract 100 mm (3.937 inch) from the measured value from step (1), and input the calculated value into the Distance parameter on XCS.

5. Design objects for processing
(1) Tap the canvas to go to the design editing and parameter setting screen.

(2) Use the tools below the canvas to create objects. You can import images, insert shapes, enter text, or generate QR codes or barcodes.
Note:
If you already have an image taken by camera or chosen from album, you can skip this step or add more elements to the canvas based on your need.
XCS supports importing the following image formats: SVG, DXF, JPG, JPEG, PNG, BMP, etc.

(2) Select the objects and use the toolbar below the canvas to further edit the objects.

Note: For more information about how to use each editing tool, see support.xtool.com/hc/en-us/categories/9157502370455-XCS.
6. Set parameters for processing
(1) Select objects on the canvas and set parameters for the selected objects.
Note:
You need to set parameters for every object. A missed object may fail to be processed.
The parameters that can be set for bitmap objects and vector objects are different. You can select multiple objects of the same type and set parameters for them at once.
- For bitmaps

- For vectors

Note: For a detailed explanation of each parameter, see support.xtool.com/hc/en-us/categories/9157502370455-XCS.
(2) After you set parameters for all the objects, tap OK on the top-left corner of the screen.

7. Preview the processing area
(1) On the bottom of the screen, tap Process to go to the Preview screen. Check the estimated time and the pattern to be processed.

(2) At the bottom of the screen, click Settings to set the Framing Speed.

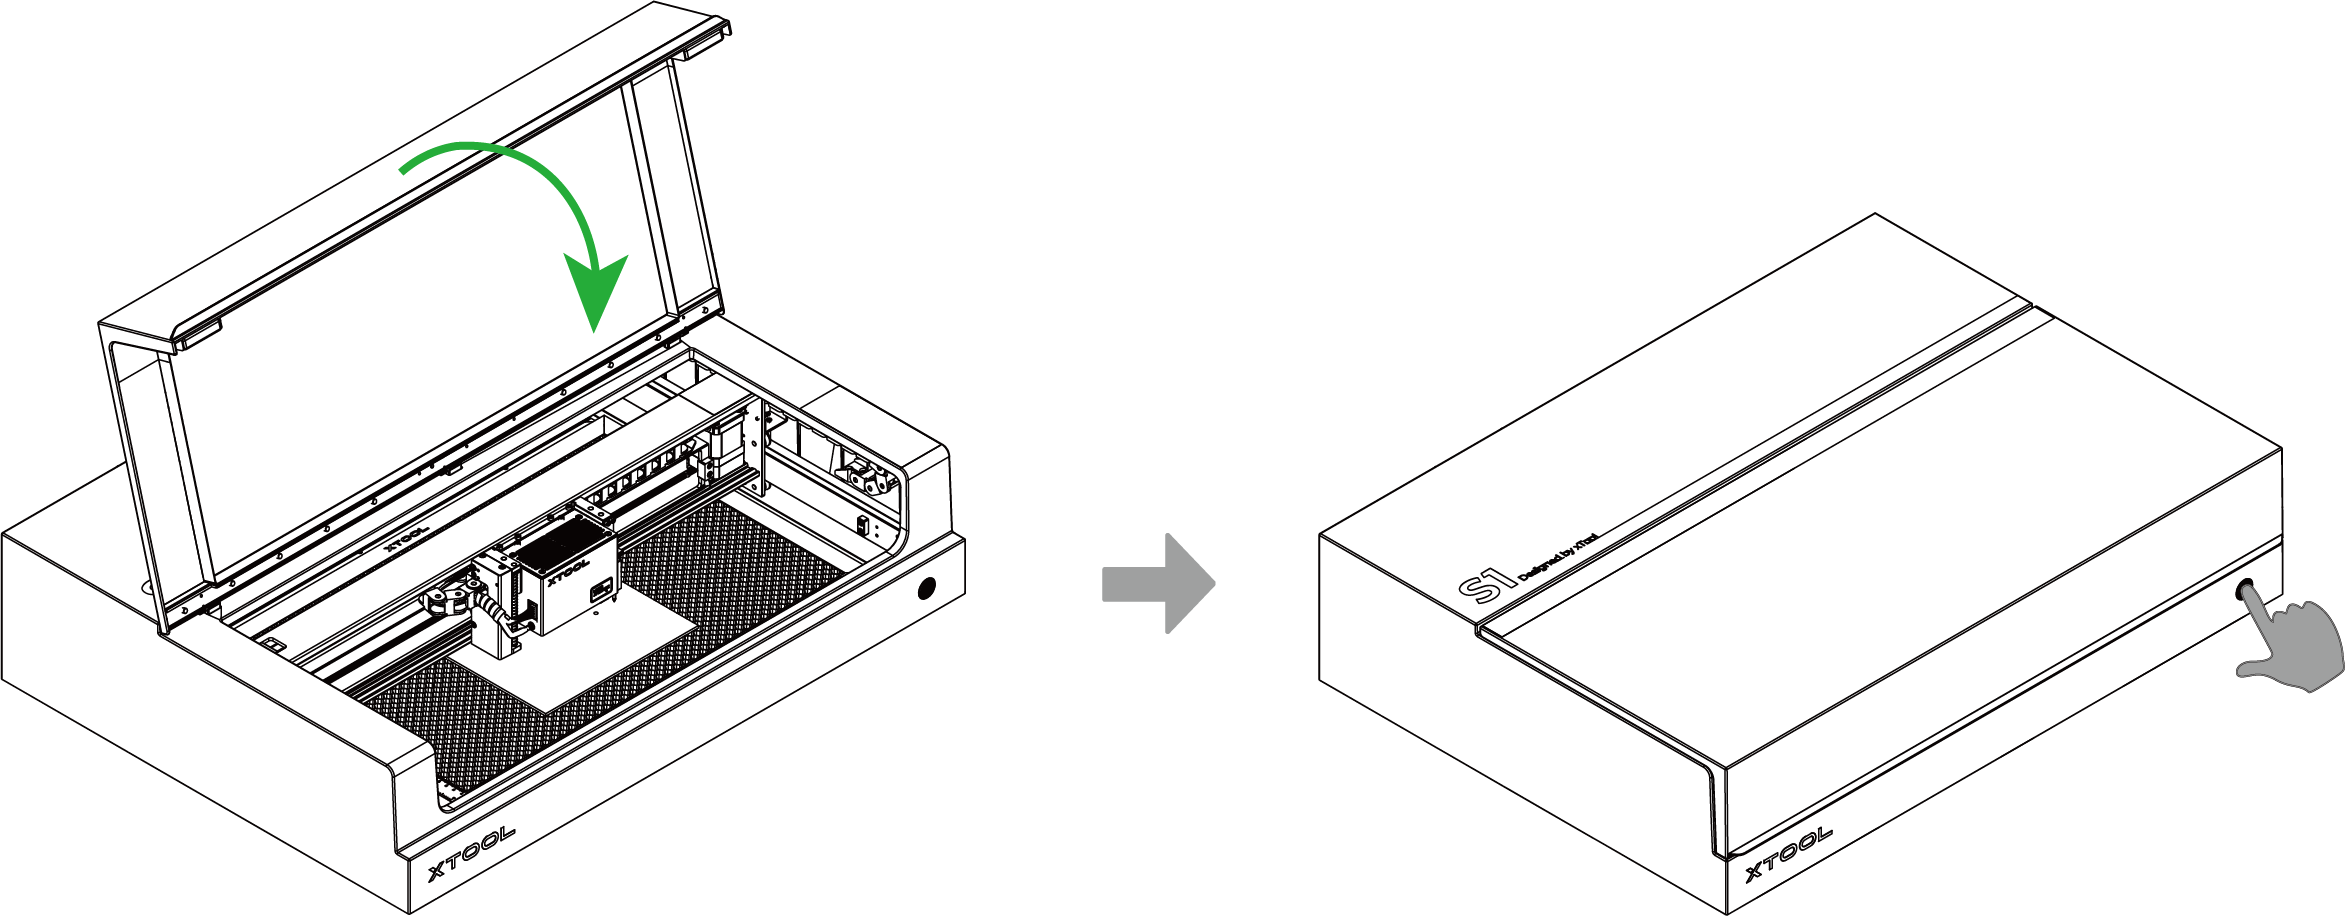
(3) Click Framing in the software. Close the lid of xTool S1 and press the button on xTool S1 to start framing. The laser spot will move along the boundary of the processing pattern on the material, so that you can preview the processing area.

(3) After you confirm that the processing area is proper, click Framing completed in XCS. If the area is not ideal, you can adjust the material position or adjust the element positions in the software, and then preview the processing area again.

8. Start processing
Note: If you use the infrared laser module at a temperature of 10 ℃ or below, please preheat the laser module for 2 minutes to ensure better processing results.
(1) On the bottom of the Preview screen, click Start.

(2) Close the lid of xTool S1. Then, press the button on xTool S1 to start processing.


Services & Help
Learn & Community
Copyright © 2025 xTool All Rights Reserved.