Issue description
During the operation of your xTool Apparel Printer, you may encounter issues where your printer is not printing white ink, or the white ink output is extremely faint, inconsistent, or shows significant gaps. This indicates a potential blockage or issue in the white ink flow system.
- This section provides troubleshooting advice for these issues. Refer to the following.
Common causes
Occurs when first powered on:
- Print head protective film not removed
- White ink clips not released
- Ink stack top cover installed incorrectly
- Startup procedure executed incorrectly
- Ink tube kinked between the ink dampers and the print head (only in rear cases)
- Poor ink stack seal condition (most likely)
Occurs after extended use:
- White ink sedimentation
- White ink buffer bottle outlet blockage
- White ink clips not opened
- Ink stack top cover installed incorrectly
- Waste ink extraction malfunction
- Poor ink stack seal condition
- Inlet ink tube blockage
- Waste ink tube blockage
- White ink filter blockage
- Severe print head blockage
Scenario identification
This troubleshooting guide is separated into two scenarios. Please identify which scenario best matches your situation and follow the corresponding steps.
- Scenario A: No white ink output during the very first-time setup of the machine.
- Scenario B: No white ink output after the machine has been used for a period of time.
Scenario A: No white ink on initial startup
If you are setting up your printer for the first time and encounter this issue, please follow these steps.
Step 1: Remove the print head protective film
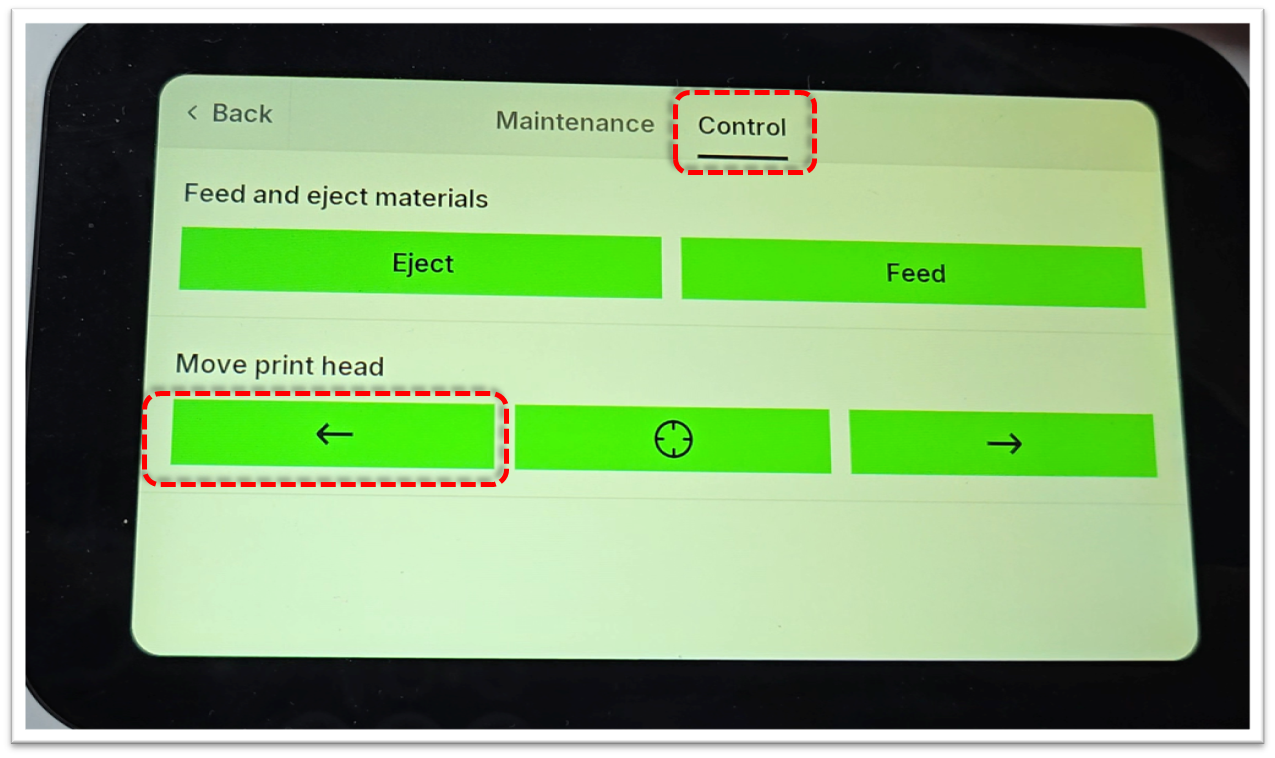
- Move the print carriage to the far left.
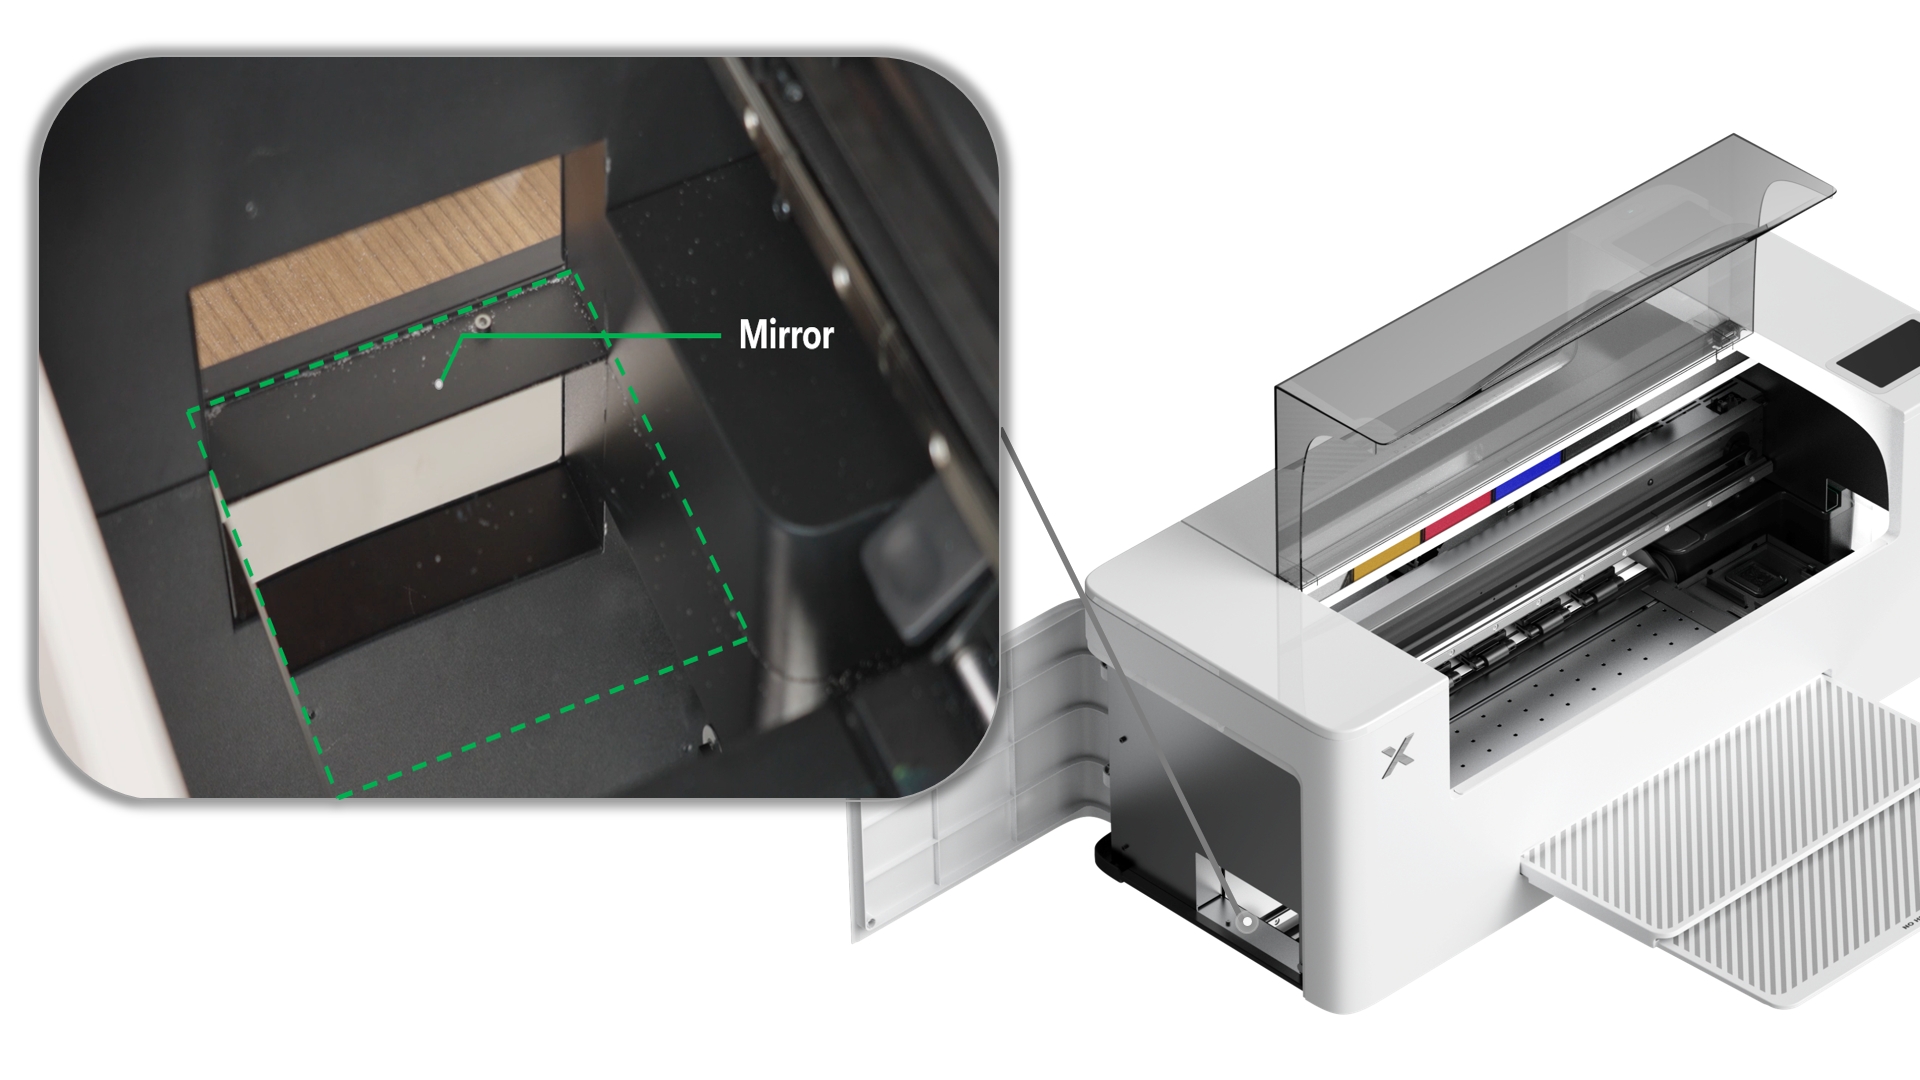
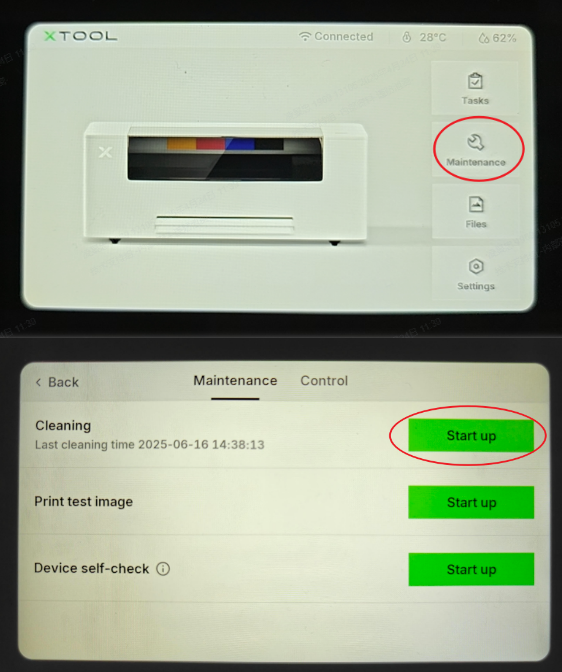
- On the LCD control panel, tap: Maintenance > Control, and the left arrow button at the "Move print head" tab.
- Using the mirror on the baseplate, look up at the bottom of the print head and confirm the thin plastic protective film has been peeled off.
- Peel off the film if necessary.
- If the film has already been removed, proceed to the next step.
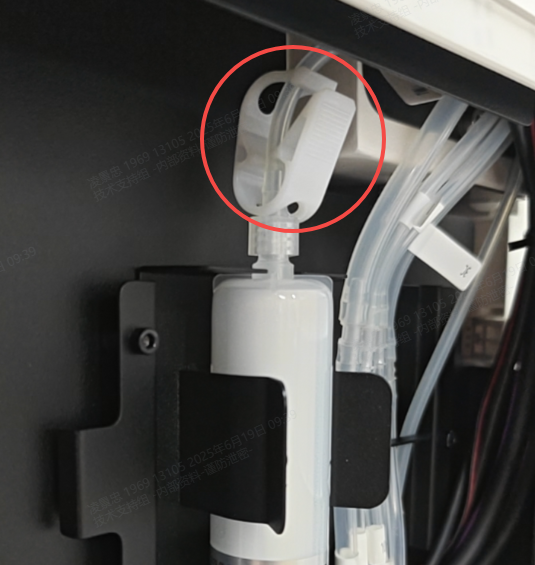
Step 2: Check all ink clips
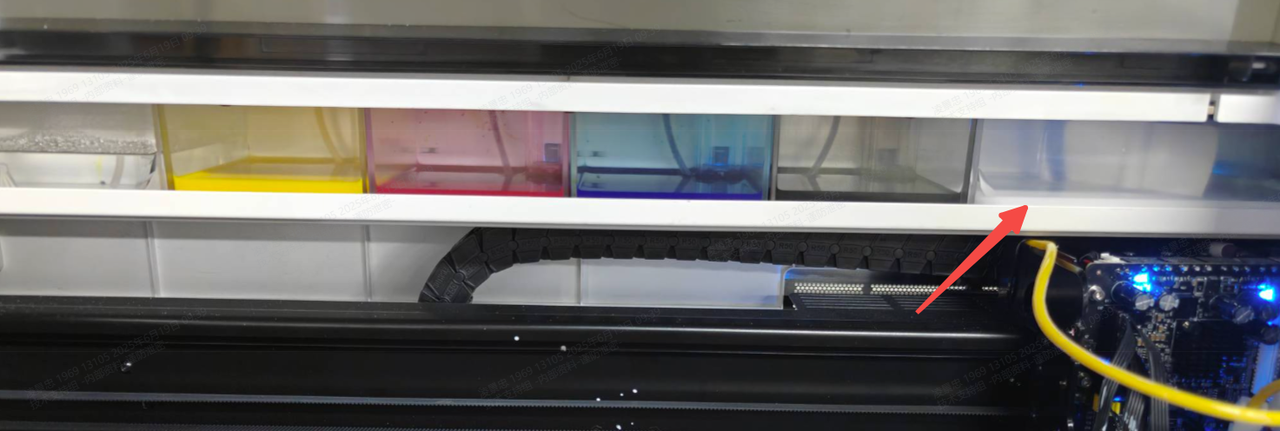
- Ensure all five white ink clips are in the open/released position. This includes the clips on the white ink dampers inside the print carriage and the main white ink clip on the right side of the machine.
- If you find any clips that were closed during the initial ink priming process, open them. You may now need to manually draw ink into the lines using a syringe.
- Video Guide: For instructions on manual ink drawing, please refer to the video tutorial (specifically from 2:51 to 3:20): Replace the White & CMYK Ink Damper in xTool Apparel Printer
- If all clips are confirmed to be open, proceed to the next step.
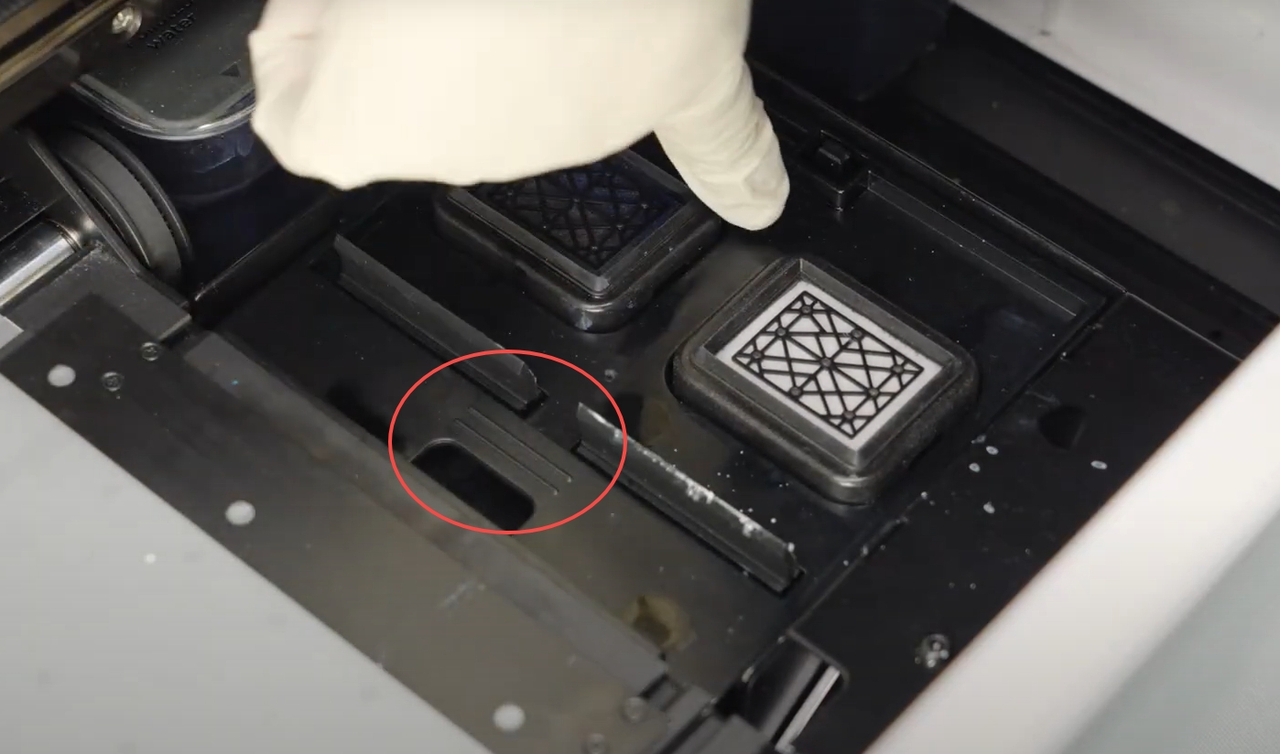
Step 3: Check the ink capping top cover installation
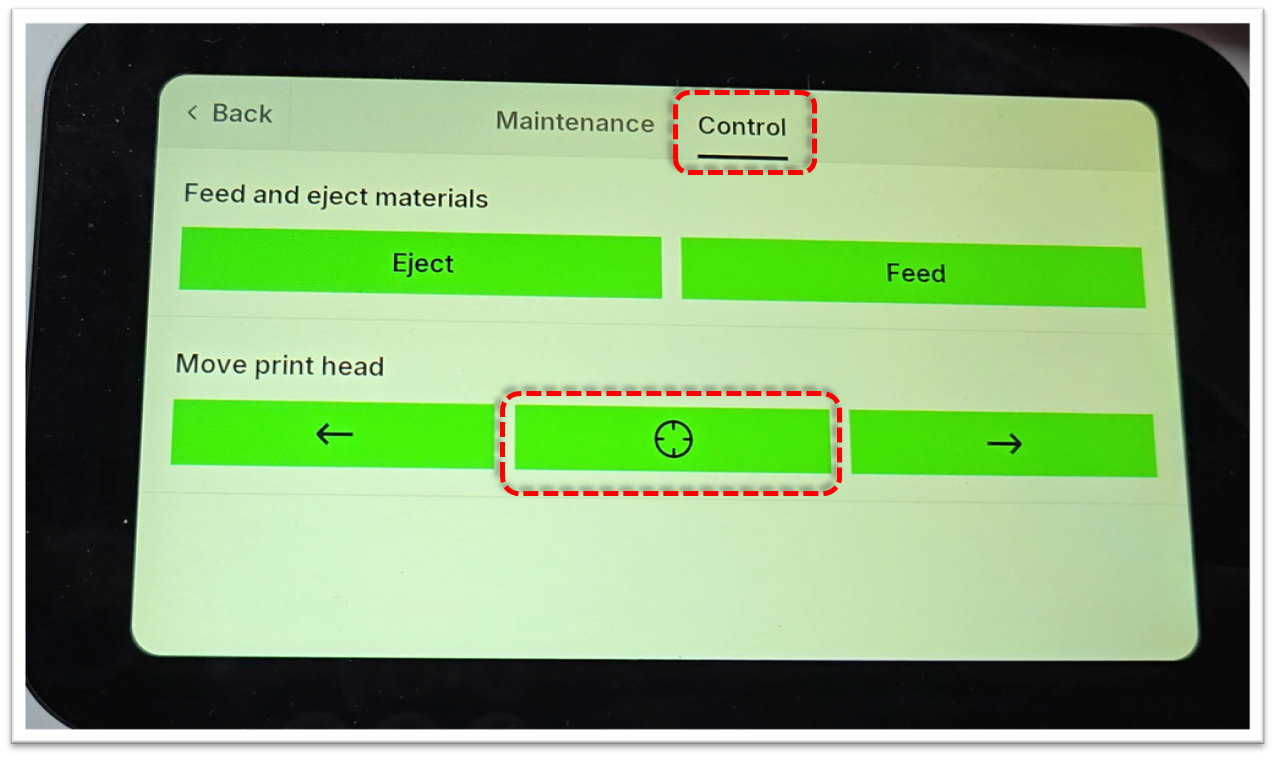
- Move the print head to the center of the printer.
- On the LCD control panel, tap: Maintenance > Control, and the crosshair button at the "Move print head" tab.
- Observe the ink capping station top cover. Ensure it is not installed upside down. The correct orientation has the anti-slip strips facing upwards.
- Correct installation: Anti-slip strips face upwards.

- If the cover is installed incorrectly, you can gently lift it up and place it back in the correct orientation.
- Video Guide: For visual reference, see the video tutorial below (from 0:34 to 0:46).
- If the cover is installed correctly, proceed to the next step.
Step 4: Calibrate ink stack position
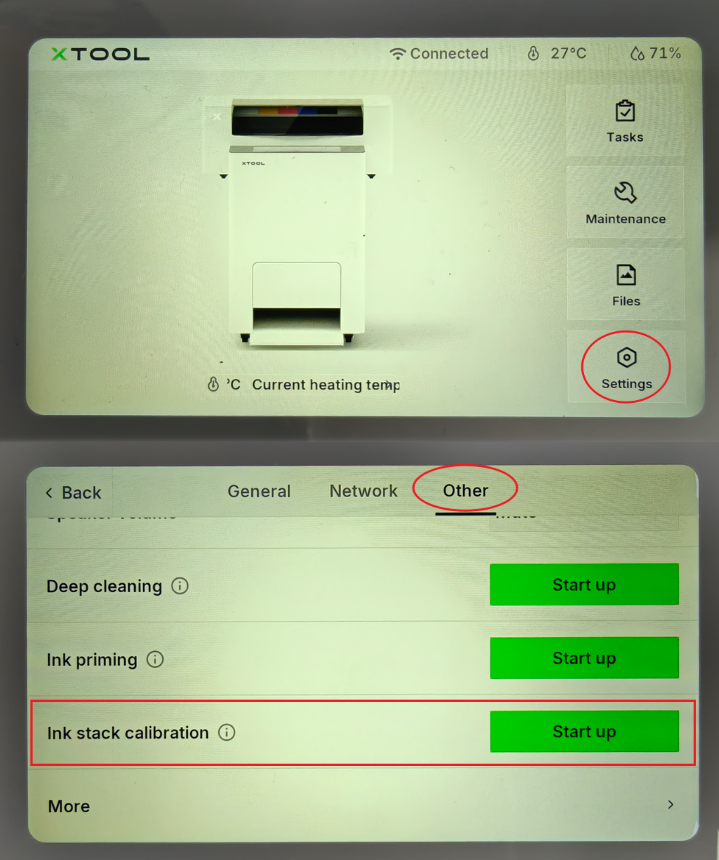
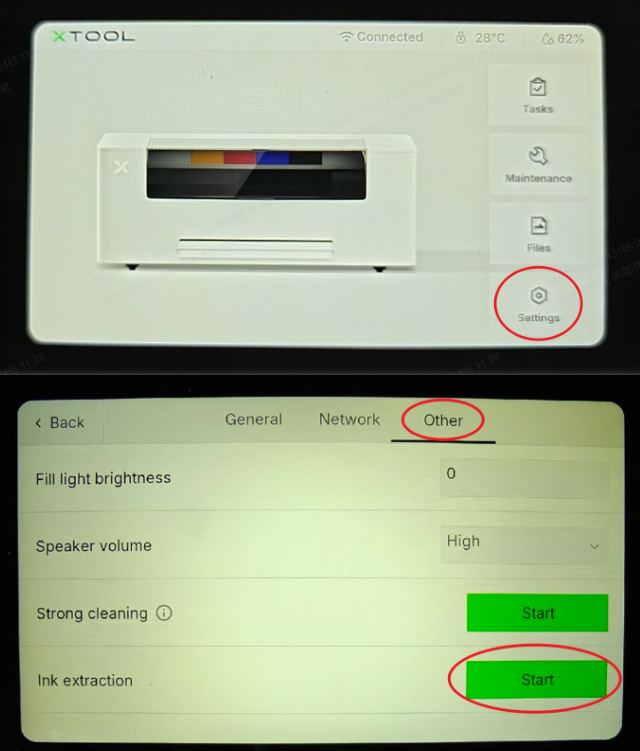
- Initiate Calibration: On the control panel of the printer, go to Settings > Other and tap the "Start up" button at the Ink stack calibration tab to begin.
- After Calibration: Once calibration is completed, either perform a thorough Deep cleaning or multiple standard auto Cleaning cycles to restore performance. Test the printer to confirm whether the issue is resolved.
- If the issue persists after calibration, proceed to the next step.

Step 5: Check the ink tube for obstructions
‼️ Important: Record a video of this entire procedure for potential submission to xTool Customer Service.
- Move the print carriage to the middle and detach the print carriage top cover.
- On the LCD control panel, tap: Maintenance > Control, and the crosshair button at the "Move print head" tab.

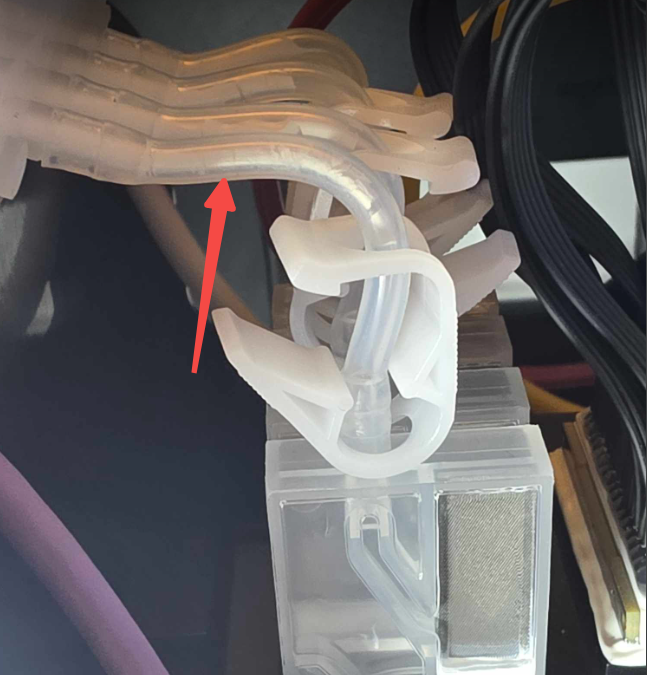
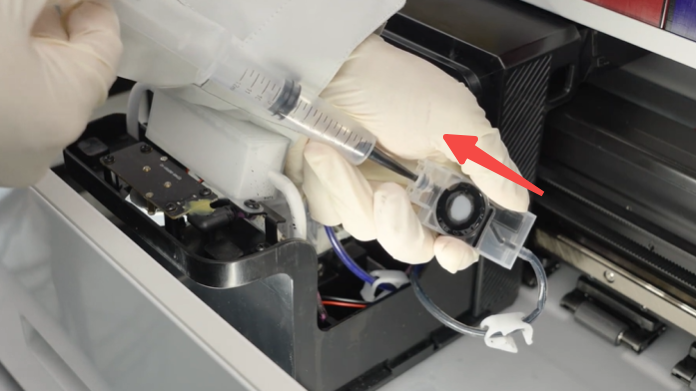
- Using a syringe, attempt to manually draw white ink from the ink damper, as shown in the video guide.
- Position the ink damper diagonally upward while drawing white ink. See the image below for visual reference.
- Video Guide: Refer to the video tutorial (sections 1:25-1:55 and 2:51-3:20): Replace the White & CMYK Ink Damper in xTool Apparel Printer
- Results Interpretation:
- Smooth Flow: Ink draws easily → tubing is clear; no obstruction; proceed to the next step.
- Resistance or No Flow: Significant pull-back resistance indicates a kink or blockage in the ink tube.
- If you encounter significant resistance, the ink tube is likely bent or kinked. This requires removing the printer's outer casing to inspect the tube routing. This is a complex step; please only proceed after all other steps have been exhausted.
- Video Guide for removing casing: Disassemble & Assemble the Casing for xTool Apparel Printer
Step 6: Check for incorrect startup procedure
If you performed the initial setup ink priming steps out of order (e.g., did not release all clips before starting), air may have entered the system.
Solution: Perform an auto ink extraction to re-prime the system.
- On the LCD control panel, tap Settings > Other and the Start button at the Ink extraction tab to initiate the process.
Scenario B: No white ink after extended use
If your printer was working correctly but has recently stopped printing white ink, follow these steps.
Step 1: Check white ink condition & agitation
- Visual Inspection: Open the printer's lip and visually inspect the main white ink tank for signs of separation or settlement.
- If separation detected:
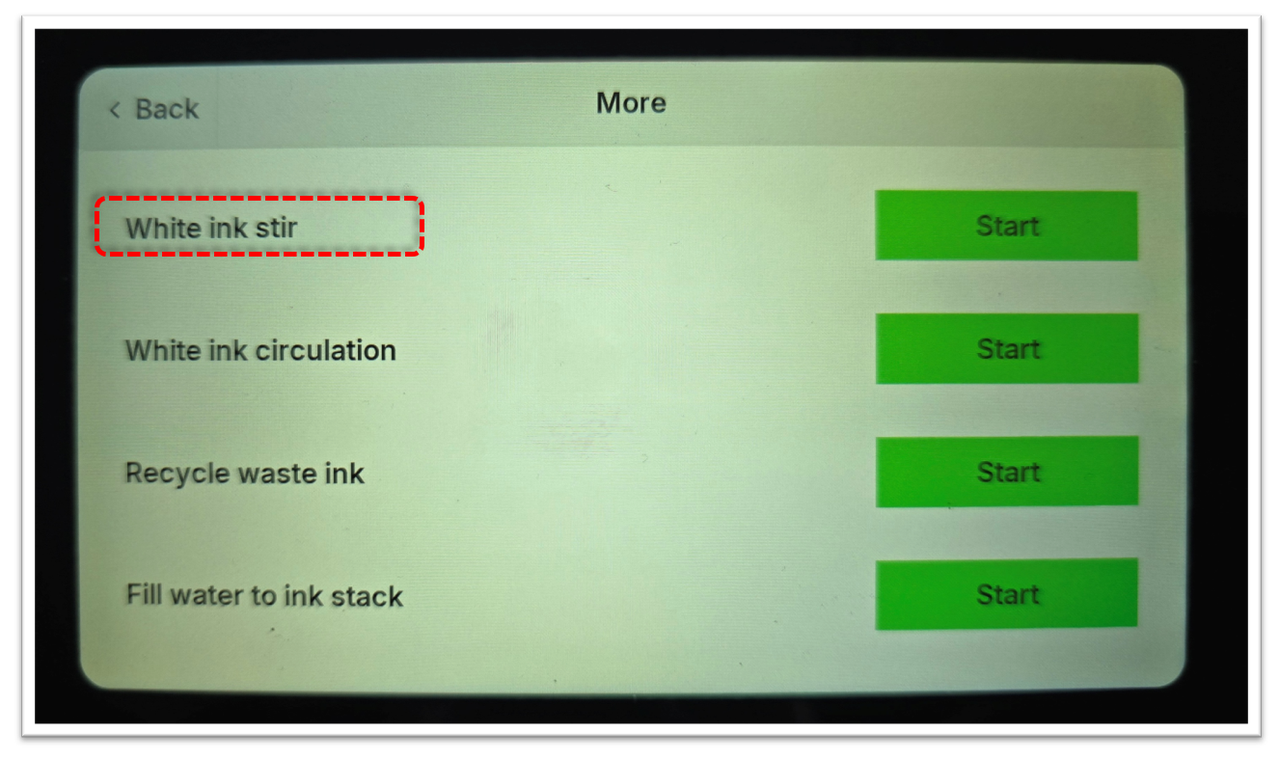
- Activate the White Ink Stir Function:
- On the LCD touchscreen, navigate to Settings > Other > More > White Ink Stir.
- Tap and hold Start to run several stirring cycles.
- Observe Stir Motor Operation:
- If motor malfunction: Proceed to the “Still Experiencing Issues?” section to xTool Customer Service.
- If motor normal: Ensure the printer remains powered continuously to prevent separation.

- If no separation: Proceed to Step 2.
Step 2: Ensure released ink clips
- Ink Clips: Ensure all five white ink clips are in the open/released position.
- If these are released, proceed to the next step.
Step 3: Check the ink capping top cover installation
- Move the print head to the center of the printer.
- On the LCD control panel, tap: Maintenance > Control, and the crosshair button at the "Move print head" tab.

- Observe the ink capping station top cover. Ensure it is not installed upside down. The correct orientation has the anti-slip strips facing upwards.
- Correct installation: Anti-slip strips face upwards.
- If the cover is installed incorrectly, you can gently lift it up and place it back in the correct orientation.
- Video Guide: For visual reference, see the video tutorial below (from 0:34 to 0:46).
- If the cover is installed correctly, proceed to the next step.
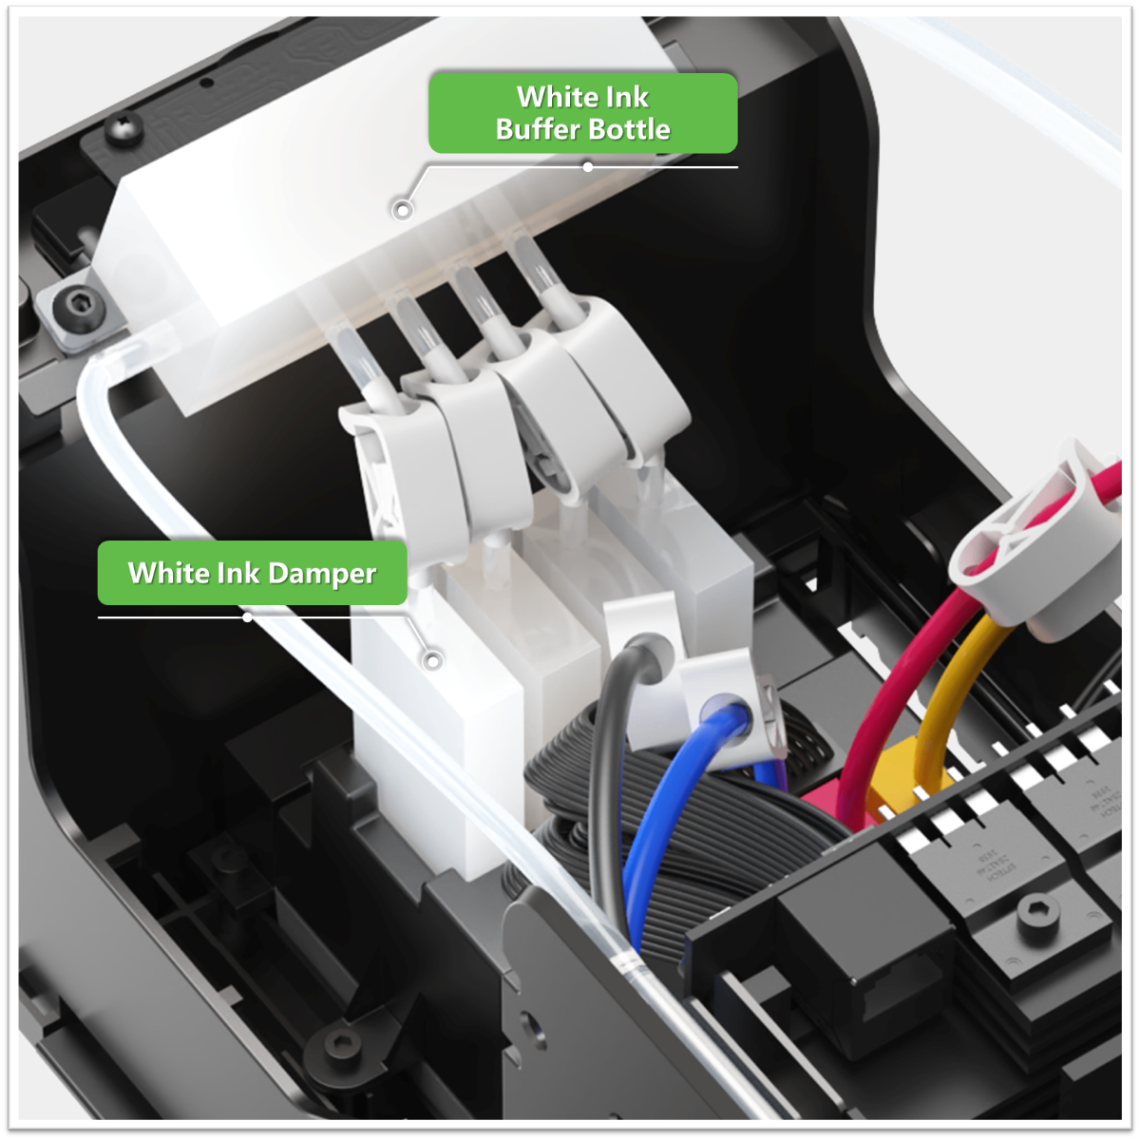
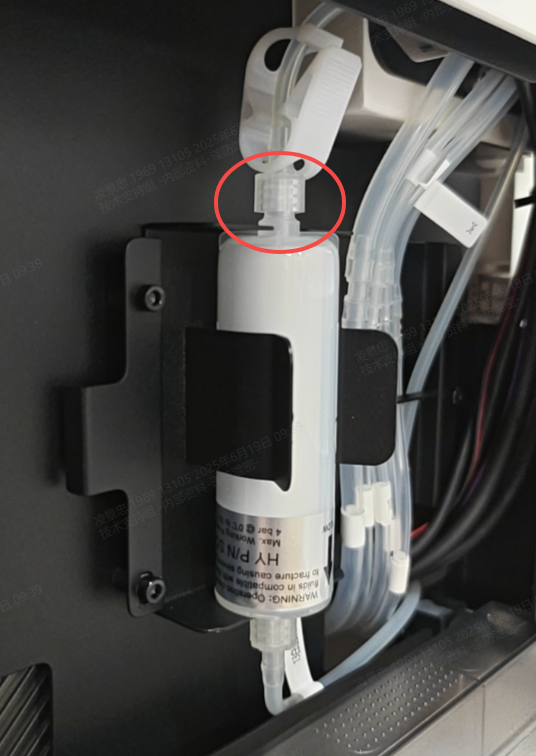
Step 4: Check the white ink buffer bottle
- Detach the print carriage top cover. Locate the white ink buffer bottle and identify its four outlet ports.
- Examine each outlet for hardened ink deposits or blockages.
- If ink flow appears intermittent, interrupted, or clogged, replace the buffer bottle.
- If all outlets are clear, proceed to the next step.
Step 5: Test the waste ink recycling function
‼️ Important: Record a video of this entire procedure for potential submission to xTool Customer Service.
- Open the printer's lid. Move the print carriage to the middle to get a clear view of the ink pad inside the ink capping station.
- On the LCD control panel, tap: Maintenance > Control, and the crosshair button at the "Move print head" tab.
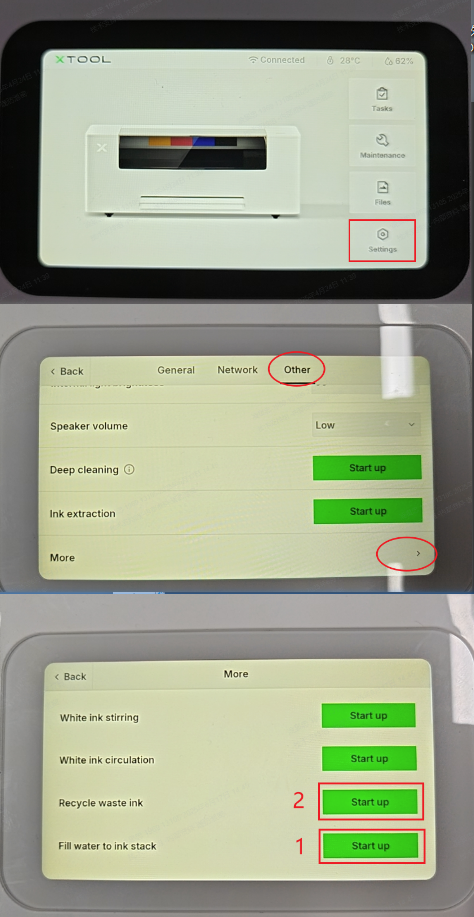
- Fill the Ink Pad with Water
- On the LCD panel, navigate to Settings > Other > More.
- Tap Start Up for Fill Water to Ink Stack.
- Let it run for about 2 seconds—just enough to form a small water pool on the ink pad.
- Recycle Waste Ink
- Immediately tap Start Up for Recycle Waste Ink.
- Observe whether the water drains away quickly.
- Results Interpretation:
- Normal: Water extracts smoothly → Continue to Step 6.
- Malfunction: Very slow or no extraction → Proceed to the "Still experiencing issues?" section to contact xTool Customer Service and include your video recording of this test.
Step 6: Calibrate ink stack position
- Initiate Calibration: On the control panel of the printer, go to Settings > Other and tap the "Start up" button at the Ink stack calibration tab to begin.
- After Calibration: Once calibration is completed, either perform a thorough Deep cleaning or multiple standard auto Cleaning cycles to restore performance. Test the printer to confirm whether the issue is resolved.
- If the issue persists after calibration, continue to the next step.
Step 7: Check the ink tube for obstructions
‼️ Important: Record a video of this entire procedure for potential submission to xTool Customer Service.
- Move the print carriage to the middle and detach the print carriage top cover.
- On the LCD control panel, tap: Maintenance > Control, and the crosshair button at the "Move print head" tab.
- Using a syringe, attempt to manually draw white ink from the ink damper, as shown in the video guide.
- Position the ink damper diagonally upward while drawing white ink. See the image below for visual reference.
- Video Guide: Refer to the video tutorial (sections 1:25-1:55 and 2:51-3:20): Replace the White & CMYK Ink Damper in xTool Apparel Printer
- Results Interpretation:
- Smooth Flow: Ink draws easily → tubing is clear; no obstruction; proceed to the next step.
- Resistance or No Flow: Significant pull-back resistance indicates a kink or blockage in the ink tube.
- If you encounter significant resistance, the ink tube is likely bent or kinked. This requires removing the printer's outer casing to inspect the tube routing. This is a complex step; please only proceed after all other steps have been exhausted.
- Video Guide for removing casing: Disassemble & Assemble the Casing for xTool Apparel Printer
Step 8: Check cylindrical filter
- Fasten the cylindrical ink filter clip inside the right-side panel.
- Activate the White Ink Stir function and run for approximately 5 seconds
- On the LCD touchscreen, navigate to Settings > Other > More > White Ink Stir.
- Release the ink clip and immediately check if ink flows into the filter.
Result Interpretation:
- Ink flows: No main tube blockage → Continue to Step 9.
- No ink flow: Main tube blocked → Continue with the following blockage diagnosis.
Blockage Diagnosis:
- Close the filter ink clip.
- Unscrew upper connection of cylindrical filter.
- Open ink clip and use syringe to extract ink.
- Reference video: Replace the Cylindrical Ink Filter inside the Right Side Panel for xTool Apparel Printer
- Difficult extraction: Tube replacement needed.
- Smooth extraction: Filter or downstream blockage.
Filter Testing:
- Reconnect filter and fasten the ink clip.
- Unscrew connection cap below the filter.
- Open ink clip and test extraction with a syringe.
- Difficult extraction: Filter blocked (replacement needed).
- Smooth extraction: Downstream tube blocked. Proceed to the "Still Experiencing Issues?" section and submit your findings to xTool Customer Service.
Step 9: Check for severe white print head clog
- If the entire ink delivery system seems to be functioning correctly, the issue is most likely a severe clog within the white ink channels of the print head itself.
- This requires intensive cleaning procedures. Standard cleaning cycles may not be sufficient.
- Solution: Please refer to the print head cleaning guide and attempt the more advanced cleaning methods (e.g., soaking, manual deep cleaning).
Still experiencing issues?
Should the issue persist after completing the preceding steps, submit a ticket via the "Submit a Ticket" button in the "Help Ticket" section below. The standard response time for xTool Customer Service is one business day.
For a prompt resolution, please include the following details:
- Issue Description: A detailed explanation of the observed problem.
- Video Evidence: Attach a video demonstrating the issue, where applicable.
- Troubleshooting Performed: Any troubleshooting steps you have already attempted, along with their results.
This information is crucial for xTool technical support engineers to provide timely assistance.
Documentation feedback
Help improve this content by providing feedback. If this content did not meet your requirements, select "No" in the "Was this page helpful?" section below. Include specific details about what was unclear or missing in the pop-up suggestion box. Feedback submissions are reviewed by xTool technical writers to enhance future documentation.
