Issue description
Your xTool M2 is not detected in the device list when connected to the computer via USB.
Possible causes
A USB connection failing to detect a device is typically caused by one or more of the following factors:
- The USB cable is loose, damaged, or incompatible.
- Faulty computer USB port or insufficient power supply
- Lack of system account permissions (non-administrator account)
- VPN or firewall software interferes with the connection.
- The driver is not installed or encounters an error.
- Firmware version is too low.
- Software cache or configuration file corruption
- Multiple laser software programs running simultaneously are occupying the COM port
- Docking station compatibility Issues (for macOS users)
- System Integrity Protection (SIP) is not disabled (for macOS users)
- Fault in the internal extension cable
Troubleshooting procedures
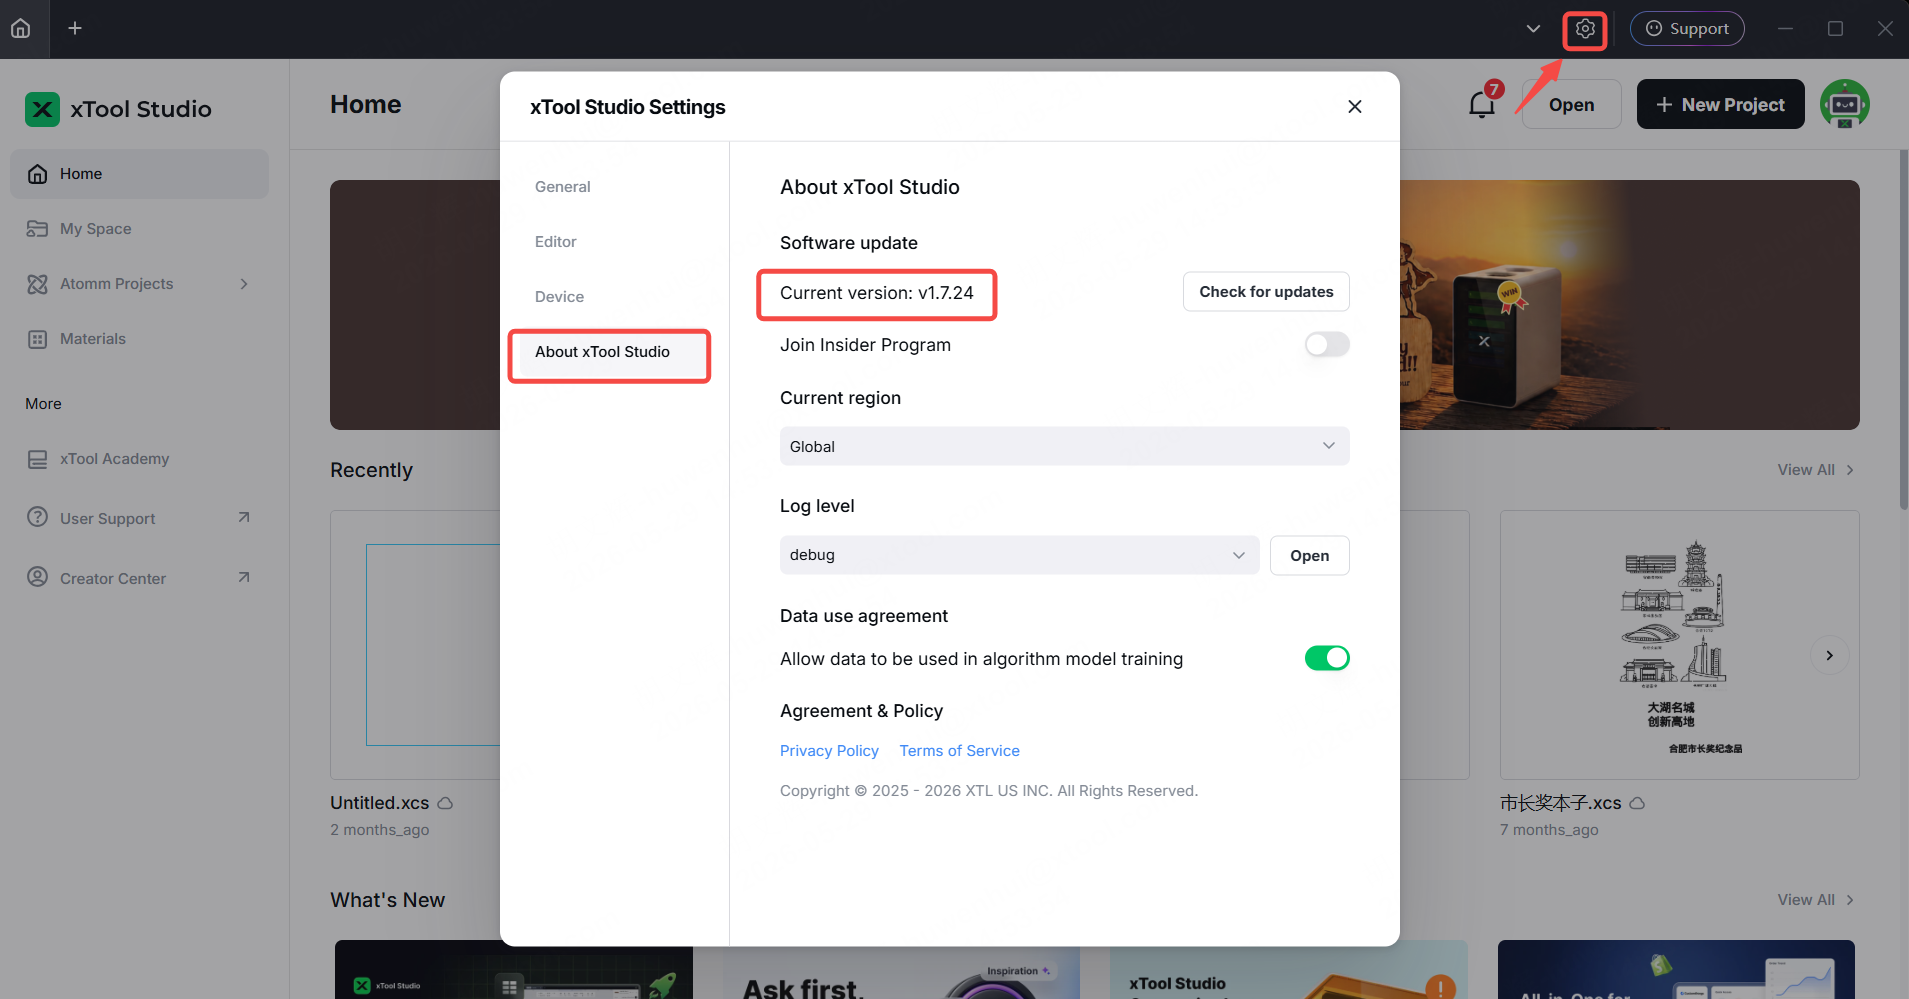
1. Check the software version
- Click the settings icon > About xTool Studio to check whether the software version is higher than or equal to V1.7.24.
2. If your current version is lower than V1.7.24, visit the xTool official website to download and install the latest version.
3. Once the update is complete, restart the software and connect it to the device again.
2. Perform the USB connection self-check test
Since there are many possible causes for USB connection failures with xTool M2, before troubleshooting, you can perform the USB connection self-test in the software. Based on the results of the self-test, you can then troubleshoot the issue specifically.
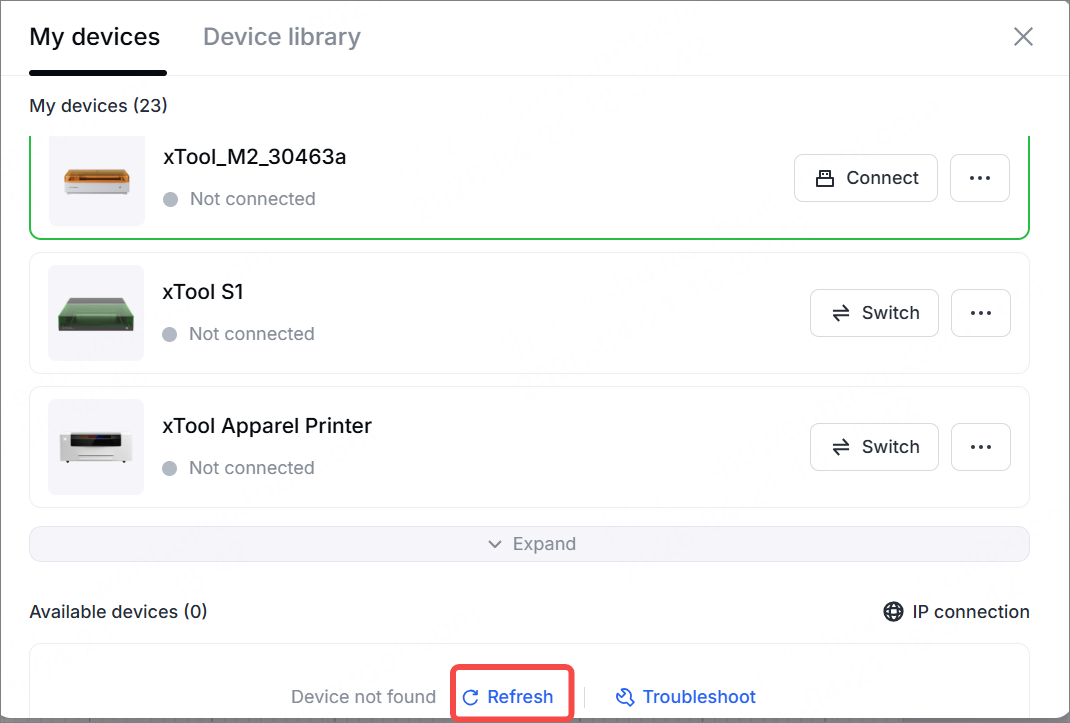
3. Refresh the device list
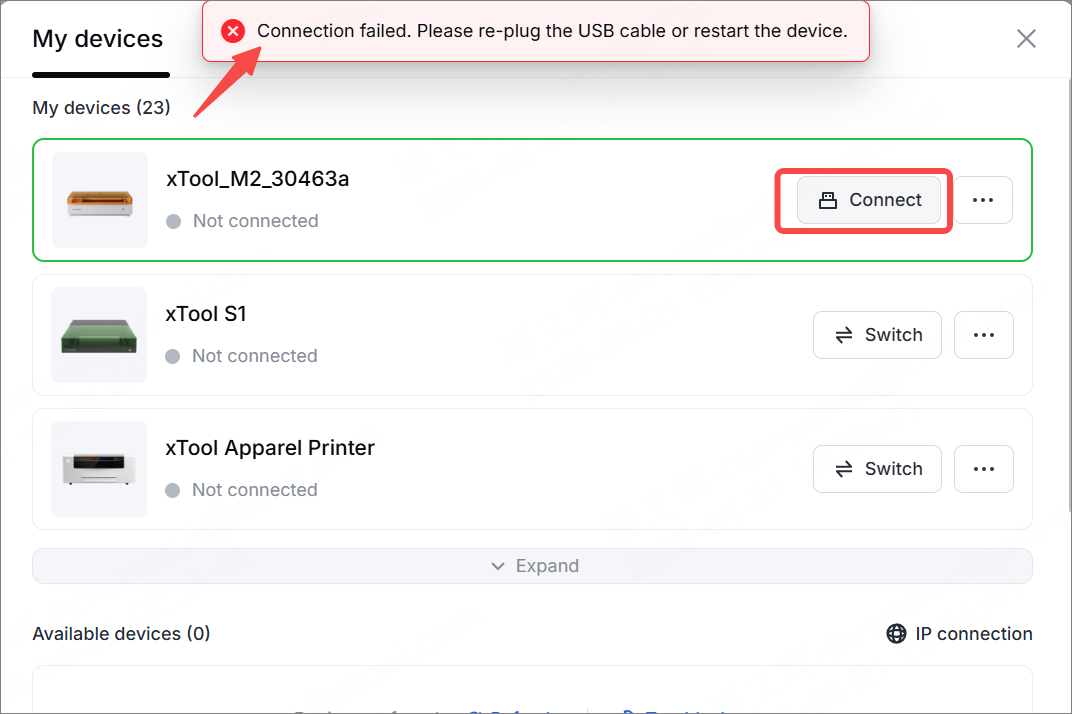
- If you receive the message “Connection failed. Please re-plug the USB cable or restart the device” shortly after connection, click Refresh and wait about 30 seconds.
- If the device is still not detected, proceed to Step 2 again.
4. Check the requirements of the computer
Make sure your computer meets the performance requirements for running xTool Studio. For specific requirements, please refer to the image below:
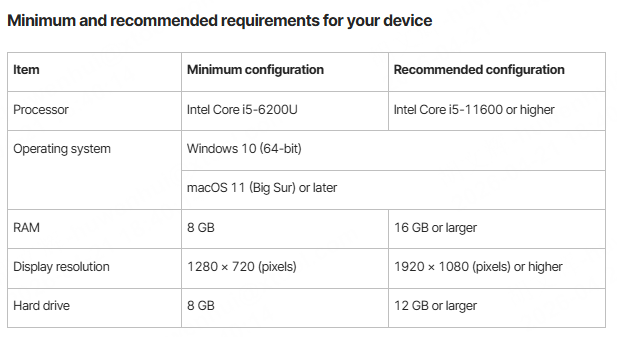
For more information, go to xTool Studio & Creative Space: Minimum and Recommended Specifications.
5. Check the USB cable and USB port
- Connect a cable correctly
Check whether the USB connector on the computer or device is loose. Unplug it and plug it back in at both ends, making sure the connectors are fully inserted.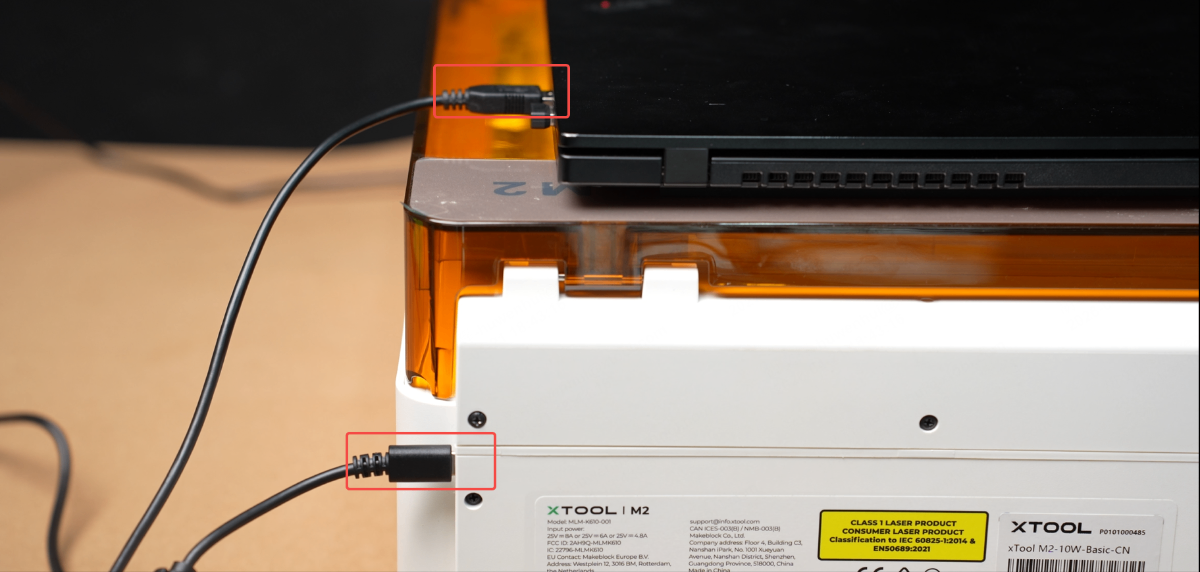
- Use a USB driver or other storage device to test
Insert a USB driver or other storage device into the computer's USB port.
- If the computer successfully recognizes the USB driver or other device, it indicates that the computer's USB port functions properly.
- If the device isn't recognized, use a different USB port on your computer to connect.
- If it does not resolve the issue, please proceed to the next step.
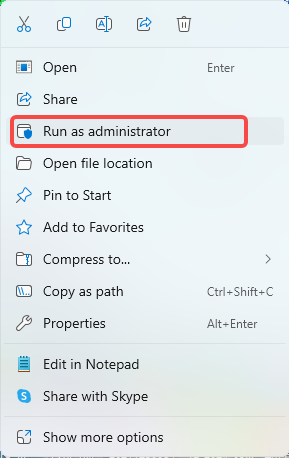
6. Check the system account permission
In some cases, the system account you use may be a guest account. Right-click and run the xTool Studio software as an administrator.
7. Check the VPN
Possible cause: VPN software is active.
Solution: Disable the VPN and attempt the connection again.
If the issue is not resolved, please proceed to the next step.
8. Clear plug-in cache
- Click the upper-left xTool icon > Device > Clear cache.

- Restart the software.
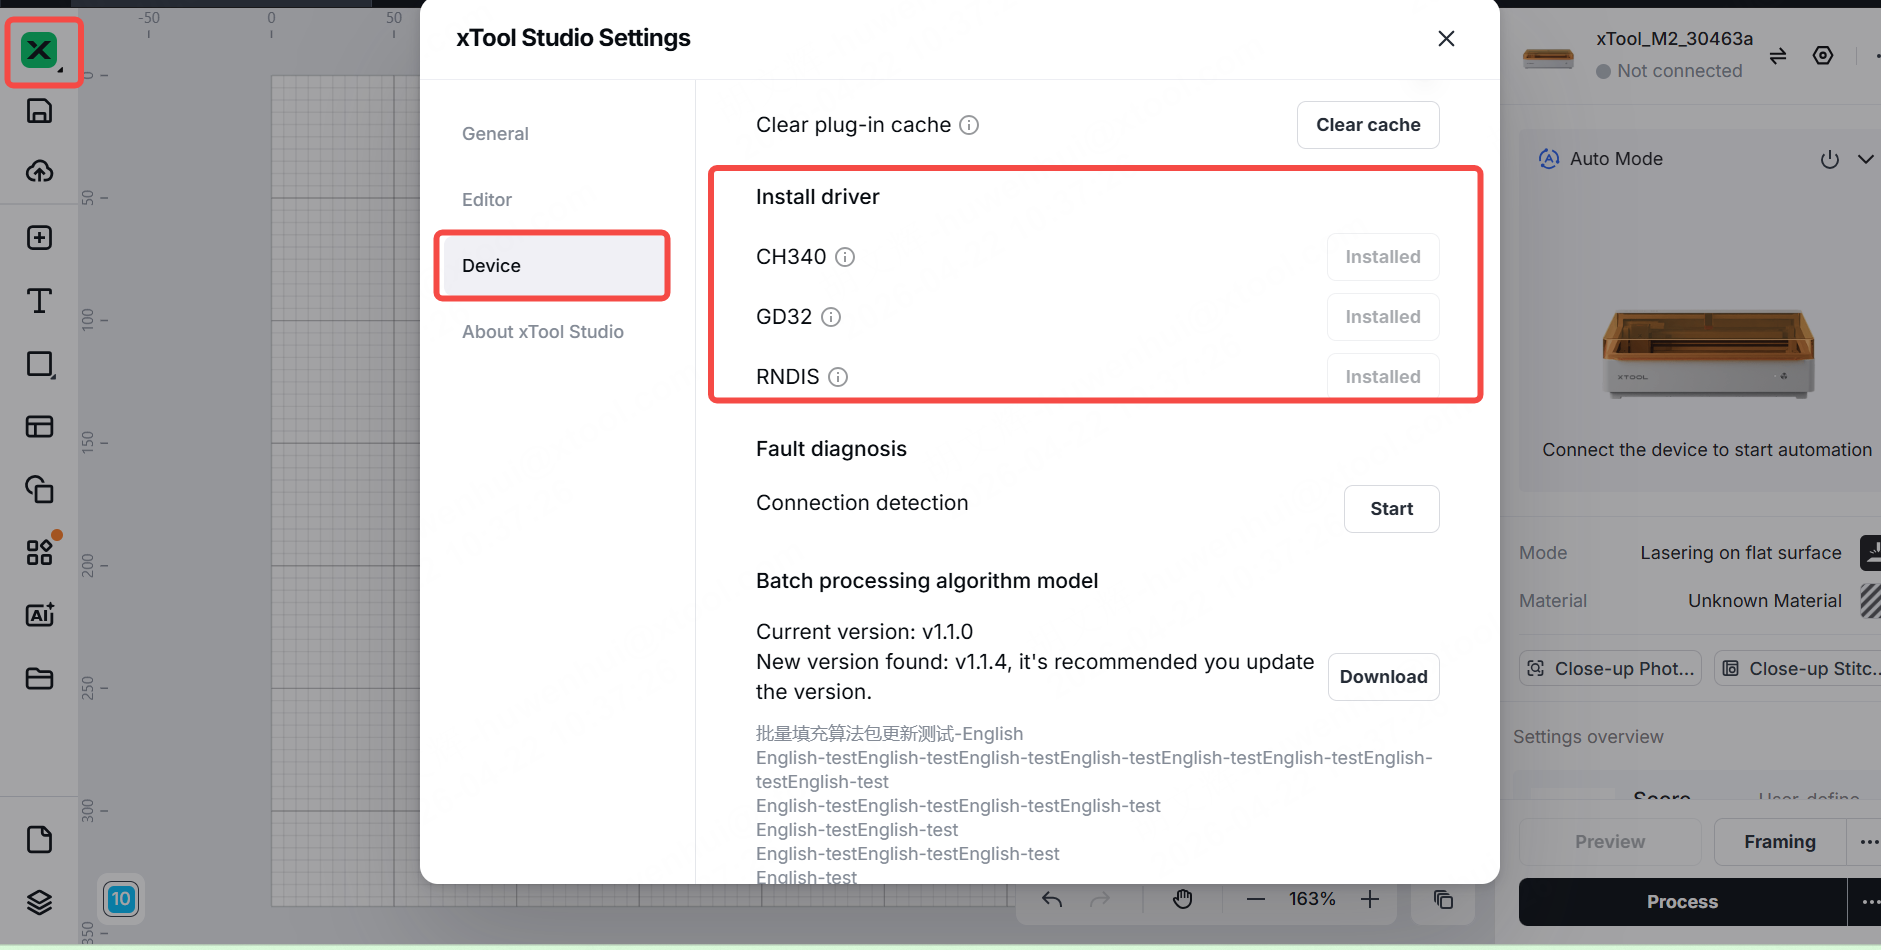
9. Check the drive program
Check whether the necessary drivers are installed and properly configured on your computer.
- If they are installed correctly, proceed to the next step.
To verify the driver:
For Windows users:
- Option 1: Go to xTool Studio Settings > Device > Install driver. If the Installed button in the Install Driver section is grayed out, it means the drivers have been installed correctly.
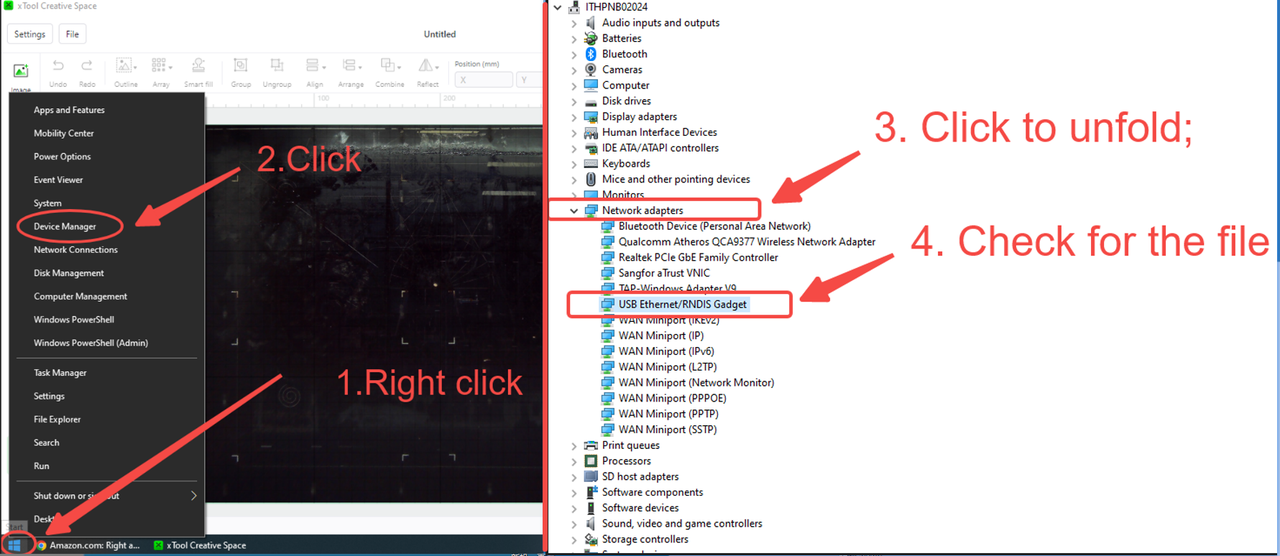
- Option 2: Connect the USB cable and follow the steps below to check the status of the device driver.
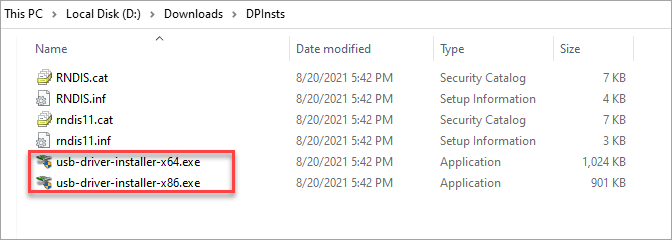
If the driver is missing, please follow the steps below to install it, and then try again.
Download and extract the driver (DPInsts.rar), select the application below, and then double-click to install it.
Once the installation is complete, the following window appears. Please restart your computer and try again.

For macOS users:
- Connect the device to your computer using the USB cable that came with the product.
- Check for the driver as follows.
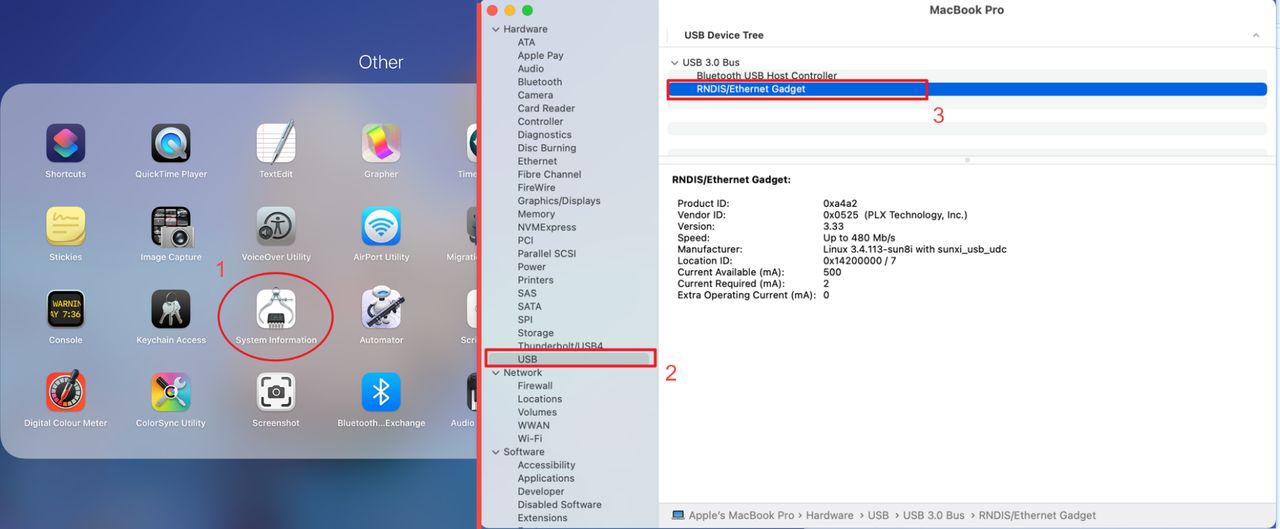
a. Click System information
b. Go to Hardware and click USB
c. Check whether the RNDIS/Ethernet Gadget is present.
If the driver is missing, please follow the steps below to install it, and then try again.
Download macOS driver: HoRNDIS-9.2_catalina.rar
10. Check the antivirus or firewall settings
Make sure your antivirus software or firewall isn't blocking the xTool device from connecting. If it is, adjust the settings in the software to allow the device to connect.
- Right-click xTool Studio and select Run as administrator to launch the software.

- For Windows users:
Enable Ping permissions in firewall settings.

- For macOS users:
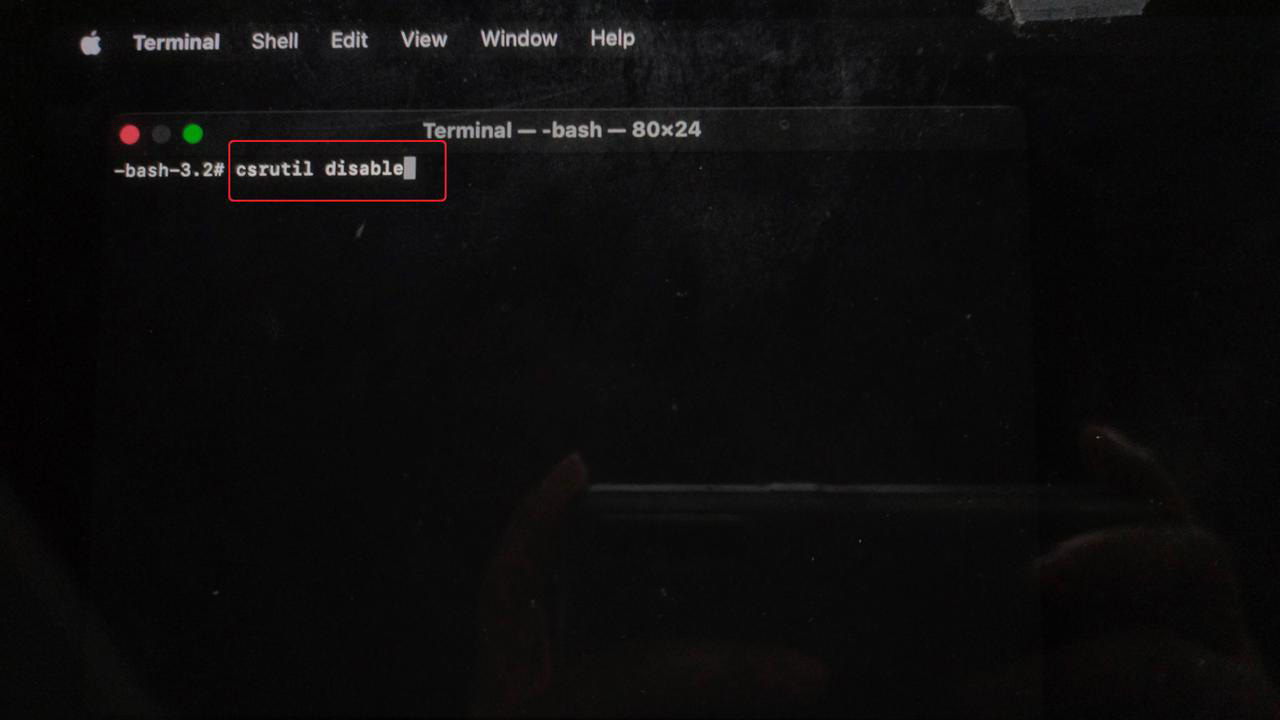
Possible cause: macOS System Integrity Protection (SIP) is enabled.
Solution: Follow the steps below to disable SIP, then try the connection again.
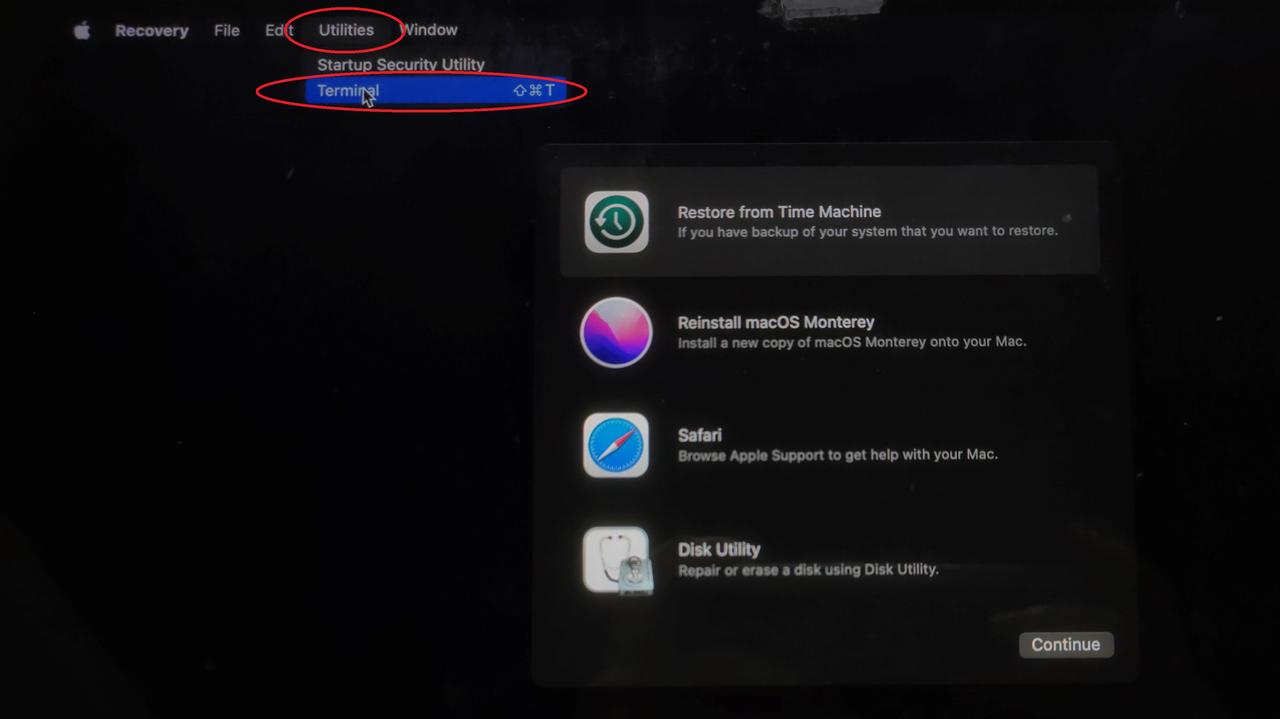
(1) Turn off the computer. Press the Command and R keys along with the power button to enter the following screen.
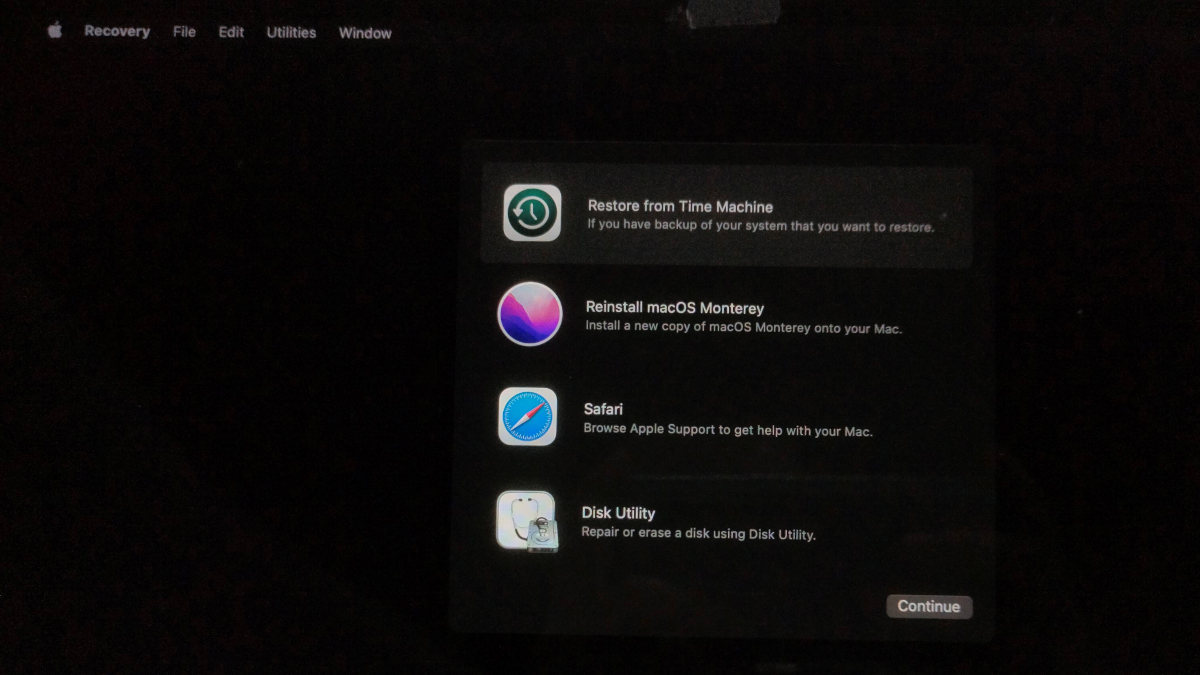
(2) Go to Utilities > Terminal.
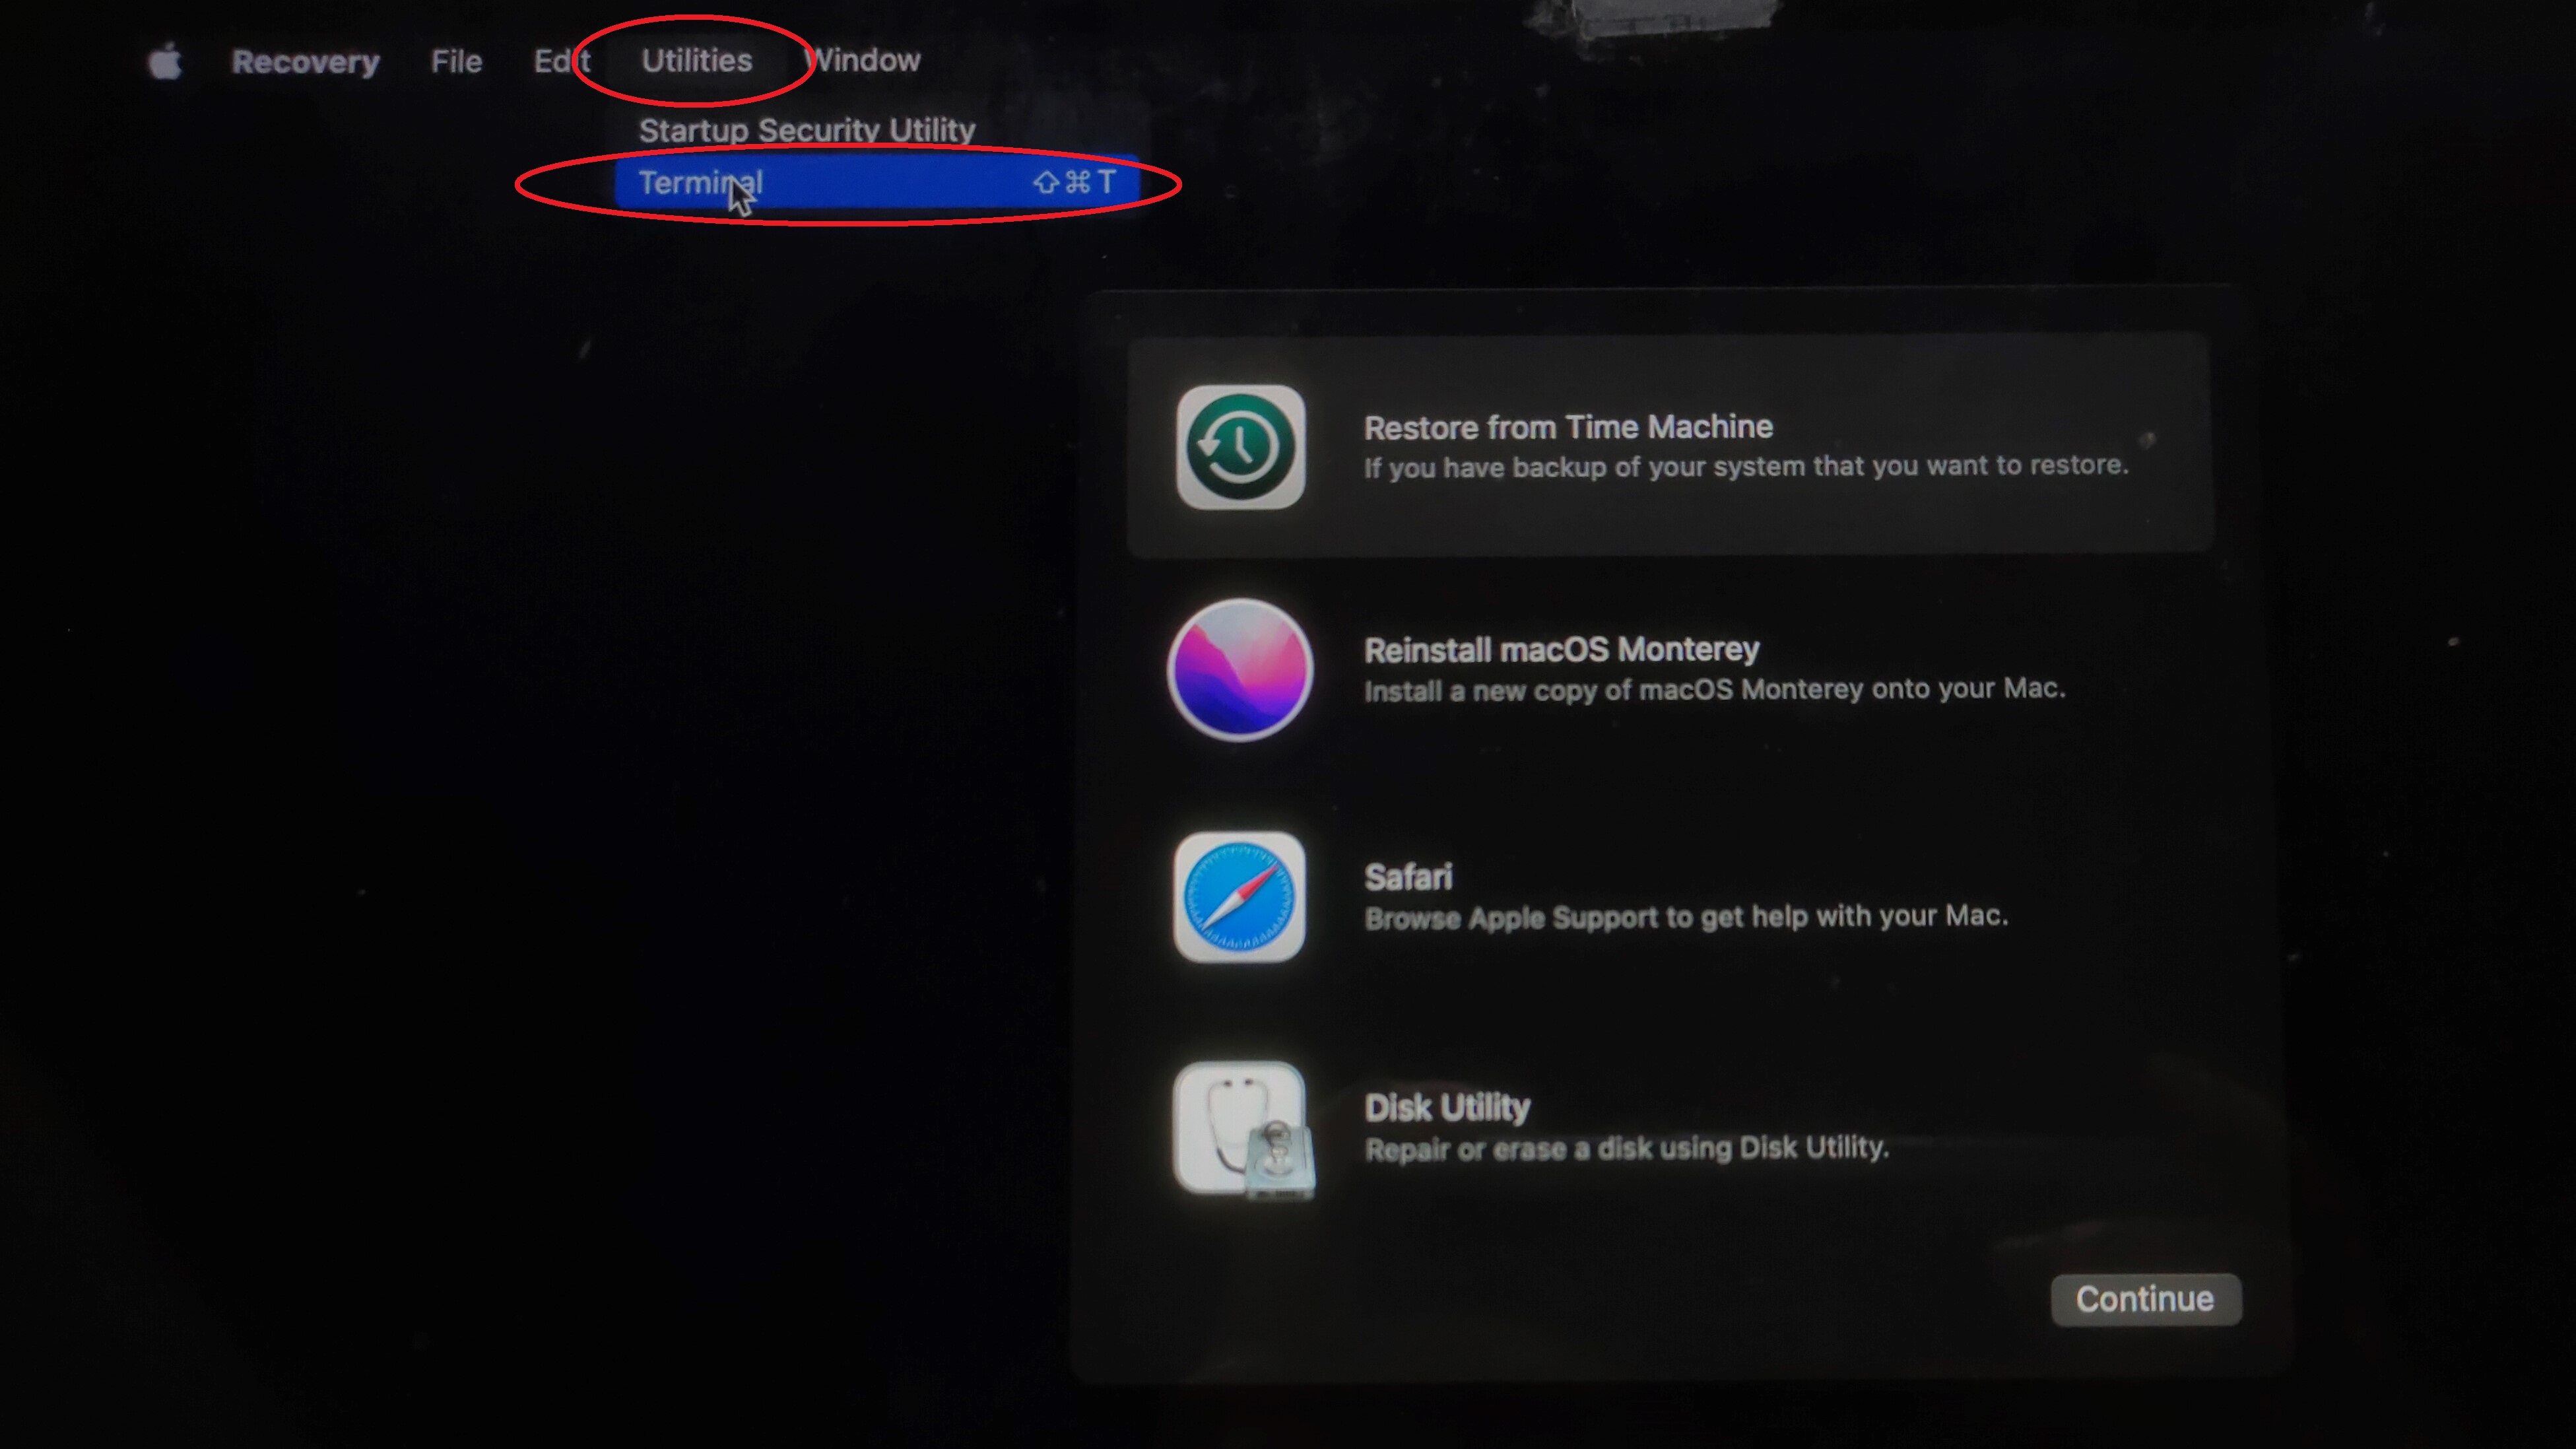
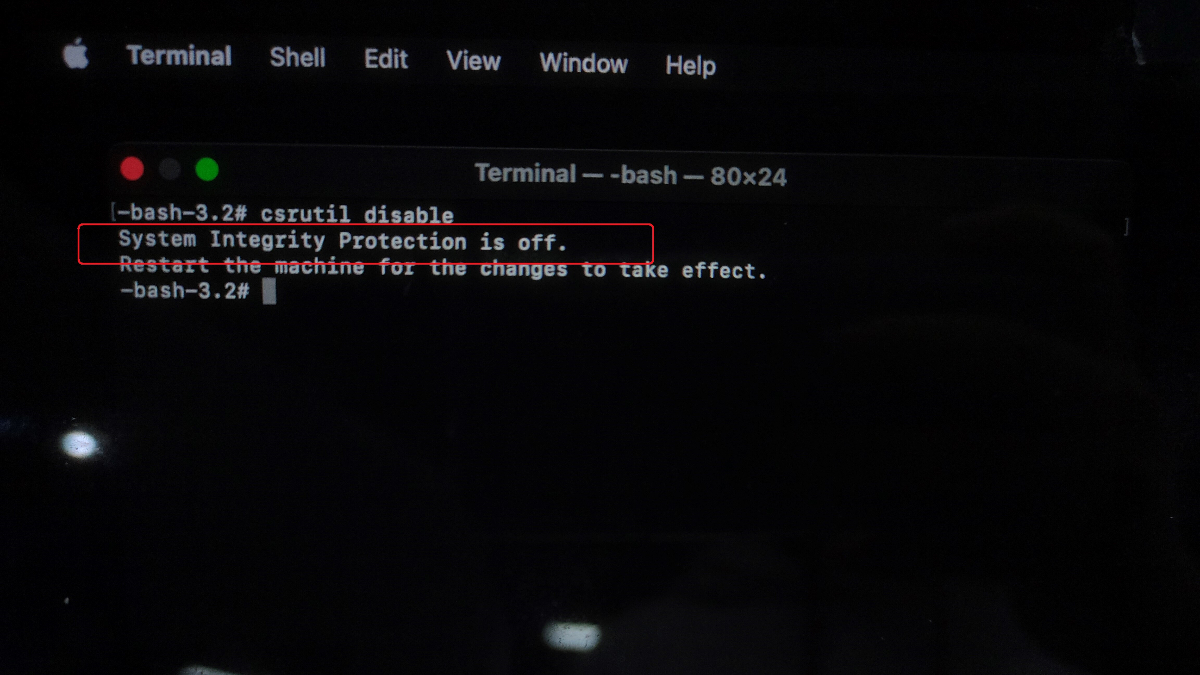
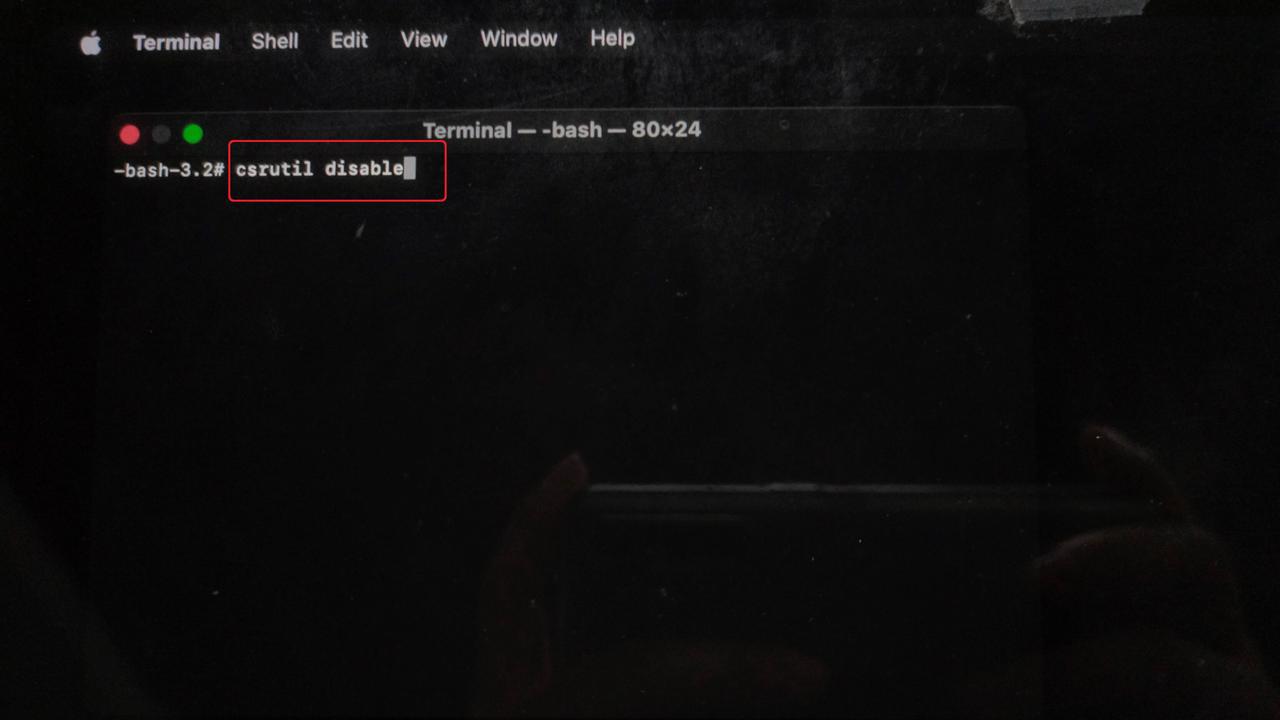
(3) Enter "csrutil disable", and press the Enter button.
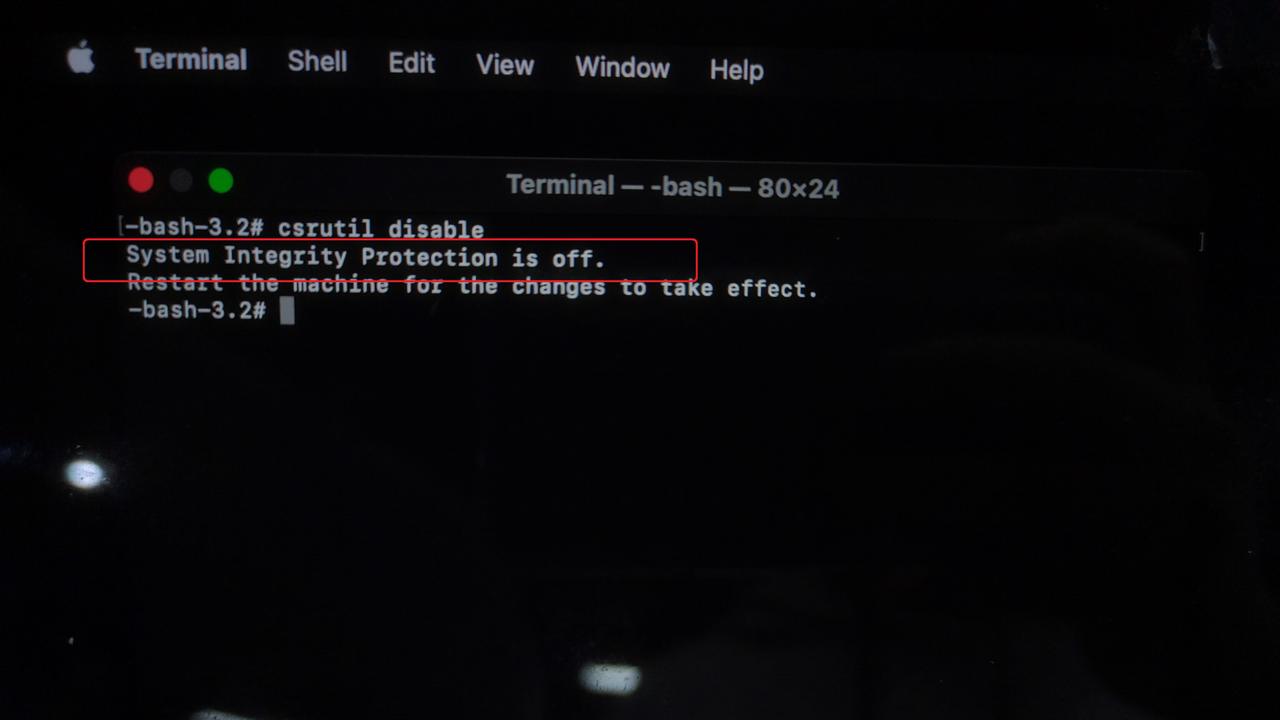
(4) When you see "System Integrity Protection is off", it means SIP is disabled. Please restart the computer.
If the issue is not resolved, please proceed to the next step.
11. Clear the software's cache
The software uses a cache to store temporary data and configurations. Clearing the cache helps refresh the software program. For more details, please refer to: https://support.xtool.com/article/2006
Location of xTool Studio cache files:
- Windows: C:\Users\User Name\AppData\Roaming\xTool studio\Local Storage
- macOS: /Users/User Name/Library/Application Support/xTool Creative Space/Local Storage
How to clear the cache:
- Make sure xTool Studio is not running. If it is running, please close it.
- Go to the cache folder mentioned above.
- Delete all files in the local storage folder.
- Restart xTool Studio and see if it works properly.
Note: Please remember to change "username" in the path with your actual username.
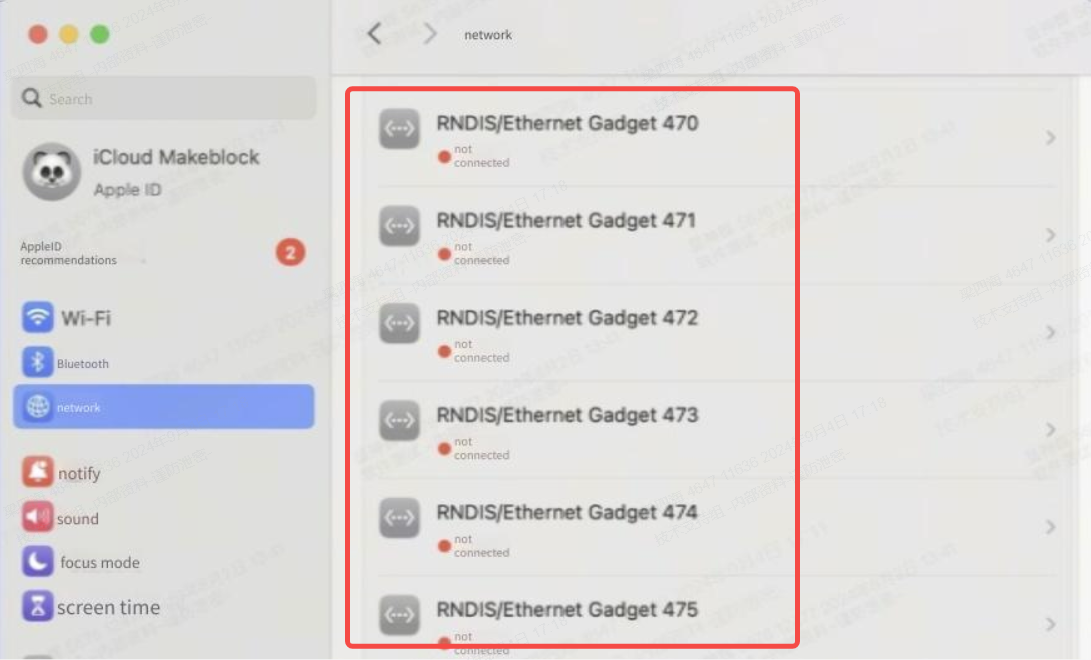
12. Check for driver connection conflicts (macOS Only)
In the network settings, check to see if there are multiple "RNDIS/Ethernet Gadget" drivers.
- If there are some, delete some of them and try connecting again.
- If the problem persists, proceed to the next step.
13. Disable System Integrity Protection (macOS Only)
(1) Turn off the computer. Press the Command and R keys along with the power button to enter the following screen.
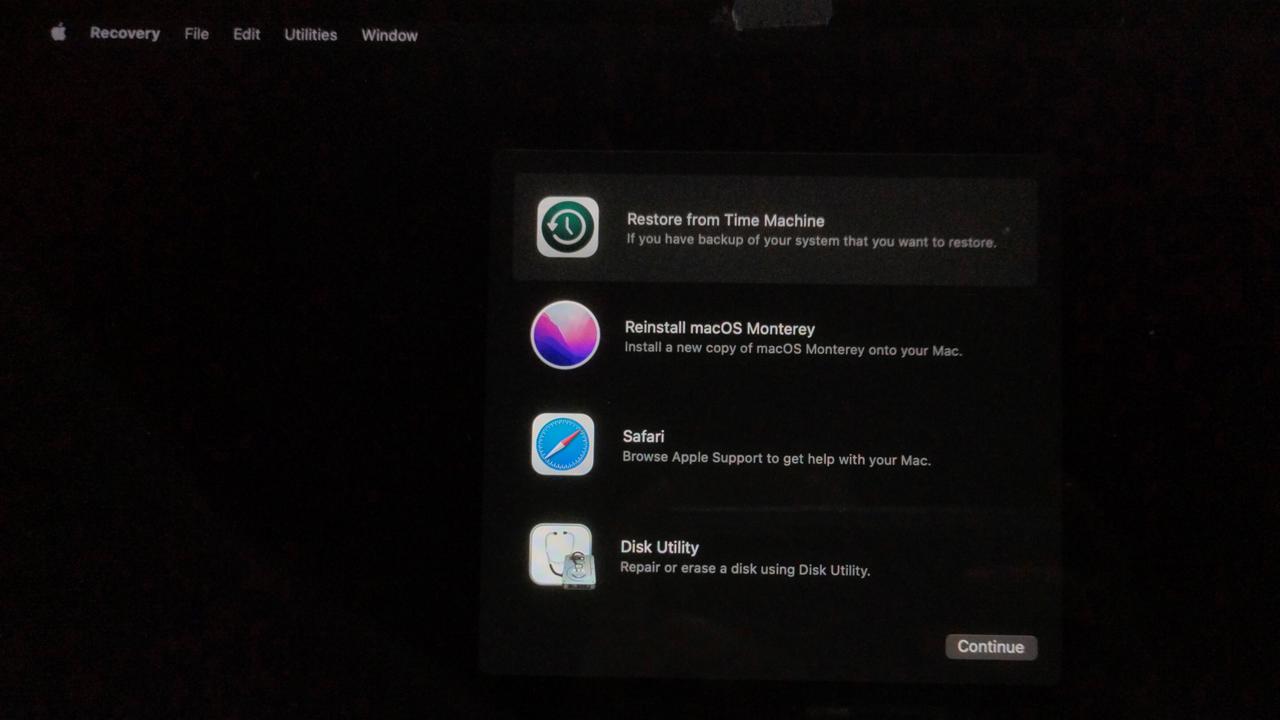
(2) Go to Utilities > Terminal.
(3) Enter "csrutil disable", and press the Enter button.
(4) When you see "System Integrity Protection is off", it means successful. Please restart the computer before connecting to xTool M2.
14. Activate "RNDIS/Ethernet Gadget" (macOS Only)
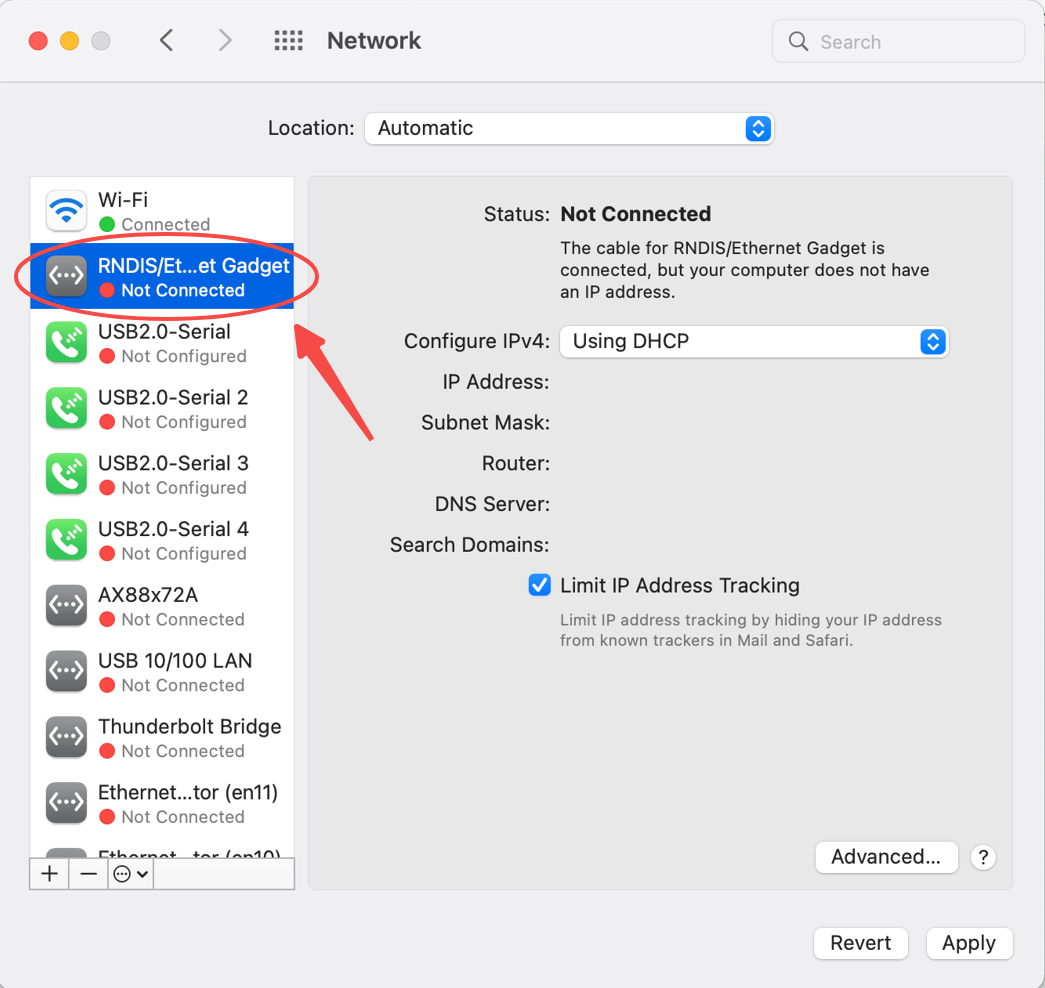
Go to System Preferences> Network to check the left list. Check the status of RNDIS/Ethernet Gadget.
- If it displays "Connected", it means your MacBook is connected to the device via USB. Please make sure the USB connection is secure.
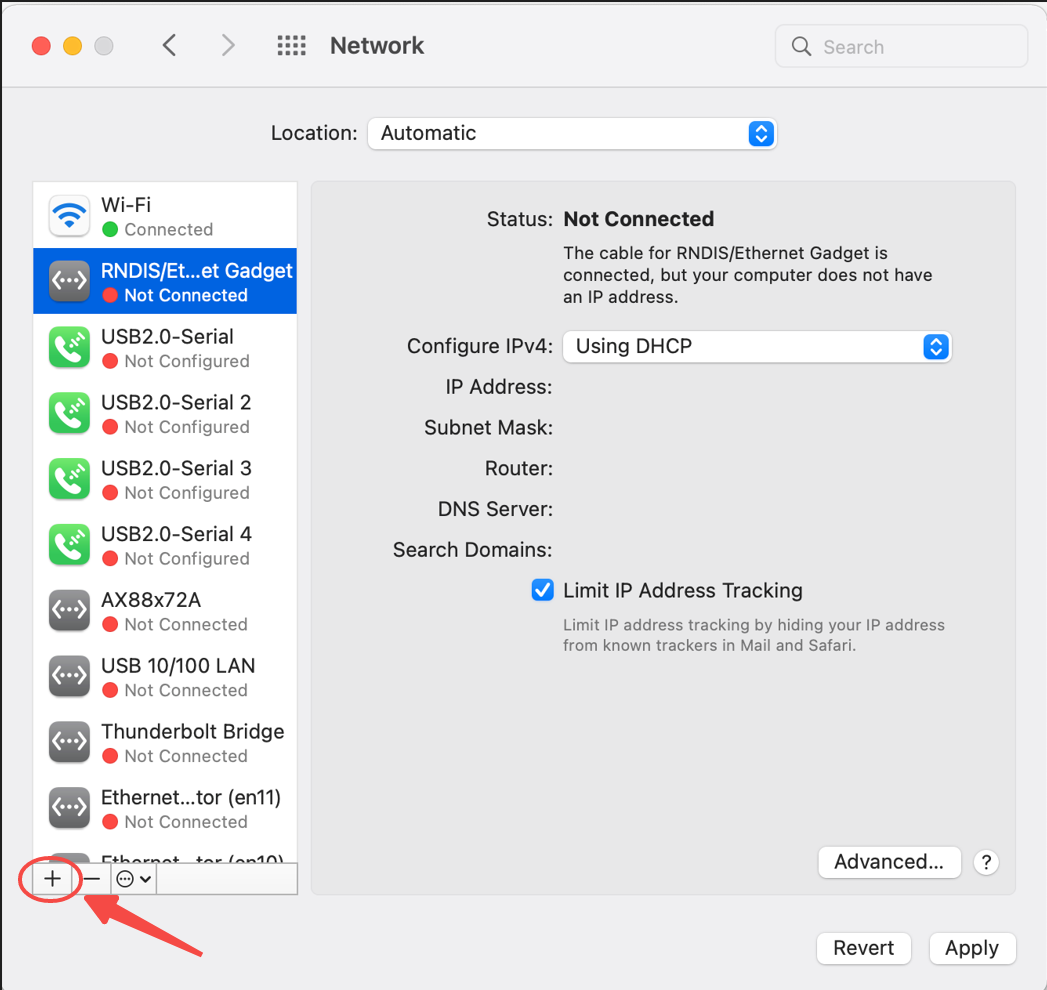
- If it displays "Not connected" as below, follow the steps to create the link manually.
a. Connect the device via USB, then click the "+" icon.
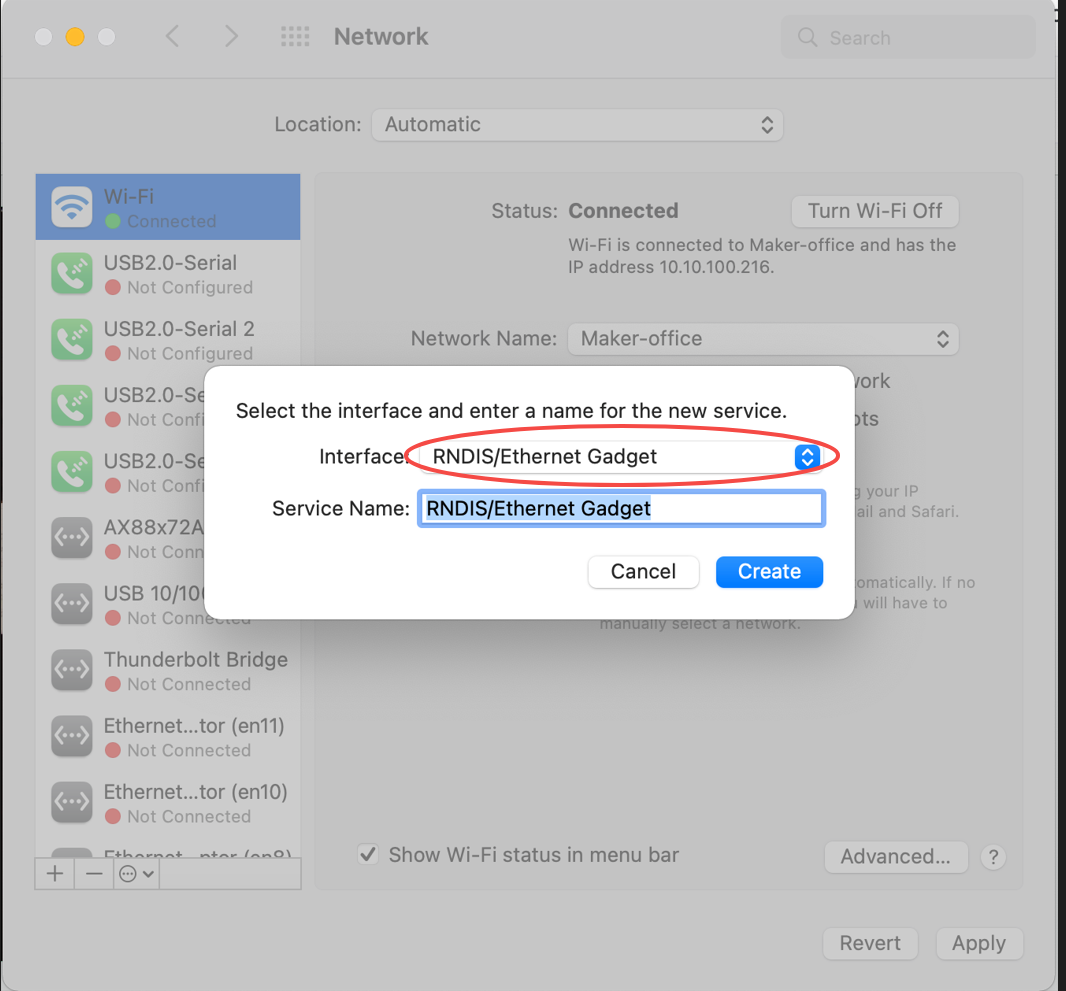
b. In the drop-down list, select RNDIS/Ethernet Gadget. This option will only appear when the device is connected to the computer.
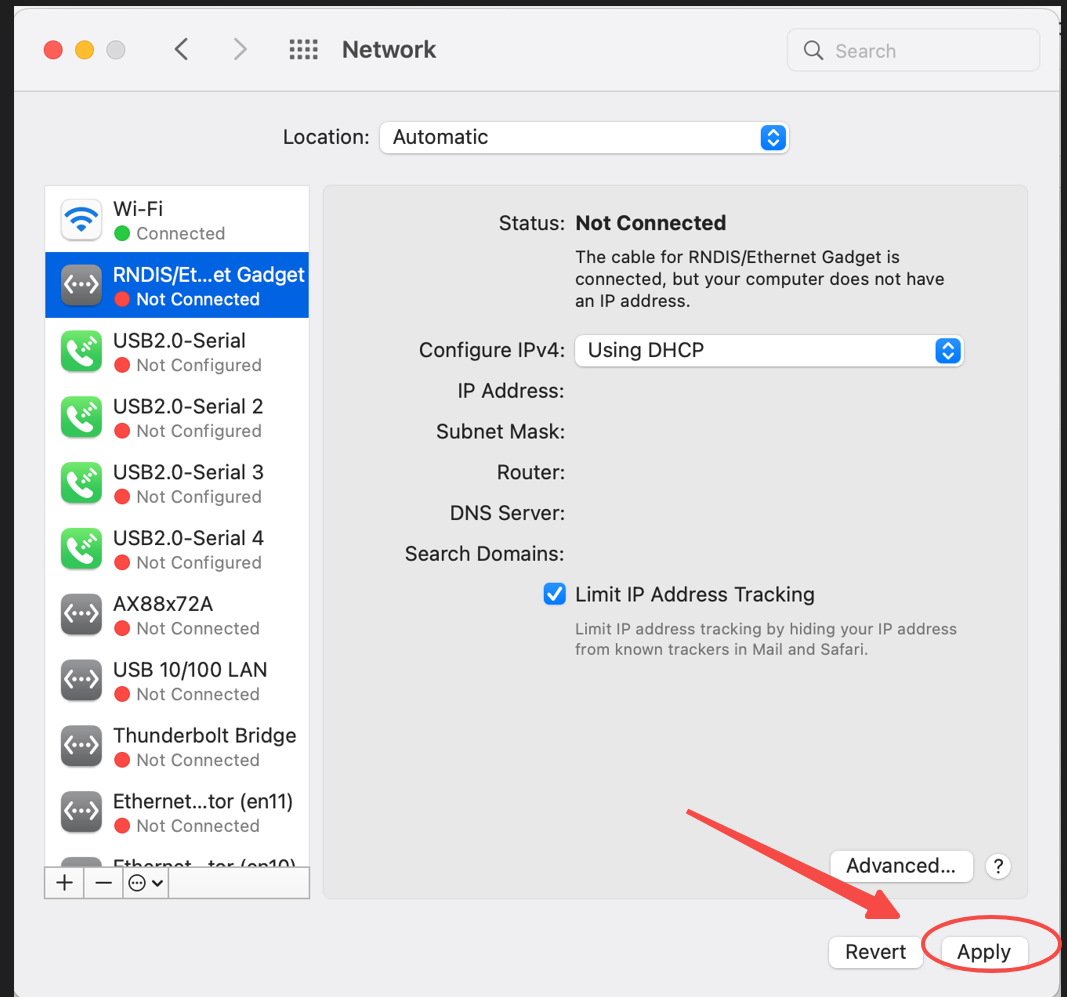
c. Click Apply.
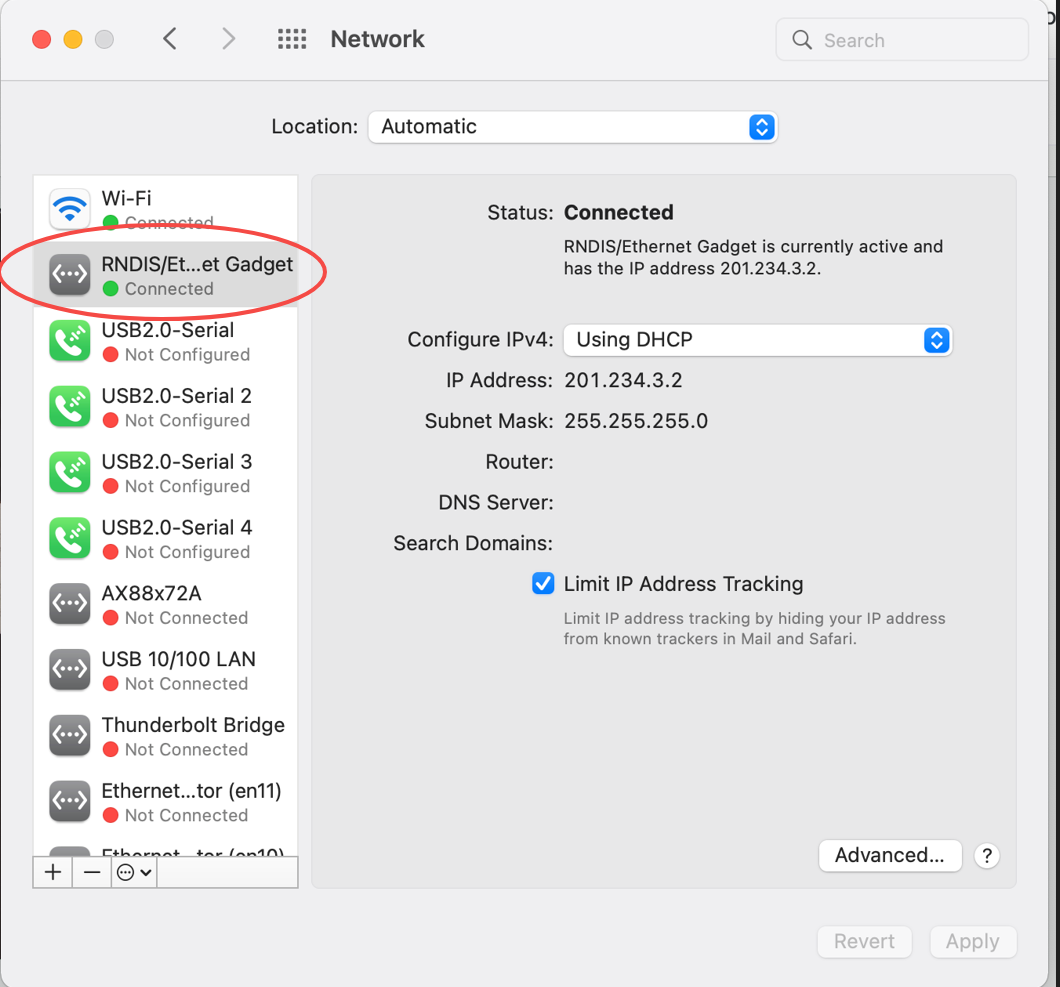
d. Once the "RNDIS/Ethernet Gadget" driver is created, it will automatically connect your computer to your device. The driver status will change to "Connected."
Services & Help
Learn & Education

Copyright © 2025 xTool All Rights Reserved.