Issue description
After you have connected xTool Apparel Printer to your computer via USB cable, the device name does not appear in the device list under the USB connection option in xTool Studio or xTool Creative Space (XCS) software. Even after you click the Refresh button multiple times, the interface continues to display "Device not found".

Potential causes
Hardware-related
- Failed USB cable: Cable is damaged or of low quality.
- Unstable USB port: Port connection is loose or unstable.
- Computer USB port failure: The USB port is malfunctioning.
- USB hub interference: Using a USB hub/dock (common with macOS).
Software-related
- Outdated software version: xTool Studio or XCS version is outdated.
- Outdated firmware version: Printer firmware needs updating.
- VPN interference: Active VPN is blocking the connection.
- Missing USB drivers: Required drivers not installed.
- Missing USB authorization: USB access not granted (macOS only).
- Driver connection conflict: Multiple driver instances (macOS only).
- System Integrity Protection enabled: SIP blocking driver (macOS only).
- RNDIS/Ethernet device not activated: Network device not configured (macOS only).
Part 1: Hardware Troubleshooting
Before adjusting software settings, ensure the physical connection is solid.
Step 1: Check the USB cable & ports
- Switch to the USB-C Connector: The included USB cable features a 2-in-1 connector (Type-A and Type-C). The Type-A adapter can sometimes be unstable.
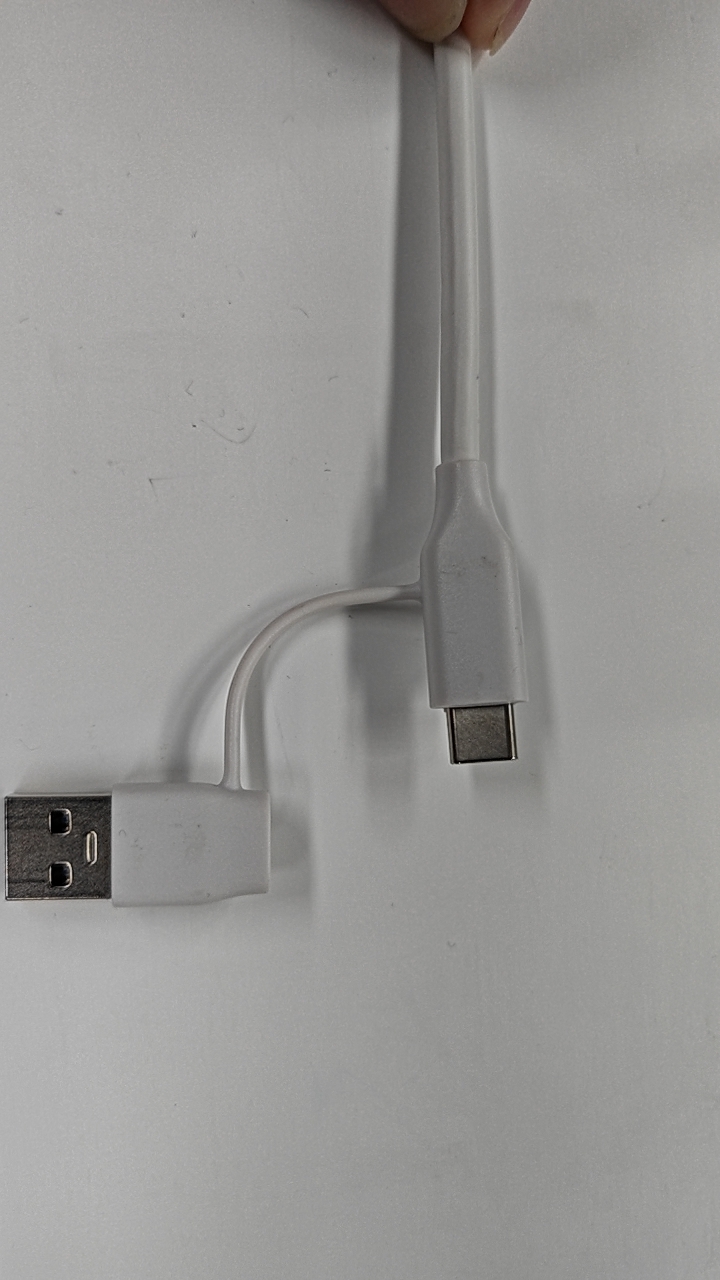
- Remove the Type-A adapter cap and connect the USB-C end directly to your computer (if your computer supports it).
- Try a Different Computer Port:
- If using a desktop computer, connect to a USB port on the rear panel (directly on the motherboard). Front panel ports often have insufficient power or data stability.
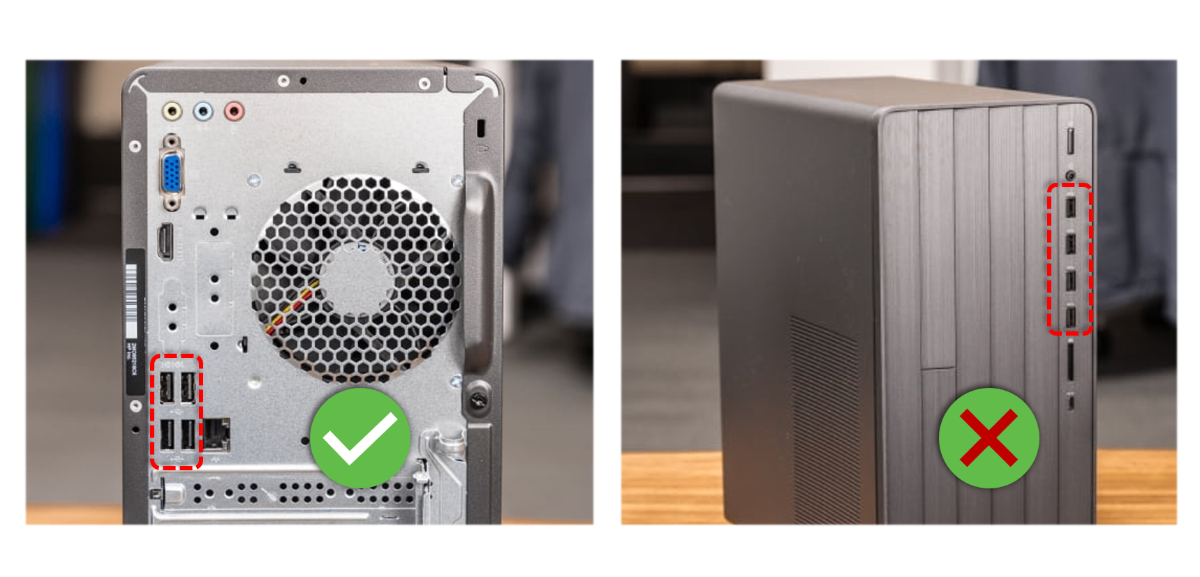
- If using a laptop, try all available USB ports.
- If using a desktop computer, connect to a USB port on the rear panel (directly on the motherboard). Front panel ports often have insufficient power or data stability.
💡 Tip: Front-panel USB ports on desktop PCs are often not directly connected to the motherboard and may cause connection issues.
- Replace the USB Cable:
- Try using a different high-quality USB data cable (Type-A or Type-C) to rule out a faulty cable.
- If the issue persists, proceed to Step 2.
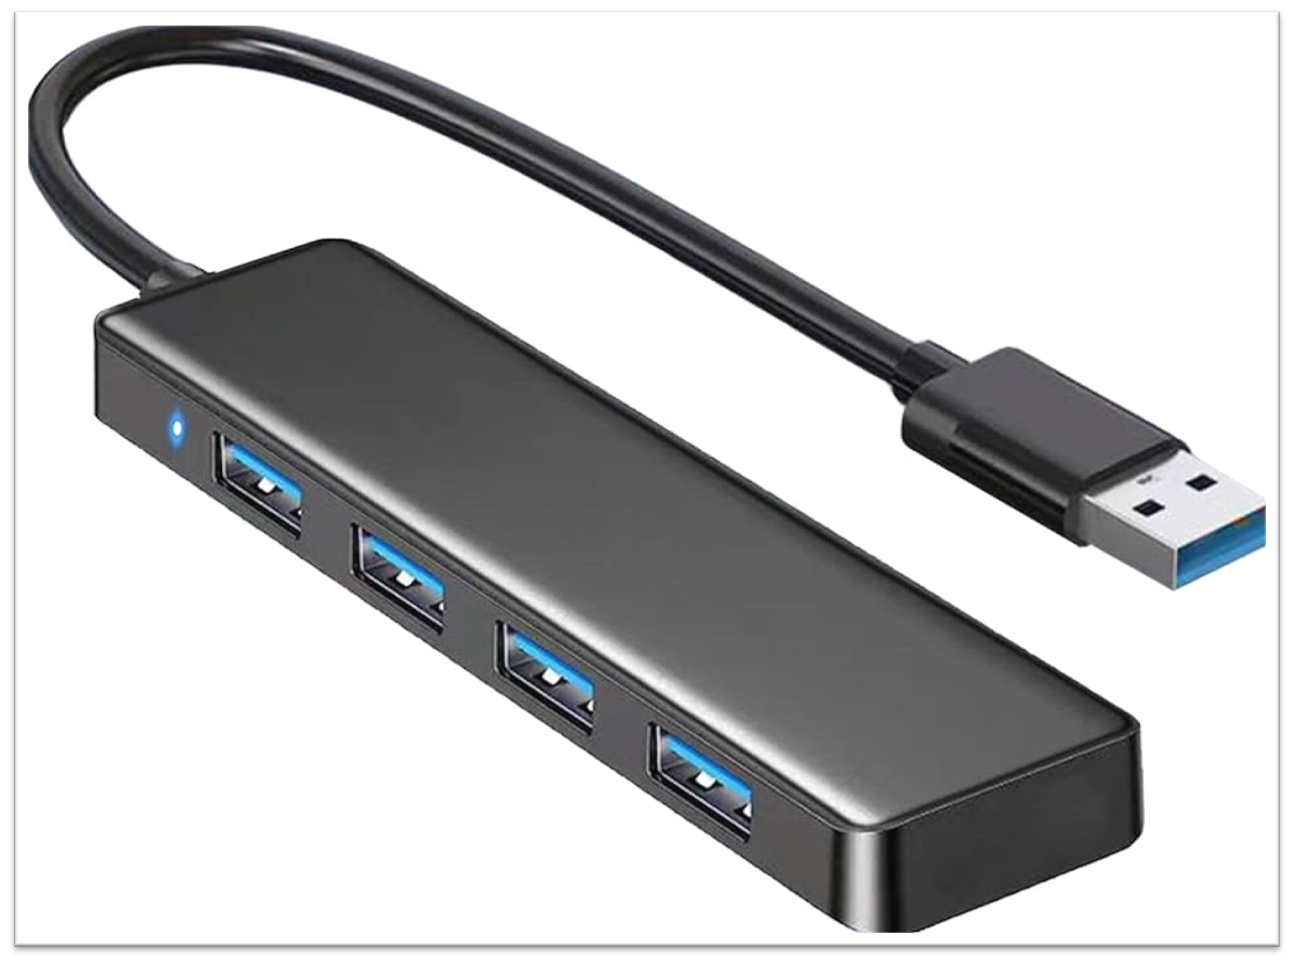
Step 2: Bypass Docking Stations (macOS Users)
If you are using a USB hub or docking station:
- Disconnect the hub.
- Connect the printer directly to the computer.
- If a direct connection works, the issue lies with the docking station.
Part 2: Software troubleshooting (General)
Step 1: Update software
Outdated software may fail to recognize new hardware.
- Visit the xTool download page: xTool Software Downloads
- Update to the latest version of xTool Studio or XCS.
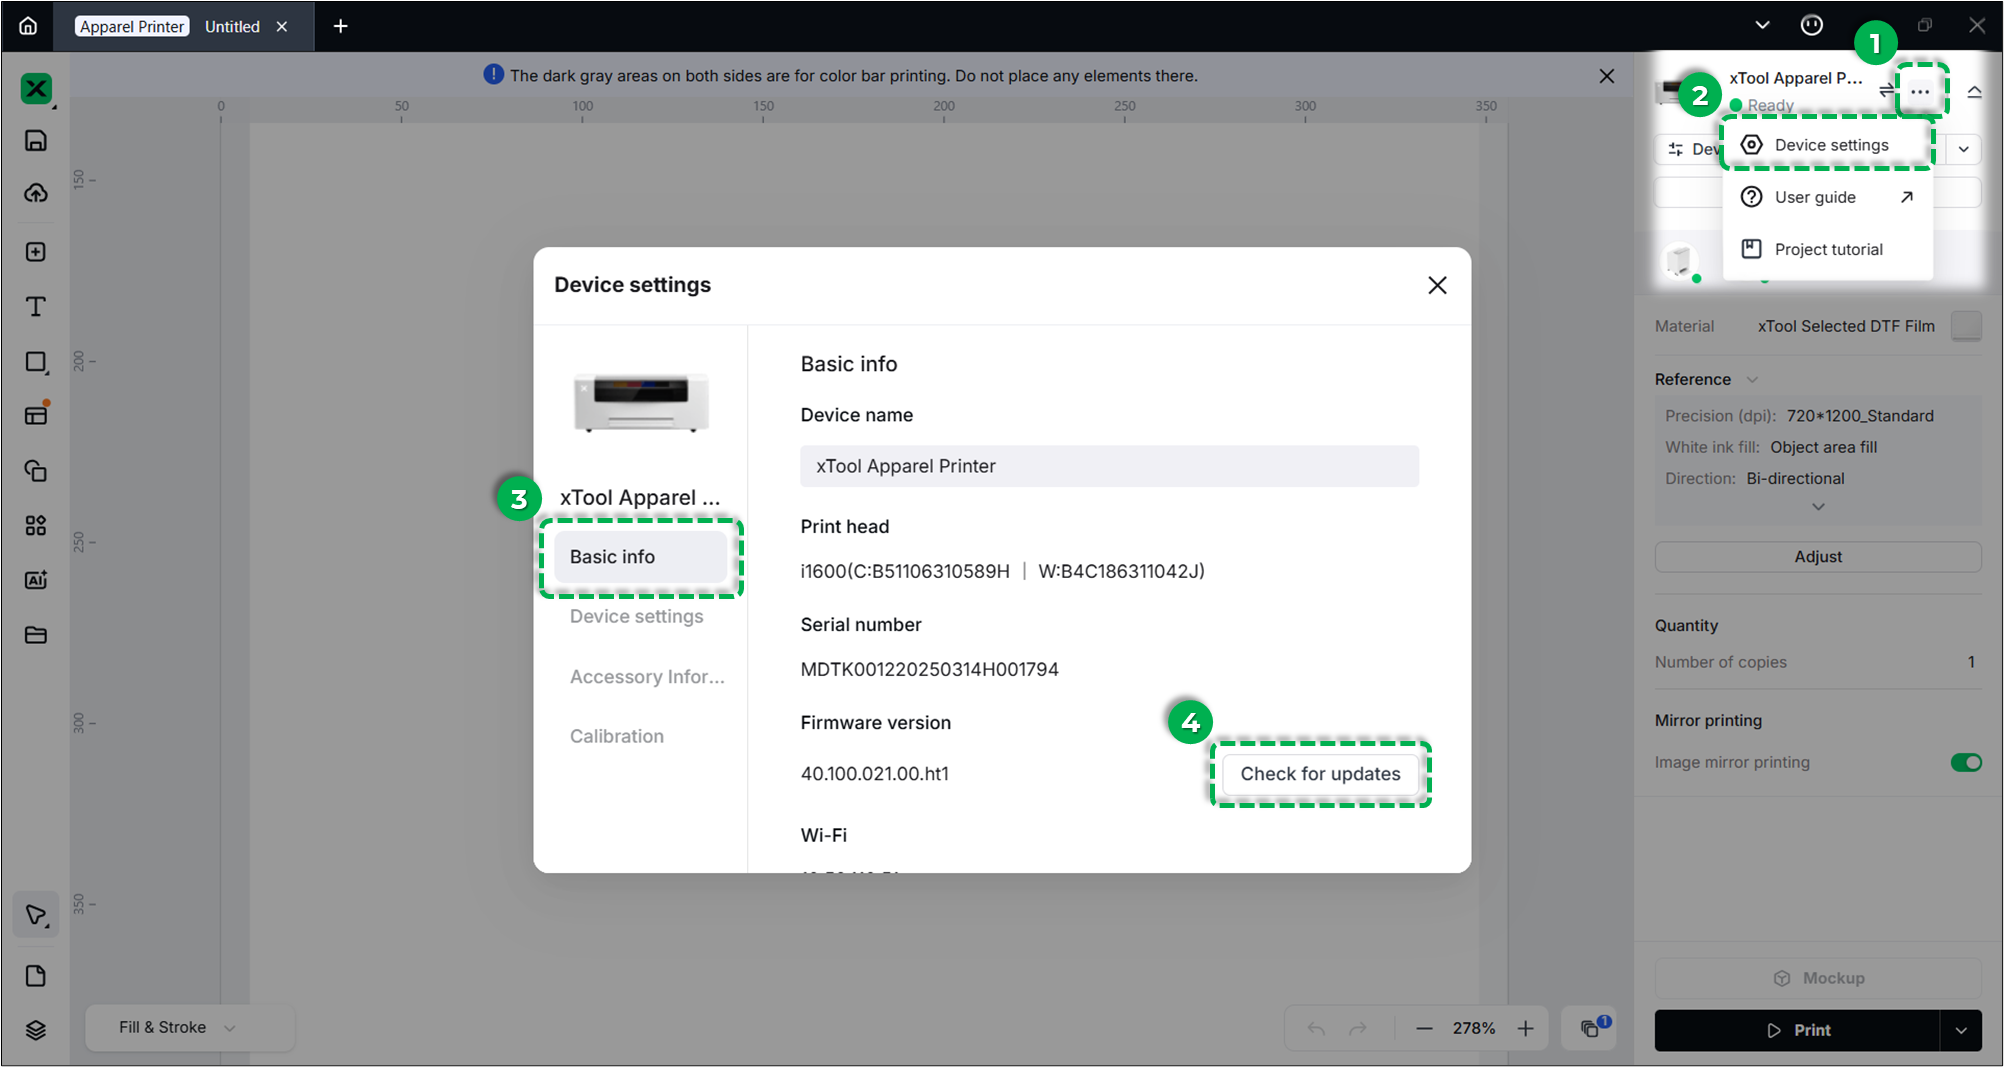
Step 2: Check for firmware updates
If you have already configured a Wi-Fi network for your printer and can connect via Wi-Fi (or if you previously connected), check for firmware updates.
- xTool Studio:
Three dots icon > Device settings > Basic info > Check for updates.
Step 3: Disable VPN
A Virtual Private Network (VPN) can interfere with local device communication.
- Check if a VPN is enabled in your system settings or if VPN software is running.
- Disable the VPN and try refreshing the device list.
Part 3: Windows operating system specific
Check for the RNDIS driver
xTool Apparel Printer requires the RNDIS driver to communicate with your computer.
- Check Installation Status in Software:
- xTool Studio: Click the down arrow (top-right) > Settings > Device.

- XCS: Click the down arrow (top-right) > Settings > Developer mode.
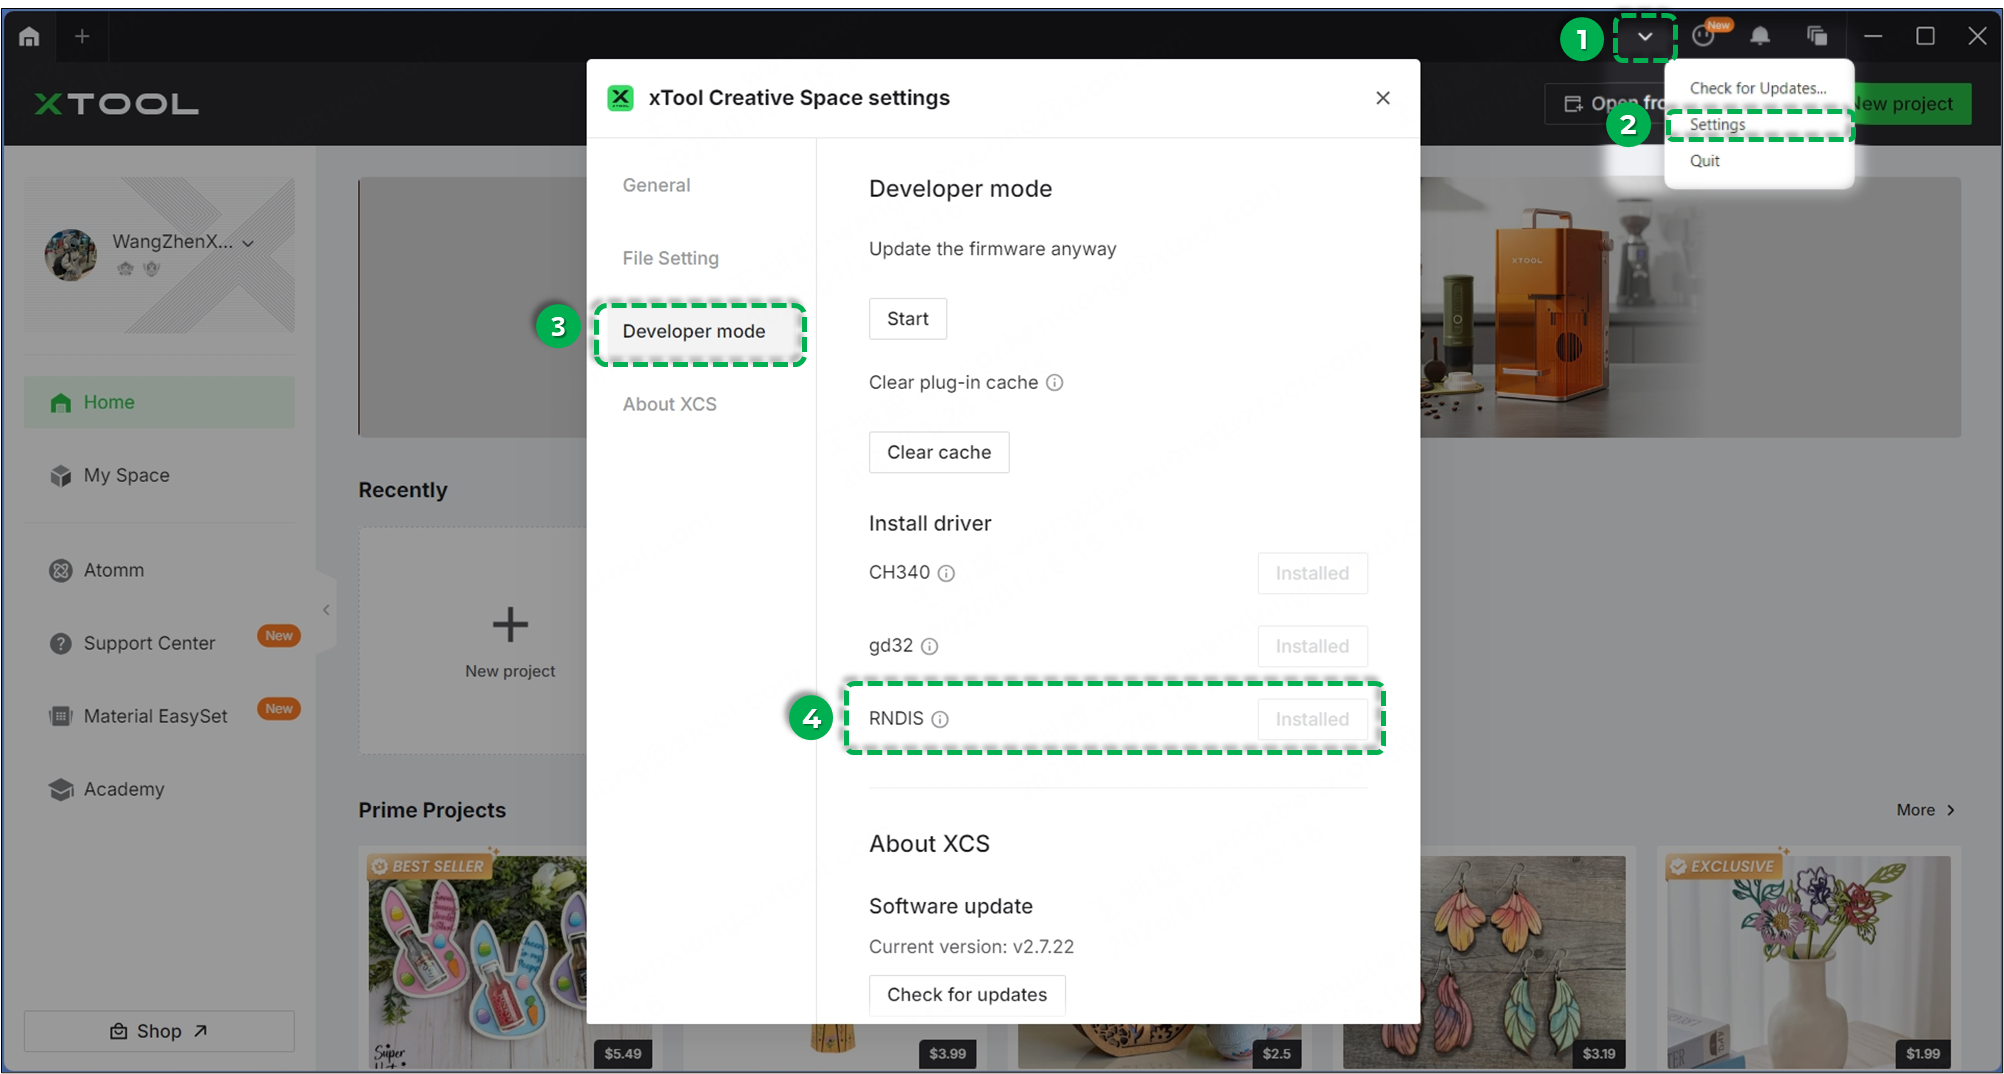
- Status:
- Greyed out "Installed": Driver is installed correctly.
- Active "Install" button: Driver is missing. Click Install and follow the pop-up guide (i.e., RNDIS Driver Installation Guide).
- xTool Studio: Click the down arrow (top-right) > Settings > Device.
- Verify USB Device Recognition in Device Manager:
- With the USB cable connected to the printer and your computer, right-click the Windows Start menu > Device Manager.
- Expand the Network adapters section.
- Verify if "USB Ethernet/RNDIS Gadget" is present.
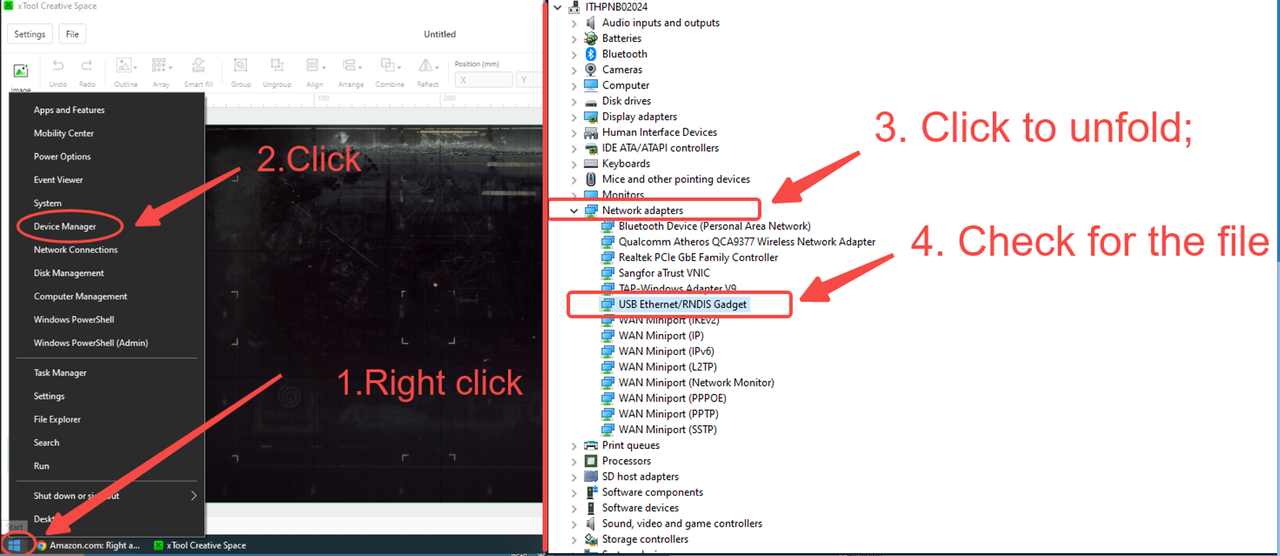
- Results:
- Device visible: RNDIS driver is functioning
- Device not visible: Driver is not working properly
- Restart your computer and try reinstalling the driver via the software.
Part 4: macOS specific
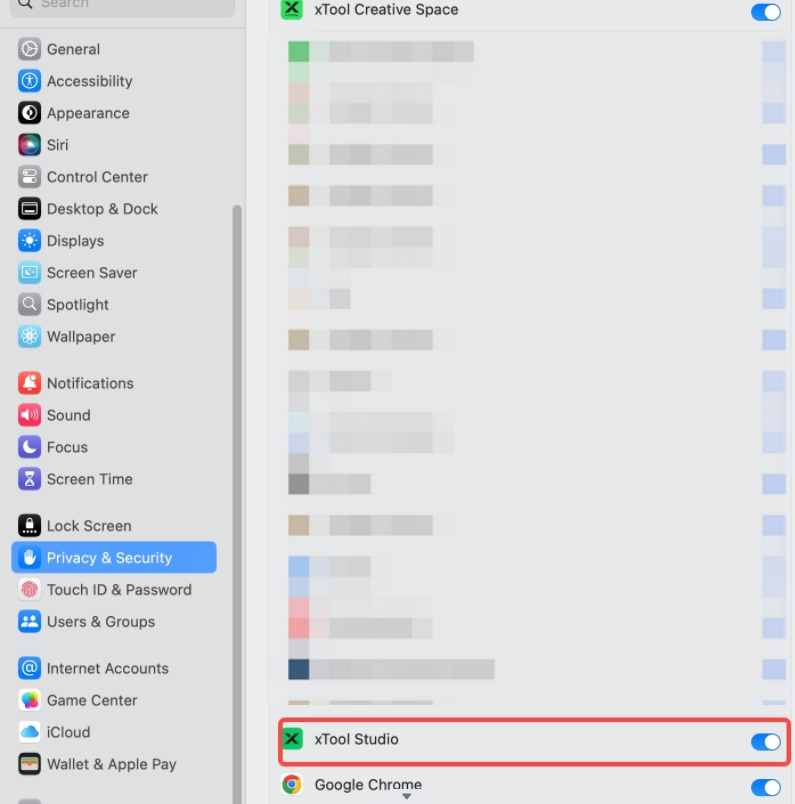
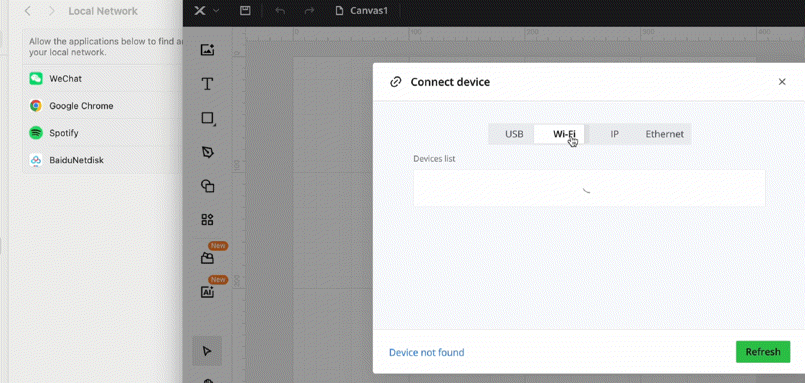
Step 1: Check local network access (macOS 15+)
macOS 15 (Sequoia) and newer versions require explicit permission for local network access.
- Go to System Settings > Privacy & Security > Local Network.
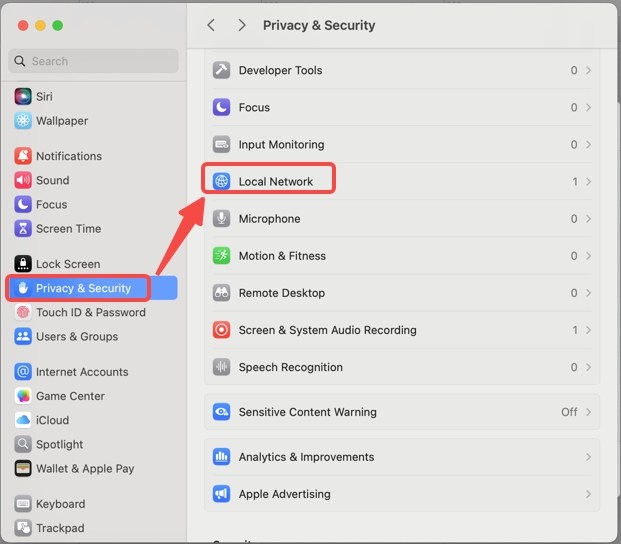
- Find xTool Studio (or XCS) in the list.
- Ensure the toggle is turned ON.
- If a pop-up appears asking for permission to find devices on the local network, click Allow.
Step 2: Check for the RNDIS driver
xTool Apparel Printer requires the RNDIS driver to communicate with your Mac.
- Check Installation Status in Software:
- xTool Studio: Click the down arrow (top-right) > Settings > Device.
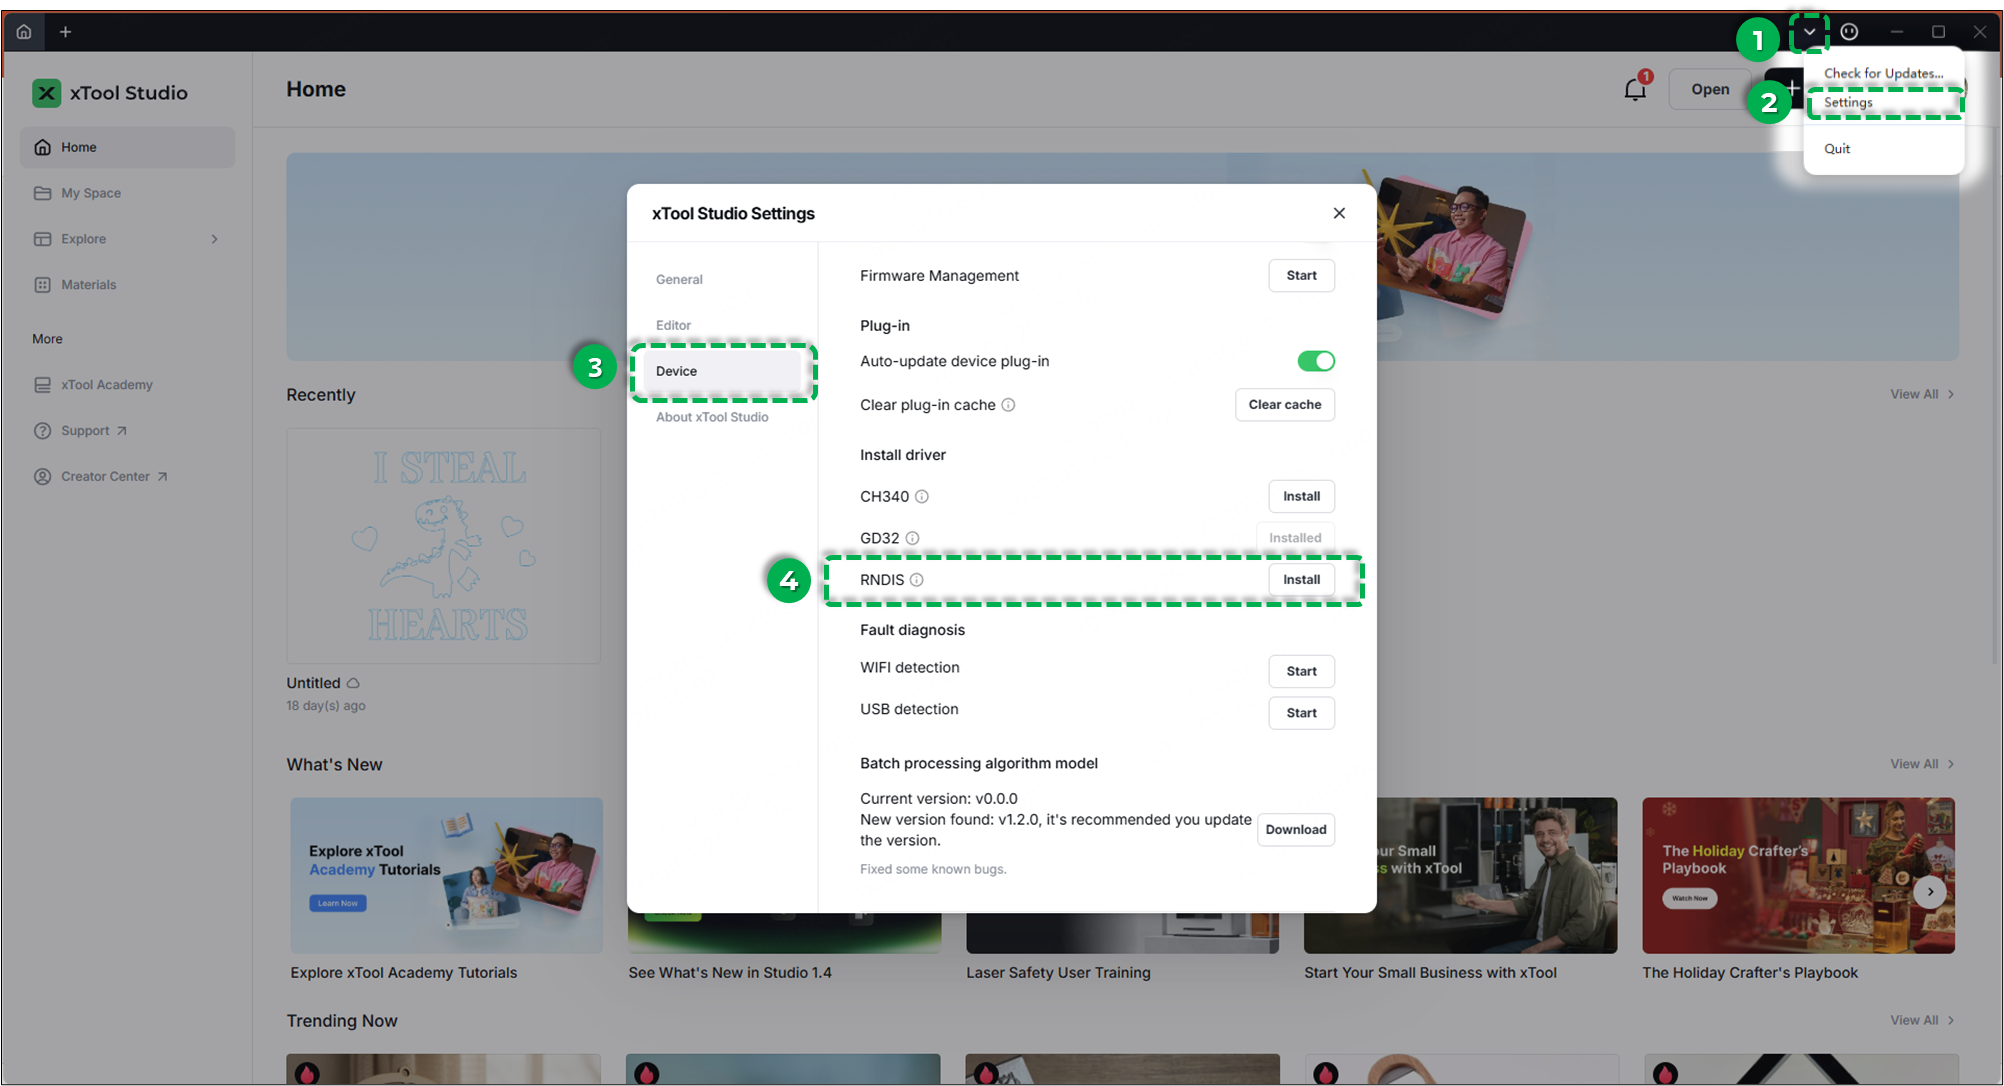
- XCS: Click the down arrow (top-right) > Settings > Developer mode.

- Status:
- Greyed out "Installed": Driver is installed correctly.
- Active "Install" button: Driver is missing.
- xTool Studio: Click the down arrow (top-right) > Settings > Device.
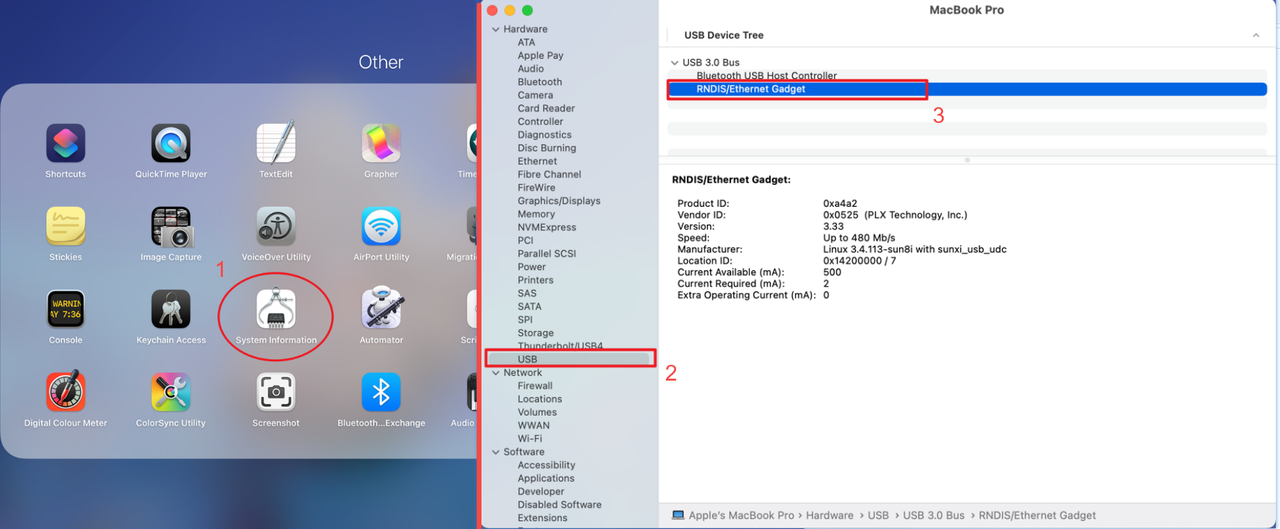
- Verify USB Device Recognition:
- Ensure the USB cable is connected to both the printer and your Mac.
- Go to System Information > Hardware > USB.
- Check if "RNDIS/Ethernet Gadget" (or similar) appears in the device tree.
- If Missing: The computer does not physically see the printer.
- Try re-installing the driver: HoRNDIS-9.2_catalina.rar (Note: Verify compatibility with your OS version).
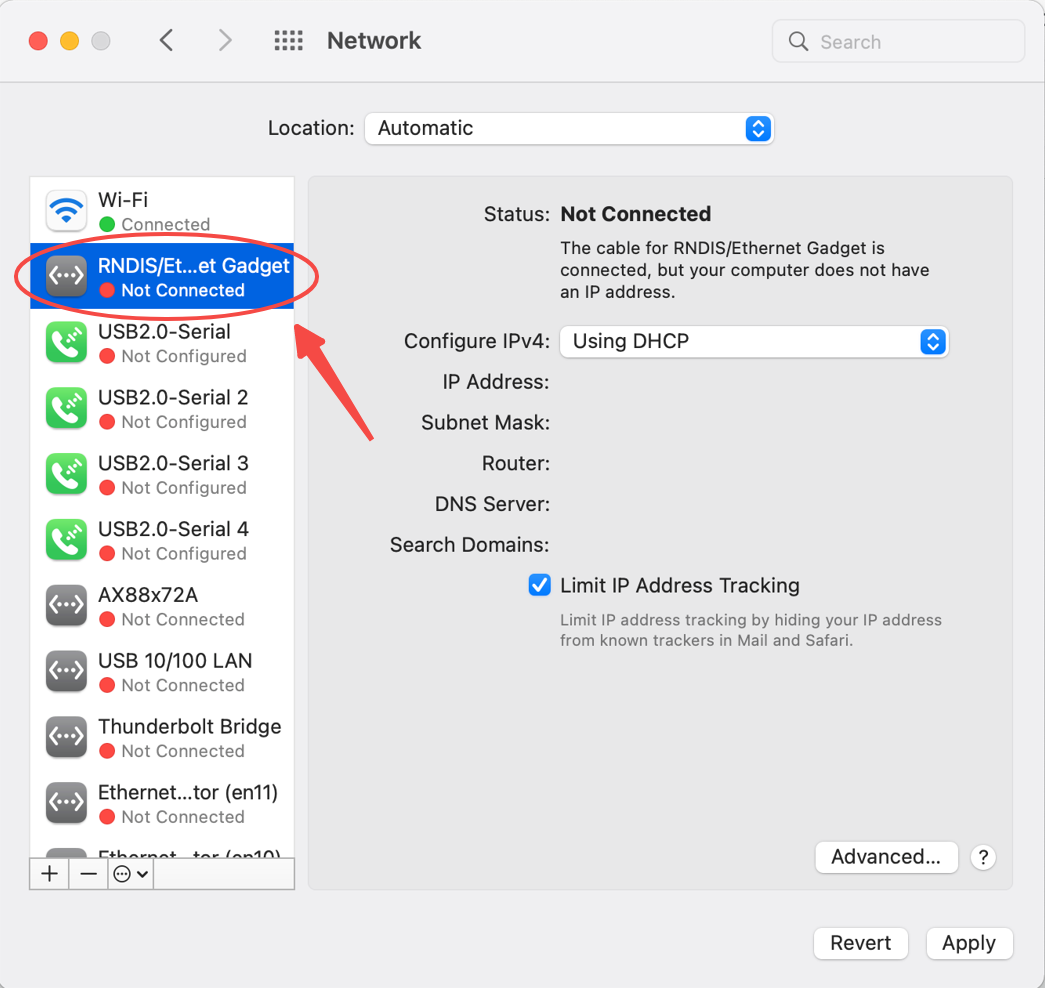
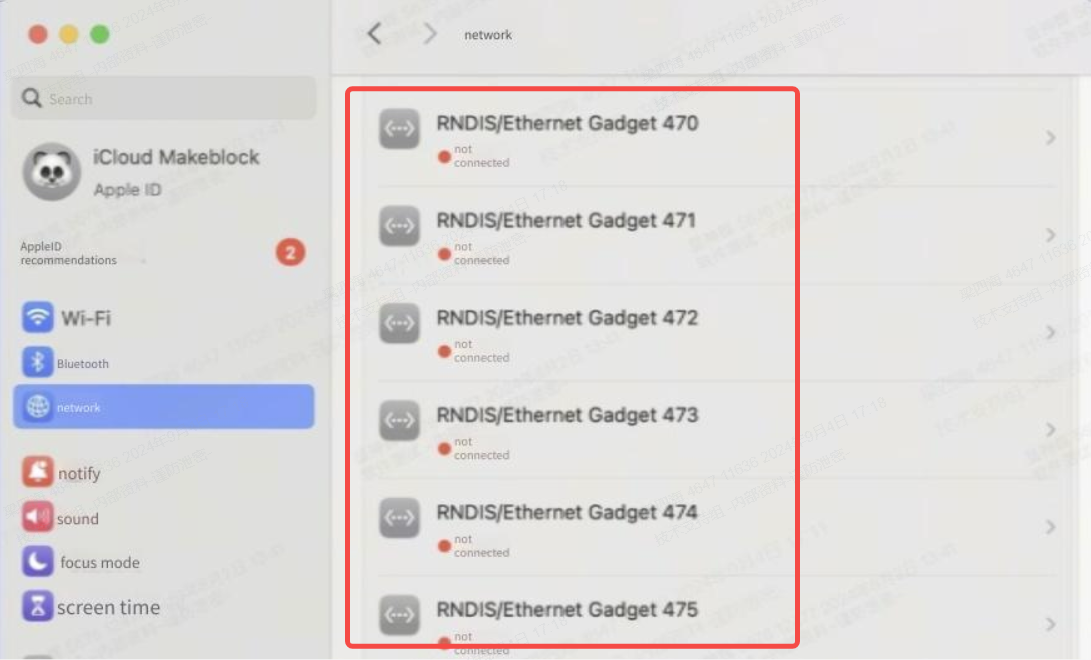
Step 3: Activate "RNDIS/Ethernet Gadget"
Even if the driver is installed, the network interface might be inactive because the RNDIS network device must be properly configured and activated.
Check Network Status
- Navigate to: System Settings > Network
- Check the left-side connection list for "RNDIS/Ethernet Gadget"
- Verify status:
- "Connected": USB connection is working properly
- "Not Connected": Manual activation required
Create Manual Connection (if Not Connected)
- Connect your device via USB and click the "+" icon.
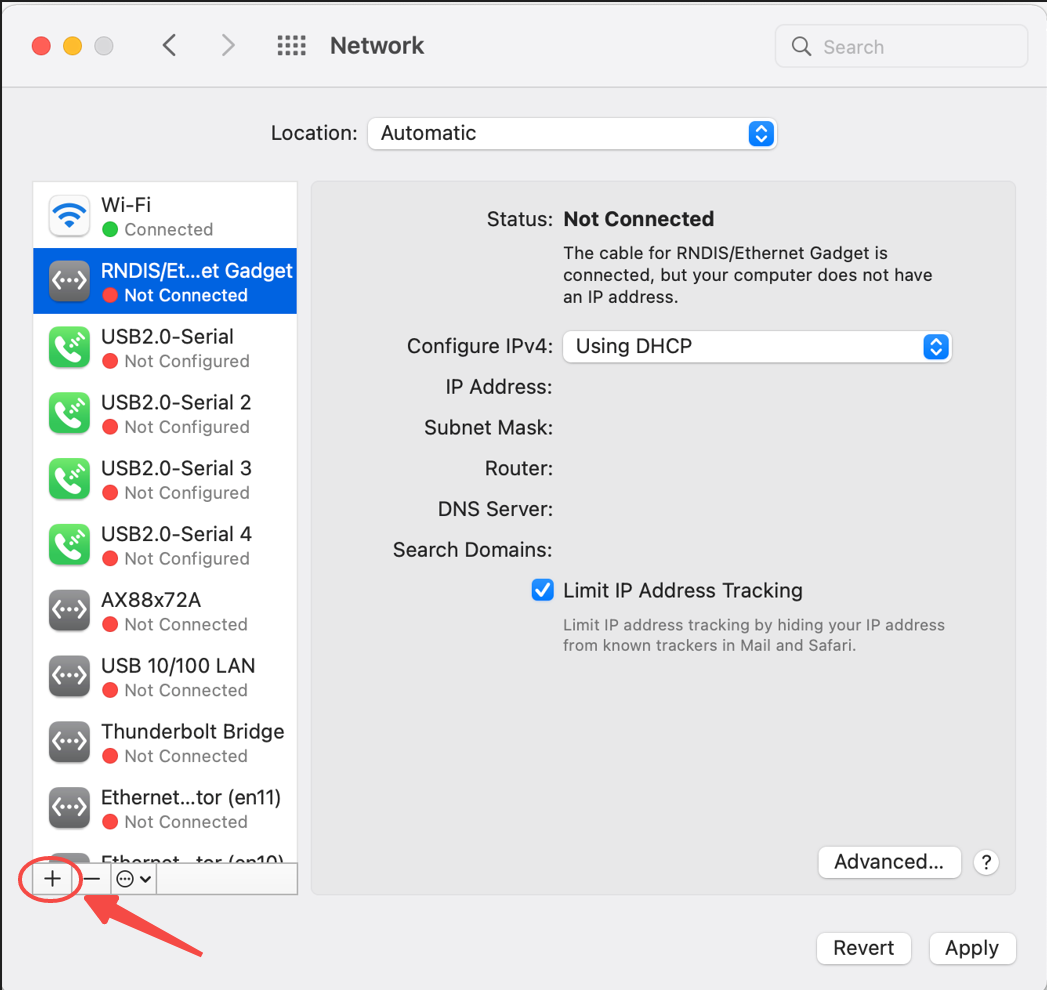
- In the dropdown list, select "RNDIS/Ethernet Gadget". This option appears only when the device is connected to your computer.
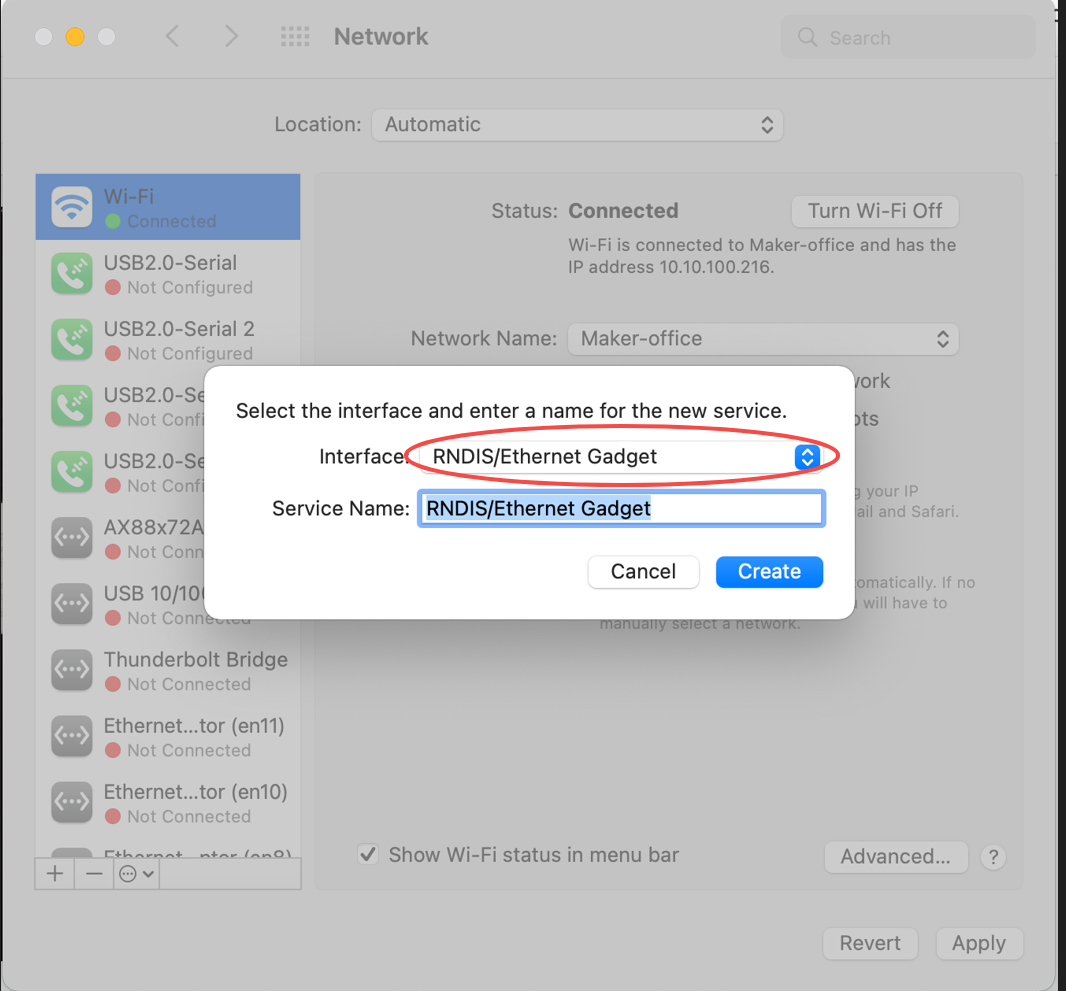
- Maintain the default settings and click "Apply".
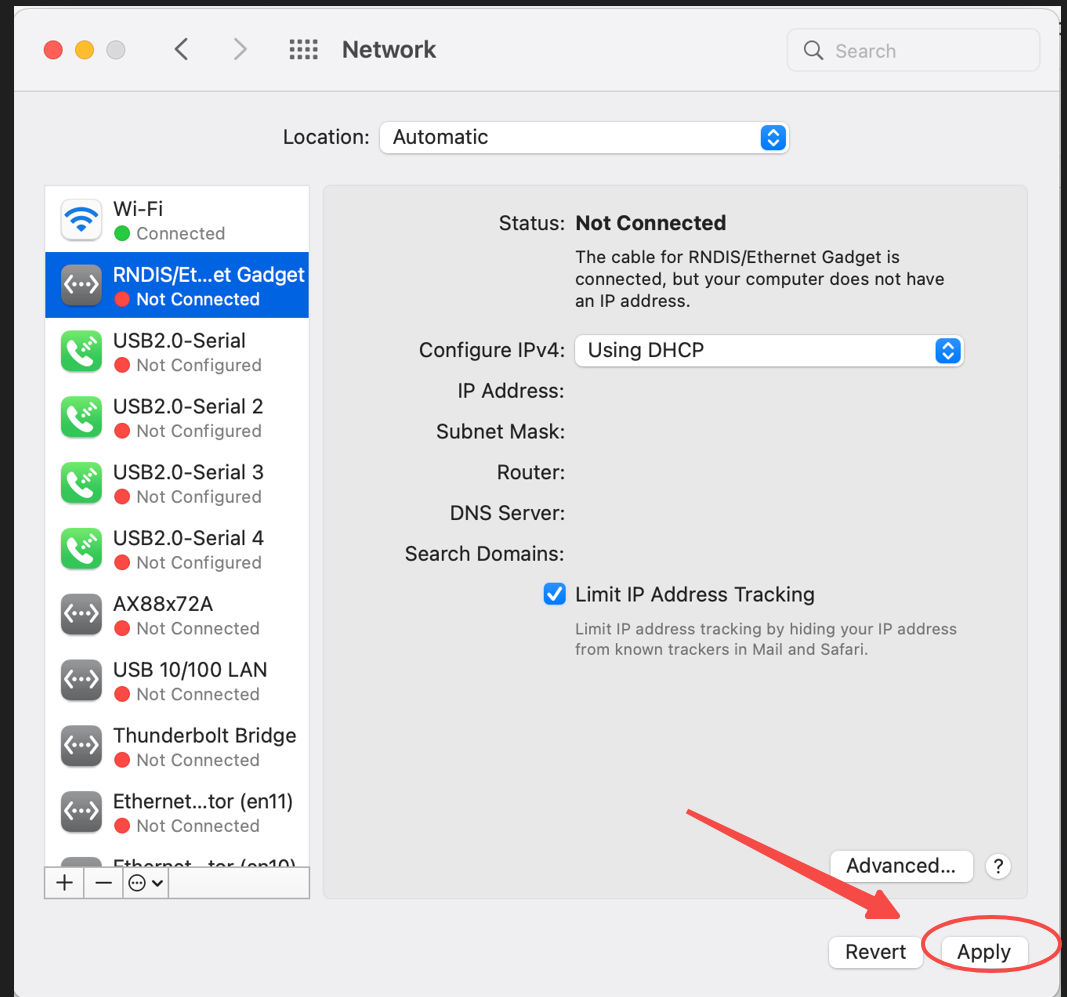
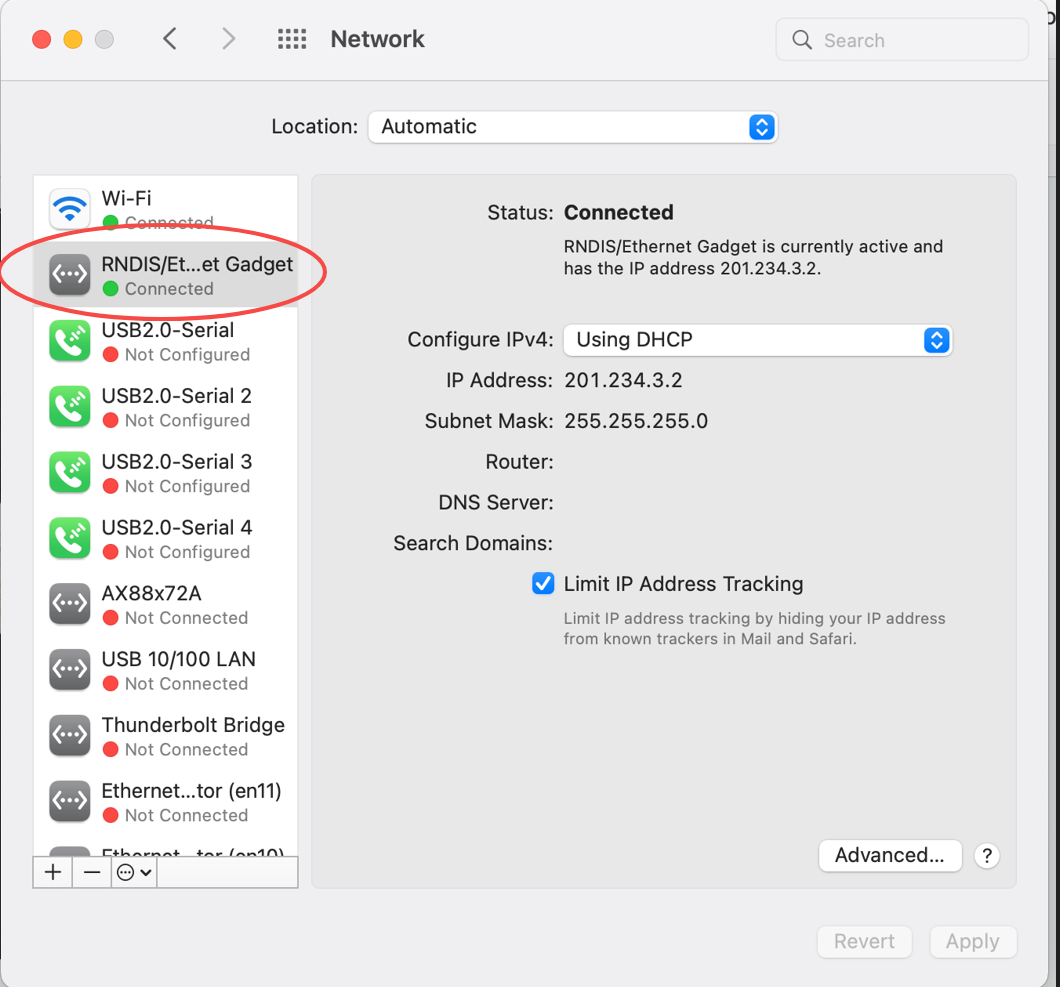
- Once the "RNDIS/Ethernet Gadget" driver is created, it will automatically connect your computer to your device. The driver status will change to "Connected" (Green dot).
Step 4: Check for driver conflicts
Multiple RNDIS driver instances can cause conflicts.
- In System Settings > Network, check if there are multiple instances of "RNDIS/Ethernet Gadget".
- If duplicates exist, delete them and keep only one active connection.
- Test the USB connection again after deletion.
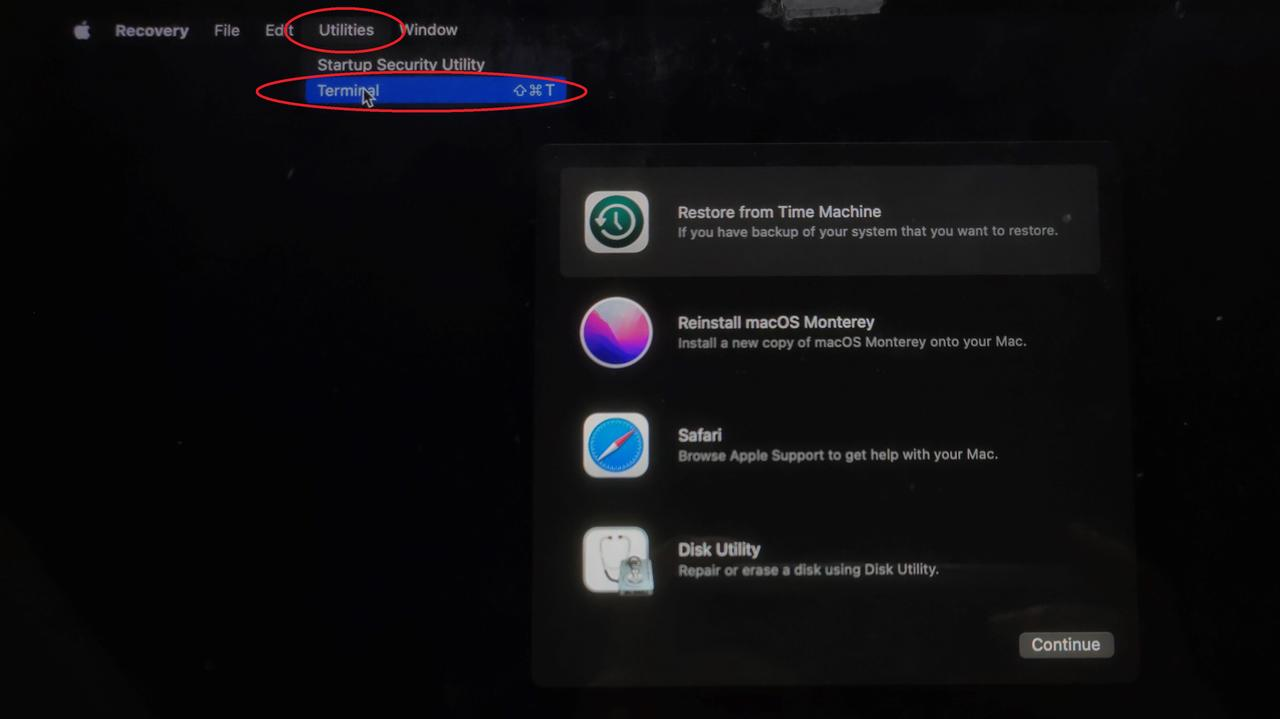
Step 5: Disable System Integrity Protection (SIP) - Advanced
System Integrity Protection (SIP) may block required drivers.
⚠️ Warning: Disabling SIP reduces system security. Only perform if other steps fail. Proceed with caution.
Enter Recovery Mode:
- Power off your Mac.
- Enter Recovery Mode: Press and hold
Command + R(Intel) or the Power Button (Apple Silicon) during startup.
Disable SIP:
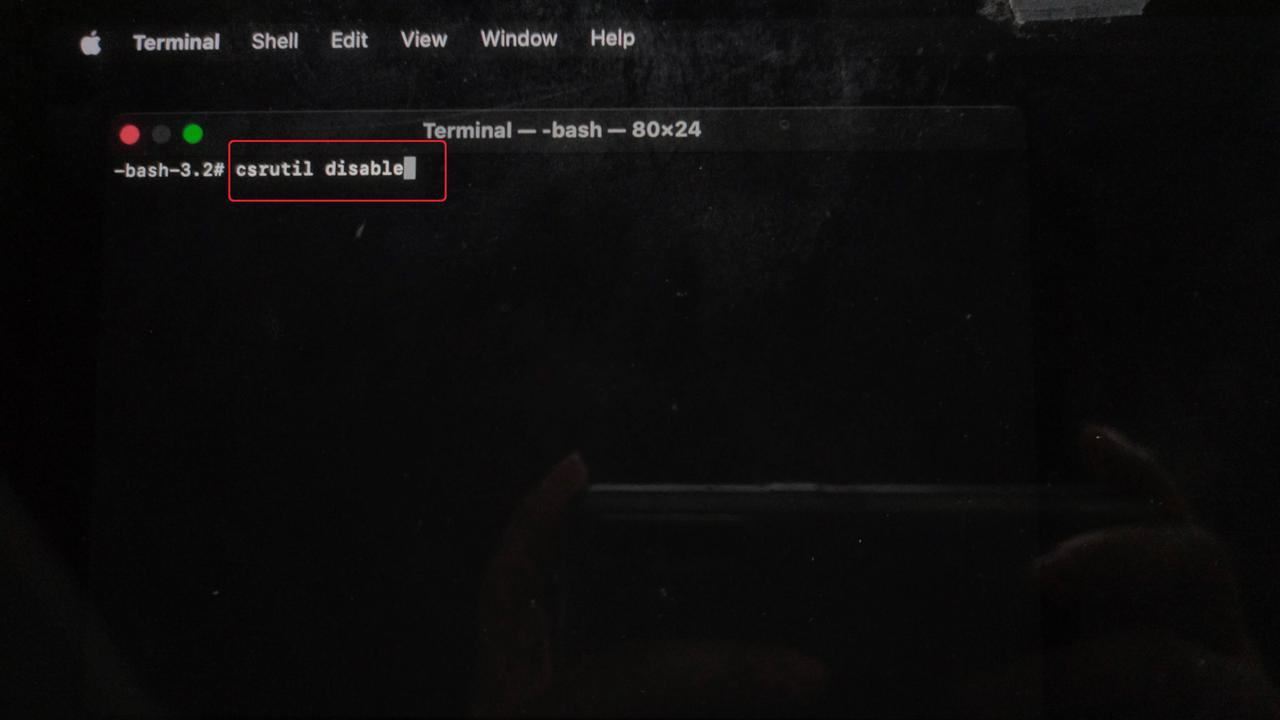
- Click Utilities > Terminal.
- Type
csrutil disableand press Enter.
- After hitting the "Enter" key, if the screen shows "System Integrity Protection is off," the alteration is successful.
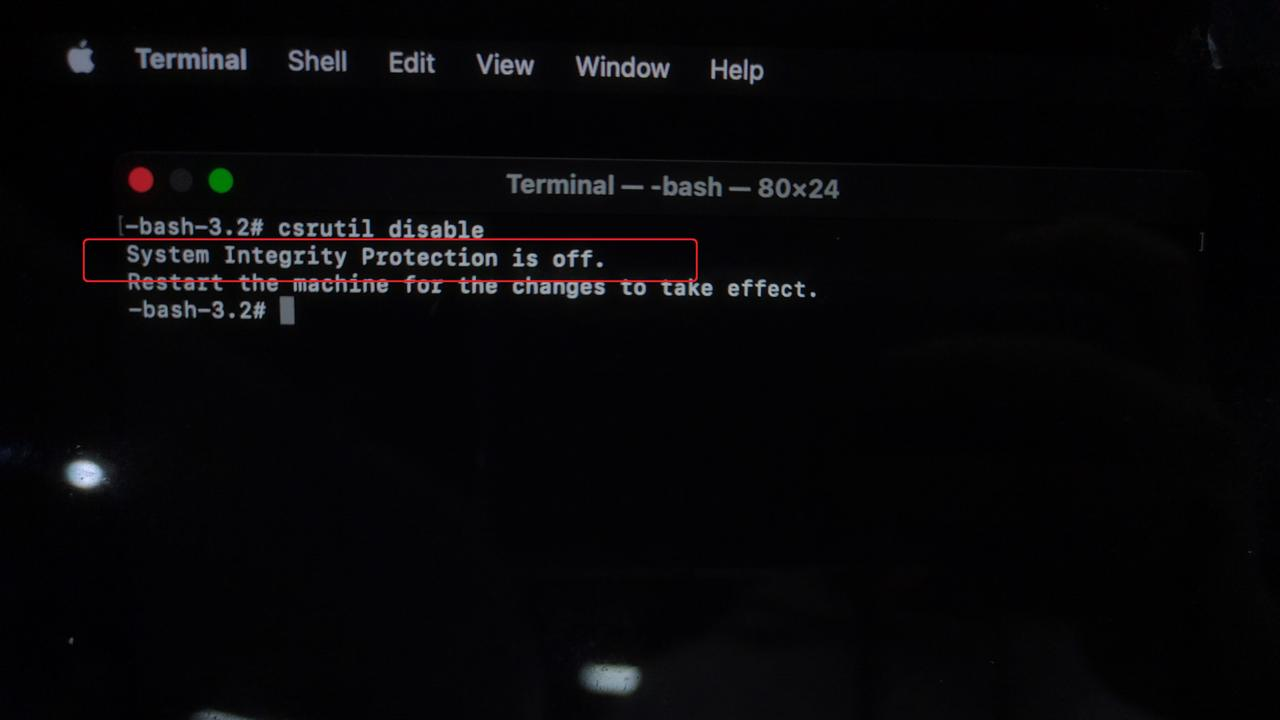
- Restart the computer and try the USB connection again.
Part 5: Advanced diagnostic (Direct connection test)
Perform this step only when the preceding troubleshooting (i.e., Part 1-4) is complete.
This test bypasses the internal USB extension cable to determine if it's the source of the problem.
Procedure:
- Disassemble: Remove the printer's casing to access its High-speed PCB.
- Connect Directly:
- Locate the Type-C port directly on the High-speed PCB.
- Connect your computer directly to this port using a USB-C cable (bypassing the printer's external port).
- Test: Check if the software recognizes the device.
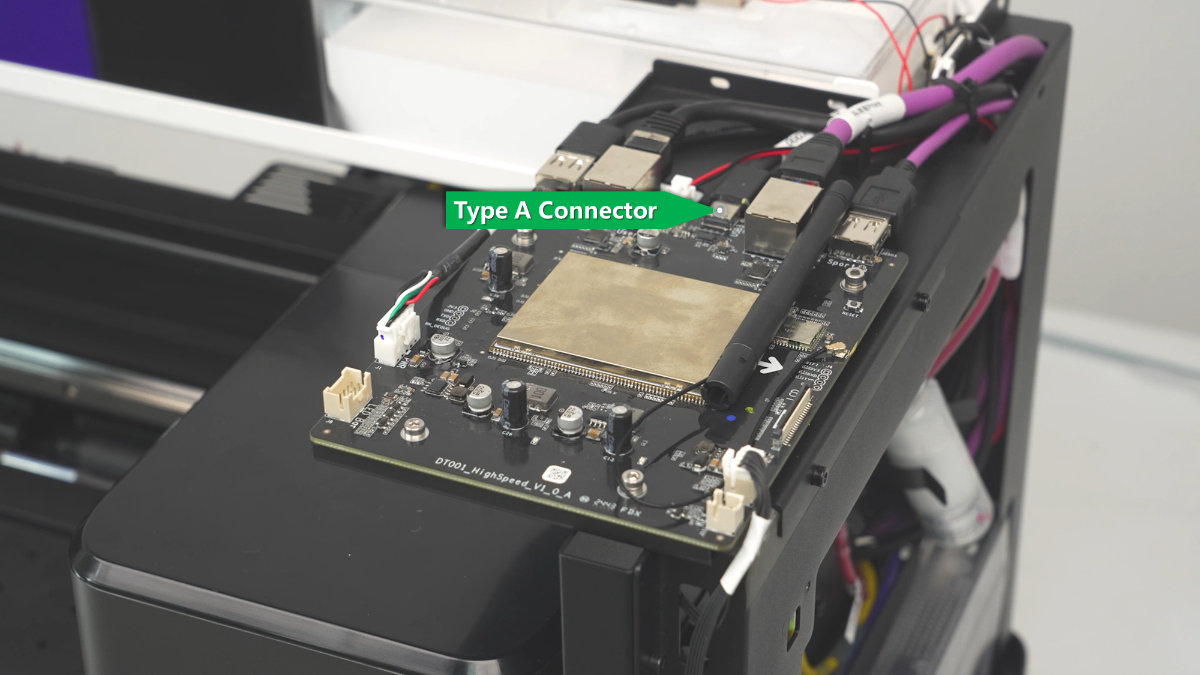
Diagnosis:
- Device Recognized: The printer's internal USB extension cable or external port is glitching. Contact xTool Customer Support for a replacement cable.
- Device NOT Recognized: The High-speed PCB is likely experiencing failure. Contact xTool Customer Support for a replacement.
If the problem persists
Should the issue persist after completing the preceding steps, please submit a ticket via the "Submit a Ticket" button in the "Help Ticket" section below. The standard response time is one business day.
Please include the following details to facilitate a quick diagnosis:
1 Work Log Files
Please export the logs twice (Before and after the cable swap in Step 3).
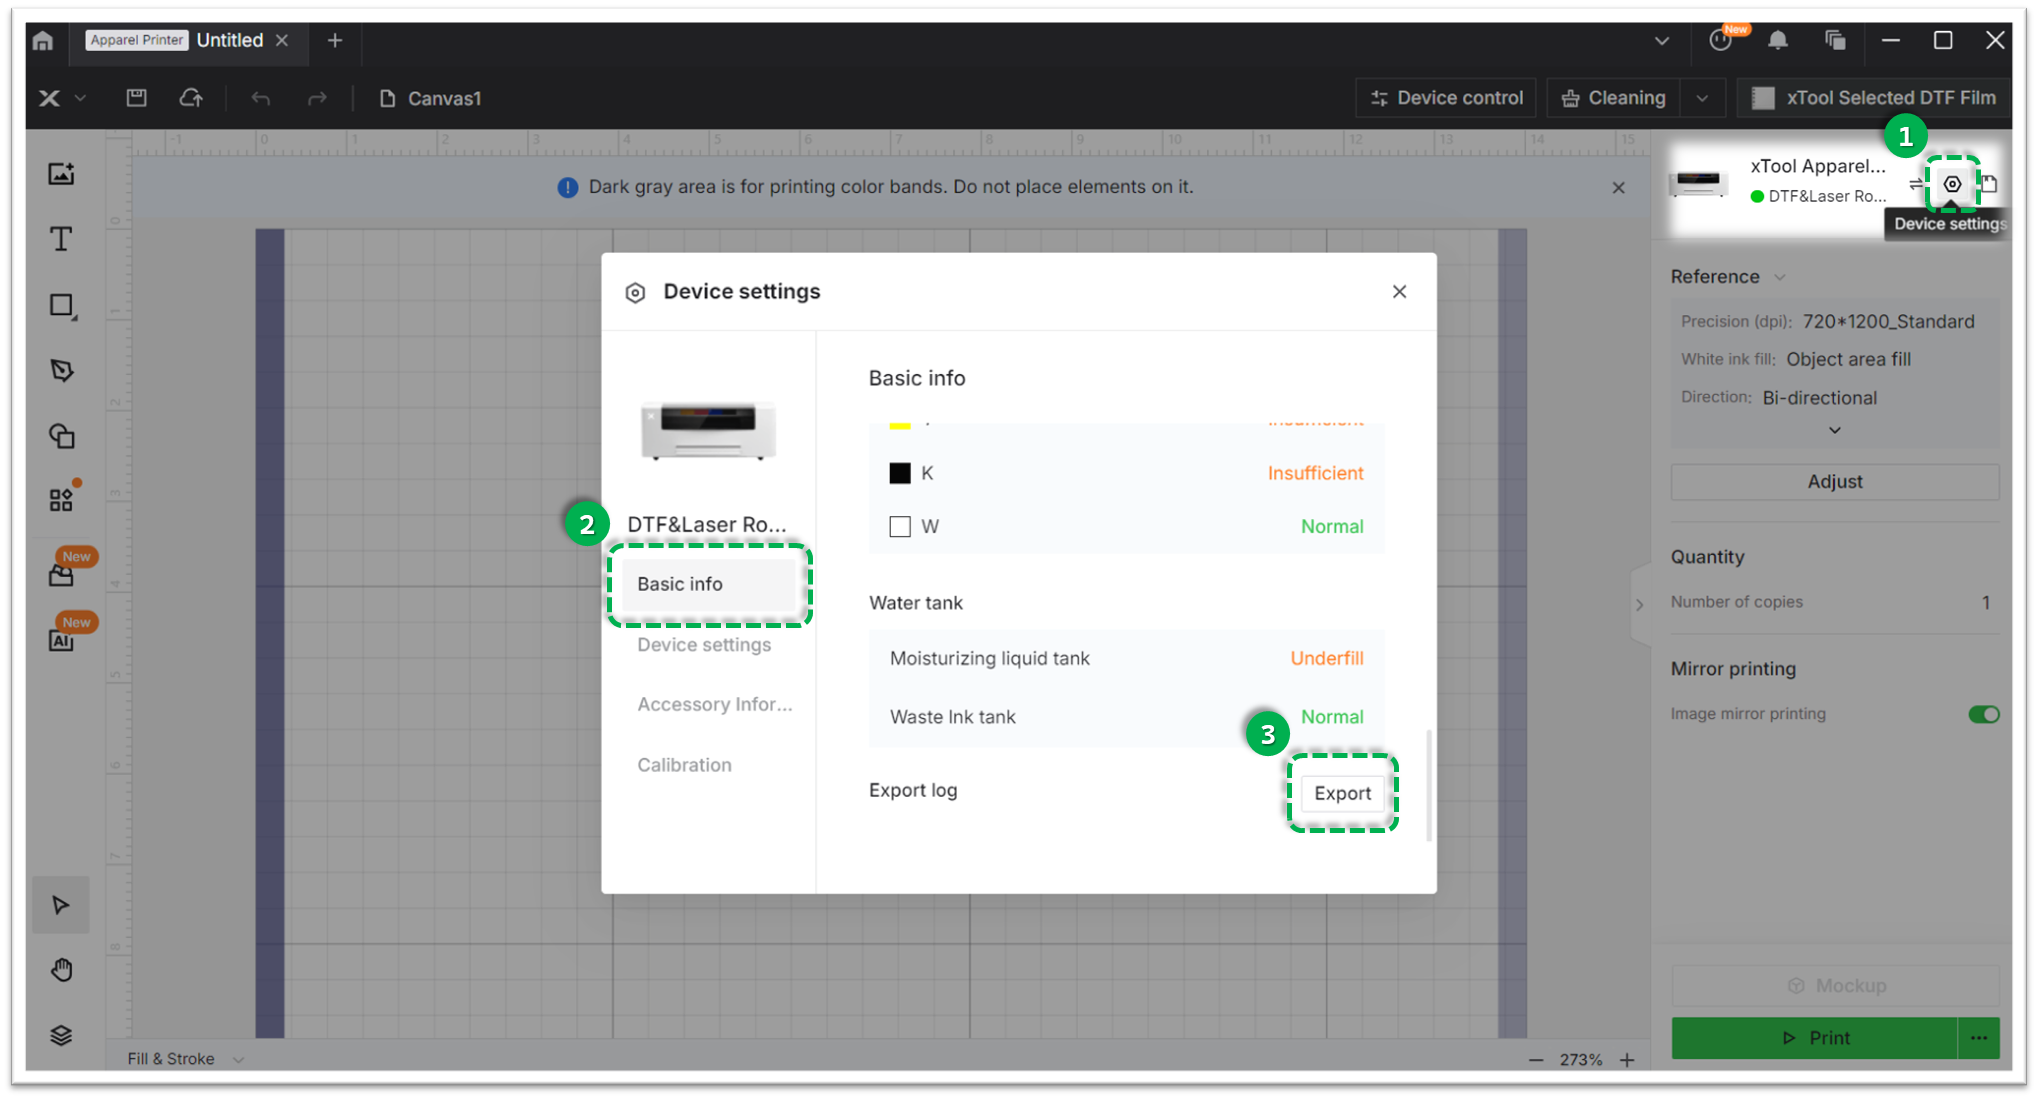
- Method A: Via xTool Creative Space (XCS)
Settings (gear icon) > Basic info > Export log.- Compress the folder into a .zip file.
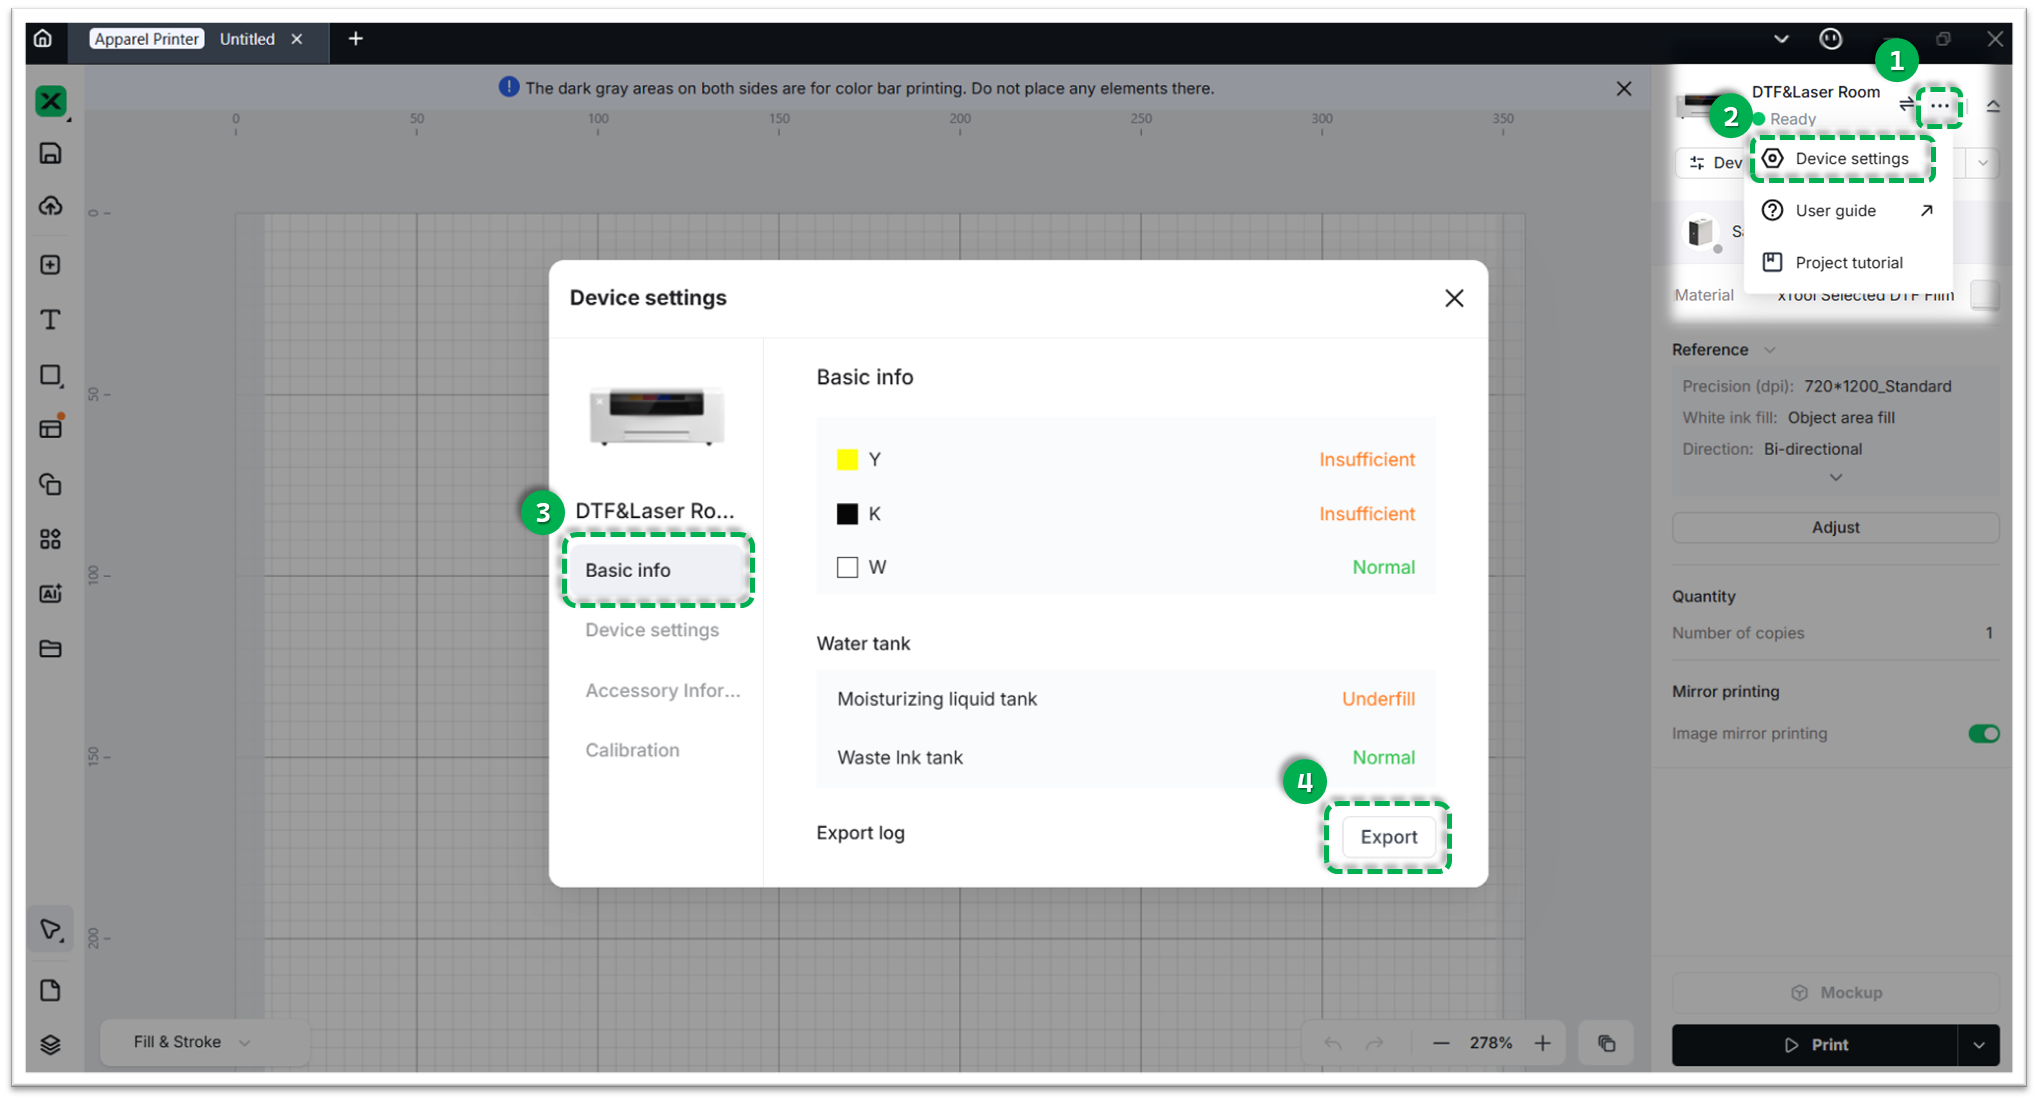
- Method B: Via xTool Studio
Three dots icon > Device Settings > Basic info > Export log.- Compress the folder into a .zip file.
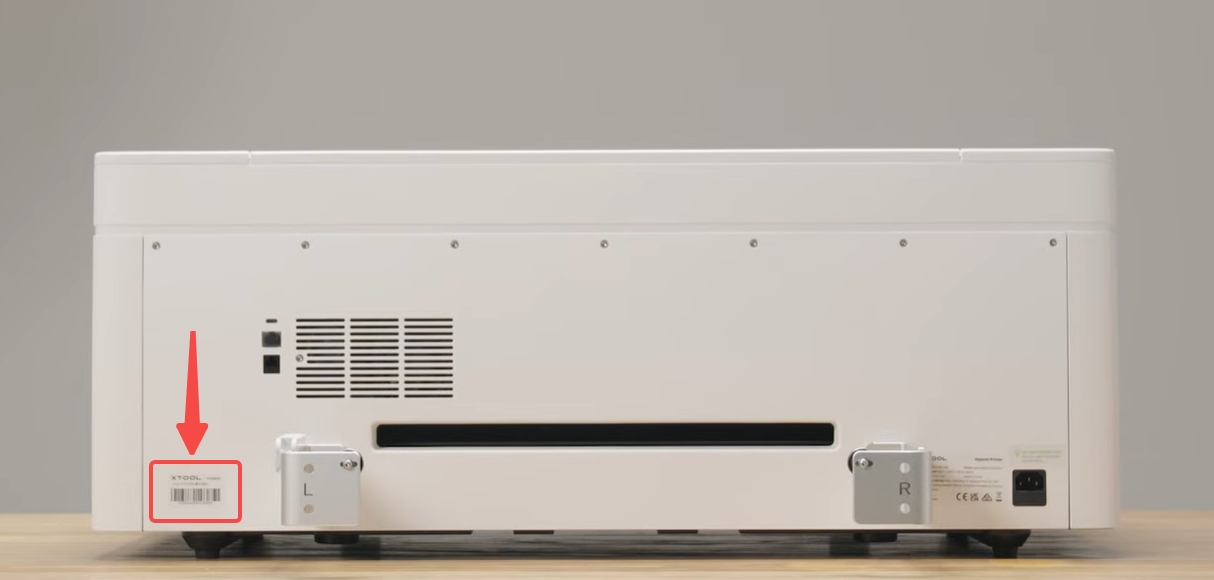
2 Device Information
- Serial Number (SN): Located on the rear panel label.
3 Visual Evidence
- Photos or videos of your troubleshooting steps (e.g., the direct connection test, Device Manager screenshots) are highly helpful for faster diagnosis.
- Report the results of each step you attempted.
Documentation feedback
Help improve this content by providing feedback. If this content did not meet your requirements, select "No" in the "Was this page helpful?" section below. Include specific details about what was unclear or missing in the pop-up suggestion box. Feedback submissions are reviewed by xTool technical writers to enhance future documentation.
Services & Help
Learn & Education

Copyright © 2025 xTool All Rights Reserved.