Issue description
During a processing task, the laser module moves normally as directed by the software, and the CO₂ laser tube emits a visible glow. However, no laser beam exits the air nozzle, and no laser reaches the material. After the task completes, the material shows no engraving or cutting marks.
- Consult this section for troubleshooting.
Glossary of terms
To better understand the troubleshooting steps, the following terms and their functions are referenced in this guide.
Term | Function |
|---|---|
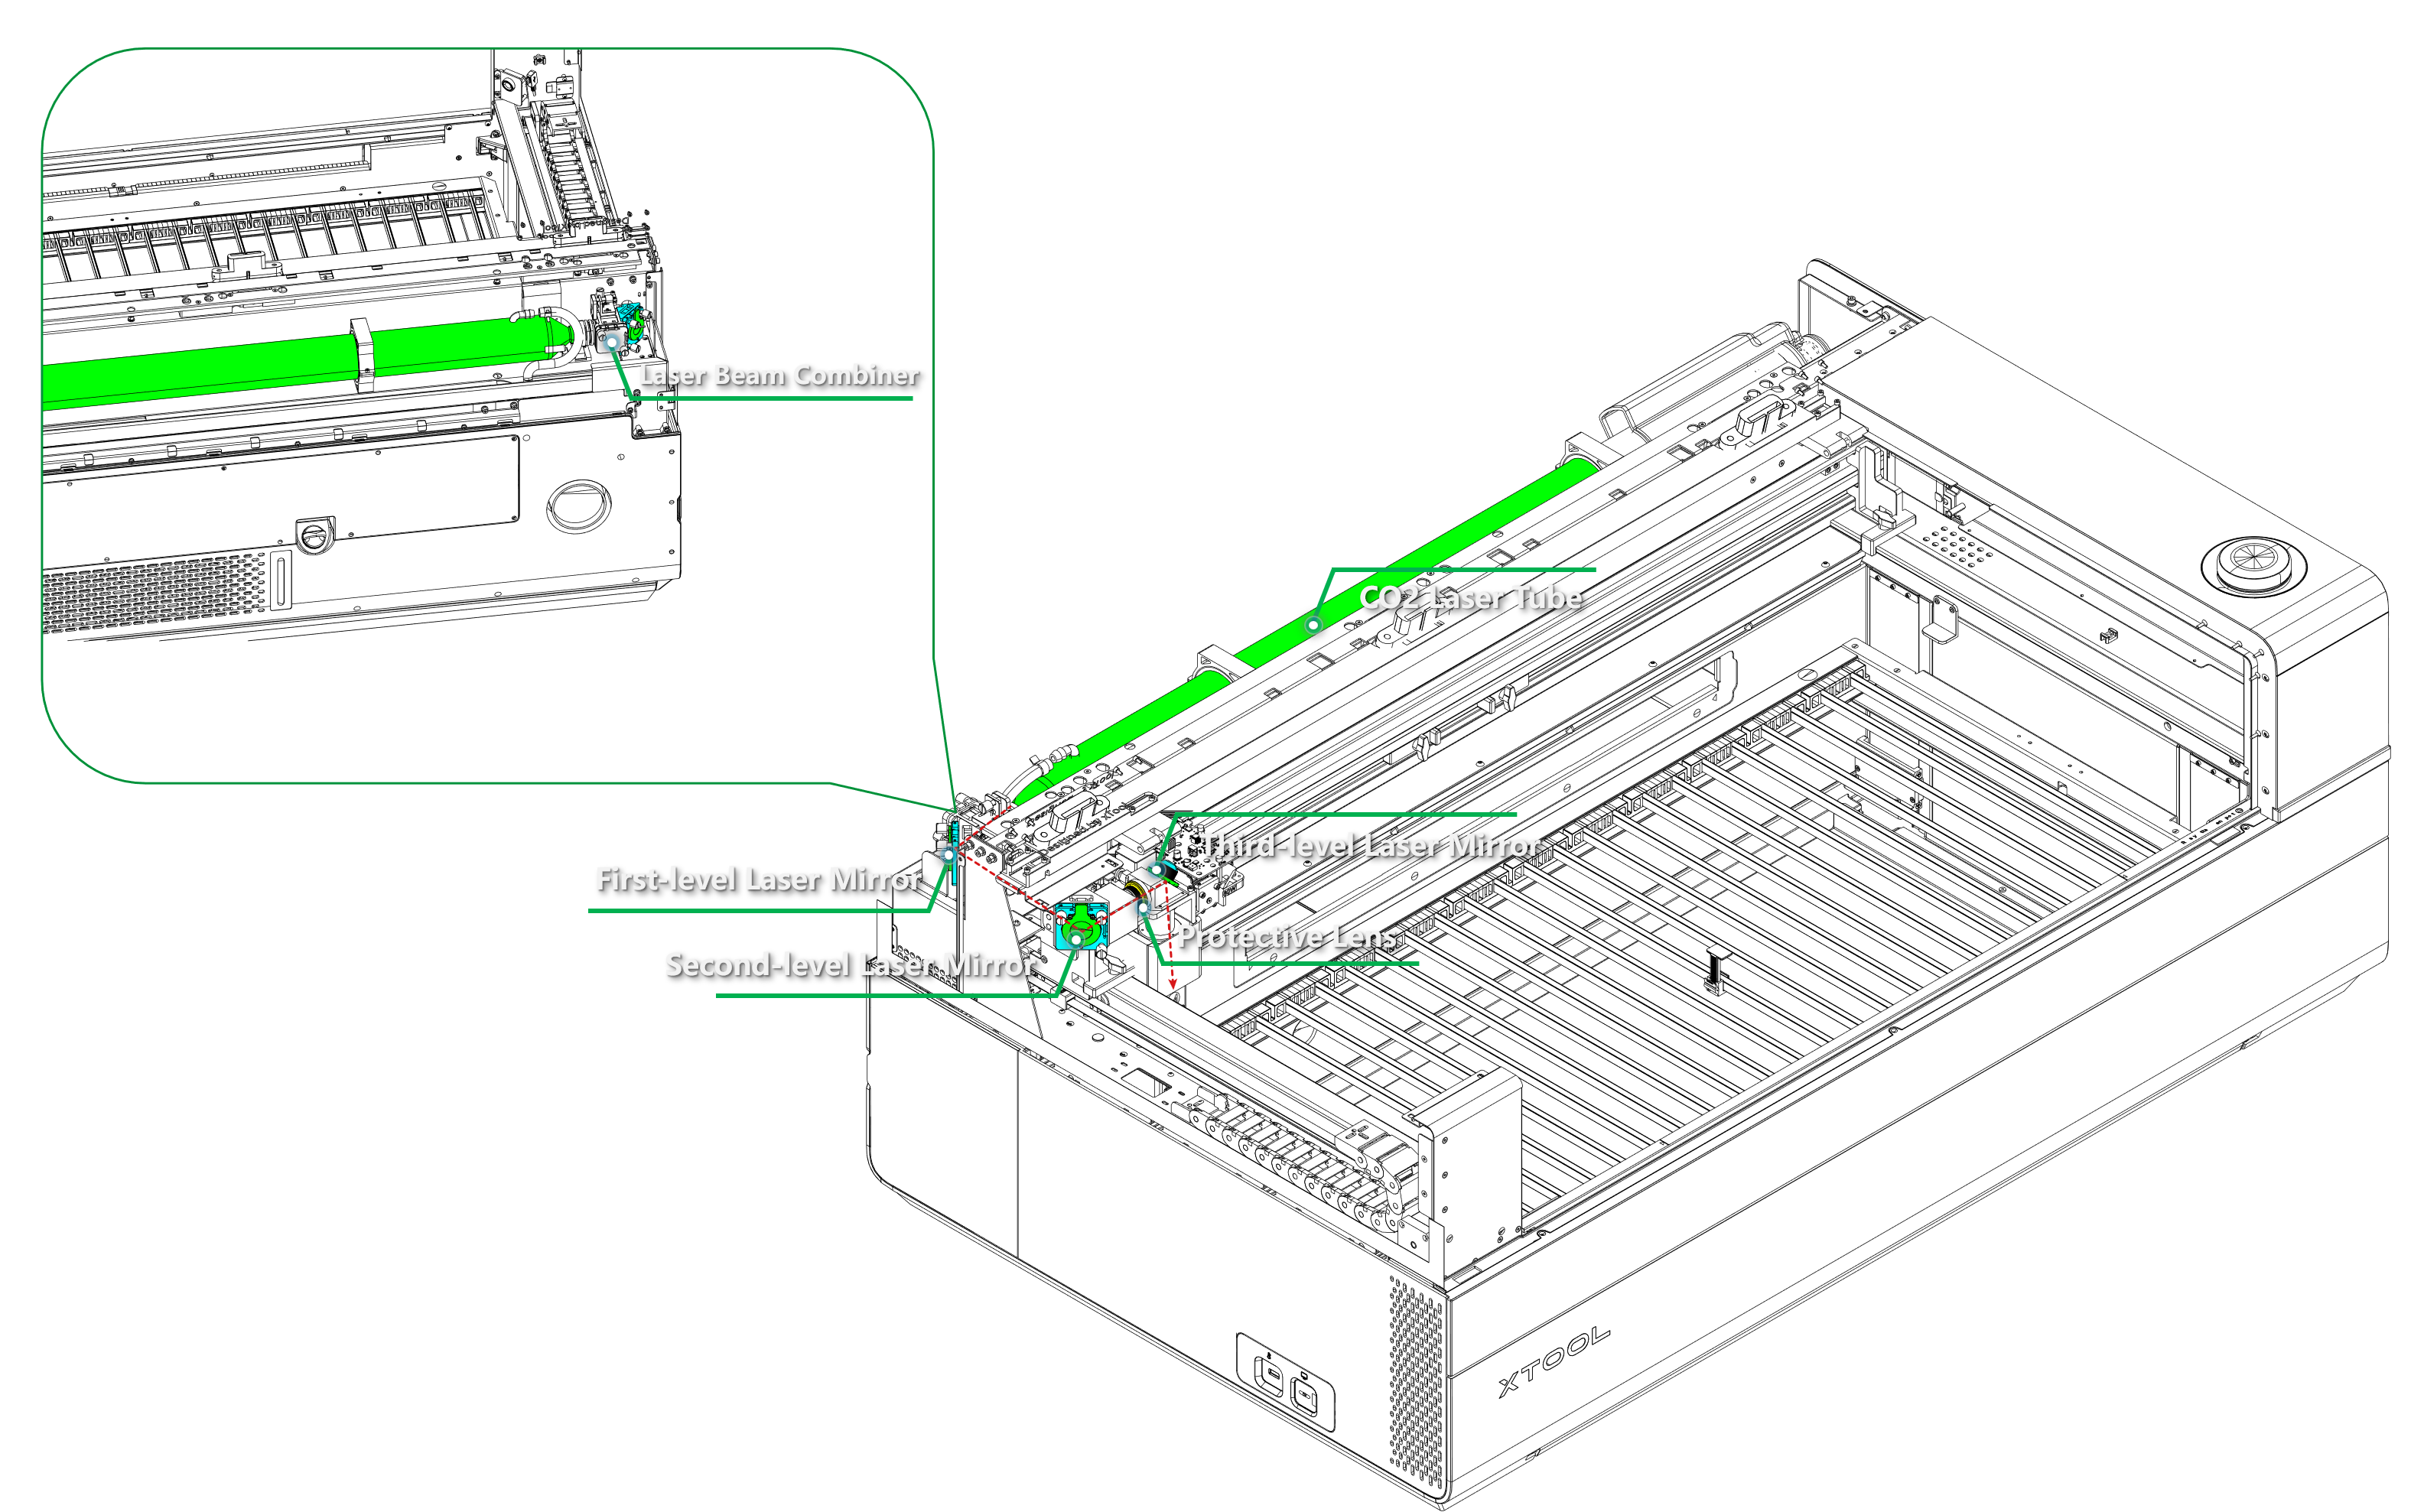
Laser Beam Combiner | Focuses and combines CO₂ laser beams from the laser tube, directing them to the first-level laser mirror. |
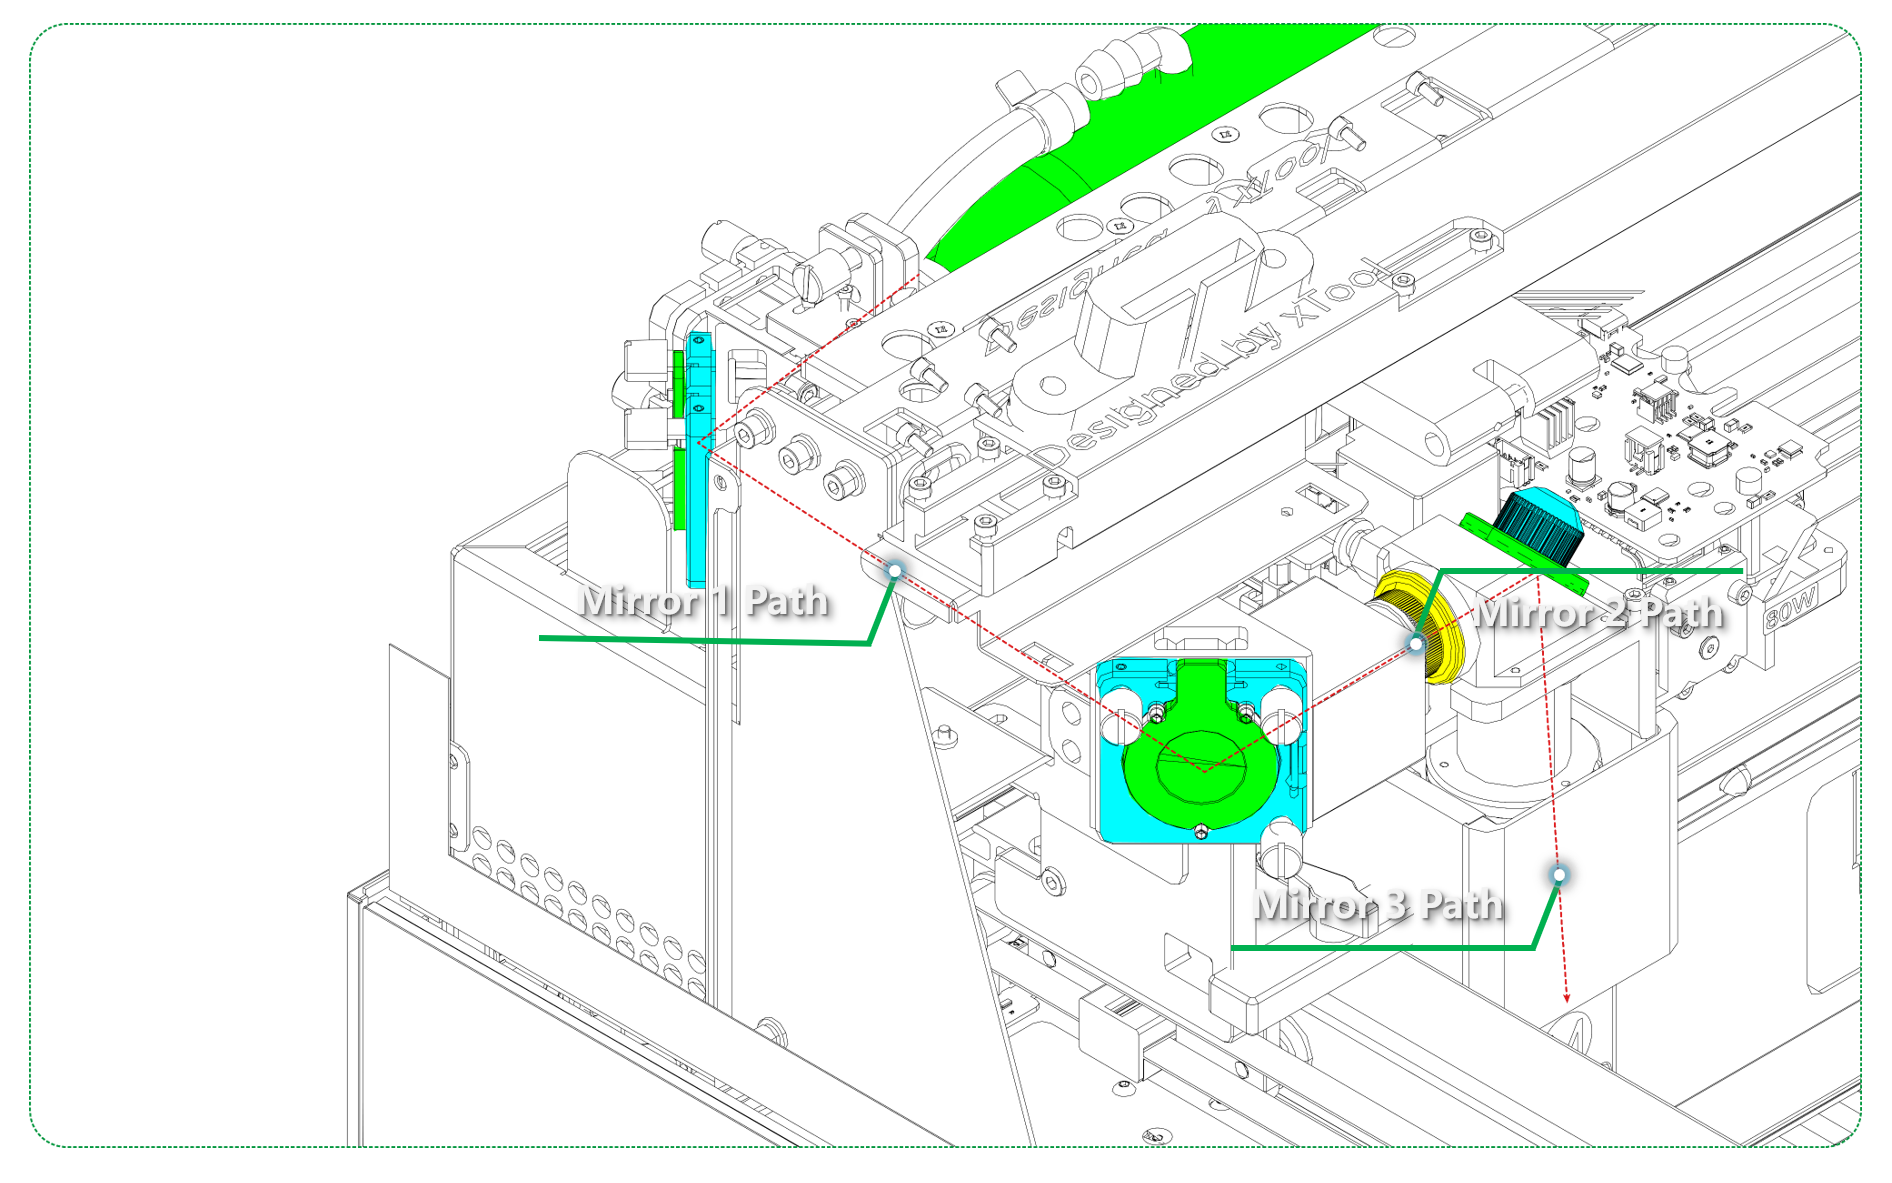
Laser Mirror | Reflects the laser beam along the optical path, forming three segments of the laser path (Mirror 1 Path / Mirror 2 Path / Mirror 3 Path). xTool P3 has three mirrors that create the path for the laser:
|
Protective Lens | Located on the left surface of the laser module, it protects the internal focus lens from smoke and debris. |
Focus Lens | Located inside the laser module, it refocuses the laser beam onto the surface of the material after multiple optical path reflections |
Potential causes
- The power setting is too low.
- The design file has large blank areas at the start.
- The optical (laser) path is misaligned.
- protective lens, laser mirror, or the focus lens is dirty, damaged, or misaligned.
- The laser tube is malfunctioning (even if it glows).
- The air nozzle is blocked.
Troubleshooting procedures
Step 1: Check power settings
Power Level Verification:
- Minimum threshold: If the power is too low, the laser tube may not generate visible laser output.
- Age-related changes: With extended use, the minimum power required for laser output may gradually increase (typically within 15%).
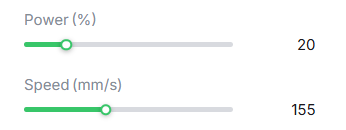
- Recommended action: Increase power to 20% or higher and test again.
Power Setting Access:
- Click to select your design in the canvas.
- Locate power settings in your xTool Studio project parameters.
- Ensure both laser power and processing speed are appropriate for your material.
Step 2: Check file processing issues
Image Content Analysis:
- When processing blank or near-white areas of images, the laser may not fire.
- If the starting processing area contains large blank regions (refer to the image below), it may appear as if no laser output is occurring.
- Recommended action: Use a test file with high-contrast, dark areas to verify laser functionality.

Step 3: Check laser tube functionality
This step verifies if the laser tube is generating a beam, even if it's not reaching the material.
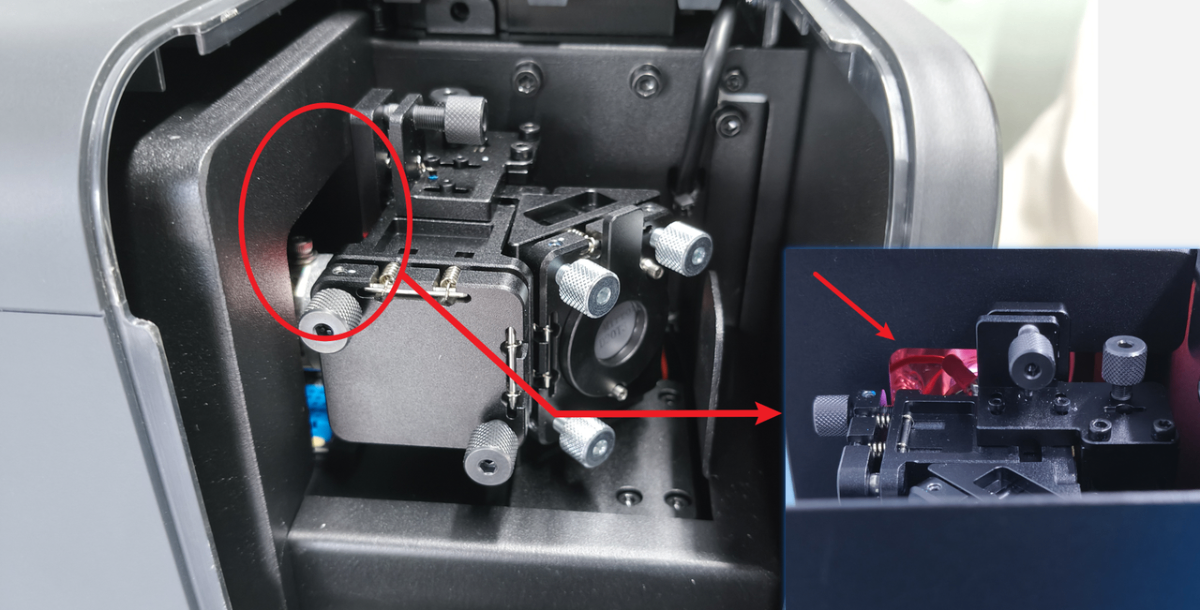
Direct Laser Tube Inspection:
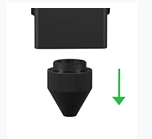
- Remove the cover from above the first-level mirror mount.
- Start a processing task with the power set to 50% or higher for testing.
- Observe through the gap at the first-level mirror location to see if the laser tube emits light.
Results Interpretation:
- Laser tube emits light: The laser tube is functioning. Proceed to the next troubleshooting step.
- Laser tube does not emit light: Refer to the troubleshooting guide: xTool P3 Laser Tube Won't Light Up.
- Laser tube emits only a faint light: Record a video of this inspection and continue to the “Still experiencing issues?” section below to submit a support ticket to xTool Customer Service.
Step 4: Check air nozzle
⚠️ Safety First: Power off your laser device before performing the inspection in this step.
A blocked air nozzle beneath the laser module can obstruct the laser beam.
Air Nozzle Inspection:
- Remove the air nozzle and inspect the inside for any obstructions, such as accumulated smoke residue or debris.
- Clean the nozzle thoroughly if any buildup is found.
- Run a processing test without the air nozzle installed to check whether the laser beam can exit normally.
Results Analysis:
- Laser beam appears after removing the nozzle: Reinstall the nozzle and test again.
- If the beam disappears again after reinstallation, proceed to the next steps to inspect the mirrors (Step 5) and optical path (Step 8).
- No laser beam even with the nozzle removed:
- The issue is not caused by the air nozzle. Continue troubleshooting.
Step 5: Check laser mirrors
⚠️ Safety First: Power off your laser device before performing the inspection in this step.
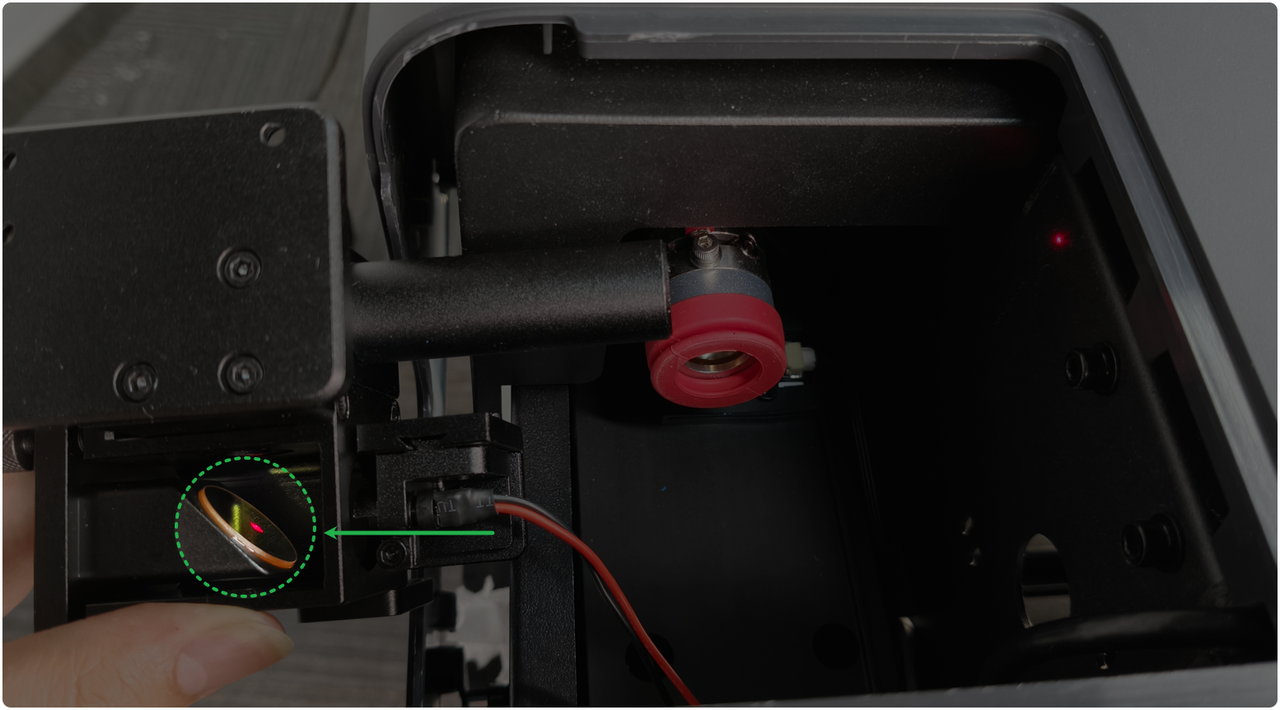
Mirror Inspection Procedure: Check each of the three laser mirrors for damage, debris, or misalignment.
Installation Check:
- If mirrors are tilted or misaligned: Reinstall properly.
- If the mirror has fallen off: Replace the laser mirror.
- If foreign matter is attached: Clean thoroughly.
Cleaning Method:
Tools Required:
- Lint-Free Cloth
- Anhydrous Ethanol
- Use a lint-free cloth.
- Dampen the cloth with anhydrous ethanol.
- Wipe gently to remove all contaminants.
- Ensure mirrors are completely dry before reassembly.
First-level Laser Mirror
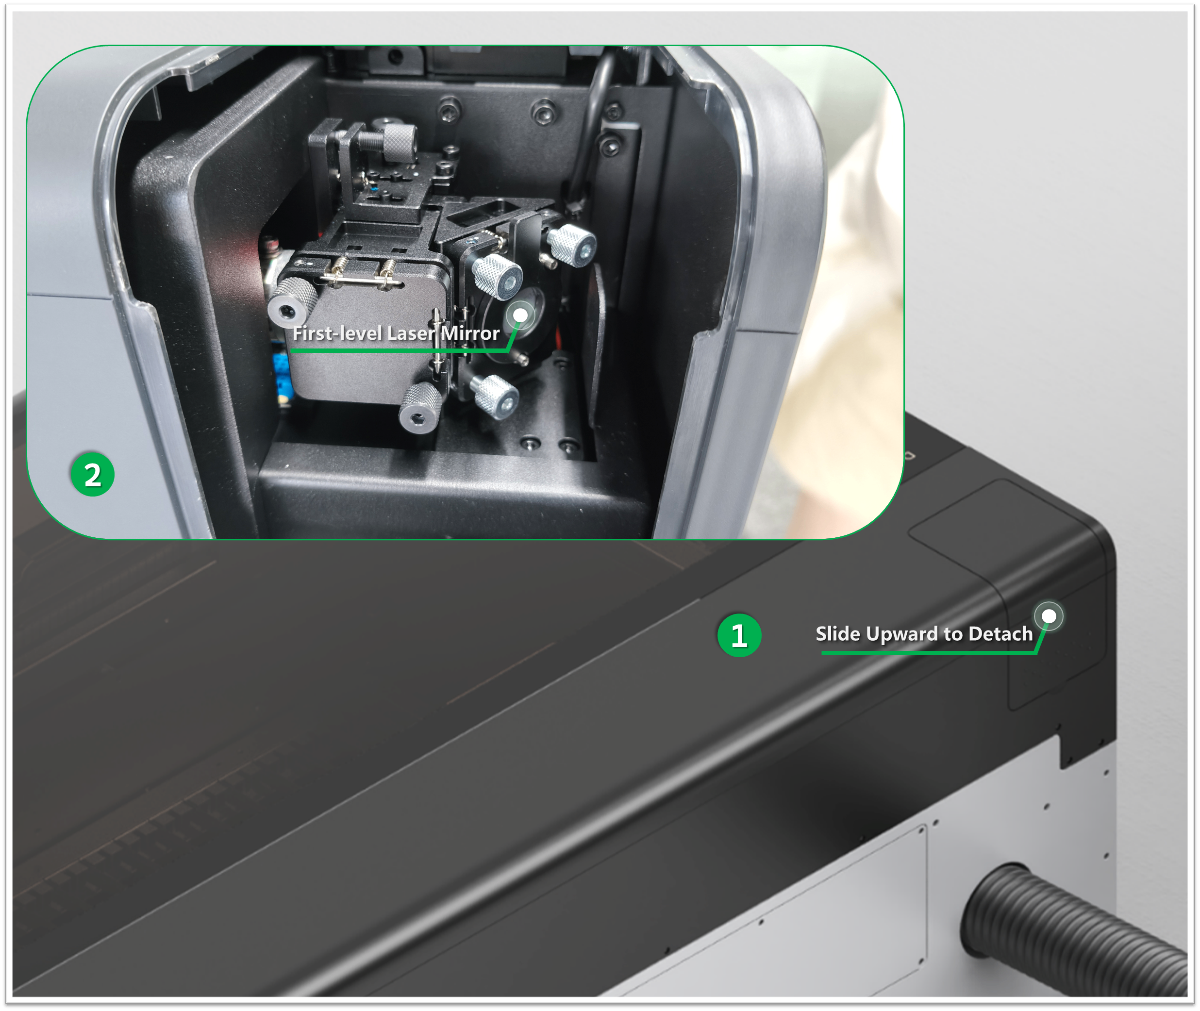
Second-level Laser Mirror
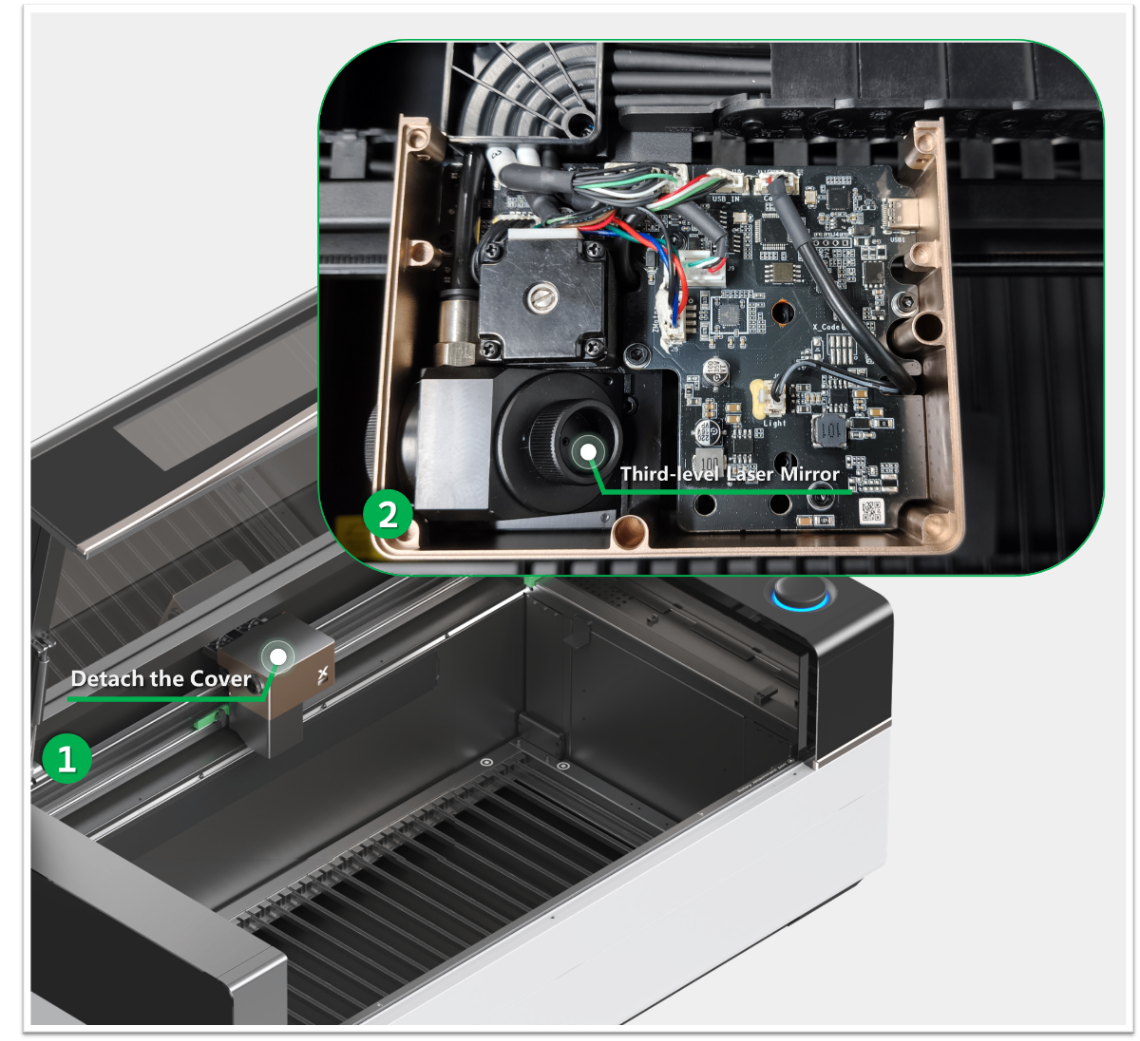
Third-level Laser Mirror
Step 6: Check protective lens
Tools Required:
- Lint-Free Cloth
- Anhydrous Ethanol
- Remove the protective lens by rotating it counterclockwise.
- Inspect the lens for any signs of damage, contamination, or oxidation.
- In most cases, dirt or oxidation on the protective lens reduces laser power but does not completely block the beam.
- A clean, clear lens helps maintain optimal laser transmission.
- For detailed removal and cleaning instructions, refer to: How to Clean Focus Lens, Window Lens, and Laser Mirror of xTool P3
Result Interpretation
- Severe oxidation or visible damage: Replace the protective lens.
- Dust, residue, or surface contamination: Clean the lens using a lint‑free cloth and anhydrous ethanol.
Step 7: Check focus lens
Focus Lens Access:
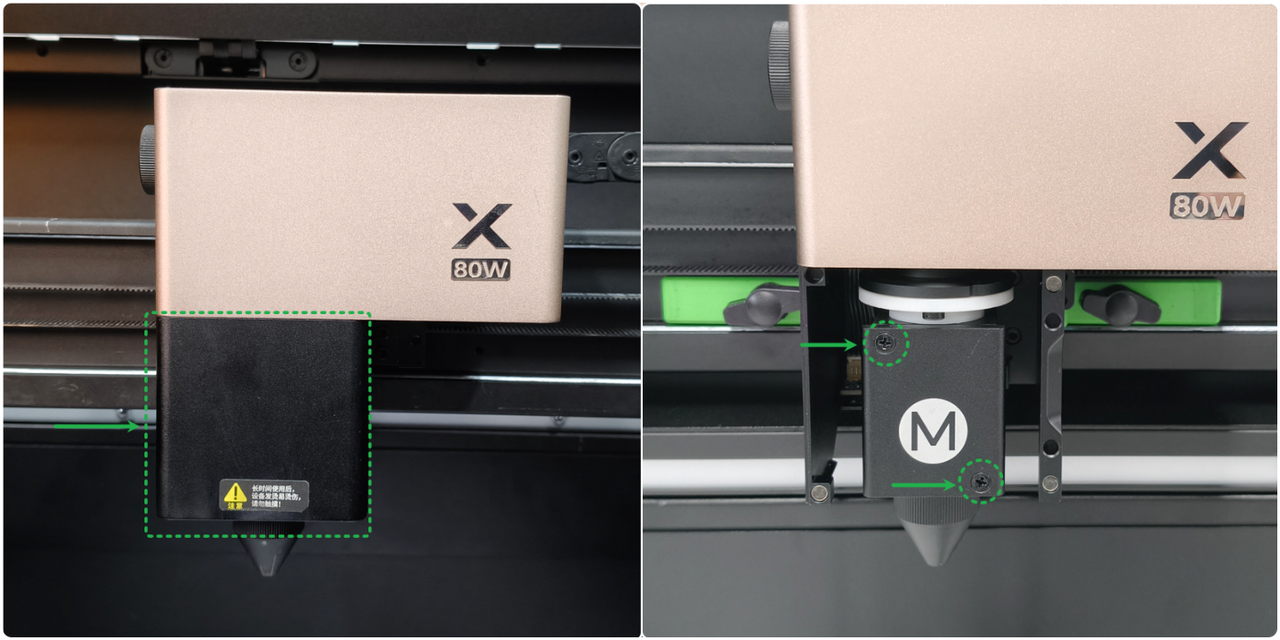
- Remove the magnetic front cover.
- Use a Phillips screwdriver to remove the screws securing the focus‑lens holder.
- Take out the bracket and inspect the focus lens for any signs of damage, contamination, or oxidation.
- In most cases, dirt or oxidation on the focus lens reduces laser power but does not completely block the beam.
- A clean, clear lens helps maintain optimal laser transmission.
- For detailed removal and cleaning instructions, refer to: How to Clean Focus Lens, Window Lens, and Laser Mirror of xTool P3
Result Interpretation
- Cracked or severely oxidized lens: Replace the focus lens.
- Dirty or contaminated lens: Clean the lens before reinstalling.
Step 8: Check optical path alignment
If all components appear clean and undamaged, the laser beam itself may be misaligned.
Access Optical Path Calibration:
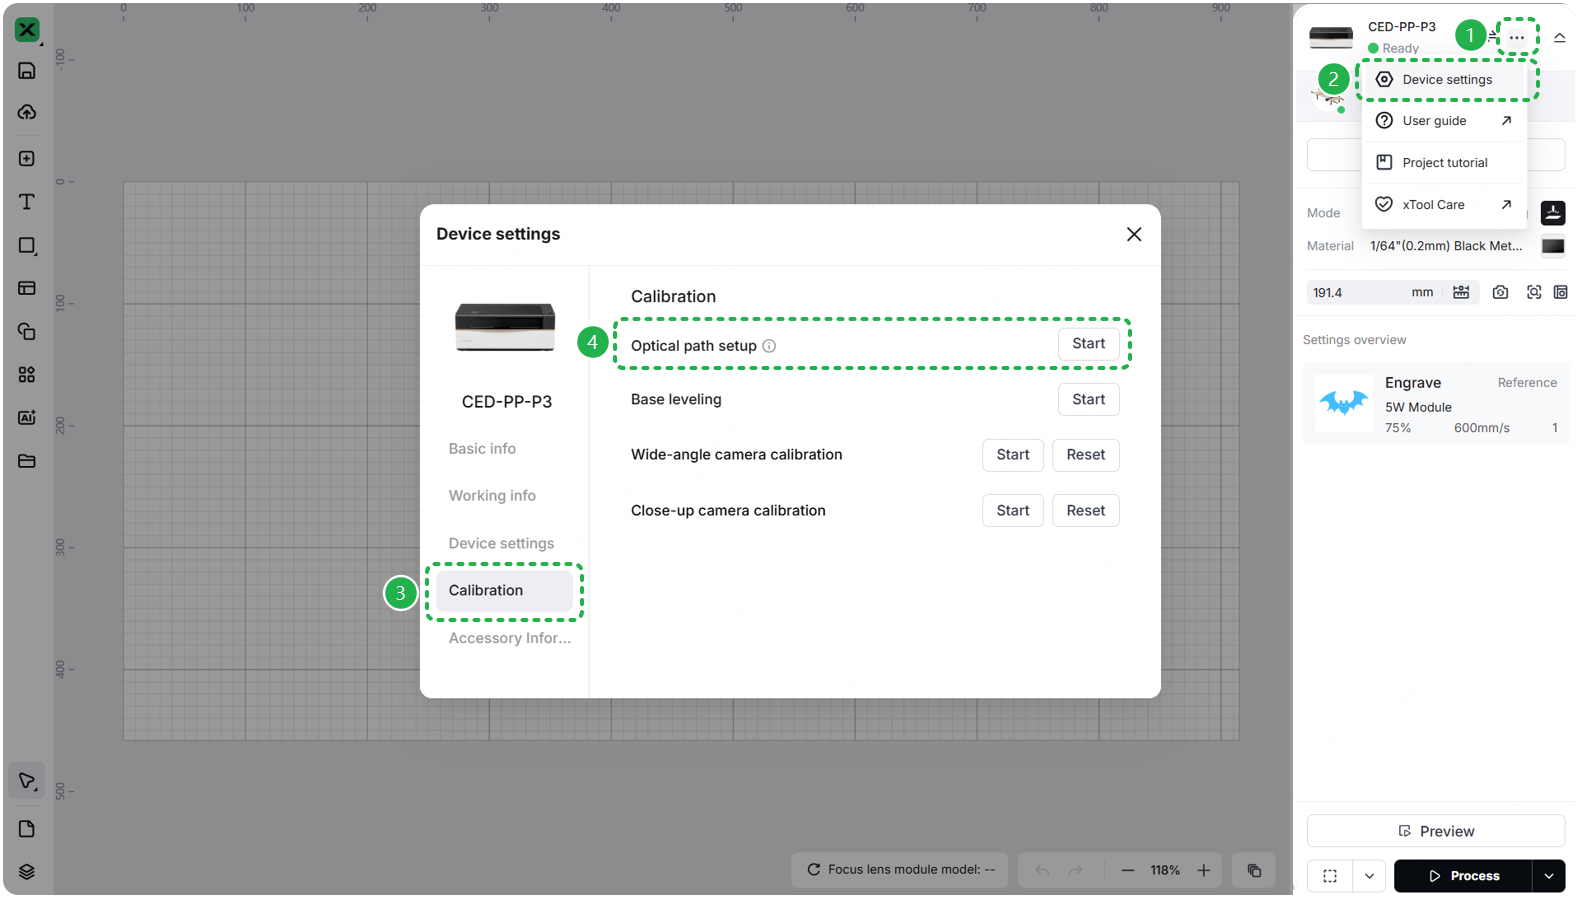
- In xTool Studio, click the three dots icon to the right of the device image > the gear icon labeled "Device settings".
- In the "Device settings" popup, select the "Calibration" tab. Click the "Start" button in the Optical path setup section.
For detailed instructions, refer to: How to Calibrate the Optical Path of xTool P3
Calibration Process:
Follow on-screen instructions for optical path testing.
- If misalignment detected: Complete the calibration procedure.
- If alignment is correct: Proceed to the next step.
Step 9: Check laser beam combiner
- Inspect the beam combiner module to determine whether it is functioning properly.
- For detailed inspection instructions, refer to: How to Clean the Beam Combiner Mirror
Result Interpretation
- Combiner is clean and reflective: Reinstall the beam combiner and perform optical path calibration again.
- Foreign particles or residue present: Clean the beam combiner following the procedures shown in the cleaning tutorial above.
- Severe oxidation or cracks detected: Replace the beam combiner module.
Still experiencing issues?
Should the issue persist after completing the preceding steps, submit a ticket via the "Submit a Ticket" button in the "Help Ticket" section below. The standard response time for xTool Customer Service is one business day.
For a prompt resolution, please include the following details:
- Issue description: A detailed explanation of the observed problem.
- Video evidence: Attach a video demonstrating the issue, where applicable.
- Troubleshooting performed: Any troubleshooting steps you have already attempted, along with their results.
This information is crucial for xTool technical support engineers to provide timely assistance.
Documentation feedback
Help improve this content by providing feedback. If this content did not meet your requirements, select "No" in the "Was this page helpful?" section below. Include specific details about what was unclear or missing in the pop-up suggestion box. Feedback submissions are reviewed by xTool technical writers to enhance future documentation.
