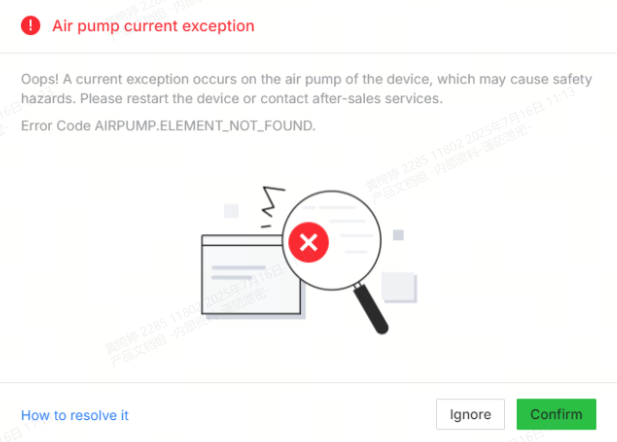
Error code “AIRPUMP.ELEMENT_NOT_FOUND”
Issue description
- If you encounter an error message stating "Air pump current exception" (Error Code: Airpump Element Not Found) while operating your P2S, please refer to this guide for troubleshooting assistance.
Possible causes
- Loose connection of the air pump adapter board cable.
- Damaged or disconnected pins on the air pump adapter board cable.
- Loose connection of the air pump cable on the UI board.
- Damaged socket for the air pump connection on the UI board.
Troubleshooting
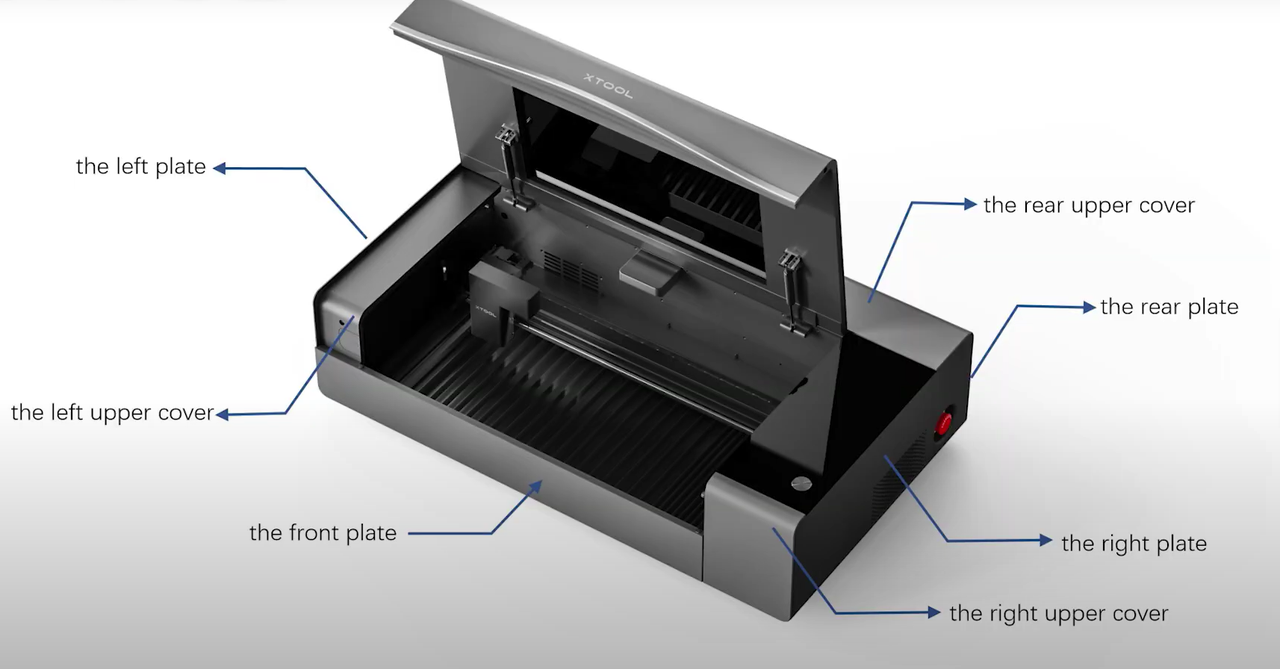
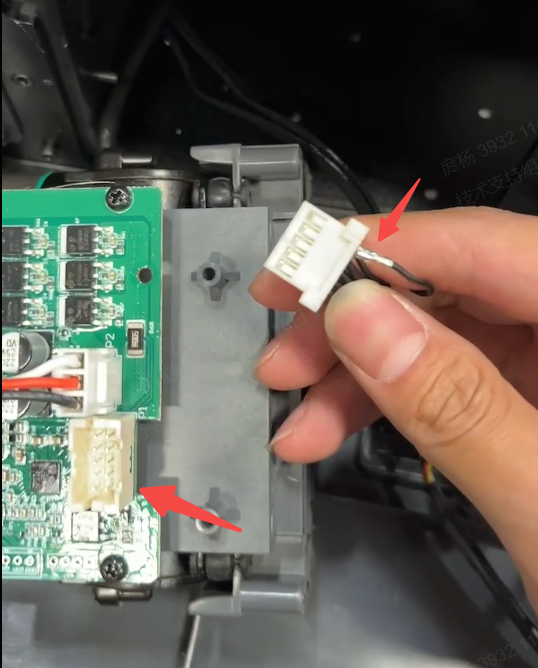
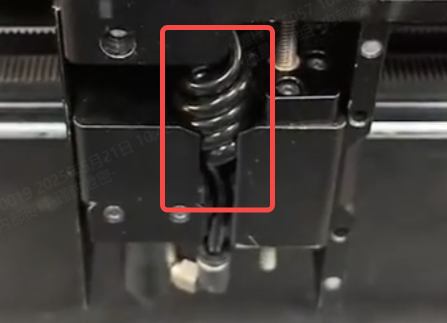
#1 Check the air pump cable
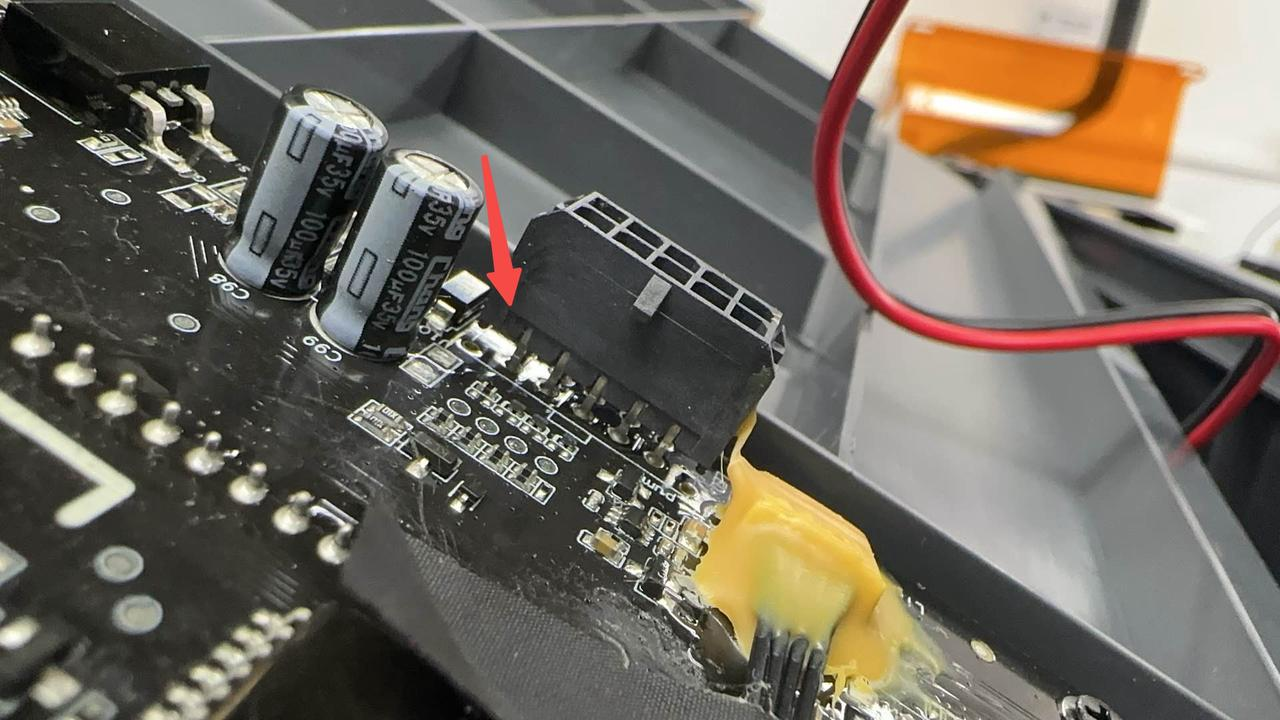
- Inspect if the air pump connection cable is loosely seated on its adapter board socket (refer to the image below). Follow this video tutorial to remove the right plate: Assemble & Disassemble the Right Plate for P2S
Check the connection cable on the UI board and air pump adapter board to see whether the socket is loose or the pins on the connection cable are disconnected.
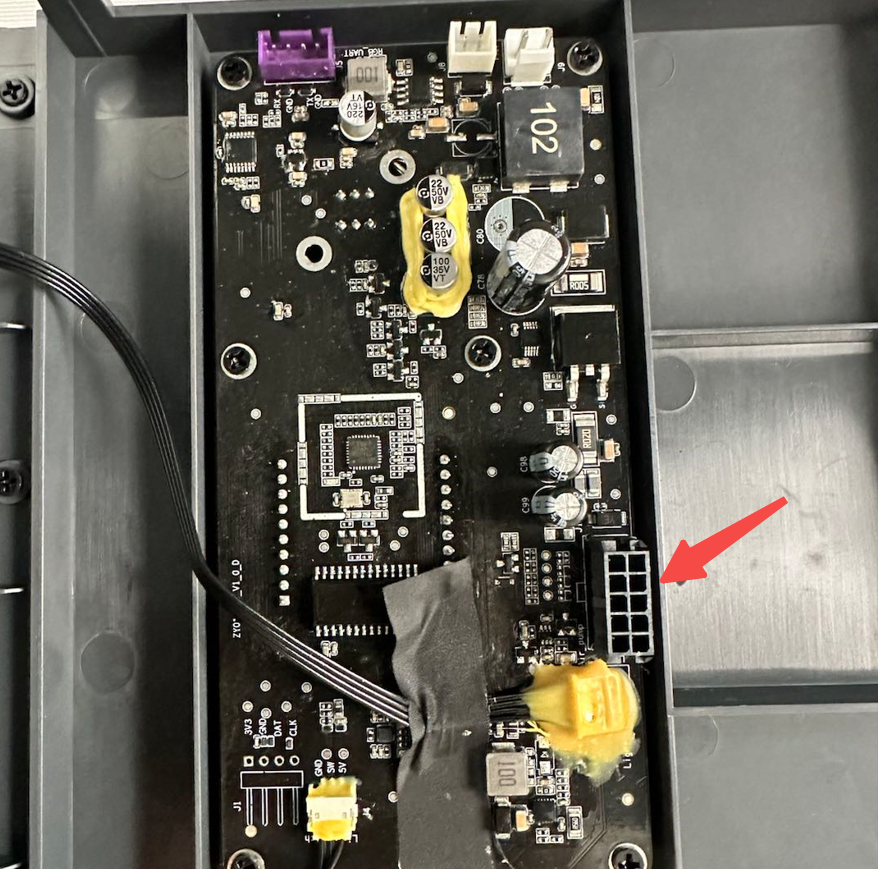
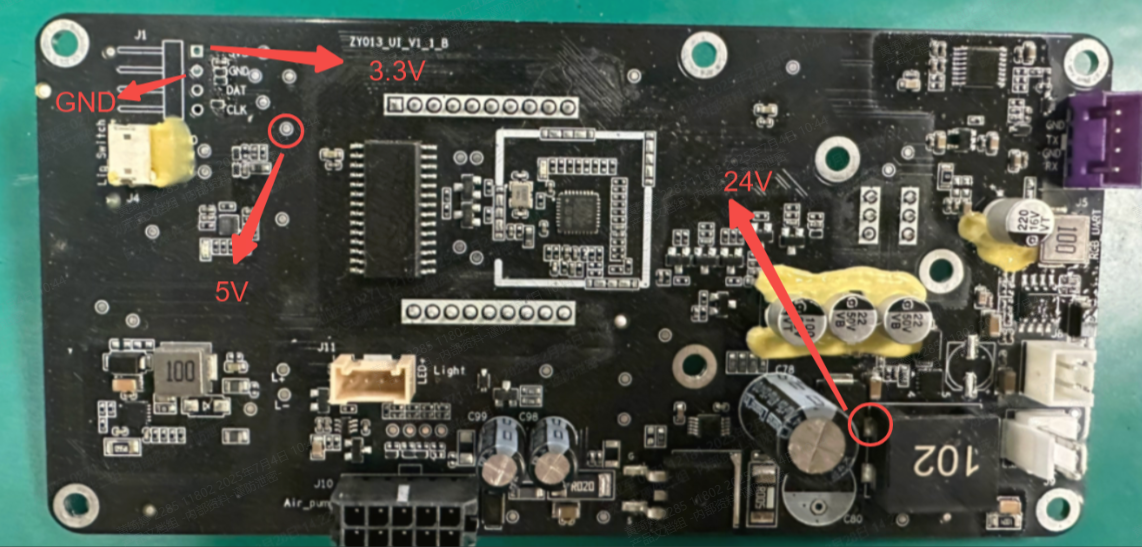
#2 Measure the voltage on the UI board
If both the UI board and the air pump adapter board are functioning normally, unplug and replug the connection cable on the UI, then measure whether the output voltage at the UI board is 24 V. If not, it indicates that the UI board may have a problem and needs to be replaced. Measure the voltage on the UI board as follows:
Step 1 Check whether each connector on the UI board is short-circuited
- Disconnect the power supply of the device.
- Set a multimeter to the on-off mode.
- Connect one end of the multimeter to the GND position, and connect the other end to the 24V, 5V, and 3.3V connectors respectively.
4. Fill the result in the chart.
Connector | Whether it is short-circuited or not |
24V connector |
|
5V connector |
|
3.3V connector |
|
Step 2 Measure the actual voltage of each connector
1. Unplug the ports on J10.
2. Turn on the power switch of the device.
3. Use a multimeter to measure the actual voltage value of 24V, 5V, and 3.3V connectors.
4. Fill the result in the chart.
Connector | Actual voltage value |
24V connector |
|
5V connector |
|
3.3V connector |
|
Step 3 Measure the actual voltage of all ports on J10
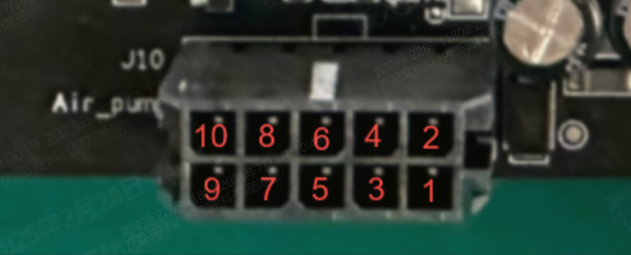
1. Unplug the ports on J10.
2. Use a multimeter to measure the actual voltage value of all ports on J10.
3. Fill the result in the chart. ("/" means no measurement)
Port 10: / | Port 8: | Port 6: / | Port 4: | Port 2: |
Port 9: / | Port 7: | Port 5: | Port 3: | Port 1: |
The following chart is the normal voltage for reference.
Port 10: / | Port 8: GND | Port 6: / | Port 4: GND | Port 2: 24V |
Port 9: / | Port 7: GND | Port 5: 3.3V | Port 3: GND | Port 1: 24V |
4. Send the results to the after-sales service.
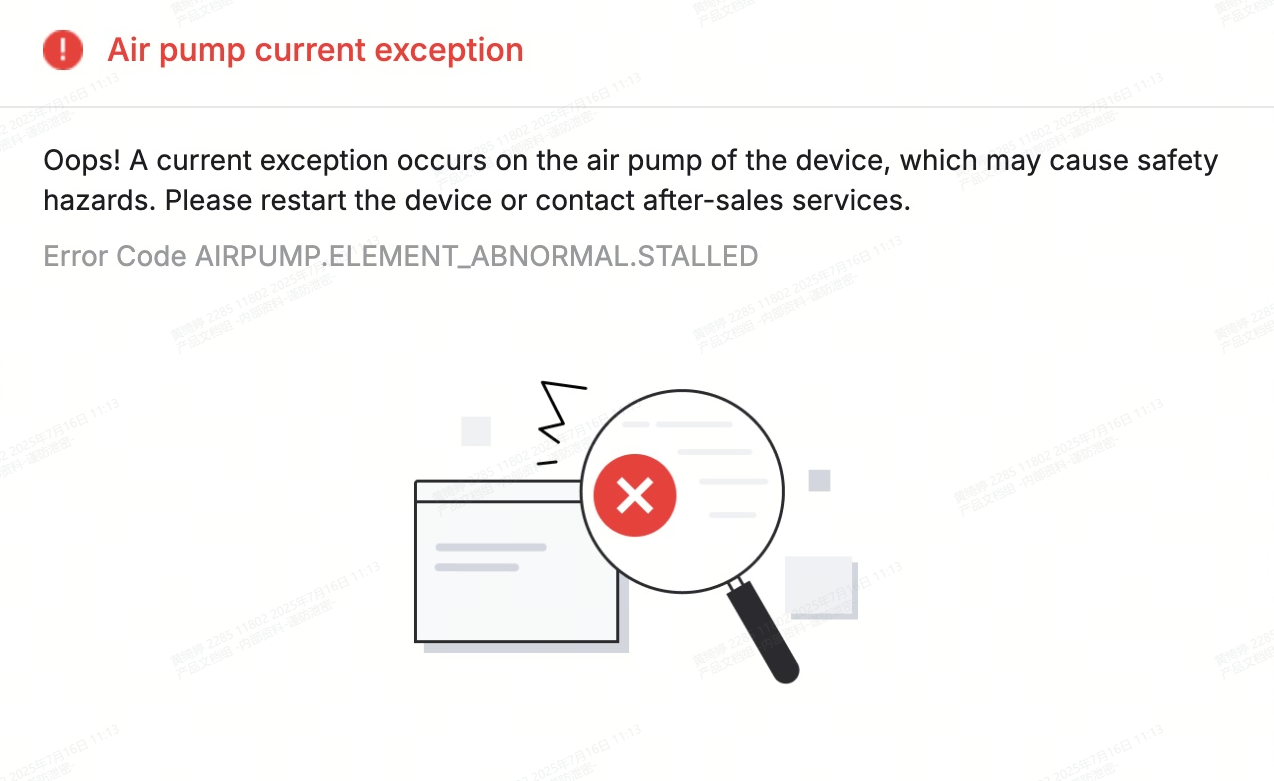
Error code “AIRPUMP.ELEMENT_ABNORMAL.STALLED”
Issue description
If you encounter an error message stating "Air pump current exception" (Error Code: Airpump Element Abnormal Stalled) while operating your P2S, please refer to this guide for troubleshooting assistance.
Possible causes
- Nozzle contacting materials causes abnormal distance measurement.
- Nozzle of air pipe is blocked.
Troubleshooting
#1 Adjust focusing
Check whether the air nozzle touches the processed material during the machining process. The operation method is as follows:
- Place a 3 mm basswood board in the device.
- Measure the distance between nozzle and board. If it is less than 3 mm, you can manually adjust the value to exceed 3 mm.
This adjustment is to prevent the nozzle from rubbing against the material and clogging due to insufficient distance.
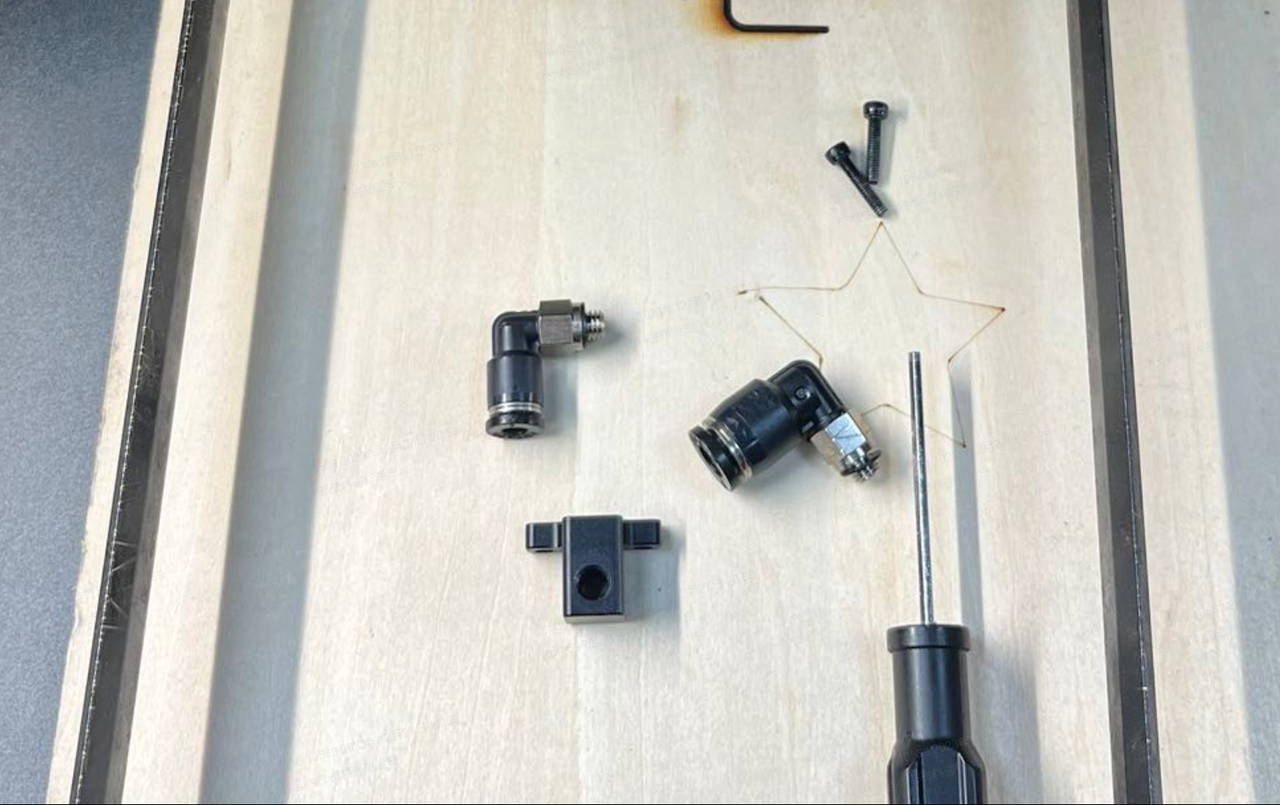
#2 Clean the air pump components
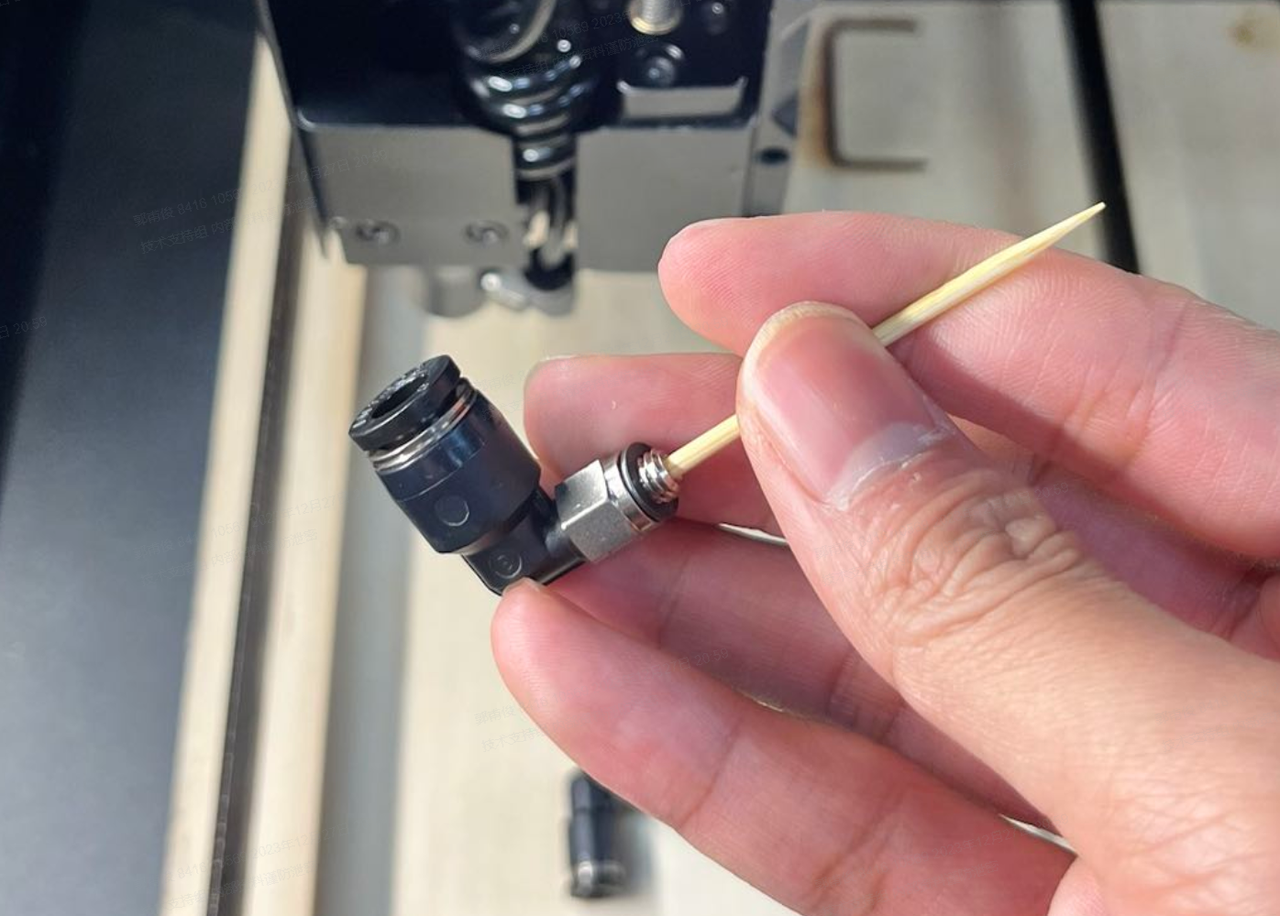
Clear the air tube connectors
- Press down the connector of the air tube and detach it from the laser module (highlighted in red 1 in picture below).
- Next, remove the two screws (indicated as 2 in picture below) with a 2.0mm hex screwdriver to uninstall two air tube connectors.
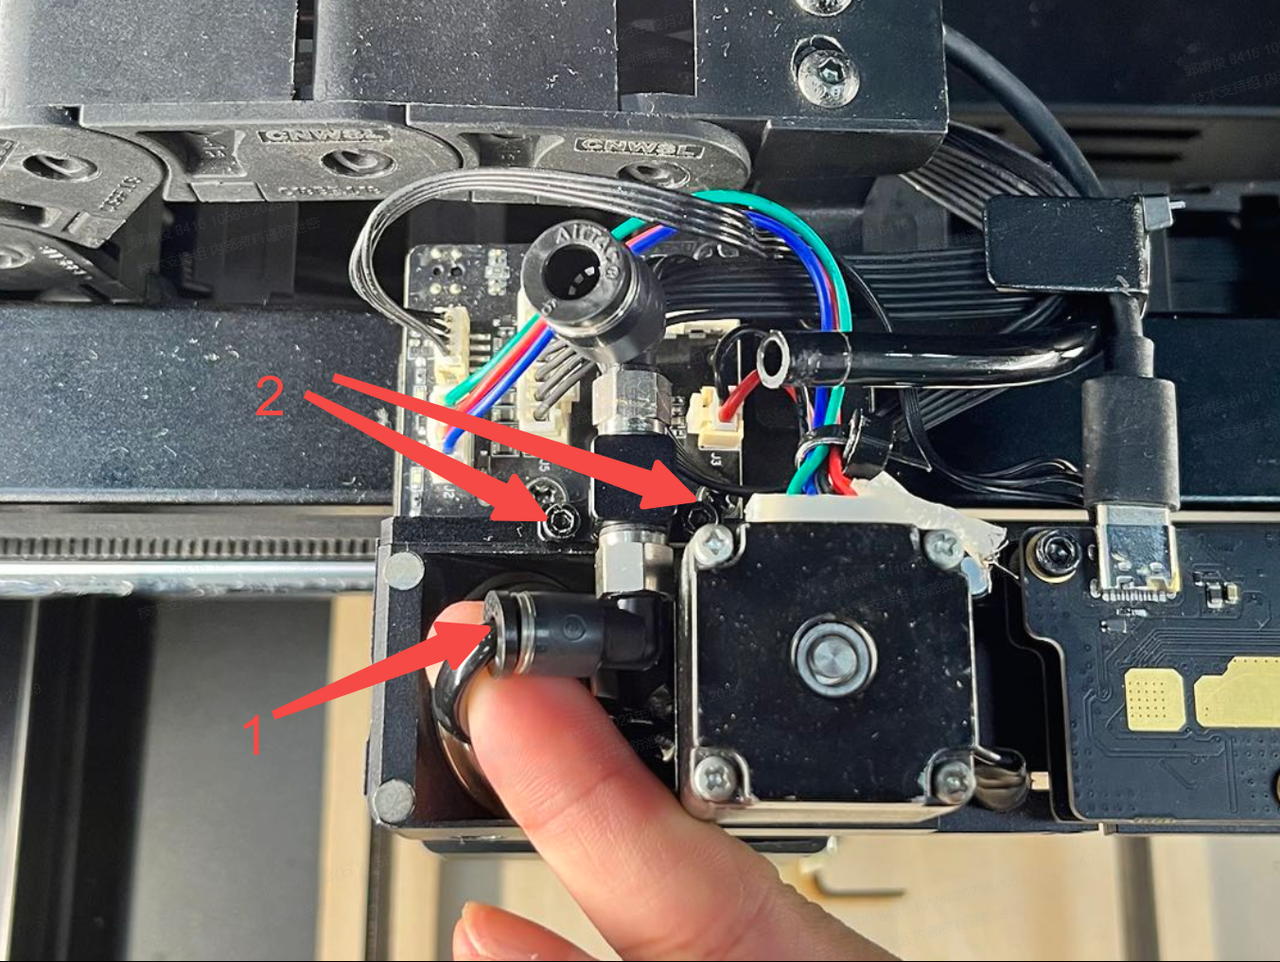
- Clear the inside of the air tube connectors with a toothpick or similar tool before reinstalling them.
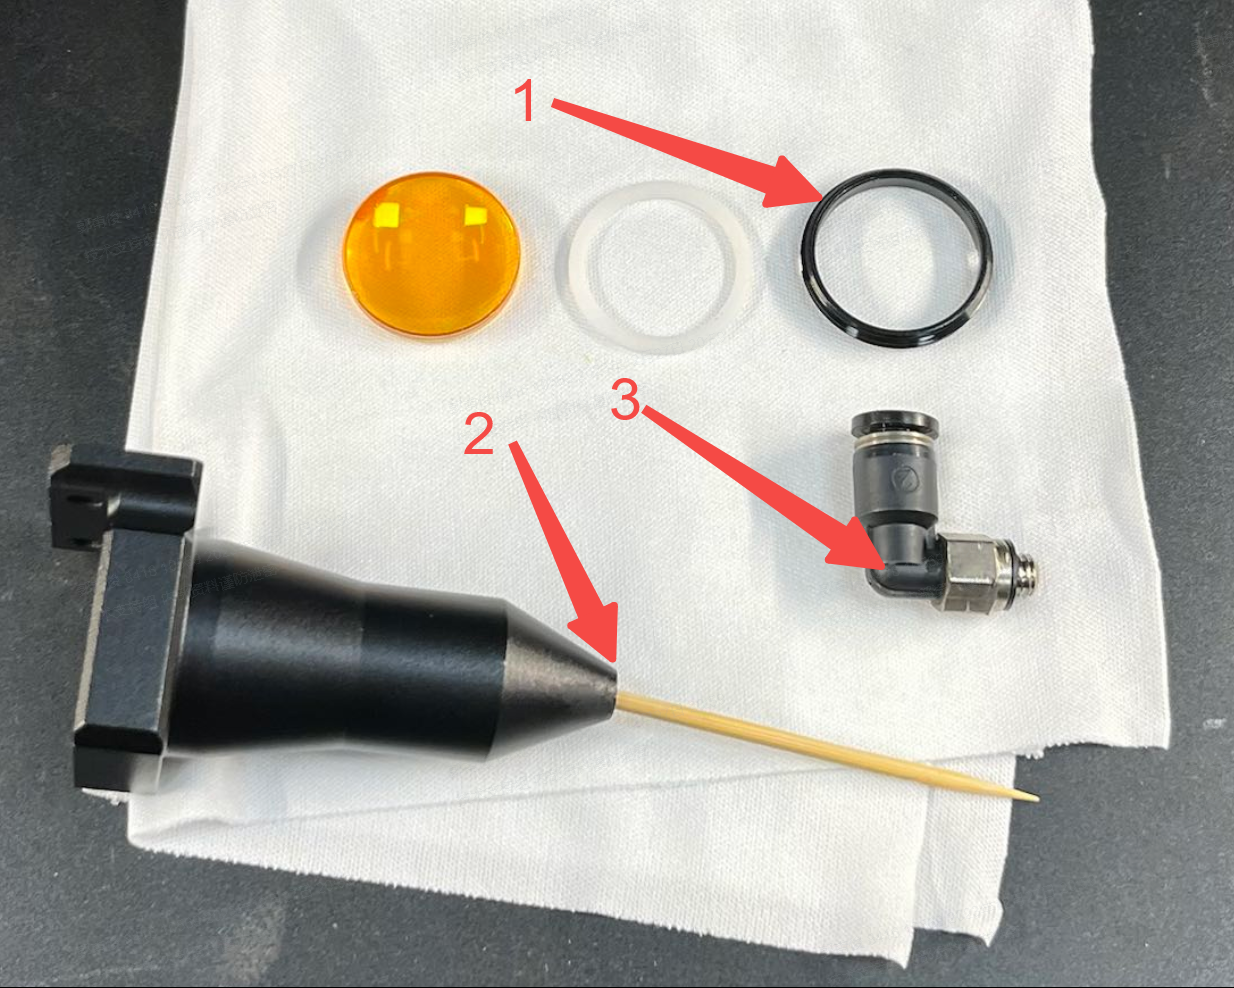
Clear the laser outlet and air tube connector
- Turn the black retaining ring counterclockwise to remove it (indicated as 1 in the picture below).
- Take out the focus lens.
- Place them on a lint-free cloth.
- Clear the inside of the laser outlet (indicated as 2 in the picture below) and the connector (indicated as 3) with a toothpick or similar tool.
Clean the air tube
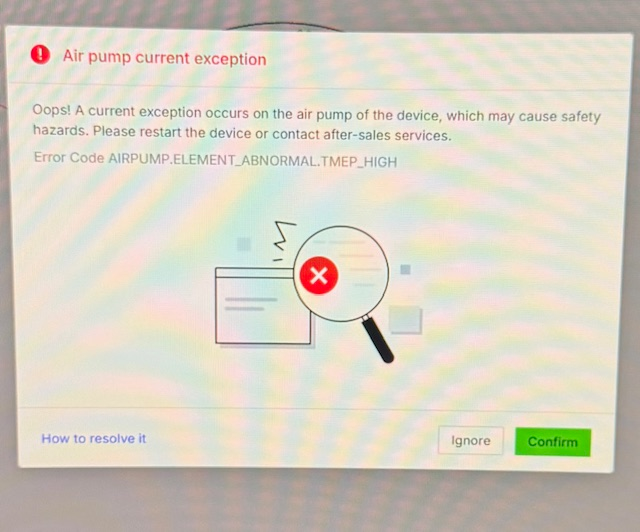
Error code “AIRPUMP.ELEMENT_ABNORMAL.TMEP_HIGH”
Issue description
If you encounter an error message stating "Air pump current exception" (Error Code: Airpump Element Abnormal Temperature High) while operating your P2S, please refer to this guide for troubleshooting assistance.
Possible causes
- Firmware version issue
- Air pump fan malfunctions
Troubleshooting
#1 Update the firmware version
If the firmware version is "V40.22.006.00" or earlier, it is recommended that you update to the new firmware version 006 or later.
#2 Test the air pump fan
If the issue persists after you update the firmware, click the command link below to control the fan separately.
Command on turning on the fan: http://201.234.3.1:8080/peripherals?type=AirPumpFan&action=on
Command on turning off the fan: http://201.234.3.1:8080/peripherals?type=AirPumpFan&action=off
- If the fan can't be turned on, you need to replace the fan or UI board.
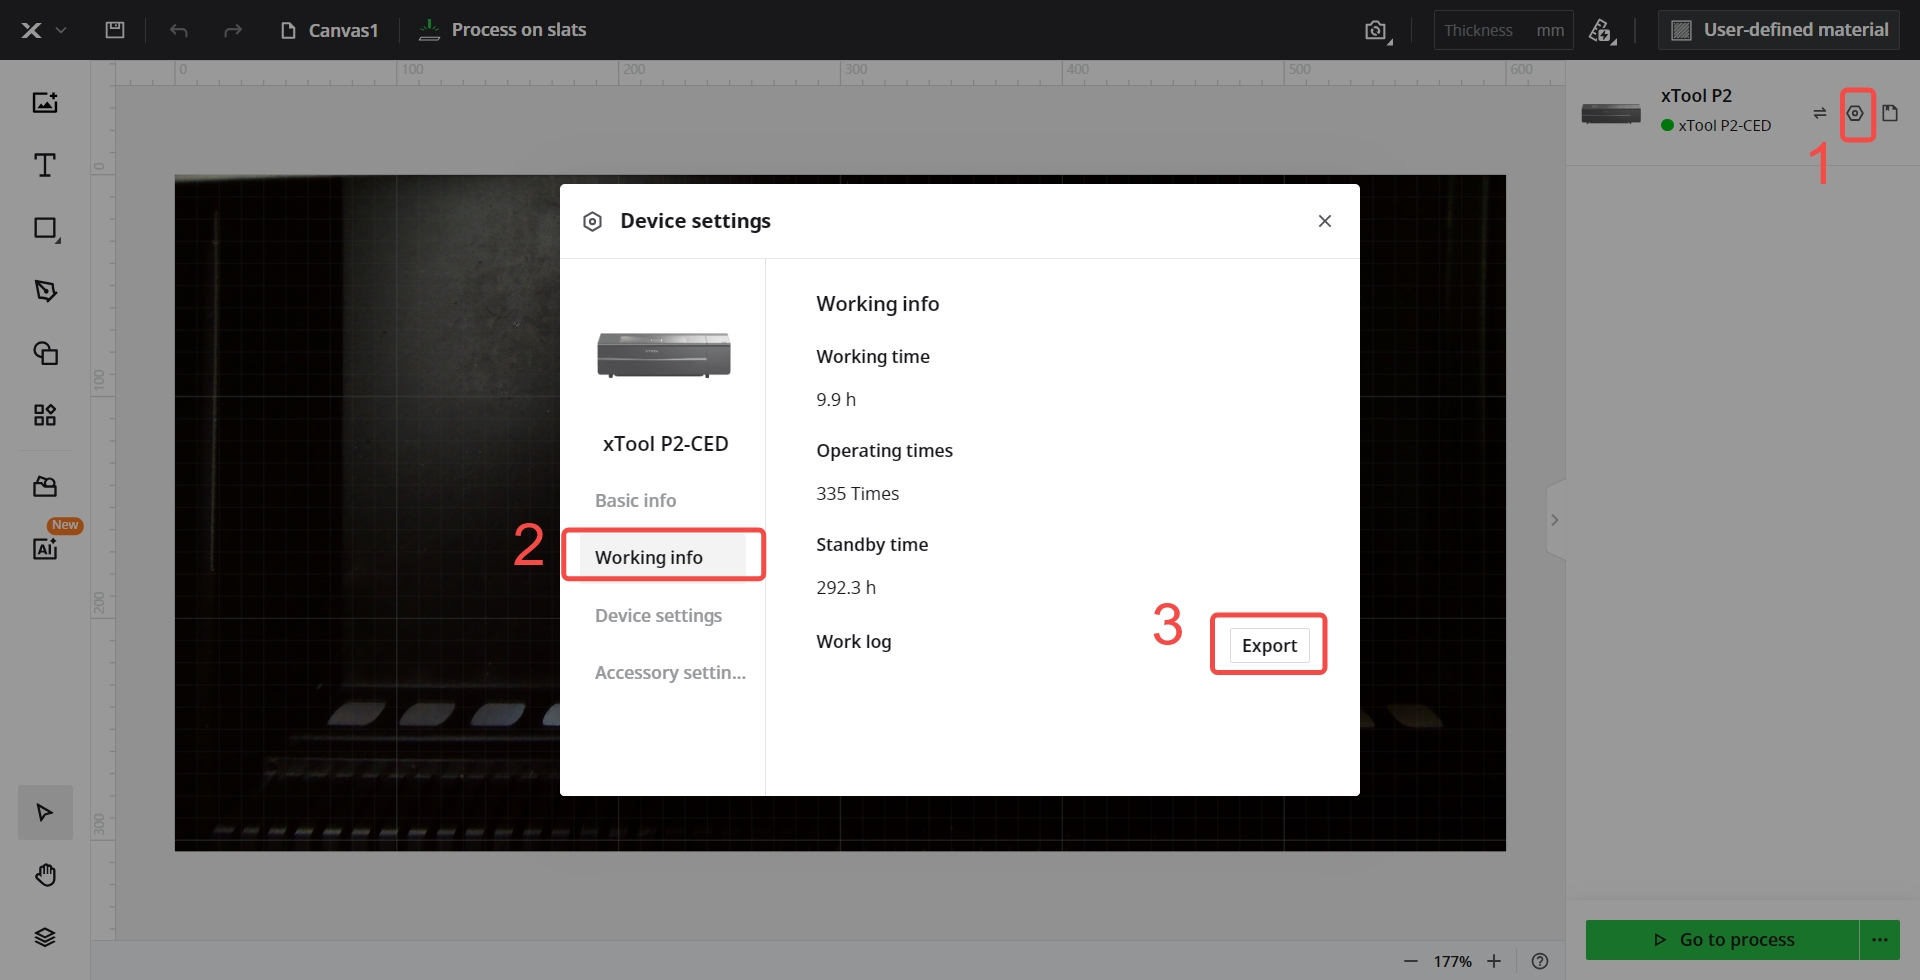
- If the fan is turned on normally, you need to export the work log to customer service for analysis. Follow the steps as follows:
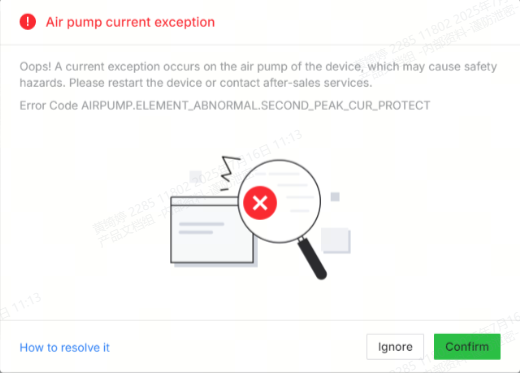
Error code “AIRPUMP.ELEMENT_ABNORMAL.SECOND_PEAK_CUR_PROTECT”
Issue description
If you encounter an error message stating "Air pump current exception" (Error Code: Airpump Second Peak Cur Protect) while operating your P2S, please refer to this guide for troubleshooting assistance.
Possible causes
Air pump adapter board exception
Troubleshooting
#1 Update the air pump adapter board
- There is a high probability that it is a problem with the air pump adapter board. The air pump adapter board and air pump set need to be replaced.
- If the issue persists, you need to export the work log to customer service for analysis. Follow the steps as follows:

Error code “AIRPUMP.ELEMENT_ABNORMAL.CUR_LOW”
Issue description
If you encounter an error message stating "Air pump current exception" (Error Code: Airpump Abnormal Current Low) while operating your P2S, please refer to this guide for troubleshooting assistance.
Possible causes
- If the air pump current is high, the air tube or nozzle is blocked.
- If the air pump current is low, the air pump may be faulty.
Troubleshooting
Export the work log
Export the work log, and send it to customer service to analyze the intensity of air pump current. Follow the steps as follows:

- Insufficient current
- If the air pump current is insufficient, the air pump may be faulty. It is recommended to replacing the air pump.
- Excessive current
- If the air pump current is excessive, follow the steps:
Step 1: Adjust focusing
- Check whether the air nozzle touches the processed material during the machining process. The operation method is as follows:
- Place a 3 mm basswood board in the device.
- Measure the distance between nozzle and board. If it is less than 3 mm, you can manually adjust the value to exceed 3 mm.
- This adjustment is to prevent the nozzle from rubbing against the material and clogging due to insufficient distance.
Step 2: Check whether the air tube is bent. Clean the air pump components, including the nozzle, connectors and so on.
Error code “AIRPUMP.ELEMENT_ABNORMAL.UPPER_MOS_ERR”
Issue description
If you encounter an error message stating "Air pump current exception" (Error Code: Airpump Abnormal Upper Mos Error) while operating your P2S, please refer to this guide for troubleshooting assistance.
Possible causes
The air pump adapter board MOSFET is burnt out.
Troubleshooting
Replace the air pump adapter board MOSFET
- Replace the air pump adapter board and air pump set.
- If the issue persists, you need to export the work log to customer service for analysis. Follow the steps as follows:

Help us improve
If this article or video doesn't effectively assist you in resolving the issue, please let us know by clicking the “No” button in the “Was this page helpful?” section below, and leave your feedback in the pop-up suggestion box. Our knowledge base team will review it and consider it for future updates.
Still need help?
If you need any human assistance, please create a ticket by clicking the “Submit a Ticket” button in the “Help Ticket” section below. Our service team will get back to you in 1 business day via E-mail.
Services & Help
Learn & Education

Copyright © 2025 xTool All Rights Reserved.