Download PDF files (multi-language)
|
|
|
|
|
|
|
|
|
|
|
|


List of items
xTool SafetyPro™ AP2
Pipe connector 1
Pipe connector 2
Pipe clamp
Smoke exhaust pipe
Bluetooth dongle
Power cable
Quick start guide
Safety instructions
Note:
1. The power cable varies according to the region in which the product is delivered.
2. Pipe connector 1 is applicable to xTool S1, F1 Ultra, F2 Ultra series.
3. Pipe connector 2 is applicable to xTool M1 Ultra, M1, F1, F2, P2, P2S, D1, D1 Pro, and OS1 Shaker Oven.
Meet xTool SafetyPro™ AP2
Product specifications
Product model | MAX-S300 |
|---|---|
Input power | AC 220-240V~ 50Hz 120W AC 100–120V~ 60Hz 120W |
Airflow volume | 150 m3/h |
Filter system | 0 Cyclone 1 Pre-filter 2 Medium-efficiency filter 3 Activated carbon filter 4 Ultra Dense Carbon Mesh Filter 5 High-efficiency filter |
Cyclone quantity | 36 |
Airflow control | 4-level control |
Noise | 55 dB |
Dimensions | 290 x 491 x 542 mm |
Compatibility | xTool P2S, P2, S1, M1, M1 Ultra, F1, F1 Ultra, F2, F2 Ultra series, D1, D1 Pro, and OS1 Shaker Oven |
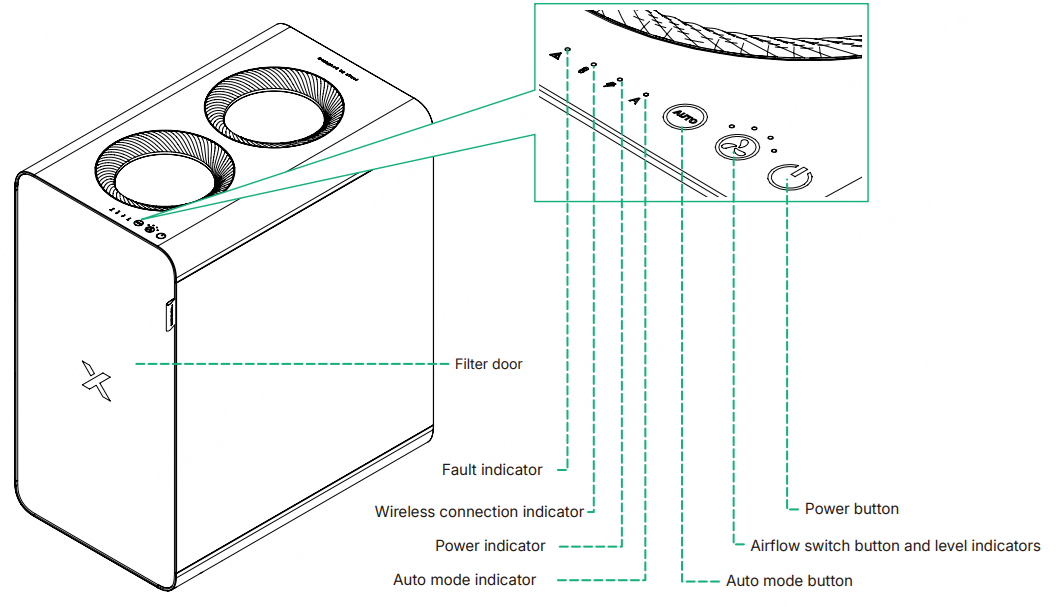
Product structure

Install xTool SafetyPro™ AP2
1. Install the filters
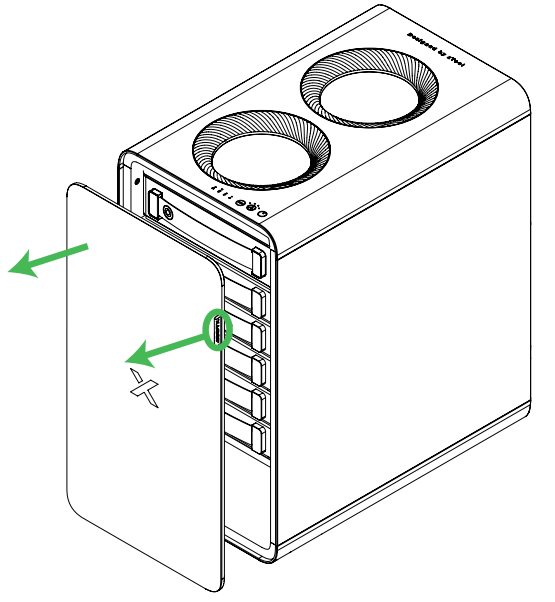
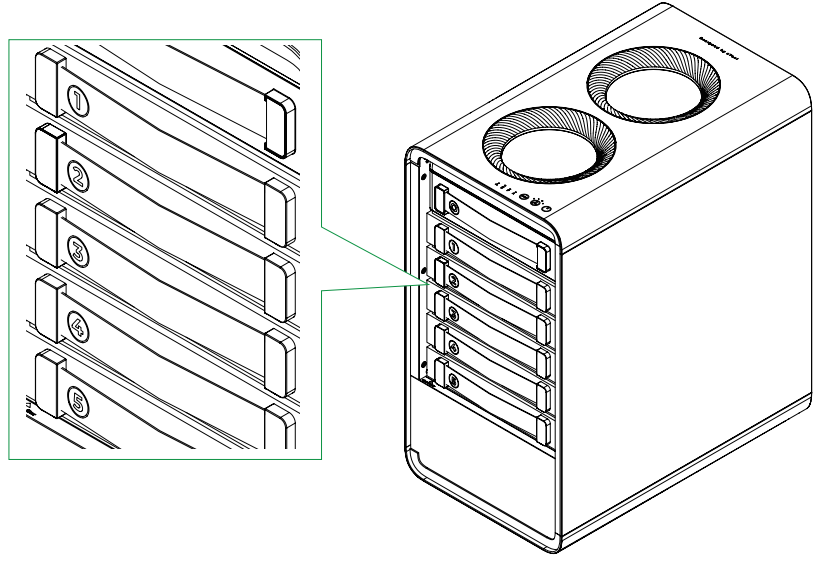
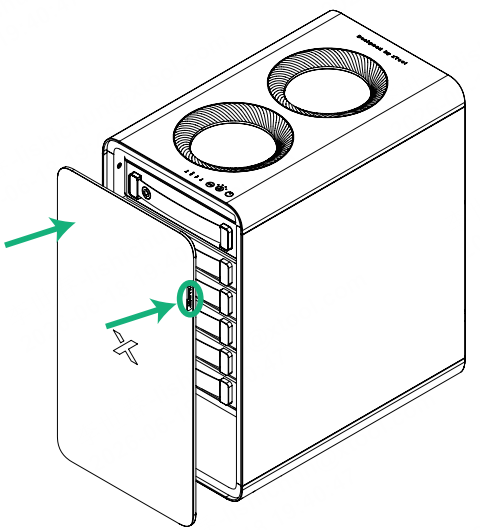
1) Open the door by pulling the handle.
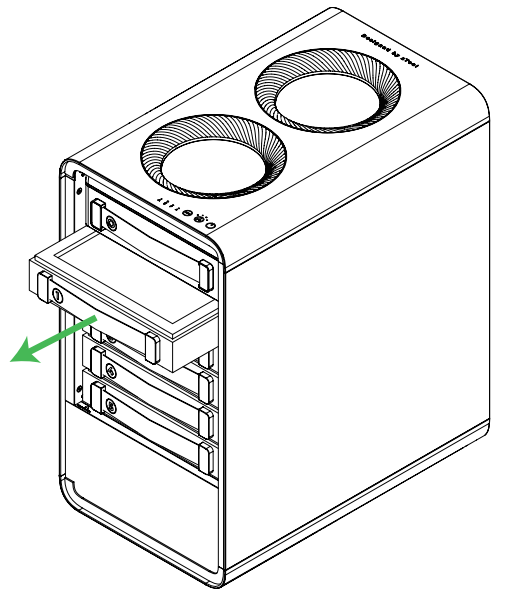
2) Take out the filters one by one. Do not remove the cyclone above filter 1.
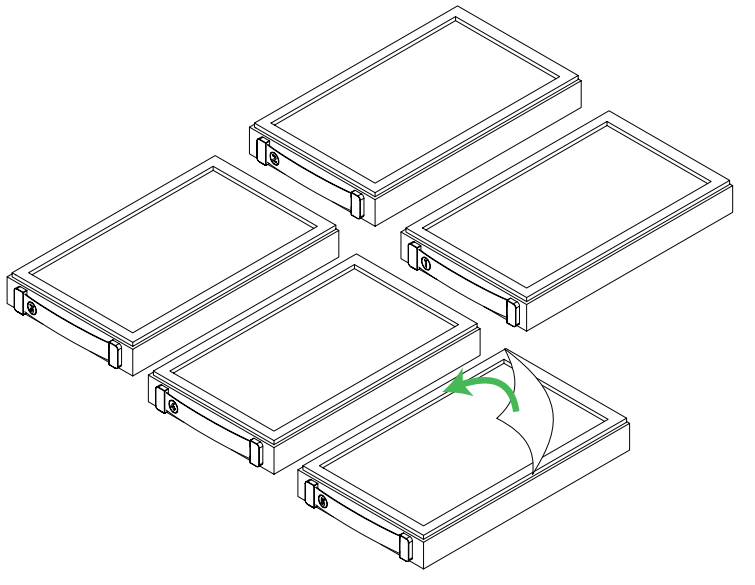
3) Remove the protective films off all the filters.
4) Put filter 5 back first. Ensure that you push it all the way in and that you see the filter alignment line.
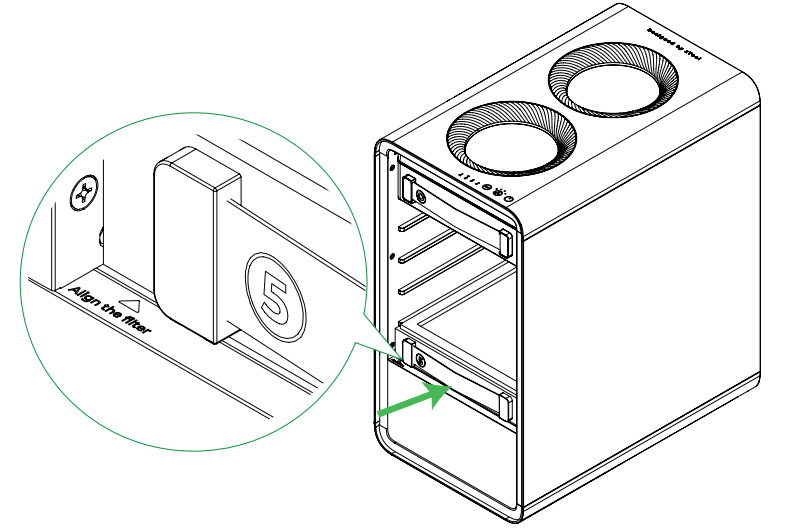
5) Put the other four filters back in sequence. Ensure that you push them all the way in and that they align with filter 5.
6) Close the door.
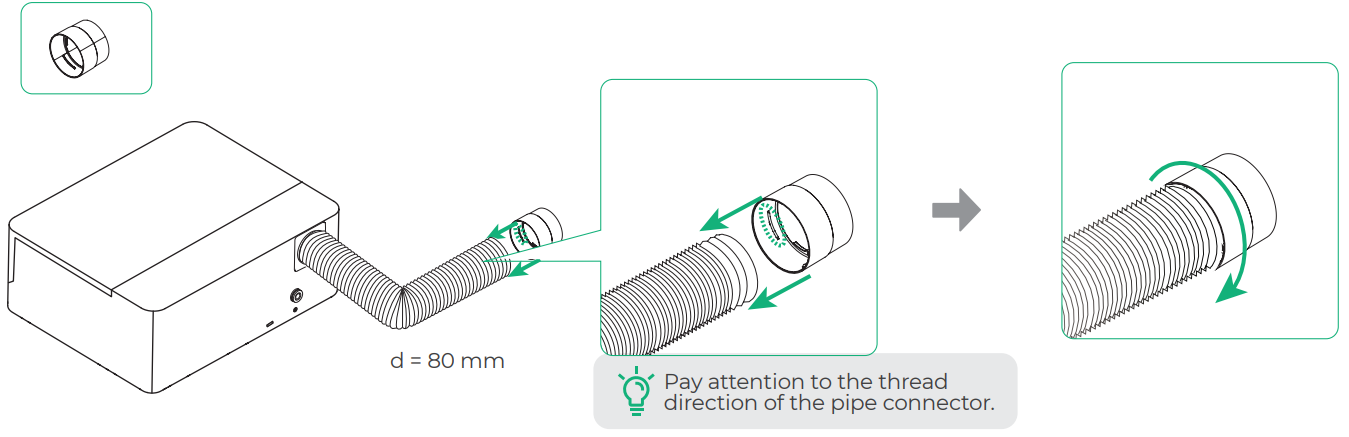
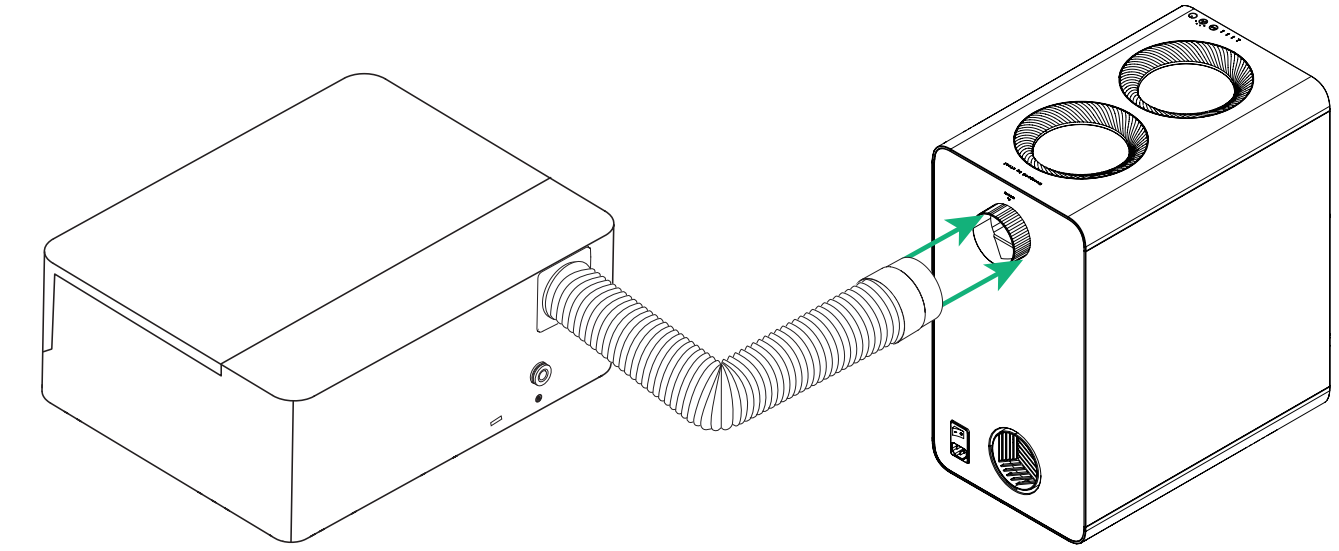
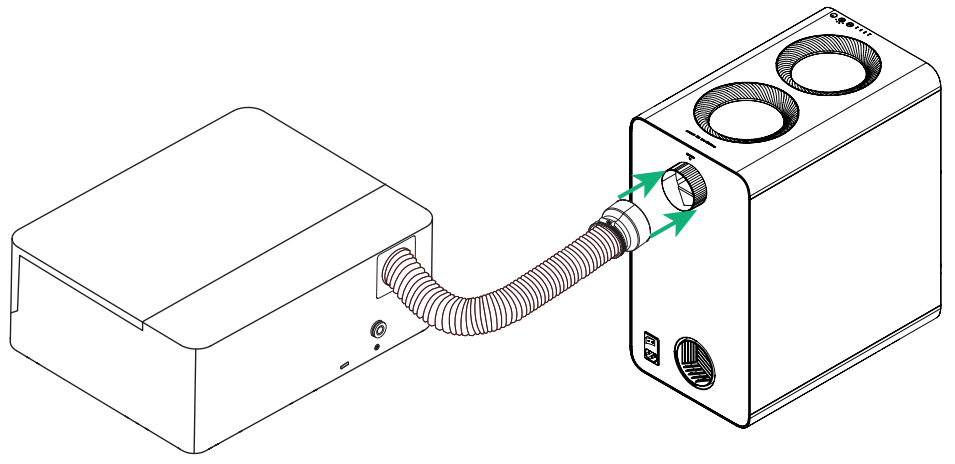
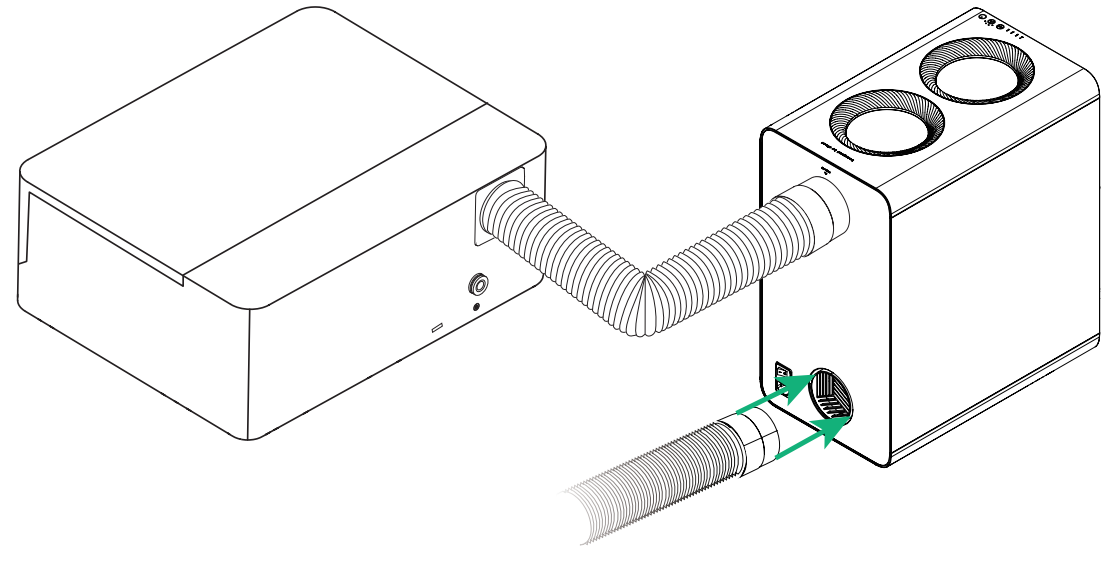
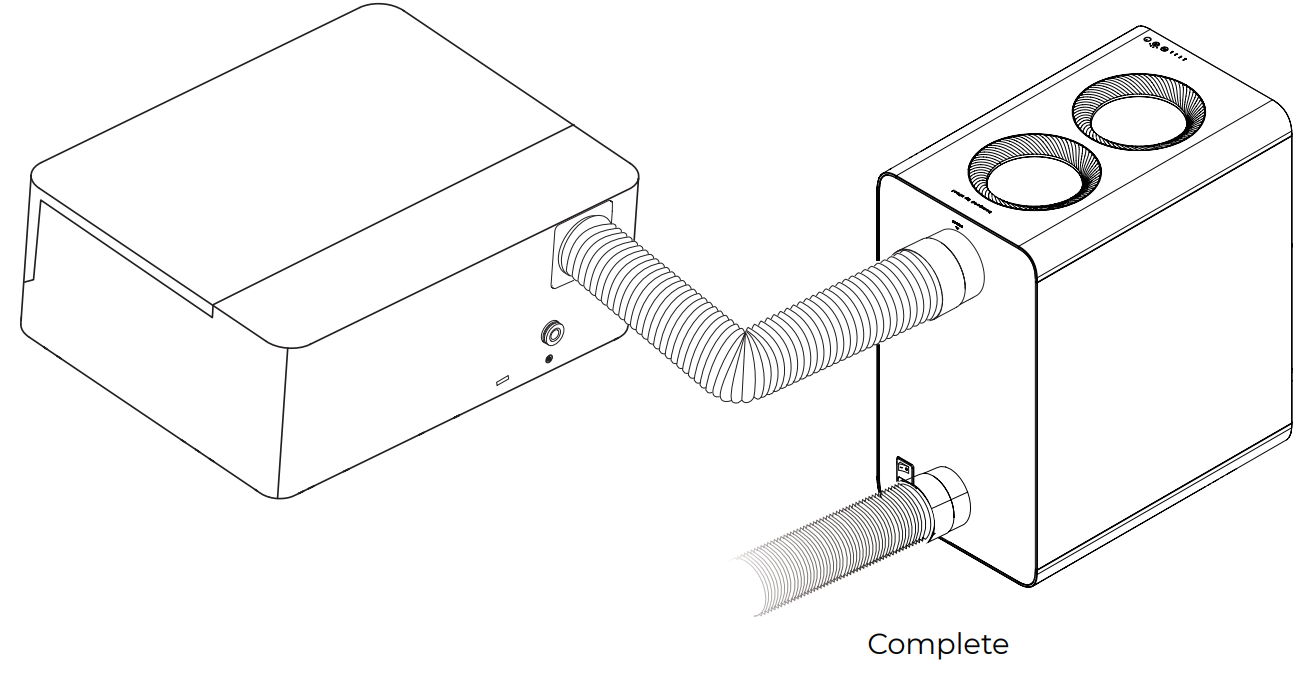
2. Connect the smoke exhaust pipe of the laser machine
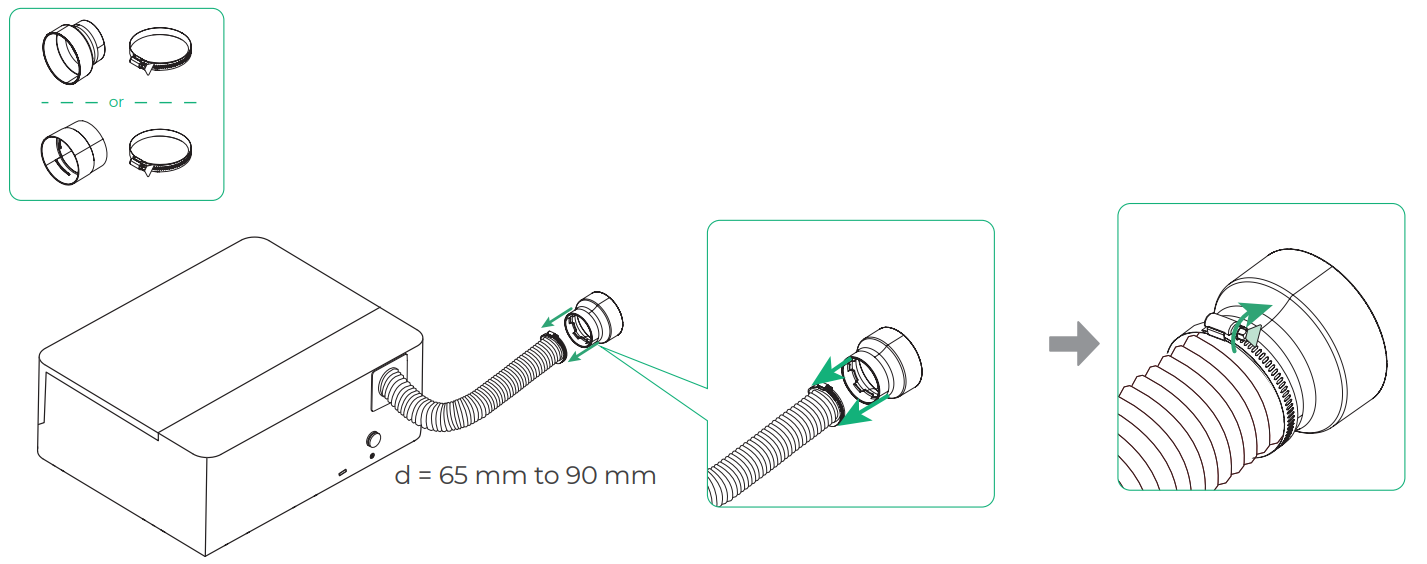
Use the exhaust pipe connector to the machine's exhaust pipe to the air inlet of AP2
Scenario 1: Diameter of the machine's exhaust pipe = 80 mm, applicable to xTool S1, F1 Ultra, and F2 Ultra series
Scenario 2: Diameter of the smoke exhaust pipe of the xTool laser machine = 65 mm, applicable to xTool M1 Ultra, F1, F2, and OS1 Shaker Oven
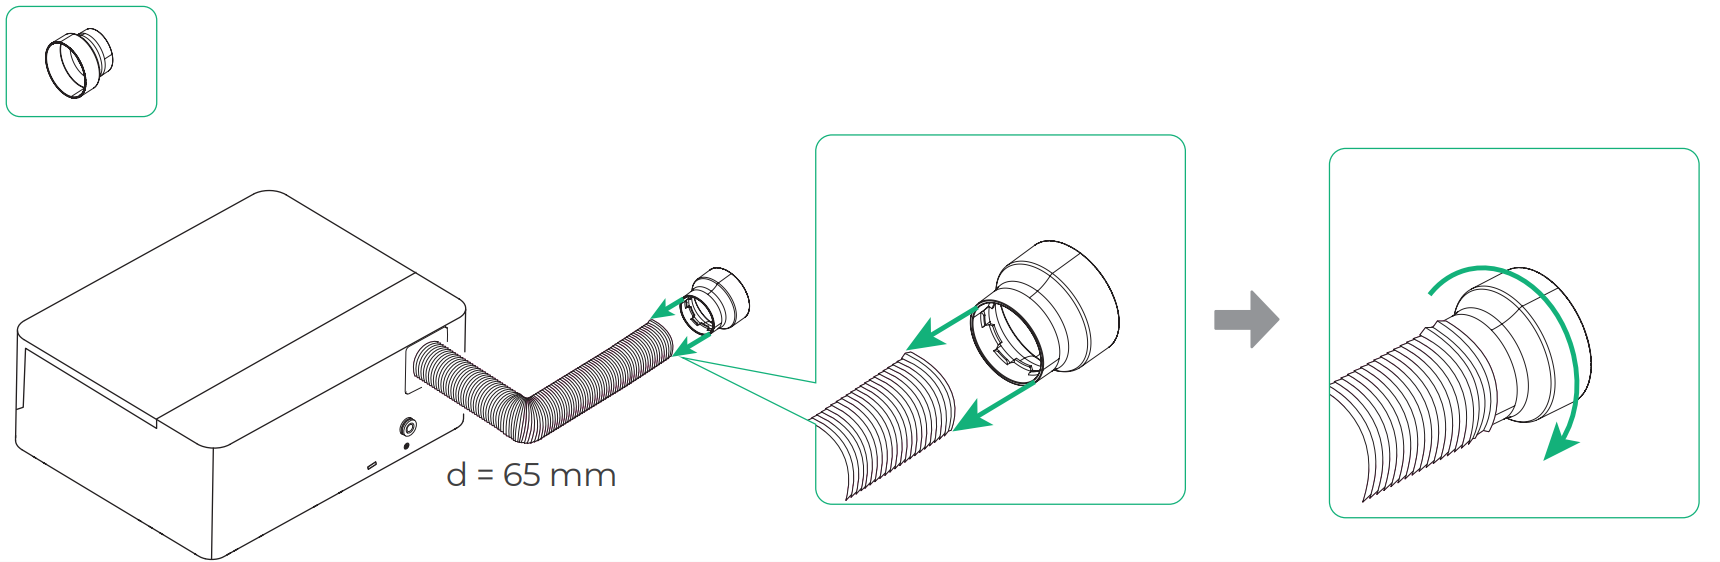

Note: When using AP2 with xTool M1 Ultra, you need to remove the filter and fan of M1 Ultra. Otherwise, you may encounter a fan blocking alarm. For details, see Resolve False Alarm of Fan Blocking When Using AP2 with M1 Ultra.
Scenario 3: Diameter of the machine's exhaust pipe = 65 to 90 mm, applicable to xTool M1, P2, P2S, D1, and D1 Pro
3. (Optional) Connect the smoke exhaust pipe at outlet
Perform this step if you need to exhaust the smoke of the purifier to outdoors.
4. Connect to a power supply


5. Set up wireless connection
Note:
AP2 can establish a wireless connection only with xTool laser machines that support Bluetooth.
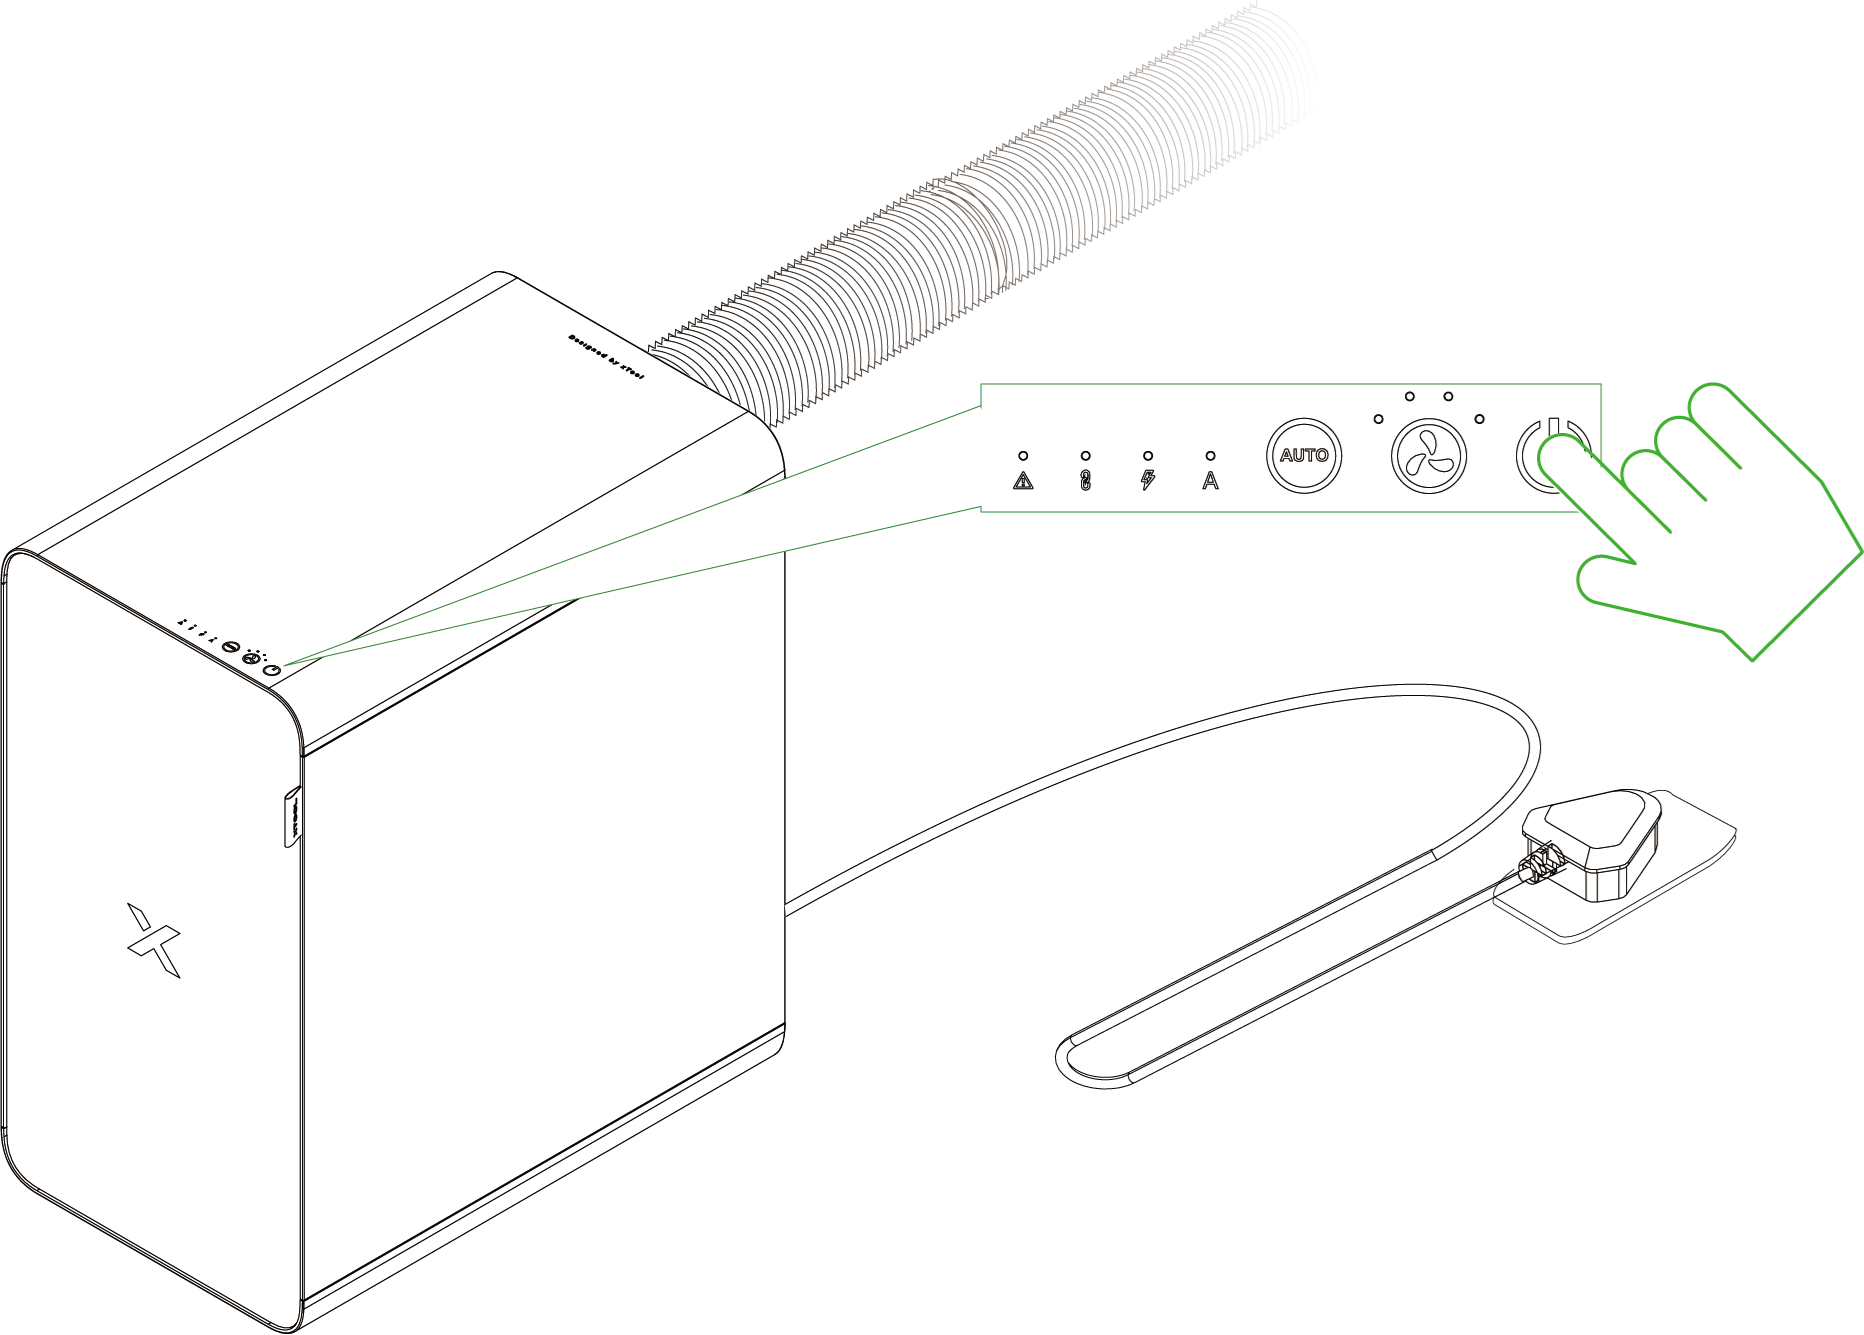
Scenario 1: Bluetooth dongle not required
Applicable to xTool F2, F2 Ultra series, and OS1 Shaker Oven
Step 1. Long press AP2's power button for at least 5 seconds until the Bluetooth status indicator blinks. At this time, AP2 enters pairing mode.
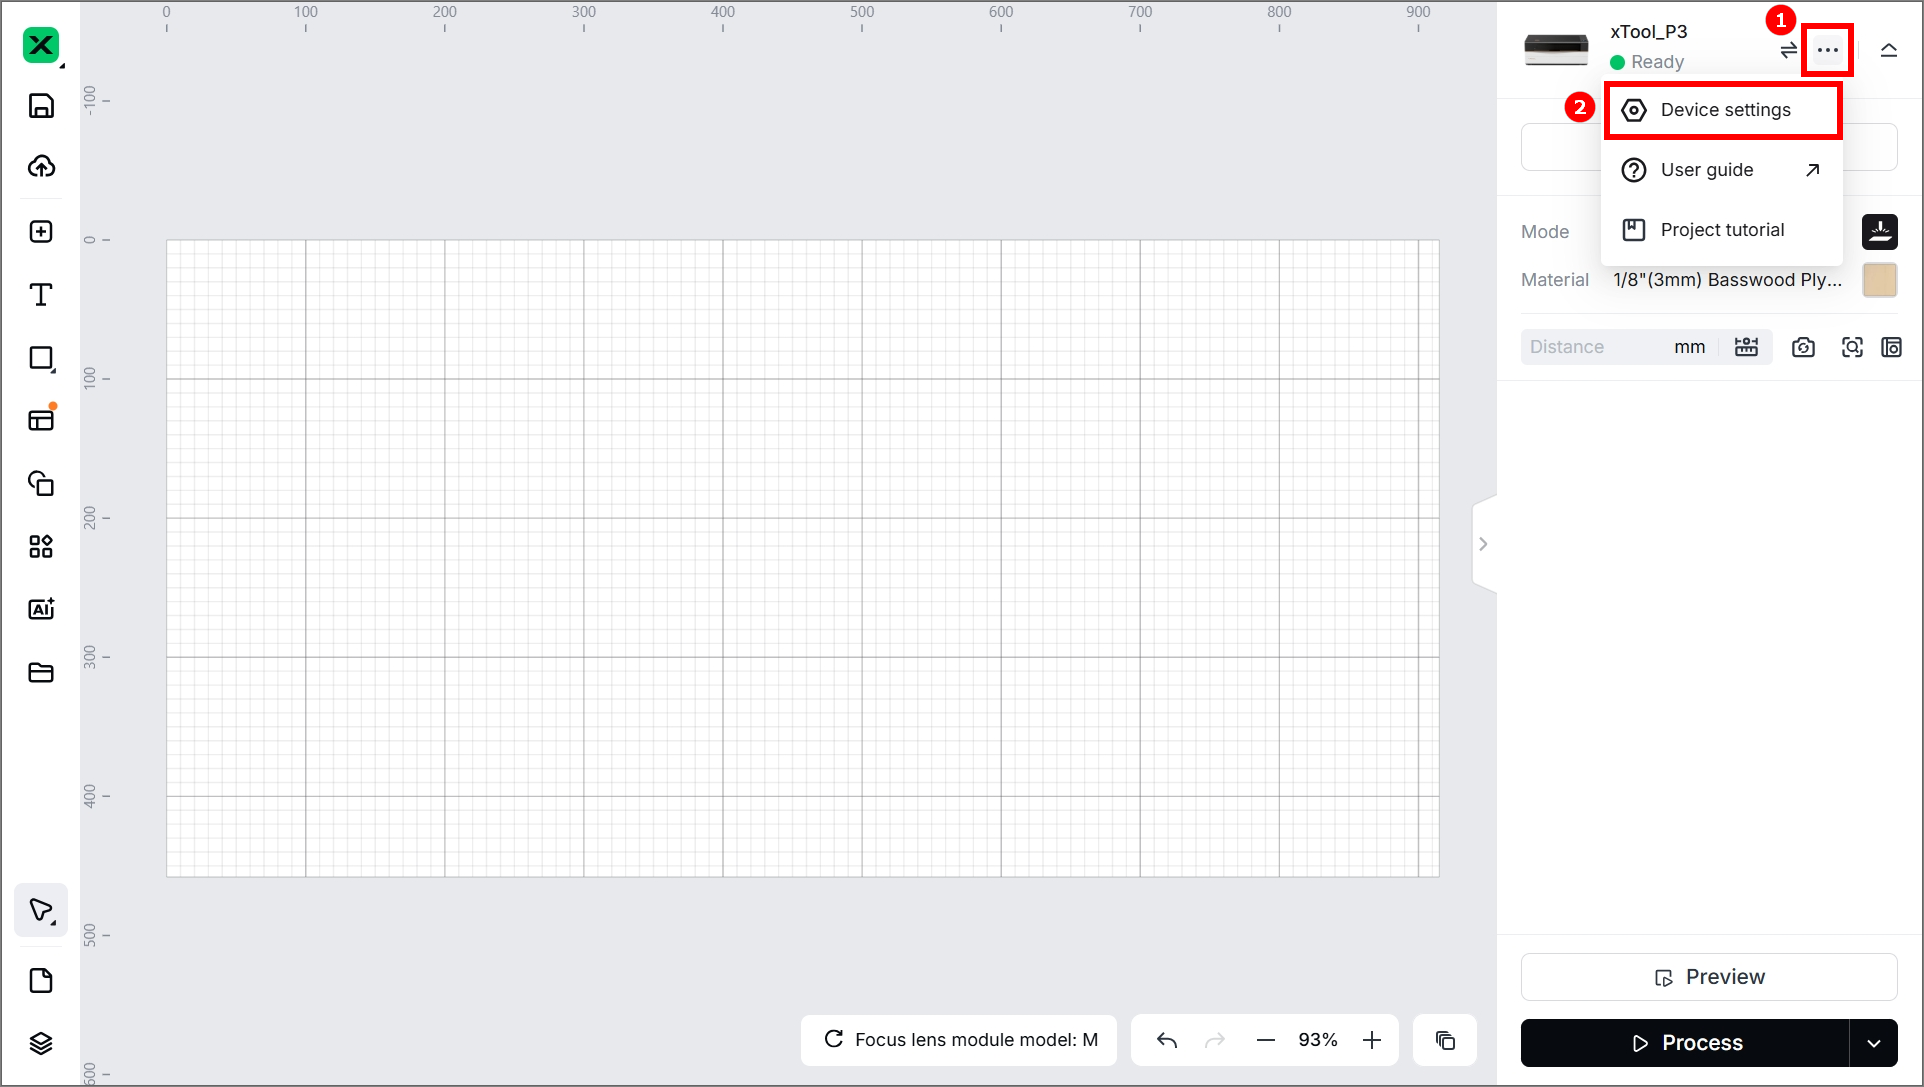
Step 2. Start the xTool software and connect AP2.
Scenario 2: Bluetooth dongle required
Applicable to xTool S1, F1, F1 Ultra, M1 Ultra, P2, and P2S

■ Insert the Bluetooth dongle into the extension port of the xTool machine. The preceding figure is for reference only.
■ After the Bluetooth dongle is connected, the connection between the purifier and the xTool machine is automatically established. The machine's Device settings page on XCS displays information about the purifier. For more details, see "Use with XCS."
Use xTool SafetyPro™ AP2


- Press the power button to start AP2.
- Select AUTO mode or manual mode.
In AUTO mode, the purifier adjusts the airflow level based on processing materials. You can also press![]() to switch between the four levels.
to switch between the four levels.
Note that AUTO mode is available only for xTool S1, M1 Ultra, F1 Ultra, F2, F2 Ultra series, P2S, and OS1 Shaker Oven.
Use with the xTool Software
Use xTool SafetyPro™ AP2 with the xTool Software
Indicator description
Indicator | Indicator status | Device status |
|---|---|---|
| Solid blue | Connected to power |
| Blinking blue | Connecting to the machine ... |
Solid blue | Connected to the machine | |
| Solid red |
|
| Solid blue | Working in AUTO mode |
Maintenance
1. Replace the filters
When a filter is reaching its end of life, XCS prompts you to purchase a new one for replacement. For steps about how to replace a filter, see “Install the filters.”
Note:
You must disconnect the power cable before replacing any filter.
