This page describes how to operate xTool P2 with xTool Creative Space (XCS).
Minimum and recommended PC requirements
Item | Minimum configuration | Recommended configuration |
Processor | Intel Core i5-6200U | Intel Core i5-11600 |
Operating system | Win 10 (64-bit) macOS 10.14 or later | |
RAM | 8 GB | 16 GB |
Display resolution | 1280 × 720 (pixels) | 1920 × 1080 (pixels) or higher |
Hard drive | 8 GB | 12 GB |
- With the minimum configurations, all the functions of XCS can be used properly. When you import a complex image, such as an image larger than 50,000,000 pixels or an SVG image larger than 1 MB, however, XCS may fail to run smoothly.
- With the recommended configurations, XCS can run more smoothly when you import and edit a complex image, the software delay may be shorter, and the performance is better.
Download and install XCS

Click Yes when you are asked "Do you want to allow this app to make changes to your device?" and then continue the installation as prompted.
Connect xTool P2 with XCS
USB connection
1. Use the USB cable to connect your device to your computer, and turn on your device.
2. Open XCS on your computer. In the upper-right corner, click New project.

XCS connects to your device automatically. If it is not connected, perform the following steps:
1. In the upper right of the project page, click the Switch device / Connect device icon next to the device name.

2. Click Connect device. Select the device to connect.


Note: After connecting xTool P2 to XCS using a USB cable, you can connect in Wi-Fi or IP mode. Whichever way you choose, you need to connect it to your computer with the USB cable first.
After connecting your device to XCS in Wi-Fi or IP mode, you can search for your device on XCS next time without USB connection.
Wi-Fi connection
Assume that you have connected your device to XCS using a USB cable.
1. Click the device settings icon to open the Device settings window. Click the Basic info tab and Setting under Wi-Fi setting.


2. Enter your Wi-Fi name and password as required to set up a Wi-Fi connection.
After you've connected your device through Wi-Fi, you can find it on the Wi-Fi tab.

IP Connection
Assume that you have connected your device to XCS in Wi-Fi mode.
1. Under the Basic info tab, find the IP address of the device in the Wi-Fi setting area. Record the IP address.
2. Go back to Connect device page, enter the IP address on the IP tab, and click Connect.

Example projects
You can start with a simple project. The following are three examples.
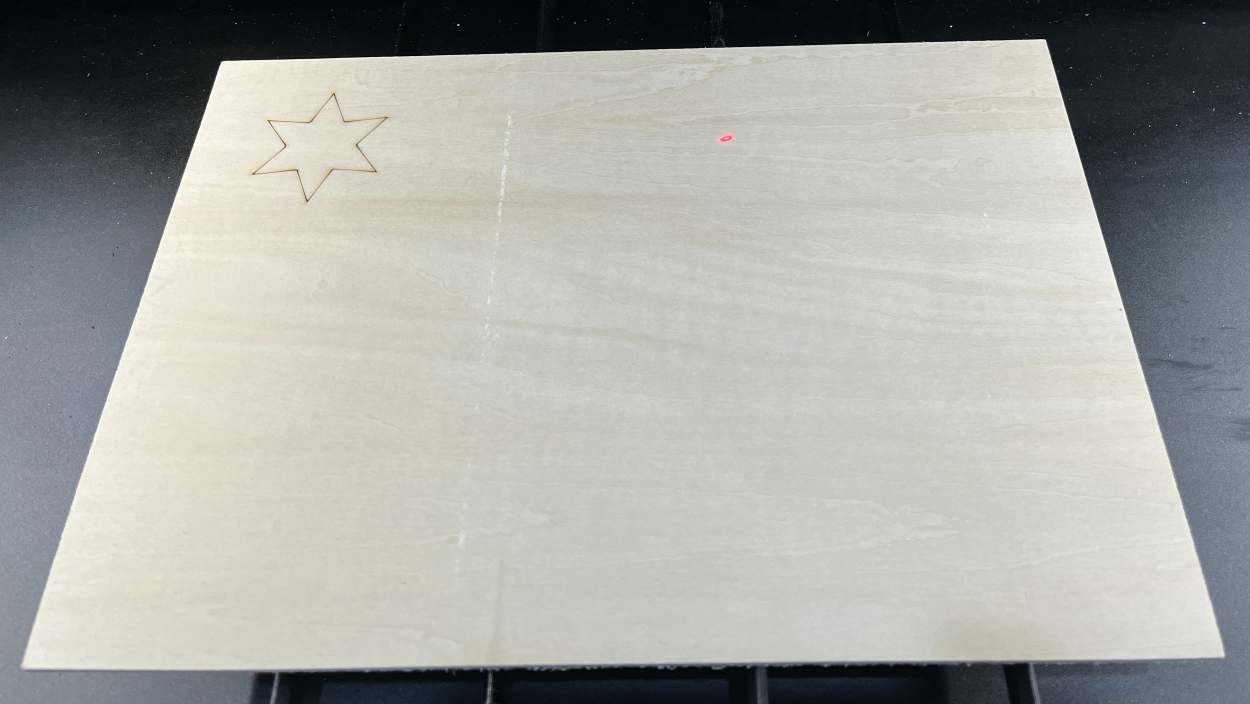
Engrave a star on a 3 mm basswood board
- Insert the star shape on the canvas.

2. On the top of the canvas, select Process on slats as the processing mode.


- Place a basswood board on the slats, and move the object to the position where you want it to be processed.

4. Measure the thickness of the material. You can use either the aimed-measure or quick-measure to measure thickness.

5. Set the processing path. This project contains only one object. You can set the processing path to Auto planning.

6. Set processing parameters for the object to be processed.

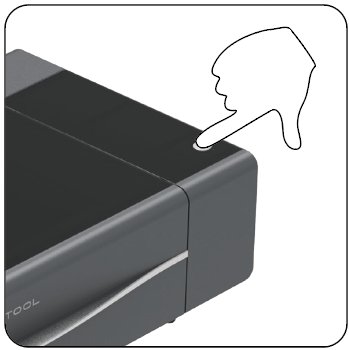
7. Press the Go to process button.

8. Preview the object and click Start.

9. Press the button on xTool P2 to start processing.

10. Wait for the processing to complete.
This is what you get after the processing.
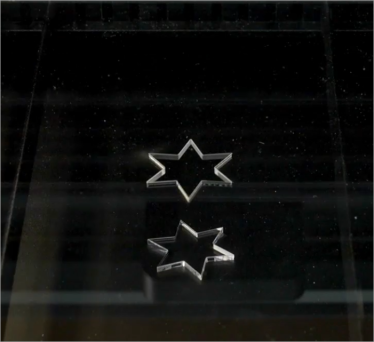
Cut a star from an acrylic sheet
The steps for cutting a star from an acrylic sheet are similar to those of engraving a star on a basswood board.
- Insert the star shape on the canvas.
- Select the Process on slats mode.
- Place the acrylic sheet on the slats, and move the object to the position where you want it to be processed.
- Measure the thickness of the material.
- Set processing parameters for the object to be processed.

6. Press the Go to process button.
7. Preview the object and click Start.
8. Press the button on xTool P2.
9. Wait for the processing to complete.
This is what you get.
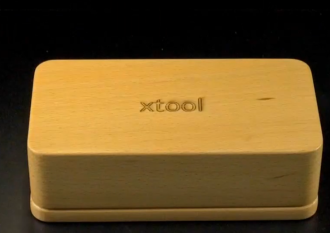
Engrave a pattern on a jewel case
- Measure the height of the jewel case.
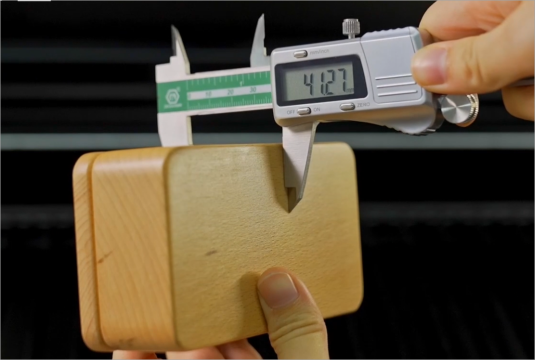
The height is greater than 25 mm, and you need to remove the slats.
- Remove the slats.
3. Select the Baseplate removed mode.

4. Disable the baseplate detection function (required only for Class 4 xTool P2).

Note: By default, baseplate detection is enabled for xTool P2. For Class 4 laser machines, if you don't disable this function, XCS keeps prompting you to remove the baseplate in Baseplate removed processing. For Class 1 laser machines, you don't need to disable it.
You can identify whether your machine is a Class 1 or Class 4 one based on the sticker on the back of the machine.
- Place the case in the working area, and click aimed-measure to allow the red spot to fall on the material.


6. Move the object to the position where you want it to be processed.
7. Set the processing parameters for it.

8. Press the Go to process button.
9. Preview the object and click Start.
10. Press the button on xTool P2.
11. Wait for the processing to complete.
This is what you get.
With the riser base, conveyor feeder, and rotary attachment, xTool P2 can process thicker, longer, and wider range of materials.
More examples
To process regular and irregular cylindrical materials, see "Use xTool P2 with Rotary Attachment."
To process long materials, see "Use xTool P2 with Conveyor Feeder."
Offline processing
When xTool P2 is in the idle state, that is, it is not processing a material, you can double press the button on the machine to start the last processing again. For offline processing, you don't need to connect xTool P2 to XCS.
XCS editor functions
You can use the XCS editor to design your own objects for processing. For details about the editor functions of XCS, see “XCS Editor Function Overview (V2.1)”.
Device settings
View device information and set its functions
After connecting your machine to XCS, you can click the icons in the upper right corner to view the online help and device settings.

①: click to view the operating information of xTool P2 and set functions for it.
②: click to go to the online help for xTool P2.
Basic information

- Device name: sets the name of your device.
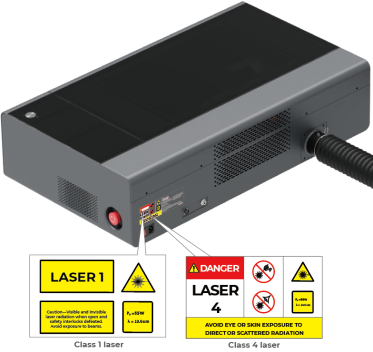
- Laser model: displays the model of the laser module.
- Laser safety classification: displays the laser safety classification of your machine, class 1 or class 4.
- Serial number: displays the serial number of your device.
- Plug-in version: displays the plug-in version of your device. You can click Info to view details about it.
- Firmware version: displays the firmware version of the device. You can click Check for updates to check for later versions and update the firmware.
- Wi-Fi setting: displays the IP address of your device. You can click Setting to enter the Wi-Fi name and password to set a Wi-Fi connection.
- Safety Terms: click to view the safety terms.
Working information

- Working time: displays the total time the device processes materials.
- Operating times: displays the total number of times the device has been operated.
- Standby time: displays the total time the device is on standby.
- Work log: You can click Export to export the work log of the device.
Device settings

- Baseplate detection: enables or disables baseplate detection in processing preview. It is enabled by default. When it is disabled, no baseplate detection is performed in all the processing modes.
- Exhaust fan: enables or disables the built-in exhaust fan of your device.
- Exhaust time after processing: sets the time the exhaust fan continues to work after the processing is complete.
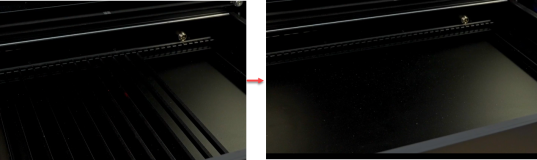
- Background brightness increase: increases the brightness of the background. When you are to process a dark-color or black material, you can enable this function to help you see the material more clearly. When you use a light-color or highly-reflective material, disable this function, or the background may be over-exposed.
- Buzzer: enables or disables the buzzer of the machine. After being disabled, the buzzer no longer works as an indicator.
- Optical path setup: allows you to test and modify the optical path. You can click Test to start testing the optical path. You can also click to view the detailed operation guide.
- Import Gcode: allows you to import a GCode file from the local disk. GCode files applicable to your device, exported on LightBurn, can be imported on XCS.
- Flame sensing sensitivity: sets the sensitivity of the fire safety set, either low or high.
- Fill light brightness: sets the brightness of the fill light when the lid is opened.
- Setting range: 1–100
- The setting of a negative value does not take effect.
- Airflow of air pump:
- Engrave: sets the airflow for engraving. A lower airflow is recommended. Setting range: 30%–100%
- Cut: sets the airflow for cutting. A higher airflow is recommended. Setting range: 30%–100%
- Lowest output power: sets the lowest power input of the machine to ensure the optical output of the laser module. Theoretically, when the laser module produces laser beams properly, the output power is the same as the power input. As time goes by, however, the output power may be slightly lower than the power input. If your machine works properly, you don't need to set this parameter.
- Export elements on the canvas as GCode: exports all the elements on the canvas to a GCode file
Accessory settings

- Convey the material back after processing: sets whether to convey the material back to its start position after processing it. This function is enabled by default, and you can click to disable it.
Processing settings
Note:
- If you use a material launched by xTool, you can select it from the material list and use the default parameter settings.
- If you use a material produced by another manufacturer, you can modify the parameters based on the settings recommended for xTool materials or your own tests.
Material settings

① Material

If you use a material launched by xTool, select your material from the list. If you use one purchased from another manufacturer, set it to User-defined material, and set the processing parameters based on those recommended for xTool materials or your own tests.
② Processing mode
You need to choose a processing mode based on your material.

The processing modes are described as follows:
- Process on slats: to process flat materials with the slats in place
- Use rotary attachment: to process regular or irregular cylindrical materials
In this mode, you need to use xTool Rotary Attachment. For details about how to use xTool P2 with Rotary Attachment, see "Use xTool P2 with Rotary Attachment."
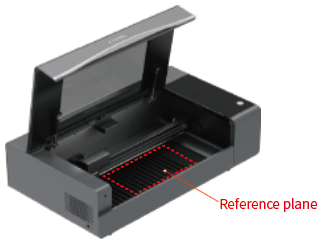
- Baseplate removed: to process thick materials
In this mode, XCS allows you to place the material surface to be processed below the reference plane, that is, the plane formed by the upper sides of the slats.
- Use conveyor feeder: to process long flat materials
In this mode, you need to use xTool Conveyor Feeder. For details about how to use xTool P2 with Conveyor Feeder, see "Use xTool P2 with Conveyor Feeder."
- Curved material: to process materials with curved surfaces
In this mode, you need to remove all the slats and can measure a curved area on a material and map objects onto the area before processing the material. For details, see “Process Materials with Curved Surfaces Using xTool P2.”
- Screen preparation: developed for xTool Screen Printer and used to engrave screens for printing. For details about how to use xTool Screen Printer and prepare the screens, see xTool Screen Printer.
③ Thickness / Distance

If you use a user-defined material, you can click the quick-measure icon to enable XCS to measure the thickness of the material. To measure the thickness of the material in a specified area, you can click the aimed-measure icon and select the area to be measured. If the automatic measurement fails, use a caliper to measure it and enter its thickness.
In some processing modes, such as Baseplate removed or Use rotary attachment, you can see the parameter Distance, which means the distance between the upper surface of a material and the bottom of the laser module.
If auto-measure fails, you can measure the distance and enter it on XCS.

④ Snapshot preview
Refresh background: Use the distant-view camera to capture images. The distant-view camera is fixed on the back inner plate. This allows it to capture a larger area.
Close shot: Use the close-view camera to capture images at any position within the processing area.
⑤ Processing path

You can set the processing path to auto planning or by layer.
Auto planning: Objects are processed based on the default processing path algorithm. Generally, objects are engraved first and then cut.
User defining


In user-defined planning, you can determine the scanning path and way, and whether to process by layer.
Object settings
After selecting the object on the canvas, you can specify the object settings, including vector settings and bitmap settings.
Vector settings


Bitmap settings


For details about these settings, see XCS Editor Function Overview (V2.1).
Start processing
(1) After setting the parameters, click Go to process.
The Preview window is displayed.
You can zoom in or out the object, or restore it to fit on screen during preview.
(2) Click Start in the upper right corner.
(3) Press the button on the device to start the processing.
You can also click Back to cancel the processing.
(4) Wait for the processing to complete.
Services & Help
Learn & Community
Contact Us

Copyright © 2025 xTool All Rights Reserved.