Disclaimer
If you need to control xTool S1 through LightBurn, download the official release of the LightBurn software. LightBurn is a third-party software, and therefore Makeblock Co., Ltd. shall bear no responsibility for any loss caused due to the operation of LightBurn.
The firmware of xTool S1 has been tested in detail by Makeblock Co., Ltd, but incompatibility with the software or hardware may still occur. You can contact our after-sales service for technical support if errors occur due to incompatibility.
Download and install LightBurn
Go to https://lightburnsoftware.com/pages/trial-version-try-before-you-buy to download the latest version of LightBurn and install it. If you are a new user, you have a 30-day free trial.
Notes:
- Ensure that you use the latest version of LightBurn, and that your LightBurn is licensed. If the software is of an early version or a cracked or pirated version, the device connection may fail.
- Ensure that the firmware version of xTool S1 is larger than 004.
- Lightburn, as third-party software, supports xTool S1 to finish the basic processing process but does not fully support all the features of xTool S1. Features such as laser module position, marking processing area, and processing curved materials are not supported. To fully explore all the features of xTool S1, please use XCS (xTool Creative Space), the official software of xTool.
Connect xTool S1 with LightBurn
- Download the configuration file for xTool S1: xTOOL_S1_V2.lbdev

- Open LightBurn. On the Laser panel, click Devices.
Note: Ensure that you start to configure xTool S1 in this way instead of choosing Import Prefs from the menu. If you choose Import Prefs, the original configuration is overridden.

- On the Devices window, click Import to import the file xTOOL_S1_V2.lbdev。


- The following device information is displayed after the file is successfully imported.

- Connect your computer with xTool S1 by using the USB cable.

- On the right side of LightBurn, click Console. On the Console panel, you can see "ok", which means that your connection is successful.

Process flat materials
1. Place the material
Open the lid of xTool S1, and place the material to be processed on the baseplate.

Note: To cut a material, you are advised to place the slats or honeycomb panel on the baseplate before placing the material. The slats or honeycomb panel can reduce the burned area on the back of the material and protect the baseplate.

2. Set the laser focus
Click Console on the right side of LightBurn. Click the DETECT button, and xTool S1 will perform auto focus.

3. Set the offset of the red cross spot
When xTool S1 is idle, its laser module emits a red cross spot to help you locate the laser module. However, the position of the red cross spot does not exactly coincide with the laser spot. Therefore, you need to set the offset of the red cross spot under the current laser height so that the machine can automatically compensate for the offset during processing.
(1) On the console, you can find the Z distance from the material to the laser module in the form of M313 Zxxx, xxx is the distance. For example, the following picture shows a Z distance of 38.827. Click Move, enter the distance value, and click the down arrow to focus the laser module.

(2) Go back to the console and click the IR_OFFSET_DET button to query the offset of the red cross spot under the current laser height. The console will print the offset distance in the form of M1111 Xxxx Yxxx. For example, the following picture shows that the offset is X0.00 Y3.00.

(3) Open the Device settings window, turn on Enable pointer offset, and enter the offset you obtain in Step (2). Click OK.

4. Design objects for processing
Use the toolbar on the left to design processing patterns on the canvas.

5. Set parameters for processing
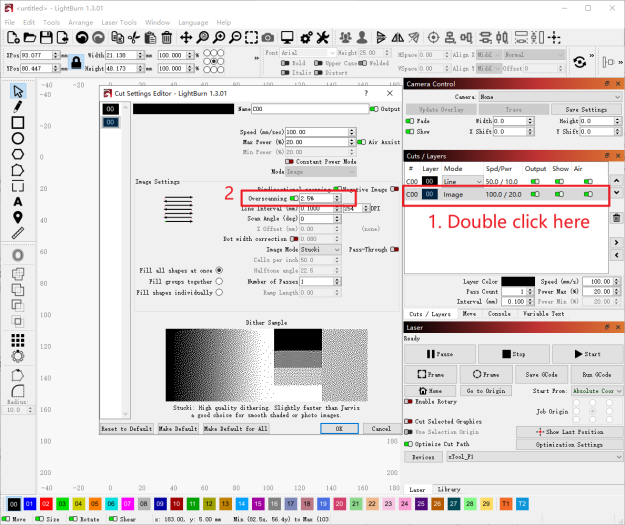
On the Cuts / Layers panel, double click a layer to open the setting window. Based on the material characteristics and processing needs, set proper processing parameters for each layer.

6. Preview the processing area
On the right of LightBurn, click Frame and the laser spot will move along the boundary of the processing pattern on the material, so that you can preview the processing area.
If the area is not ideal, you can adjust the material position or adjust the element positions in the software, and then click Frame to preview the processing area again.

7. Start processing
Close the lid of xTool S1. Then, click Start on LightBurn to start processing.

Process cylindrical materials
1. Connect with the rotary attachment and place the material
Connect xTool S1 with the rotary attachment and place the material on the rotary attachment.

Note 1: To use the rotary attachment on xTool S1, you need to raise the height of xTool S1 with the riser base.
Note 2: For detailed information and instructions on how to use the rotary attachment, see User Manual for Rotary Attachment 2 (RA2).
For more information on how to connect xTool S1 with the rotary attachment, see xTool S1 User Manual.
2. Enable rotary
(1) Open the Rotary Setup window, turn on Enable Rotary, and set Y Axis as the rotary axis.

(2) Set parameters of the rotary attachment and the material to be processed. After you finish setting, click OK.
- If you use chuck on the rotary attachment, select Chuck, set 128 mm per rotation for the rotary attachment, and enter the diameter or circumference of your material.
- If you use rollers on the rotary attachment, select Roller, set 32 mm per rotation and 17 mm roller diameter for the rotary attachment, and enter the diameter or circumference of your material.

(3) Open the Device Settings window, and click GCode. Add the command "M117 A2B4" to the last line of the Start GCode. Add the command "M117 A2B2" to the first line of the End GCode. Click OK to enable rotary attachment processing.

Note: Do not put a semicolon before a command, otherwise the command will be blocked.
3. Set the laser focus
(1) Move the laser module over the material. Ensure that the locating spot falls on the top surface of the material.

(2) In the Console on the right side of the LightBurn, click the DETECT button and xTool S1 will perform auto focus.

4. Design objects for processing
Use the toolbar on the left to design processing patterns on the canvas.

5. Set parameters for processing
On the Cuts / Layers panel, double click a layer to open the setting window. Based on the material characteristics and processing needs, set proper processing parameters for each layer.

6. Preview the processing area
(1) On the Console panel, click the ROTARY_FRAMING button. Then, click Frame on the Laser panel below. The laser spot will move along the boundary of the processing pattern on the material so that you can preview the processing area.
If the area is not ideal, you can adjust the material position or adjust the element positions in the software, and then click Frame to preview the processing area again.

(2) After you confirm that the processing area is as expected, click the EXIT_ROTARY button on the console to exit the rotary framing mode.

Note: Ensure that you click the EXIT_ROTARY button after you finish rotary framing. Otherwise, exceptions may occur when you perform framing for the processing of flat materials.
7. Start processing
Close the lid of xTool S1. Then, click Start on LightBurn to start processing.

How to disable rotary processing
(1) Open the Rotary Setup window, turn off Enable Rotary, and click OK.

(2) Open the Device Settings window, and click GCode. Delete the command "M117 A2B4" from the Start GCode, and the command "M117 A2B2" from the End GCode. Click OK to disable rotary processing.

Notes
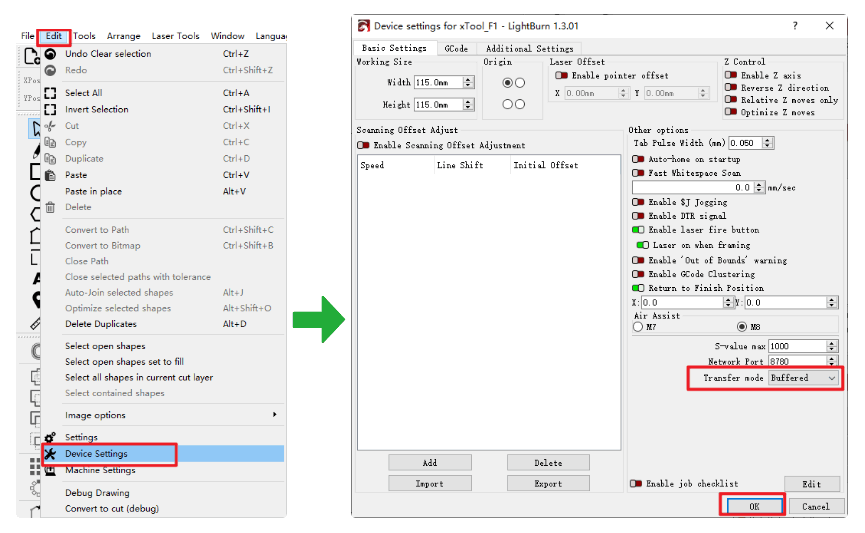
- To ensure that xTool S1 works properly with Lightburn during laser processing, you need to set the transfer mode to buffered: on the toolbar, select Edit > Device Settings. Set the Transfer mode to Buffered.
2. For an image object, enable Overscanning for it to prevent charred edges.
- You can switch between XCS and LightBurn after connecting your computer with xTool S1.
You can visit the website of LightBurn to view more information on how to use LightBurn.
- Video tutorials: https://lightburnsoftware.com/pages/tutorials
- Documentations: https://docs.lightburnsoftware.com/index.html


Mon-Fri,9:00-18:30 PDT
Mon-Fri,9:00-18:30 PDT
vicky@xtool.com
support@xtool.com
support@xtool.com(US)
support.eu@xtool.com(EU)
support.uk@xtool.com(UK)
xTool on causes like education,
public welfare, innovation, etc.,
or if you want to review our
machines, please email
partner@xtool.com
Irwindale. CA91706