
Issue description
When this issue occurs, the indicator light flashes yellow, and the buzzer sounds. A pop-up window appears in the software showing "Ink cartridge not in place", as shown below. Error Codes: 5128 - 5141 (14 codes in total).

Possible causes
- The cartridge is not locked in place: The ink cartridge is not fully inserted. This prevents the latch from locking and may cause poor contact.
- A gap around the cartridge: The gap prevents the ink cartridge contacts from touching the contacts inside the device.
- The contact board is loose: The cartridge detection board on top of the cartridge is loose and cannot make contact with the detection pins inside the device, even when the cartridge is fully inserted.
- The metal contacts are dirty or corroded: Leaked UV ink may corrode the contacts if not cleaned promptly.
Troubleshooting procedure
Step 1: Close the error message
The message may have appeared when the cartridge was removed and remained open afterward.
- Close the error message.
- If the issue persists, proceed to the next step.
Step 2: Reinstall the cartridge
- Remove the cartridge and align it with the slot.
- Push it straight into the slot until you hear a clear click.
- If you do not hear a click, the cartridge may not be locking properly. Record a video of the cartridge installation. Submit a support ticket and attach the video and your troubleshooting details. https://support.xtool.com/submit-ticket
- Note: Install a large cartridge with both hands. Follow the procedure in this installation tutorial Replace Ink Cartridges & Ink Absorber Foams for O1 Omni Printer.

- If the cartridge is installed correctly but the error persists, proceed to the next step.
Step 3: Check the cartridge detection board
- Gently press the cartridge detection board on the back of the cartridge. Check whether the board is loose or raised.
- If the board is severely loose, it may not touch the metal contacts inside the device. Apply two small drops of glue to secure the board to the cartridge. This reduces the gap between them, as shown below.

- If no issues are found with the cartridge, continue to the next step.
Step 4: Check the gap between the cartridge and the device
- Make sure the cartridge is locked in place and the detection board is secure. If the error persists, a gap between the cartridge and the device may be preventing proper contact.
- Take a clear photo of the gap, as shown below.
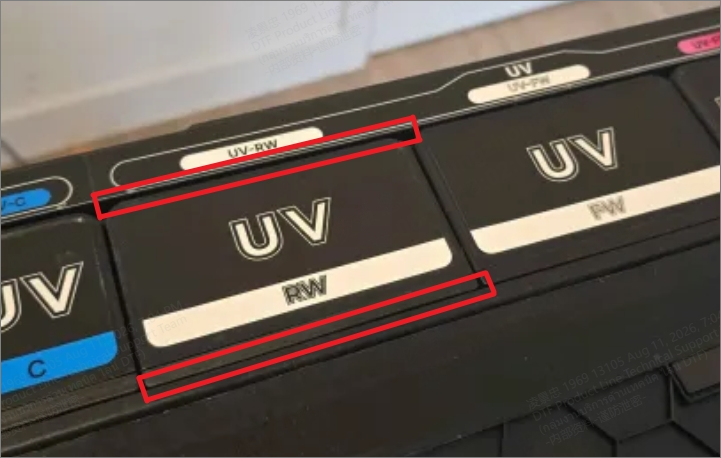
- You can also insert a thin piece of paper to improve contact between the metal contacts, as shown below.

Step 5: Check and clean the metal contacts
- Check the metal contacts on the back of the cartridge and the contacts inside the cartridge slot. Look for leaked ink, darkened areas, or corrosion, as shown below.

- If the contacts are stained with ink or slightly oxidized:
- Turn off the device and unplug the power cable.
- Gently clean the contacts with a wipe moistened with anhydrous alcohol.
- Wait until the contacts are completely dry.
- Reinstall the cartridge and check again.
- If the contacts are severely corroded or damaged (uncommon), take clear photos of the damaged contacts. Submit a support ticket with the photos attached and wait for a response from after-sales support. https://support.xtool.com/submit-ticket
- If the device is new and no issue is found, proceed to the next step.
Step 6: Other causes
- Further analysis requires the following information:
- A video showing the cartridge being installed correctly. Make sure the locking click can be heard clearly.
- A photo or video showing the gap between the installed cartridge and the device.
- A video showing that the cartridge detection board is secure.
- Clear photos showing that the metal contacts are clean and free of corrosion. Include the contacts on both the cartridge and the device.
- The device log. Export the log using the following method:
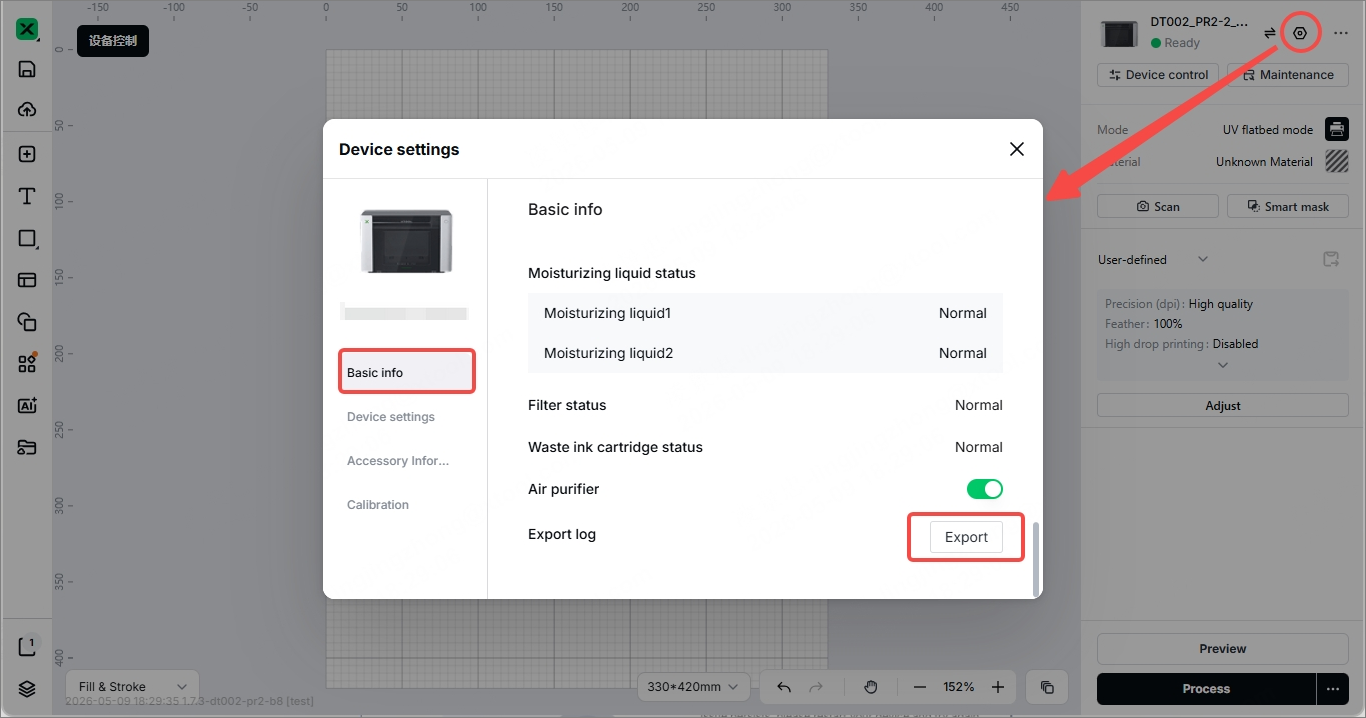
- Submit a support ticket with the information above at https://support.xtool.com/submit-ticket. Wait for a response from after-sales support.
Still experiencing issues?
Should the issue persist after completing the preceding steps, submit a ticket via the "Submit a Ticket" button in the "Help Ticket" section below. The standard response time for xTool Customer Service is one business day.
For a prompt resolution, please include the following details:
- Issue description: A detailed explanation of the observed problem.
- Video evidence: Attach a video demonstrating the issue, where applicable.
- Troubleshooting performed: Any troubleshooting steps you have already attempted, along with their results.
This information is crucial for xTool technical support engineers to provide timely assistance.
Documentation feedback
Help improve this content by providing feedback. If this content did not meet your requirements, select "No" in the "Was this page helpful?" section below. Include specific details about what was unclear or missing in the pop-up suggestion box. Feedback submissions are reviewed by xTool technical writers to enhance future documentation.

