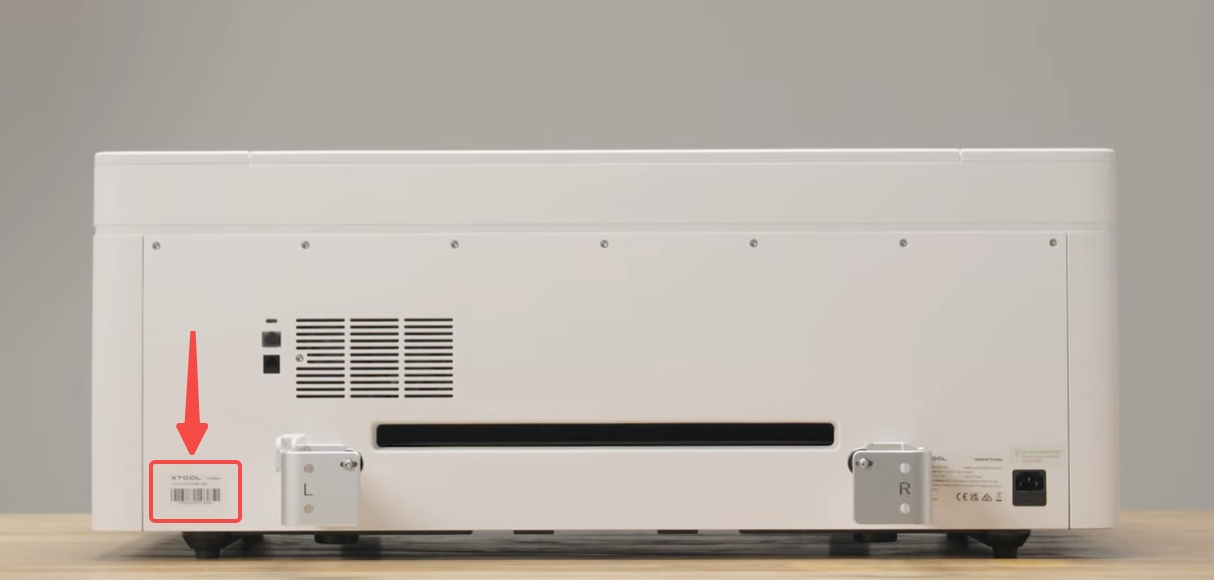
Note: If you are using the xTool Apparel Printer, this article does not apply to you. Please refer to another article: Diagnose & Fix "No White Output" or White Ink Flow Blockage on xTool Apparel Printer.
Issue description
When printing test patterns or patterns, white ink cannot be printed.
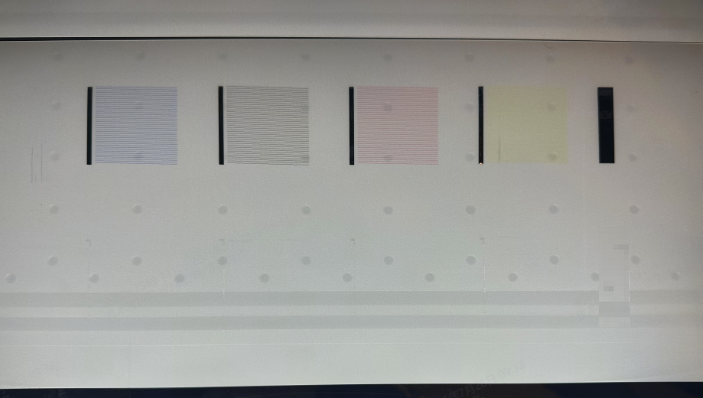
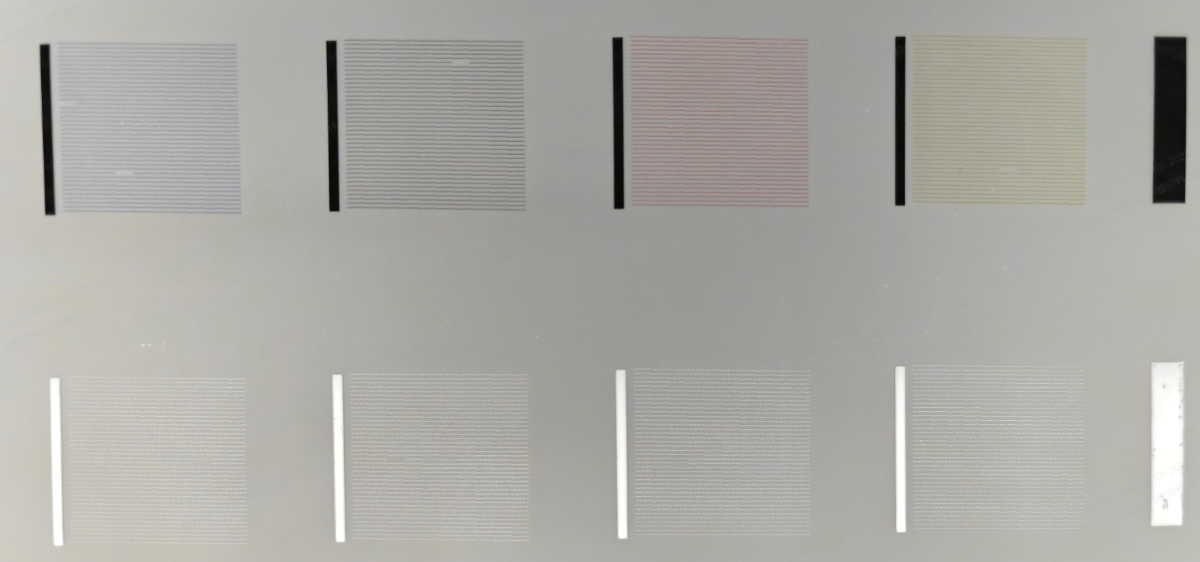
Abnormal - No white color output in sample print test
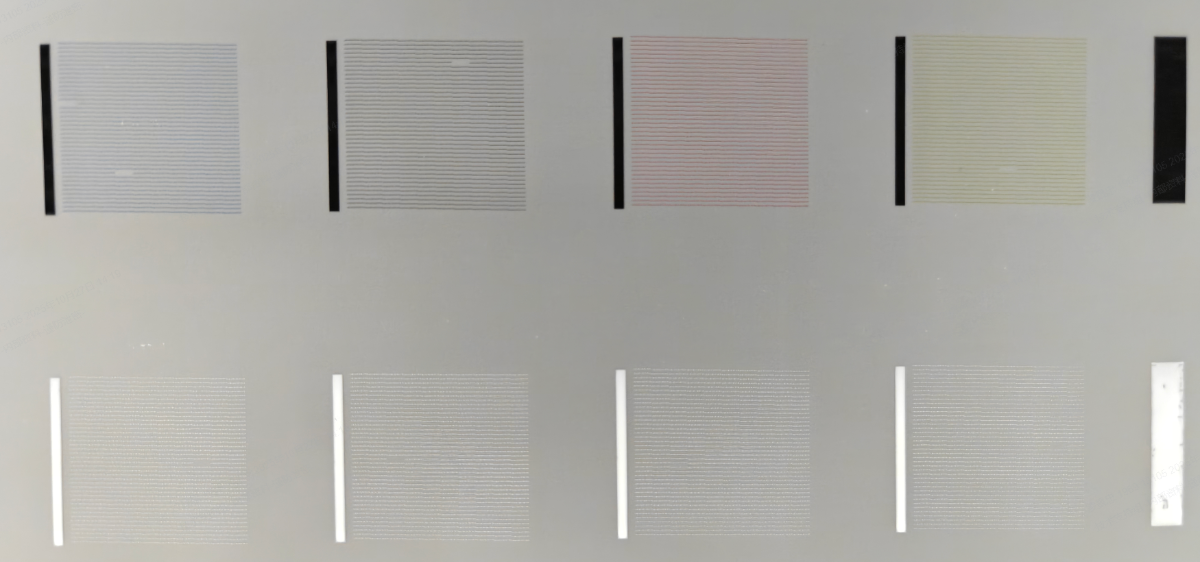
Normal - Both CMYK color and white color output in sample print test
How to determine if a test print is acceptable: If each color block has no more than 5 missing lines, it is considered an acceptable test print.
Possible causes
Occurs when first powered on:
- Print head protective film not removed
- White ink tube clips not released
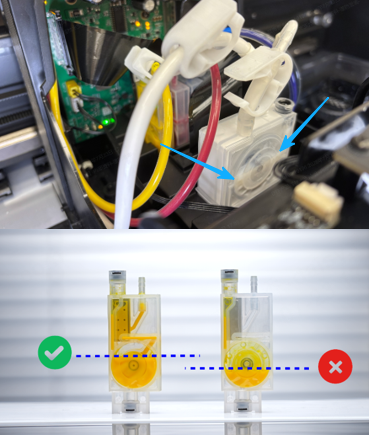
- Insufficient ink in the white ink damper
- Loose white ink print head connection cable
- Waste ink pump failure (very low probability)
Occurs after extended use or long-term standby:
- White ink sedimentation
- White ink clips not released
- Loose white ink print head connection cable
- Waste ink recovery malfunction (waste ink tube clogged)
- White ink tube clogged
- Severe print head blockage
Troubleshooting procedures
Scenario A: No color ink on initial startup
(1) Check whether the print head protective film is peeled off
Move the print carriage to the far left. Using the mirror on the baseplate, look up at the bottom of the print head and confirm the thin plastic protective film has been peeled off.
- If the film is still present, peel it off.
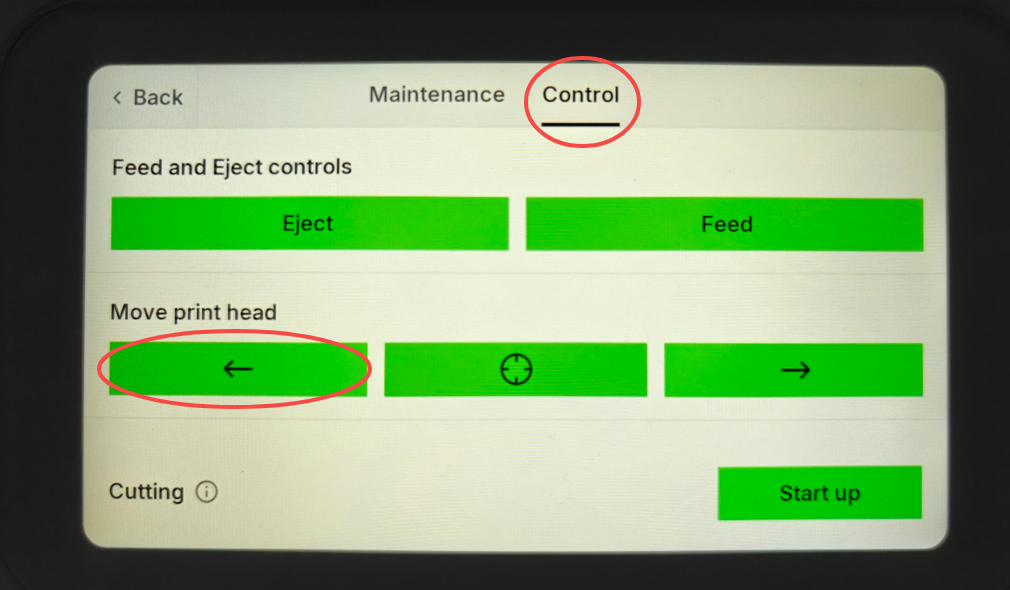
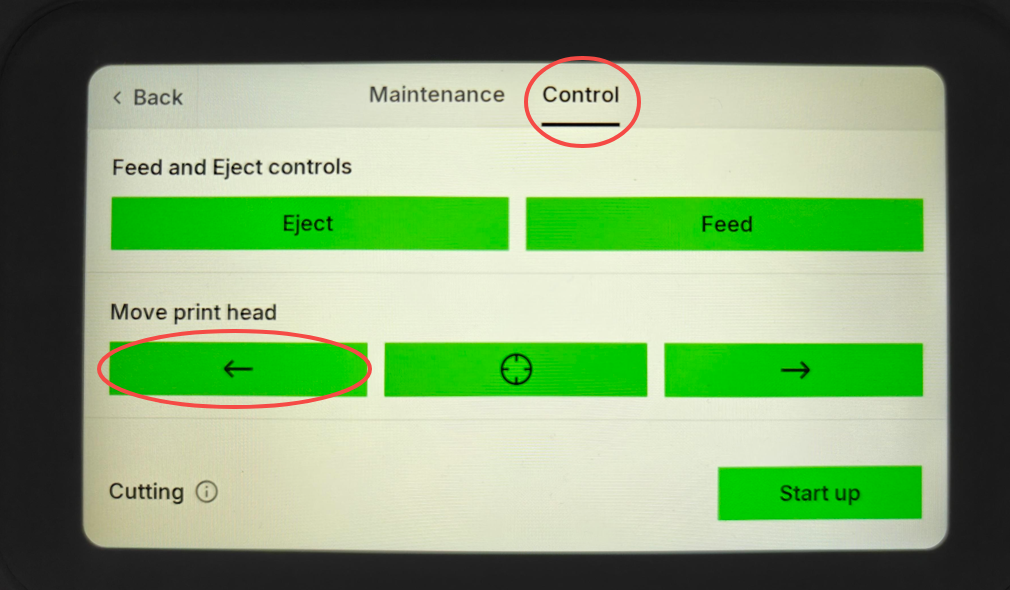
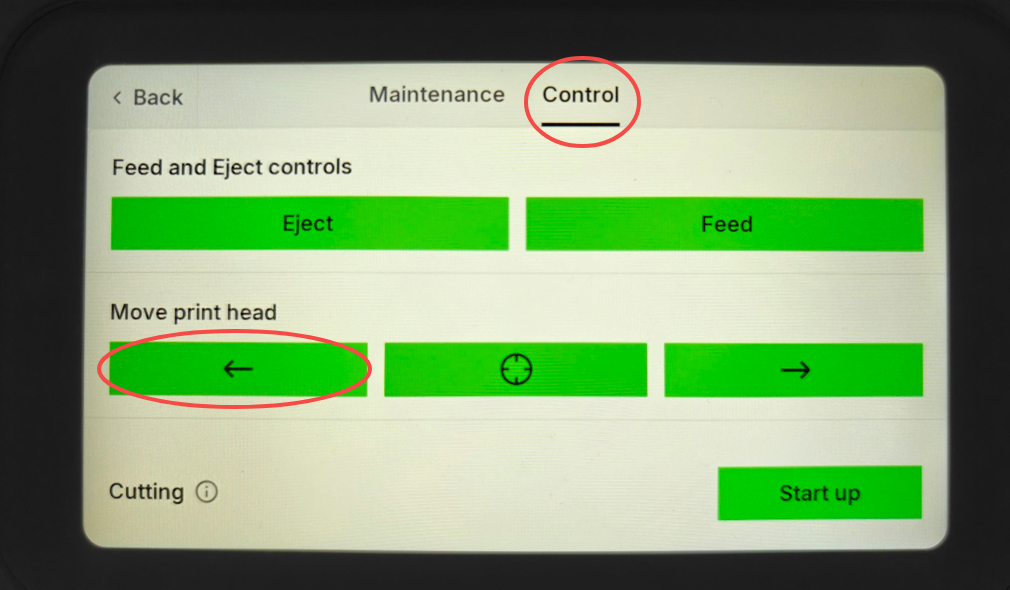
Move the print head to the far left by tapping the key
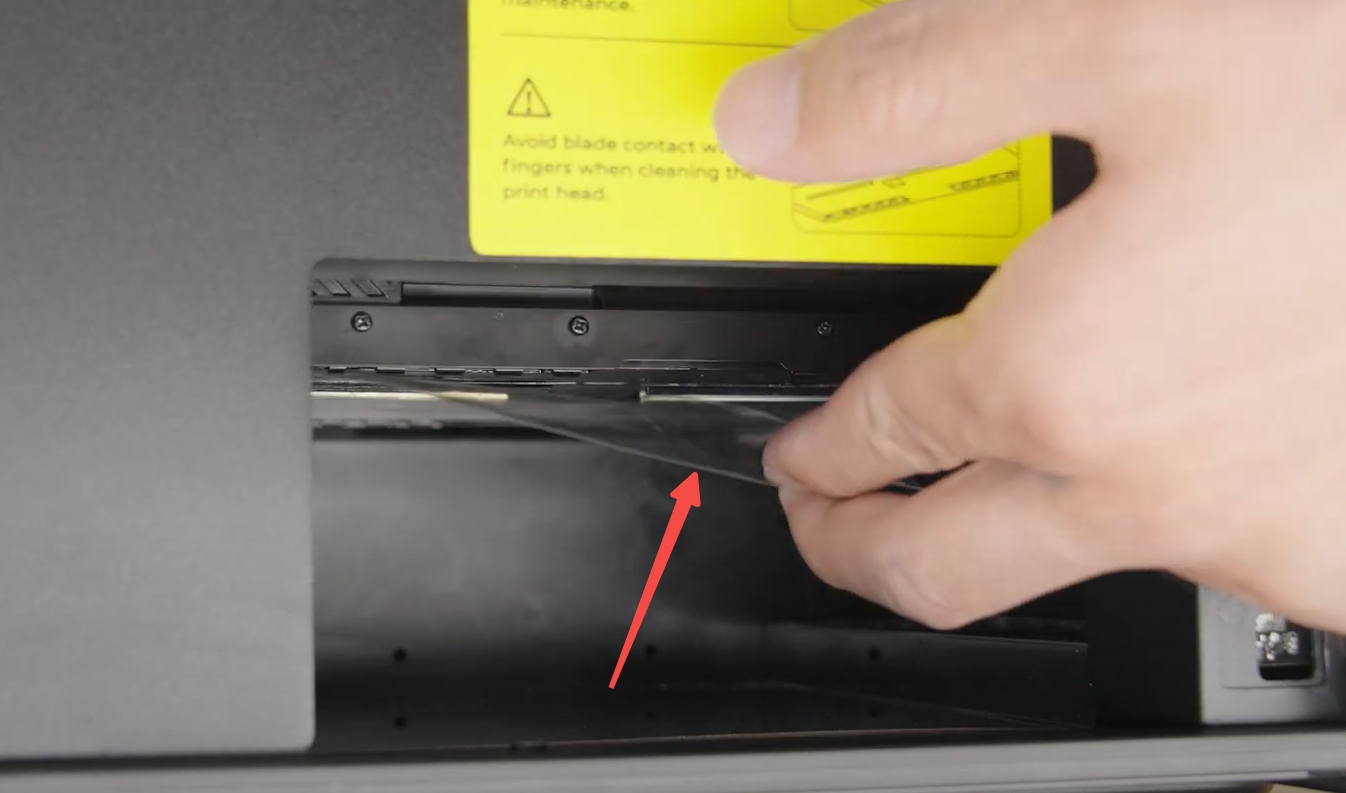
Check and make sure the film has been removed
- If the film has already been removed (It's possible that it was peeled off along with the white protective film), proceed to the next step.
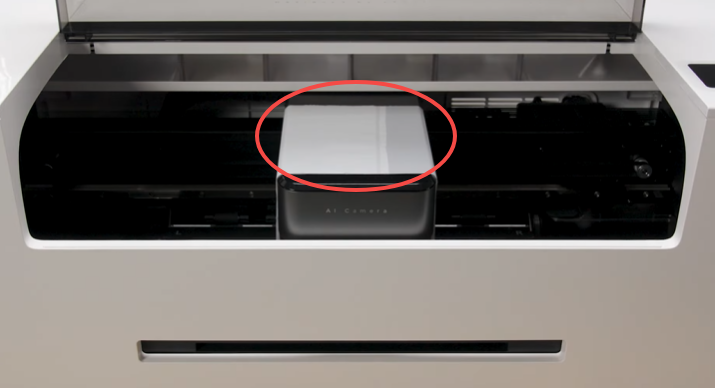
(2) Check all ink clips
Ensure all ink clips are in the open/released position. If all clips are confirmed to be open, proceed to the next step.
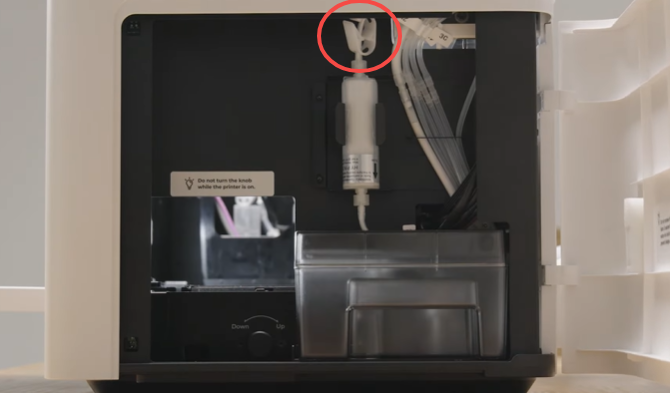
One white ink clip in the right panel
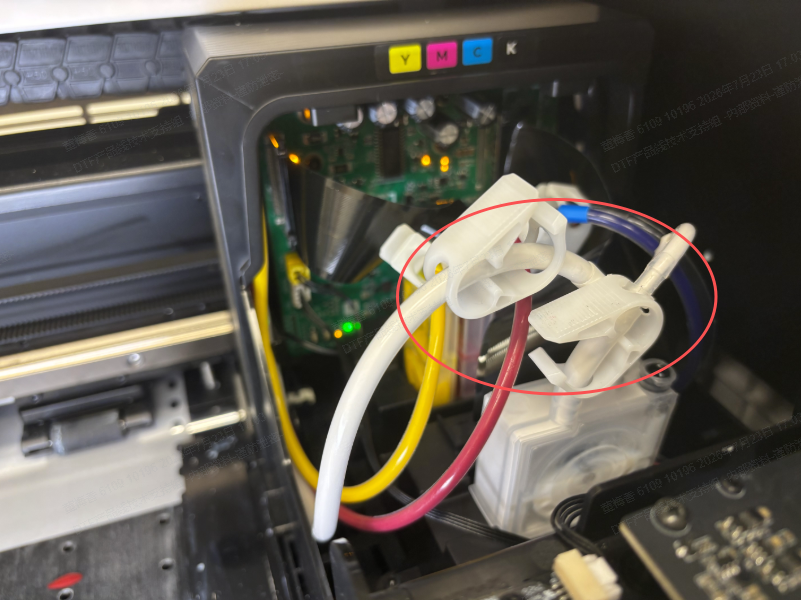
Two white clips on the white ink damper
(3) Check the ink level of the white ink damper
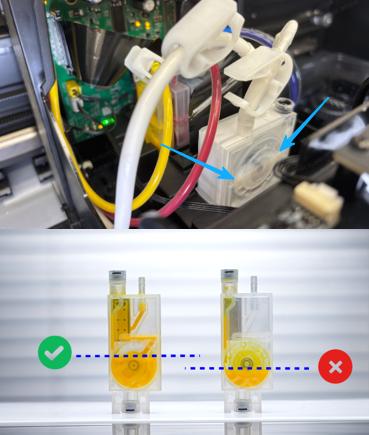
If the ink level of the white ink damper is sufficient, proceed to the next steps.
(4) Check and ensure that the white ink print head cable is securely connected.
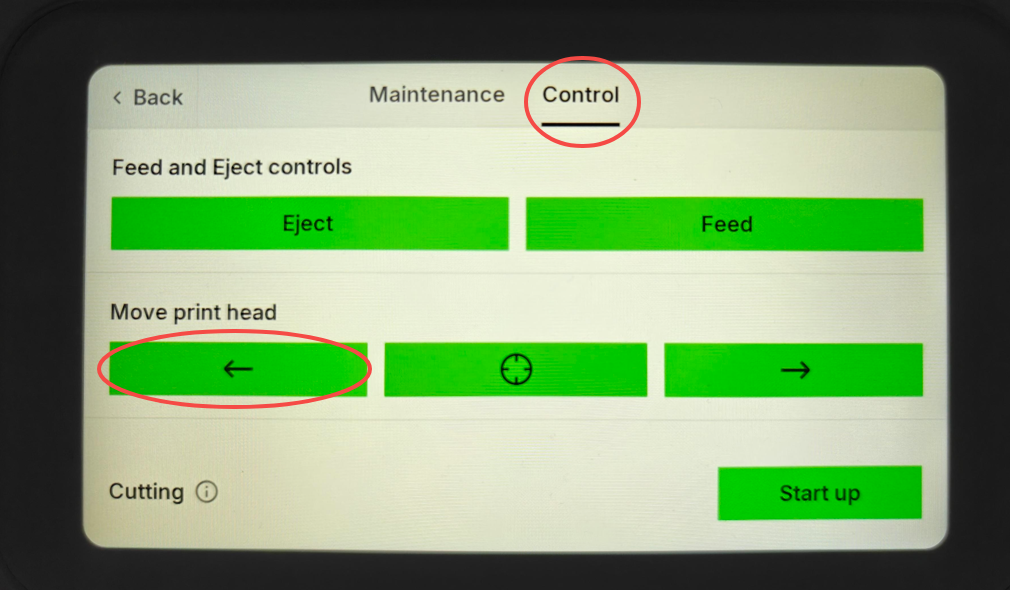
- Move the print head to the center of the printer: On the LCD control panel, tap: Maintenance > Control, and the Left Arrow button until the carriage is centered inside the printer.
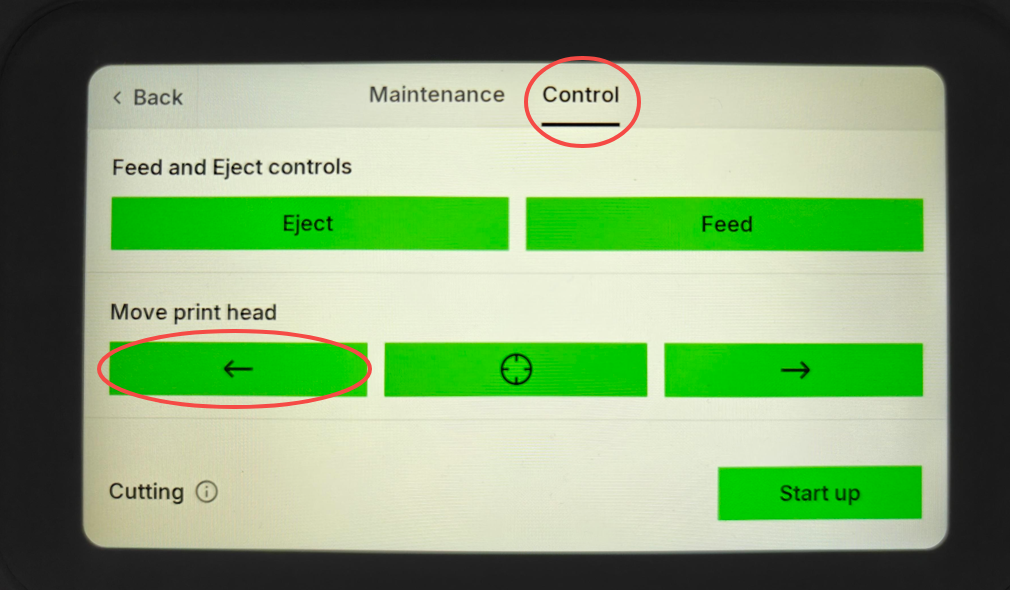
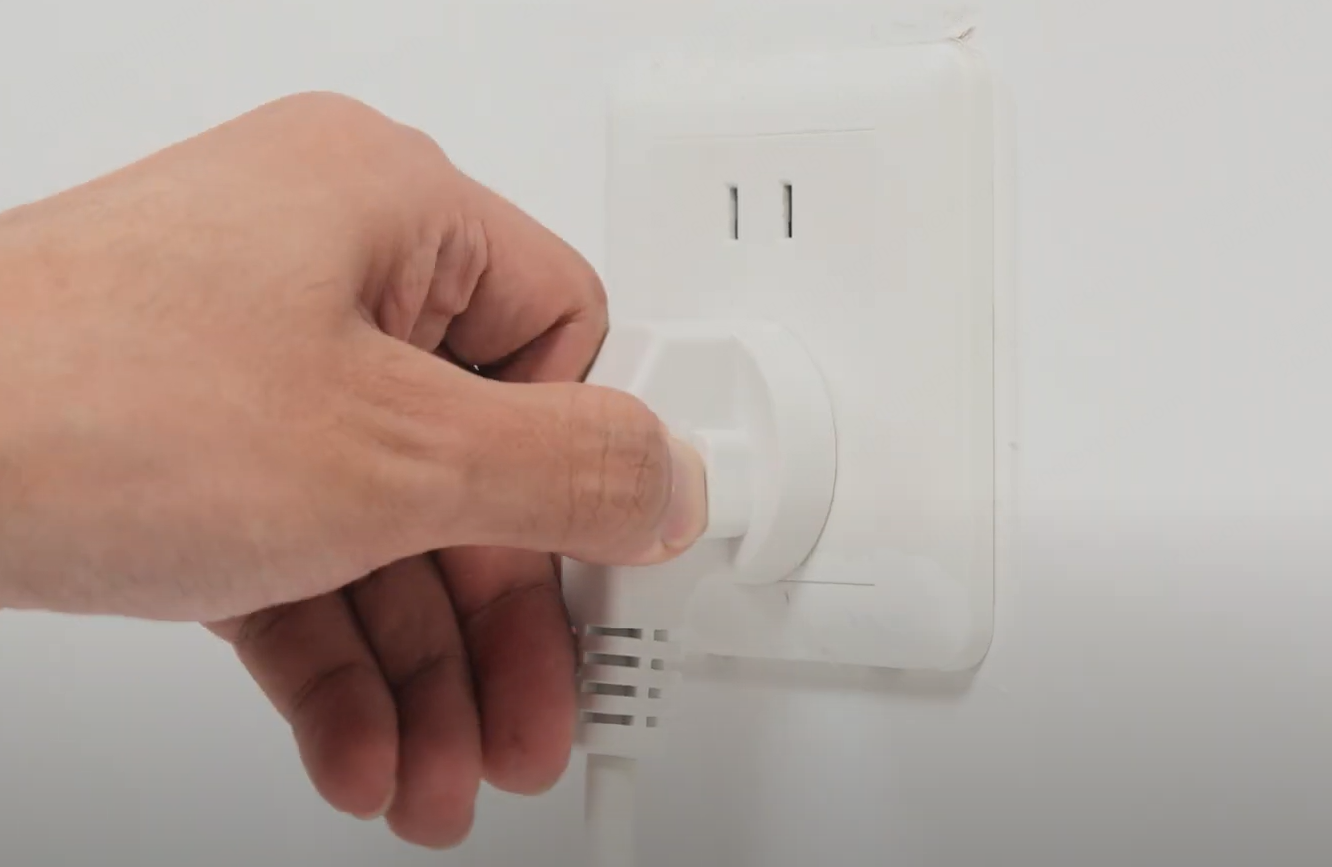
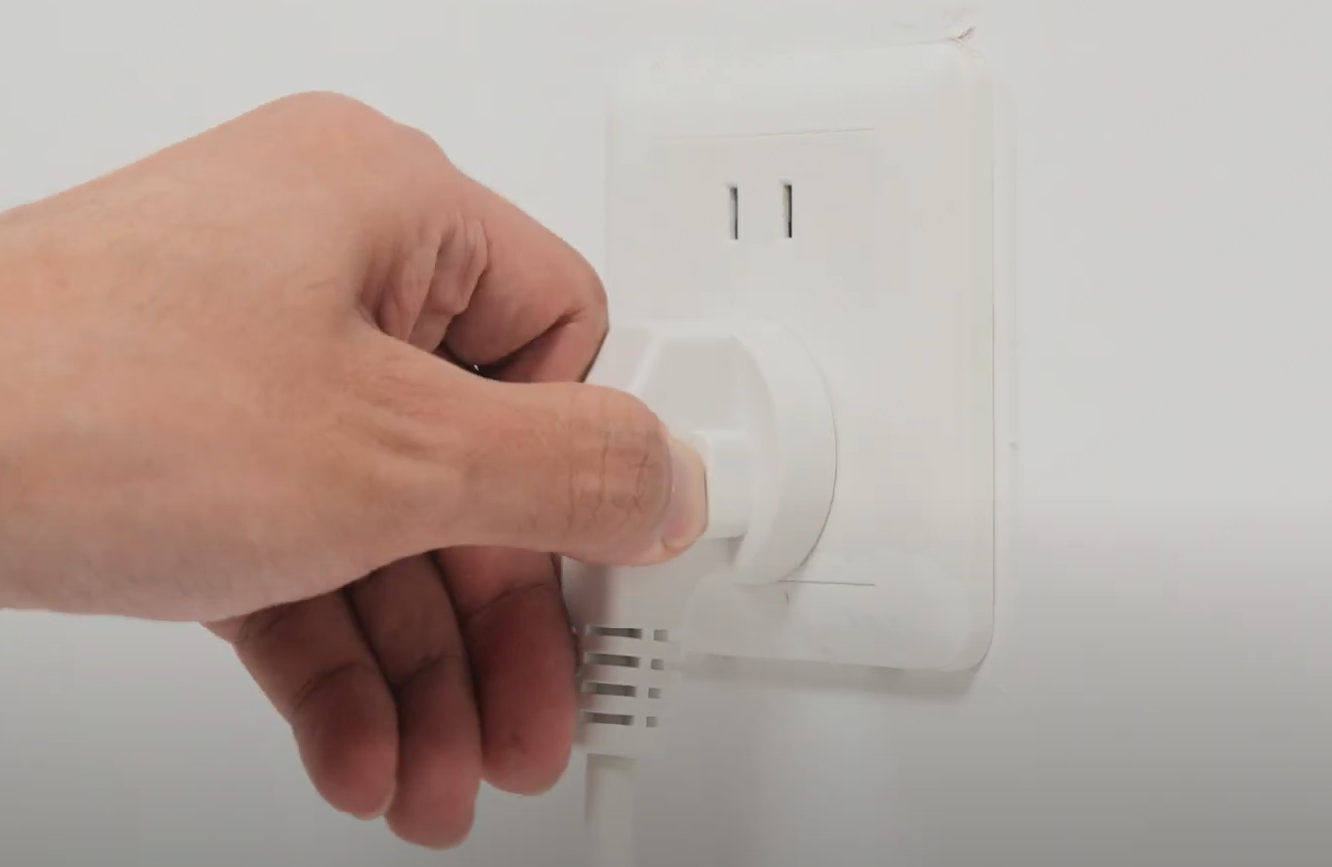
- (Important! Do not ignore this step) Unplug the printer's power cable.
- Unplug and replug the white ink print head cable to ensure that the connectors at both ends are securely connected.
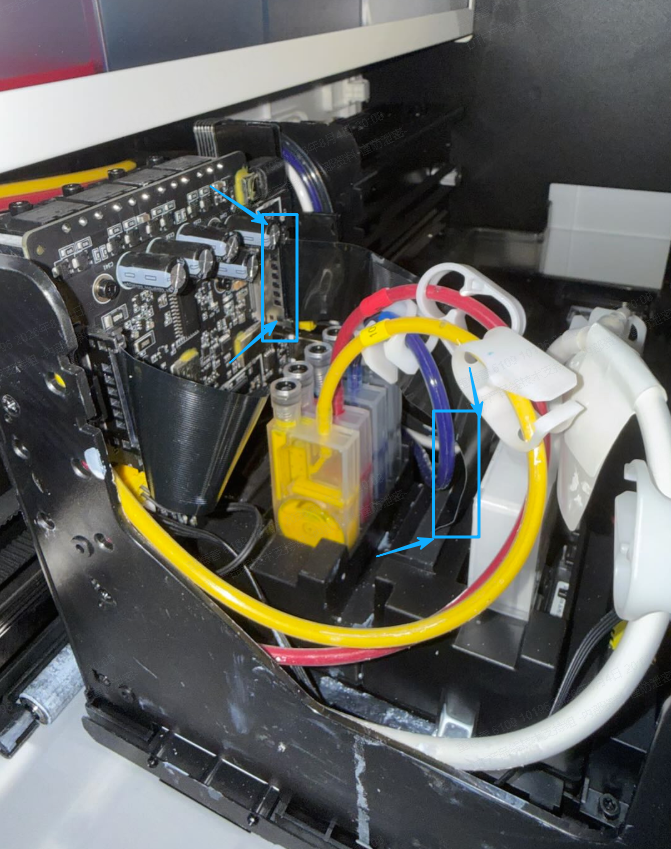
If it has already been unplugged and reconnected and the connection is secure, proceed to the next step.
(5) Check whether the pump operates properly
- Plug in the printer’s power cable to ensure the printer has a normal power supply.
- Tap the screen to move the print head to the center position.
Please record a video of the following steps:
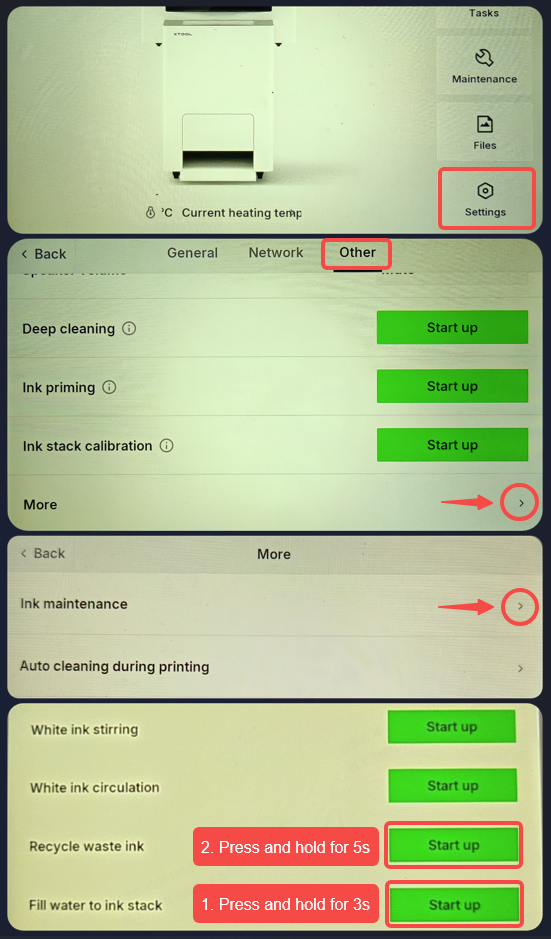
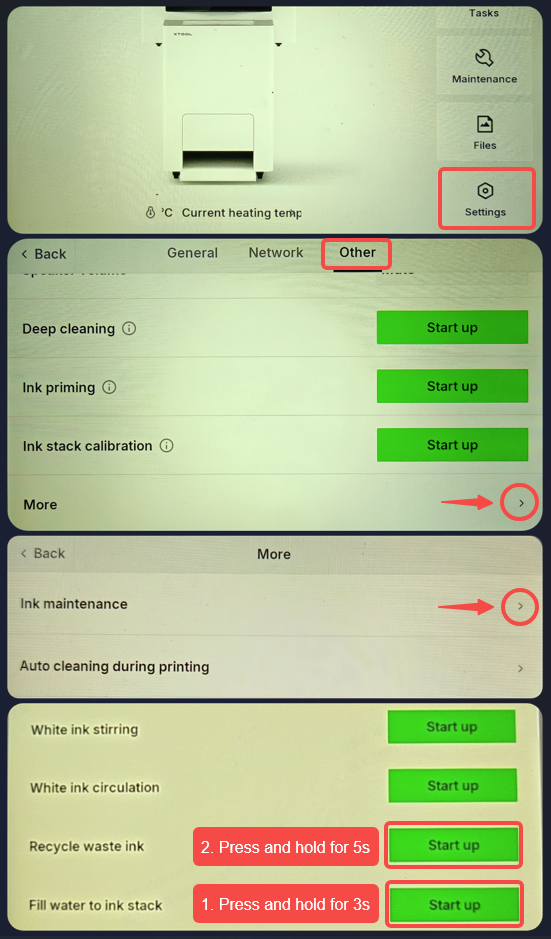
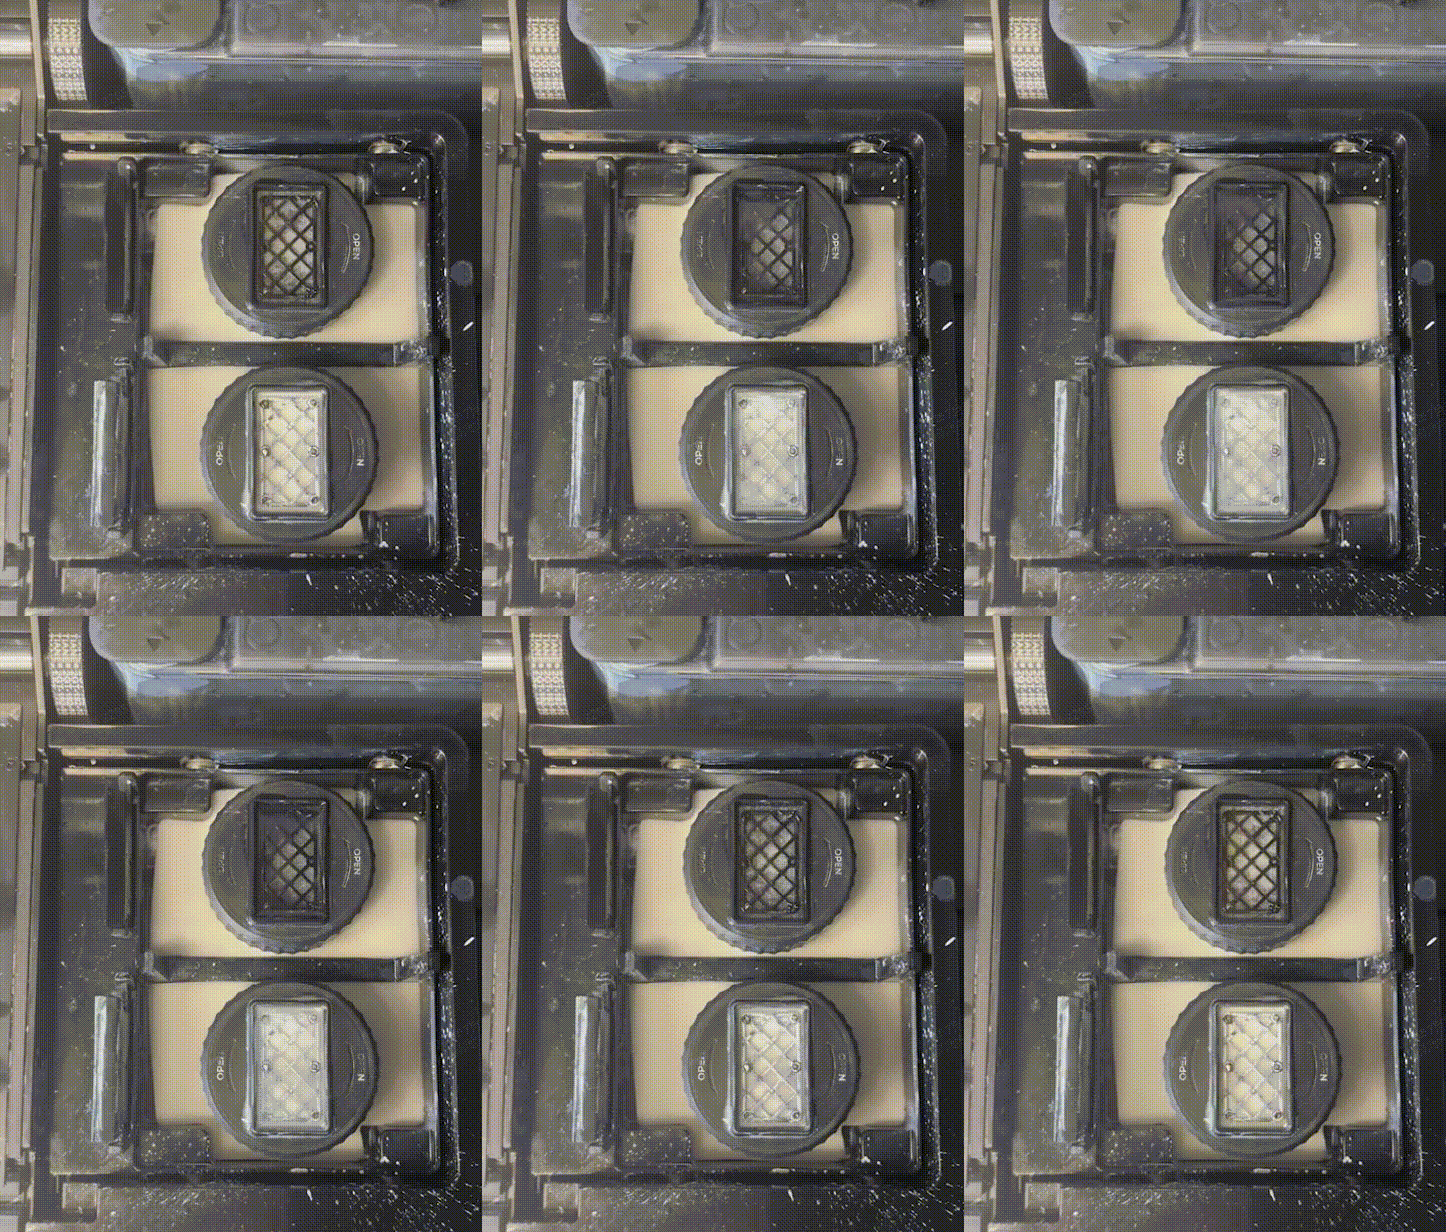
- Follow the steps shown in the image below. First, Fill water, and then Recycle waste ink. While holding down the button, observe the position of the white ink pad.
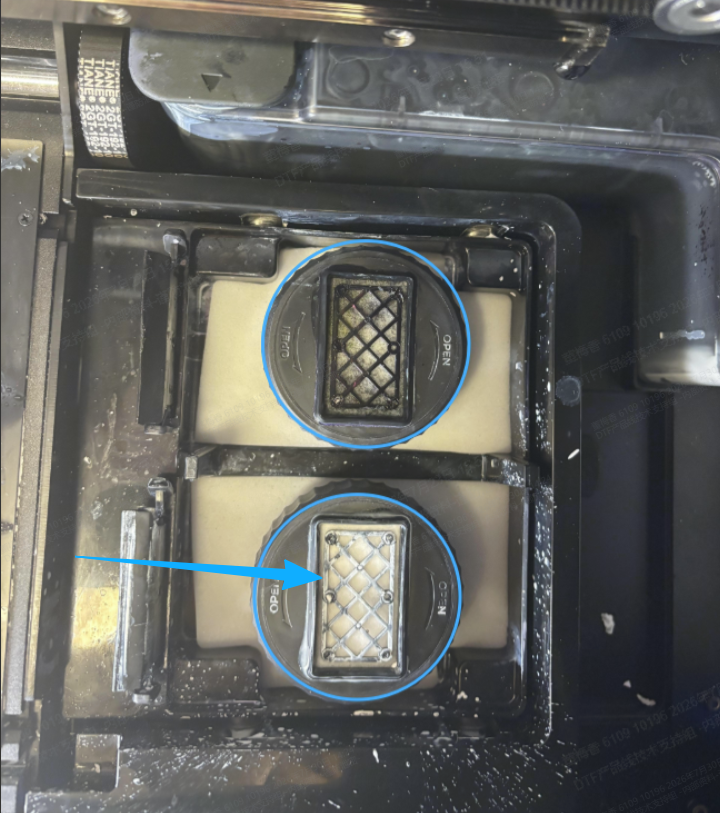
- If the "water rises and is then drawn back up" (as shown in the video below) appears successively on the white ink pad, this indicates that the white ink clean water pump and waste ink pump function properly.
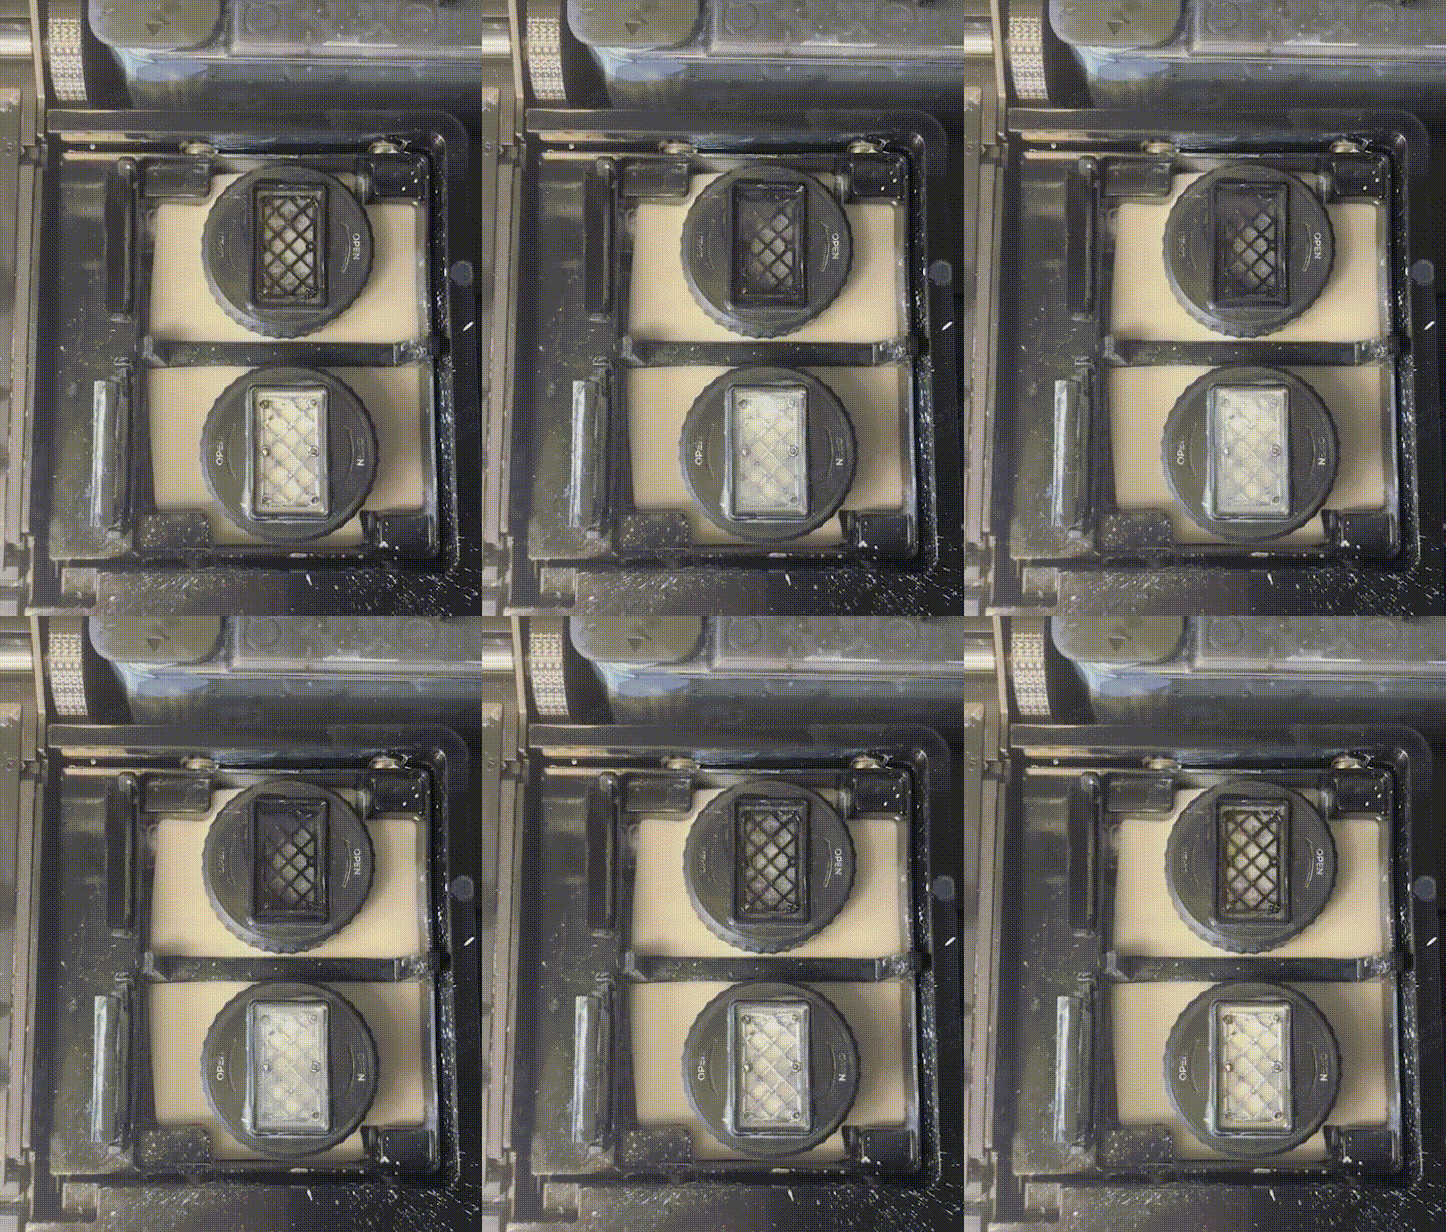
- If no water rises, it indicates that the white ink clean water pump is malfunctioning (this happens very rarely). You can refer to the following video tutorial to locate the clean water pump and replace it.
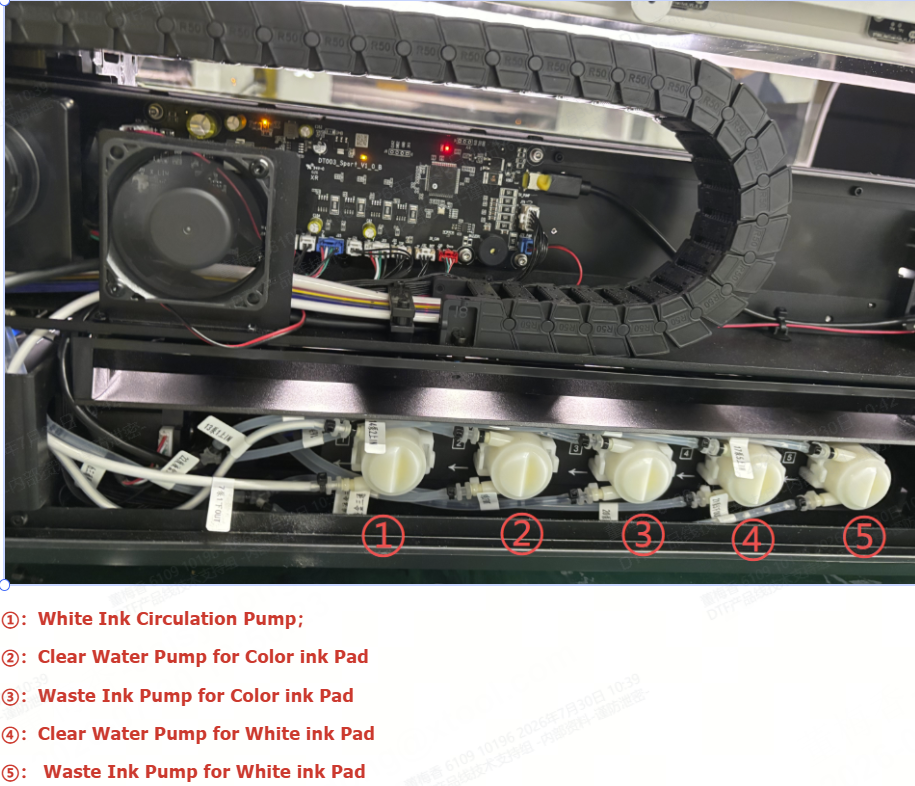
① Remove the rear panel of the device: Disassemble & Assemble the Casings for xTool Apparel Printer
② Replace the pump: Replace the printer pump
- If "water rises but cannot be drawn, or is drawn very slowly", it indicates that the white ink waste ink pump is malfunctioning. You can refer to the following video guide to locate the waste ink pump and replace it:
① Remove the rear panel: Disassemble & Assemble the Casings for xTool Apparel Printer
② Replace the pump: Replace the printer pump
If all of the above checks have been completed and the problem persists, please provide the following information to xTool after-sales customer service to help them quickly analyze and resolve it:
· The troubleshooting conclusion for each step above;
· The information required in the “Still experiencing issues?” section at the end of the article
Scenario B: No white ink after extended use or long-term standby
(1) Check white ink condition & agitation
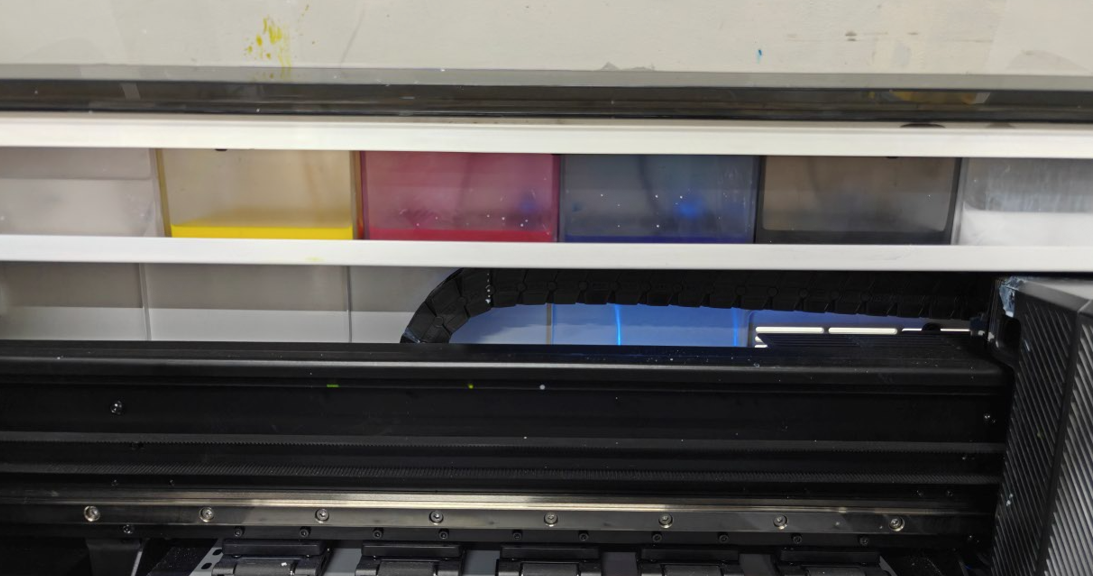
- Open the printer's lid and visually inspect the main white ink tank for signs of separation or settlement.
Normal white ink condition:
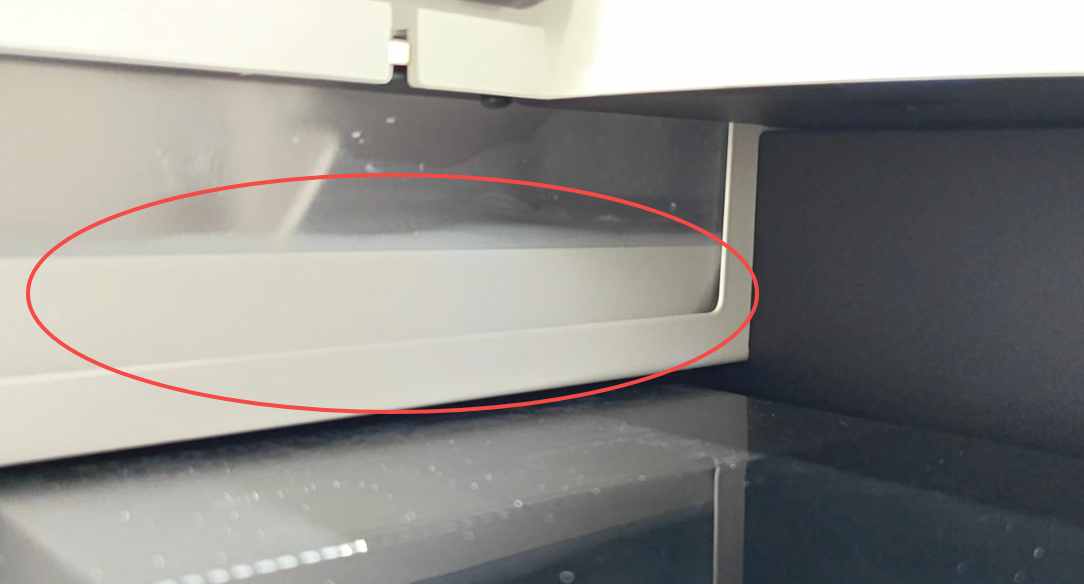
- If separation is detected, activate the white ink stir function:
On the LCD touchscreen, navigate to Settings > Other > More > Ink maintenance > White Ink Stirring.
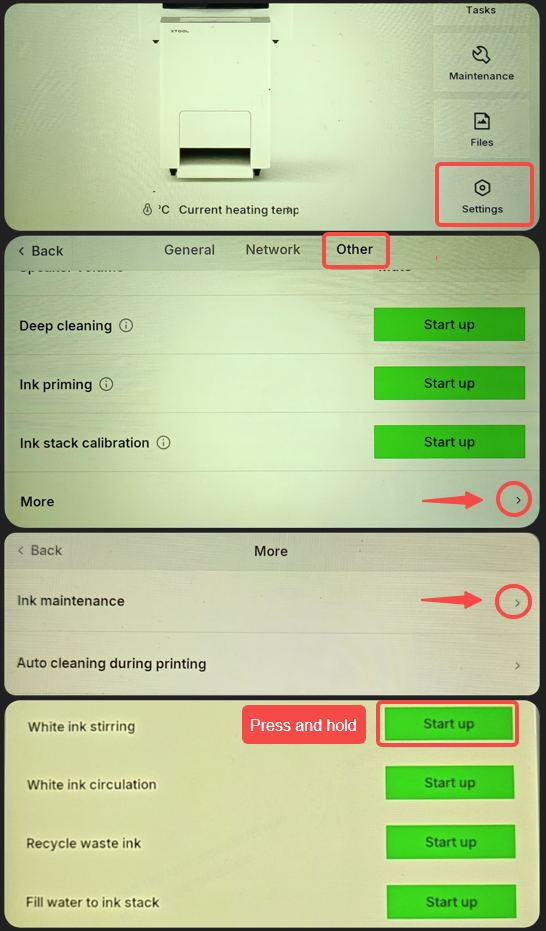
Observe whether the stirrer stirs the white ink normally.
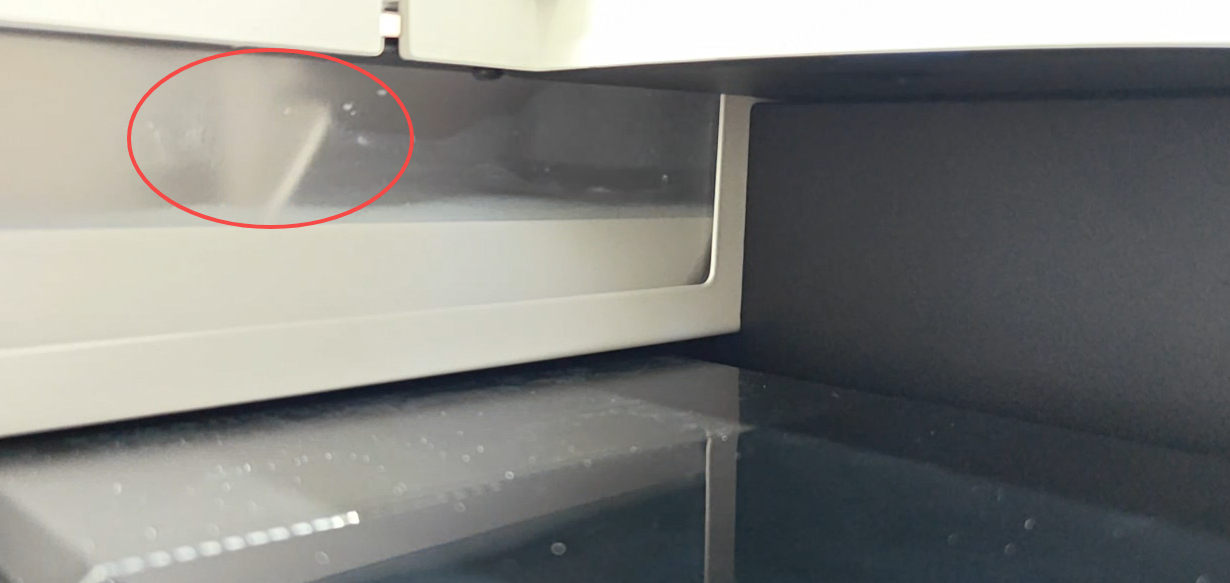
- If the motor malfunctions: There may be a problem with the stirring motor or its connecting cables, which will need to be replaced. Please contact the xTool customer service team.
- If the motor is normal: It indicates that the stirring motor is working properly. The white ink separation may have been caused by the device being powered off for an extended period. After performing this white ink stirring operation, please be sure to keep the device powered on, and then observe whether the problem is resolved.
- If no separation: Proceed to Step 2.
(2) Check white ink clips
Ensure all ink clips are in the open/released position. If all clips are confirmed to be open, proceed to the next step.
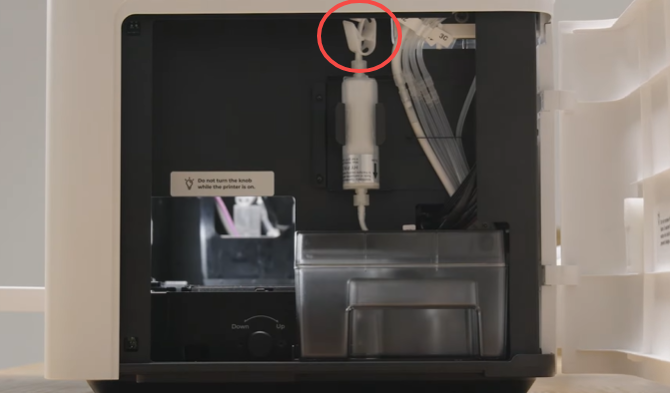
One white ink clip in the right panel
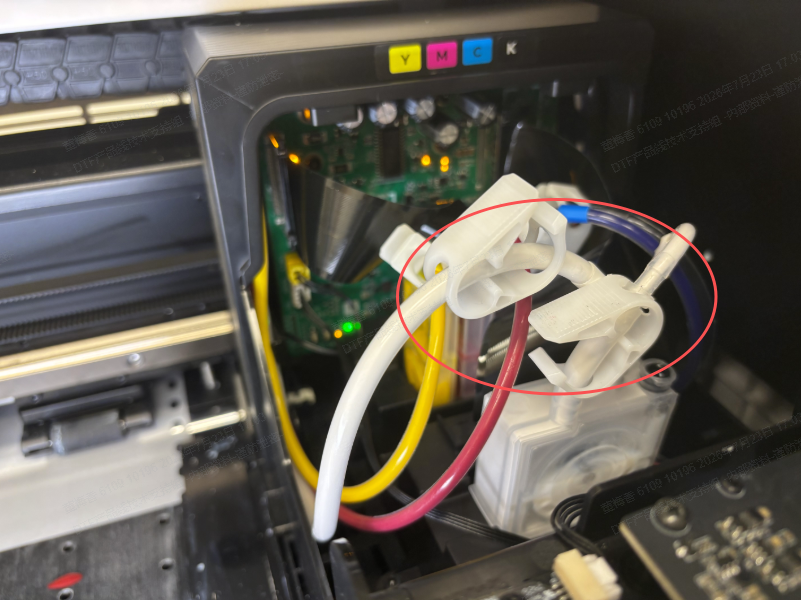
Two white clips on the white ink damper
(3) Check and ensure that the white ink print head cable is securely connected
- Move the print head to the center of the printer: On the LCD control panel, tap: Maintenance > Control, and the Left Arrow button until the carriage is centered inside the printer.
- (Important! Do not ignore this step) Unplug the printer's power cable.
- Unplug and replug the white ink print head cable to ensure that the connectors at both ends are securely connected.
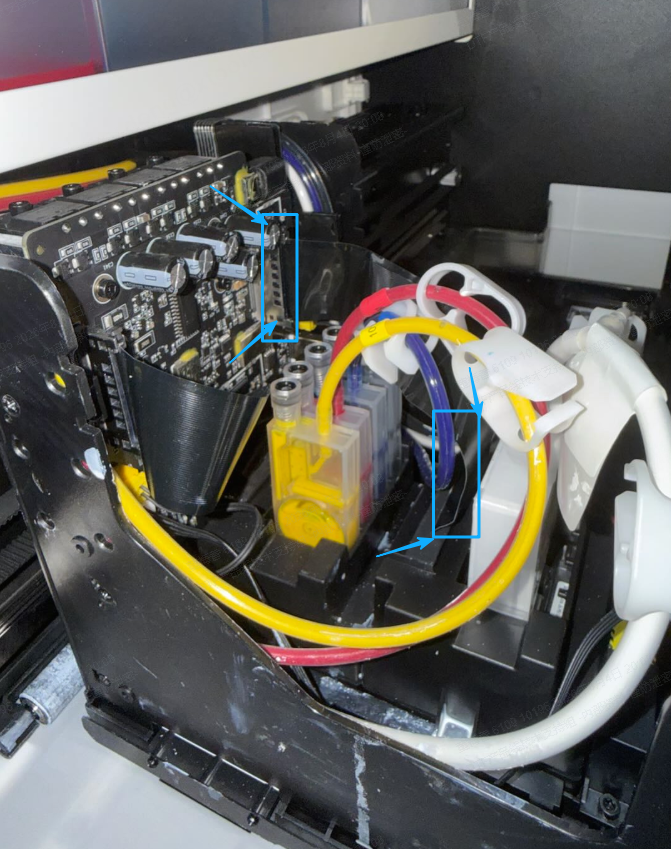
If it has already been unplugged and reconnected and the connection is secure, proceed to the next step.
(4) Check whether Recycle waste ink function operates properly.
- Plug in the printer’s power cable to ensure the printer has a normal power supply.
- Tap the screen to move the print head to the center position.
Please record a video of the following steps:
- Follow the steps shown in the image below. First, Fill water, and then Recycle waste ink. While holding down the button, observe the position of the white ink pad.
- If the "water rises and is then drawn back up" (as shown in the video below) appears successively on the white ink pad, this indicates that the color ink Recycle waste ink function works properly. Proceed to Step 6.
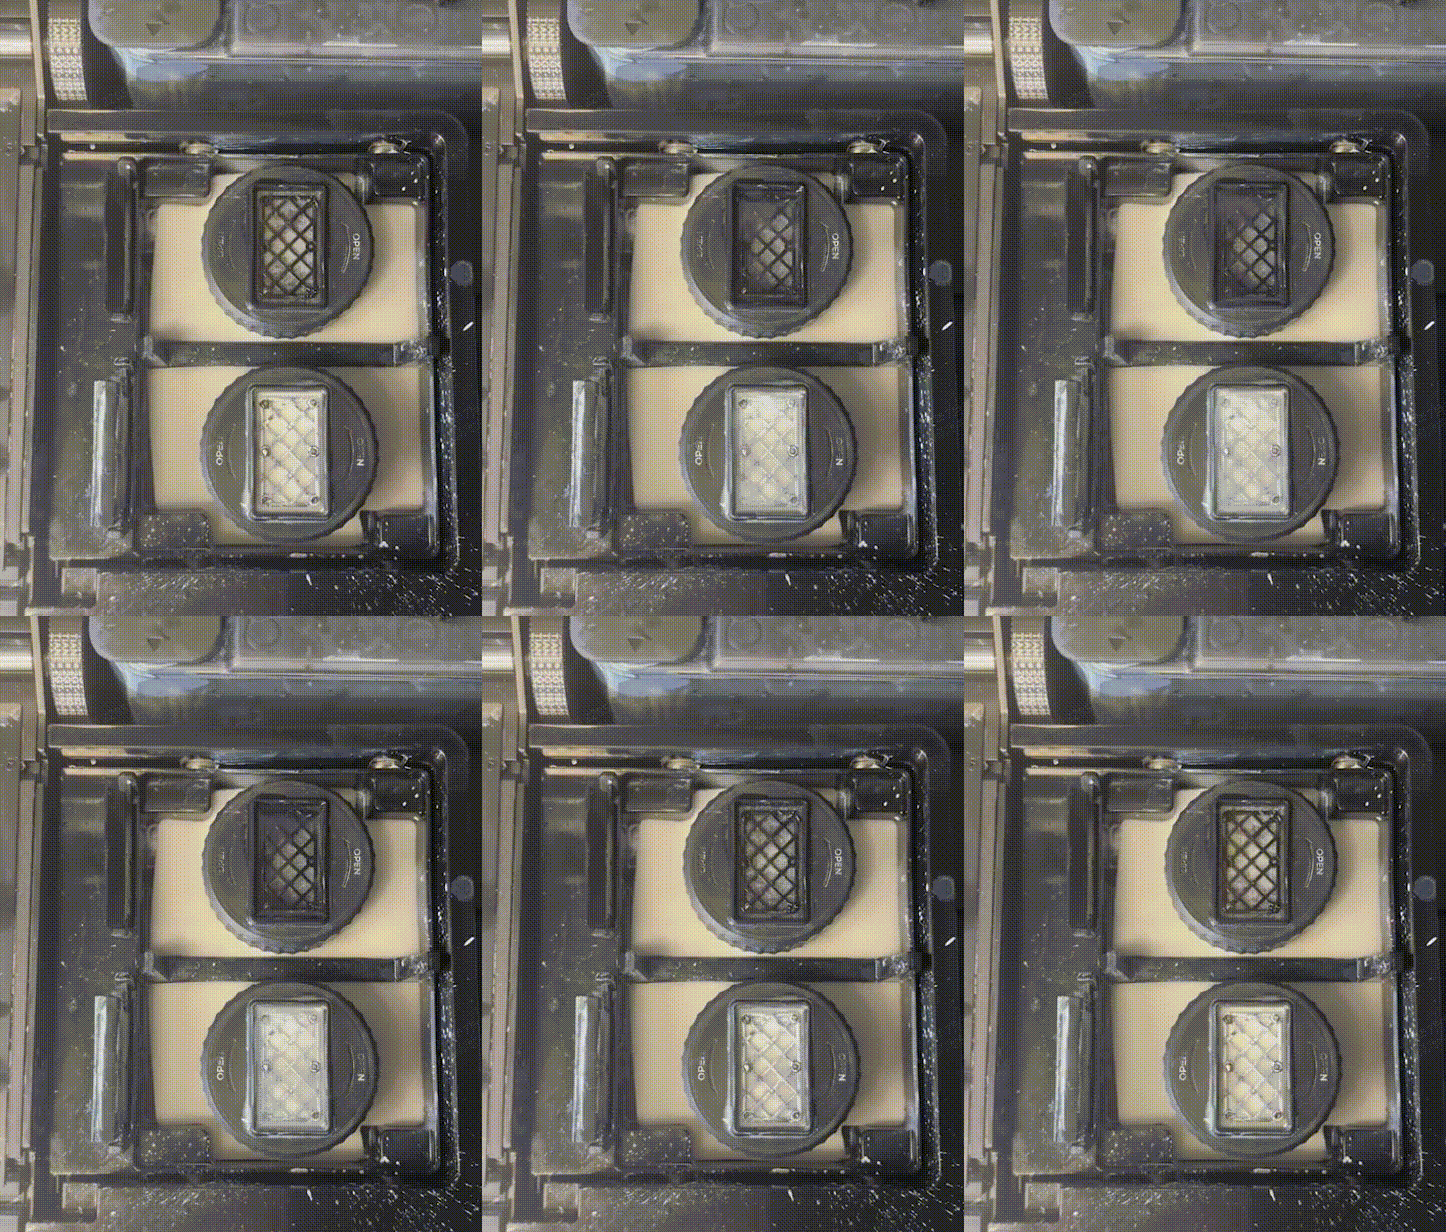
- If there is water rising but it cannot be pumped away normally (for example, waste ink cannot be suctioned away or is suctioned away very slowly), it indicates that waste ink recovery is abnormal. Please follow the steps below to further identify the cause:
a. Removing the white ink pad: Please refer to the video.
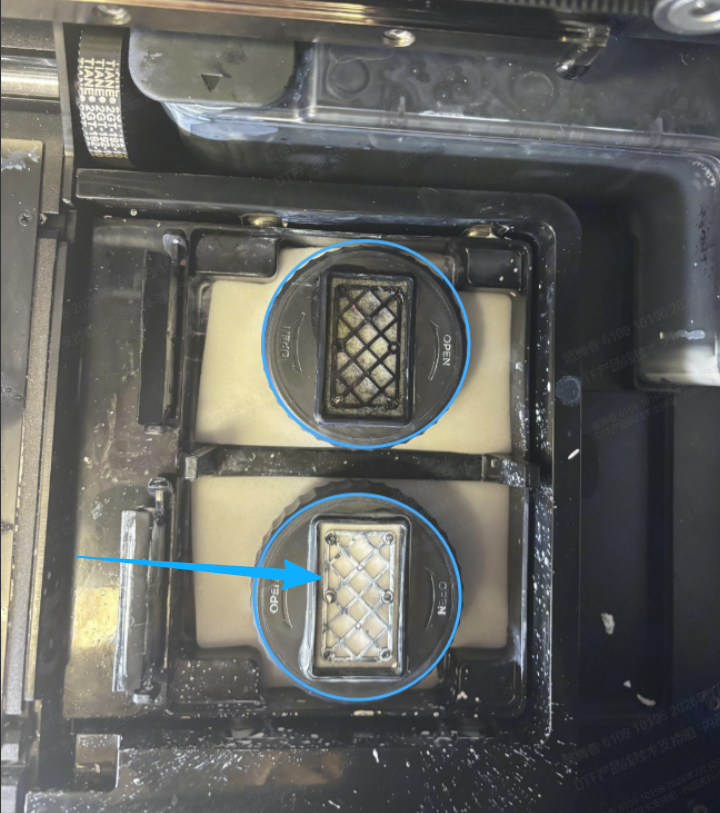
b. Identify the clean ink inlet and waste ink outlet inside the white ink pad:
Perform Fill water to ink stack for 3 seconds and observe the two openings: the opening from which the moisturizing solution is dispensed is the clean water outlet, and the other opening is the waste ink outlet for white ink.
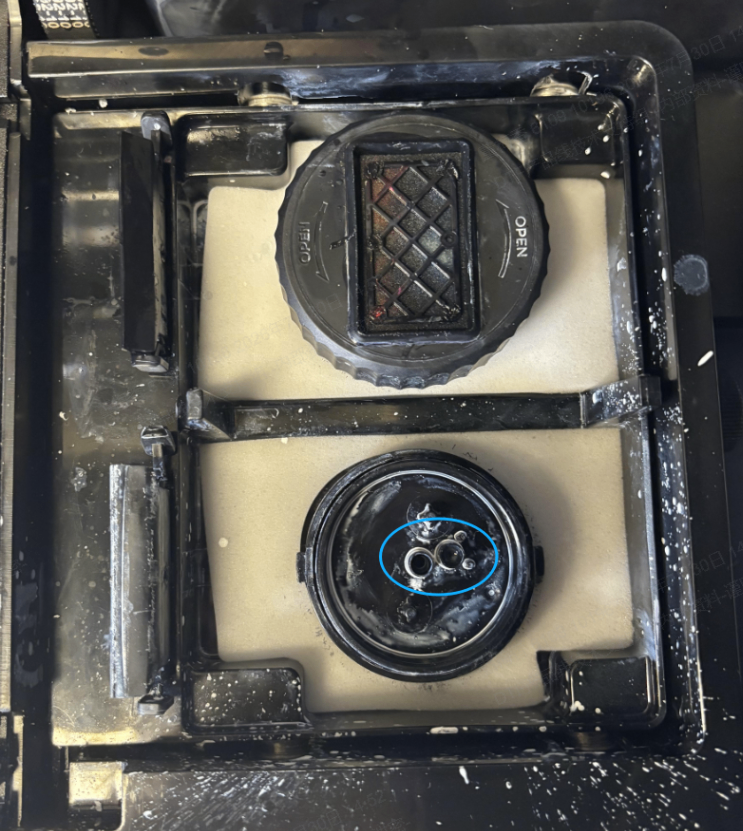
c. Check whether the waste ink tube is clogged:
Fill a syringe with waste ink or clean water --> use the syringe to inject some clean water into the waste ink tube opening --> press and hold Recycle waste ink for 3 seconds --> observe whether the clean water at the waste ink tube opening is being sucked away (the opening on the right is the waste ink tube opening as shown)
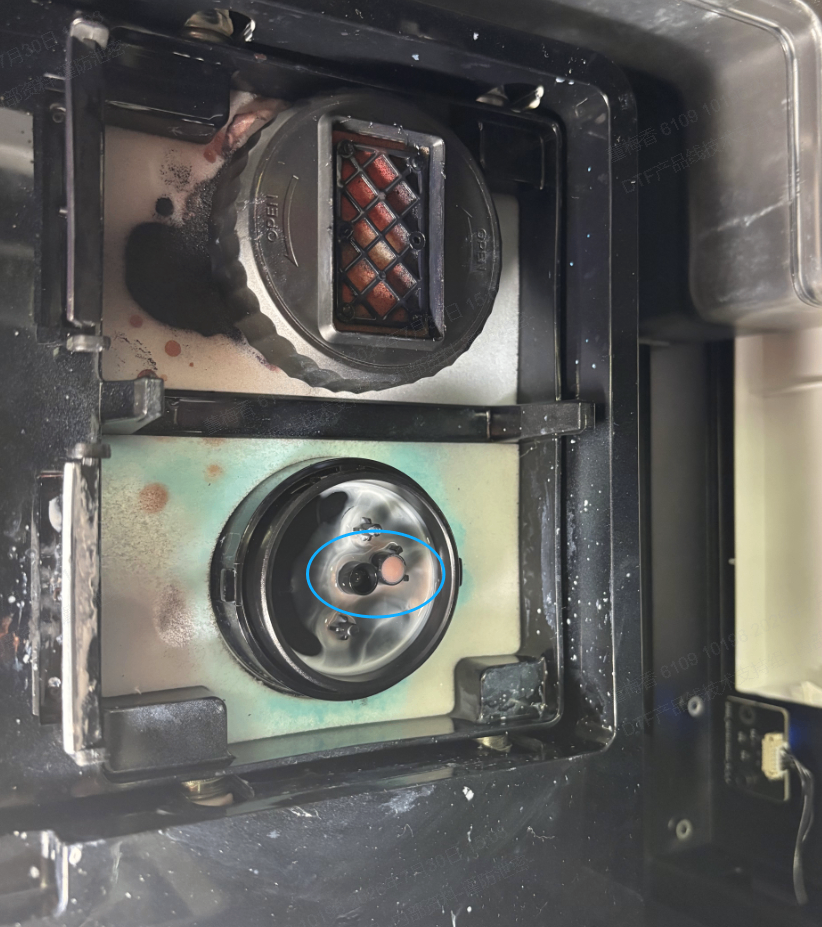
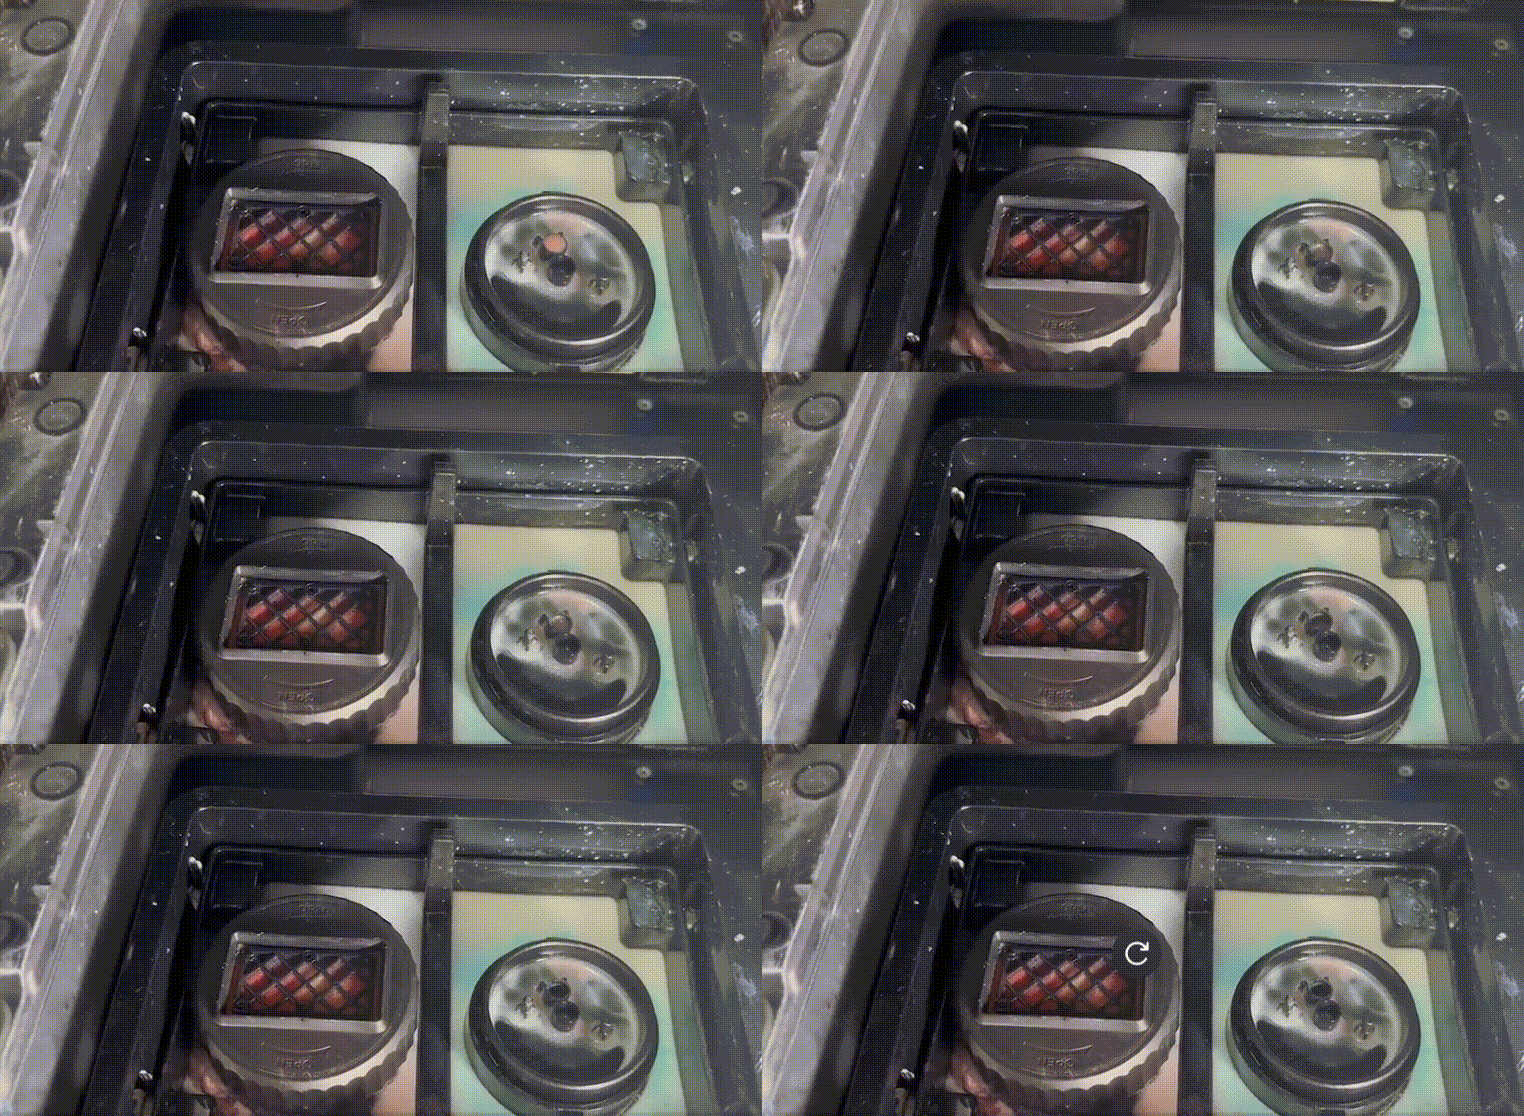
- If the ink is drawn out, it means the waste ink tube is not clogged. The ink pad needs to be replaced. Follow the tutorial to replace the ink pad.
Note: The ink pad needs to be replaced regularly, typically once every three months.
- If the ink has not been drawn out, it indicates that the waste ink tube is clogged. Please contact xTool customer service to confirm the location of the clog and receive instructions on how to clear it.
(5) Check whether the ink tubes in the white ink system are clogged
1. Unplug the white ink tube, place it above the white ink tank, and secure it in place.
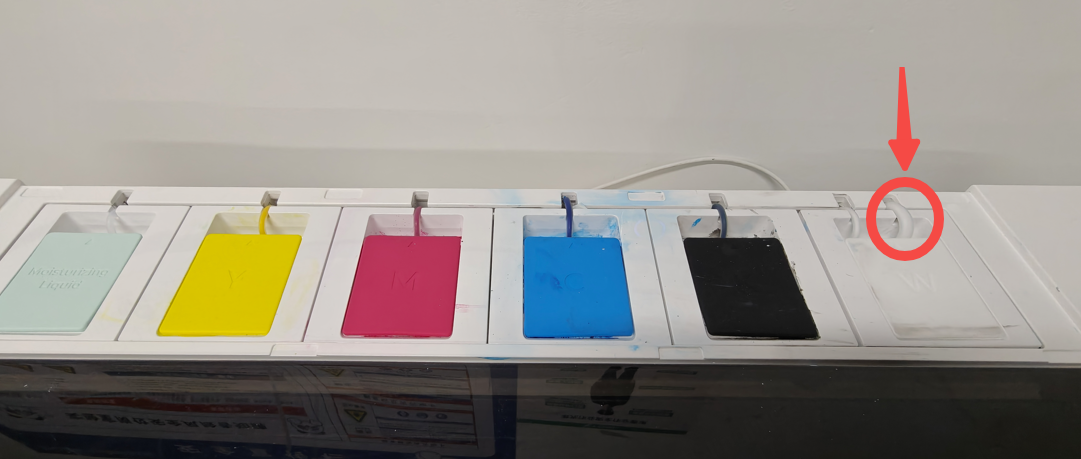
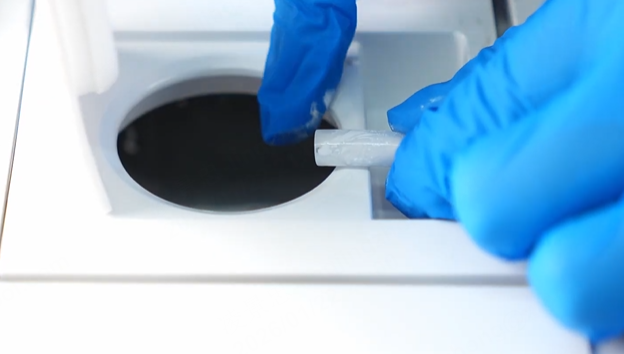
2. Tap White ink circulation and check whether ink flows out of the ink tube.
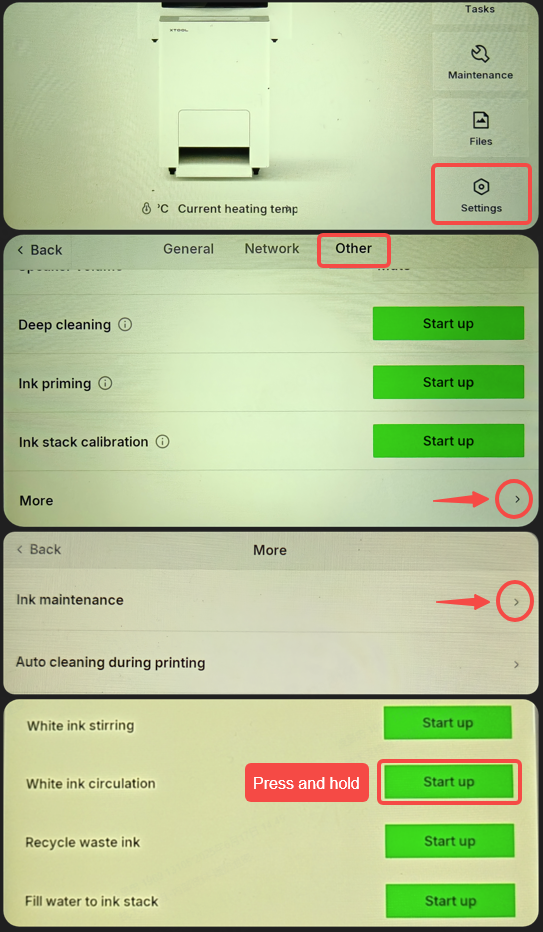
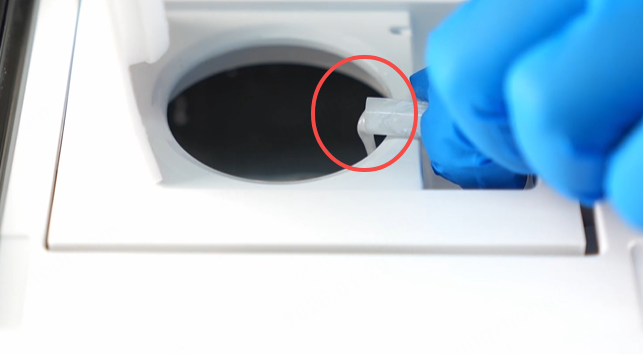
- If no ink comes out, it indicates that the ink tube is clogged. Please follow the steps below to determine where the clog is located:
- Disconnect the ink tube at the top of the white ink filter (located inside the right-side panel), use a syringe to extract ink from the top ink tube, and check to see if ink is extracted normally.
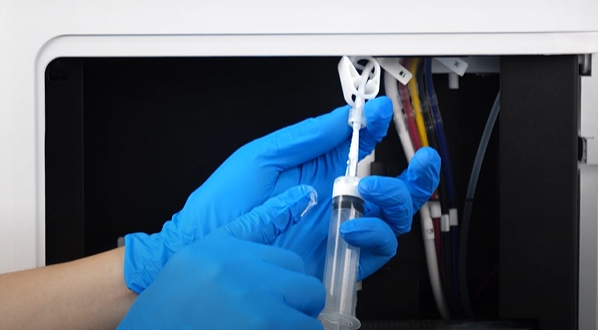
- If it can be extracted normally, it indicates there is no blockage in the ink tube of the upper tube.
- If it cannot be extracted normally, there may be a blockage in the upper tube. Please report this result to xTool after-sales customer service.
b. Disconnect the ink tube at the lower end of the white ink filter (inside the right-side panel), and use a syringe to extract from the lower ink tube to check whether ink can be extracted normally.
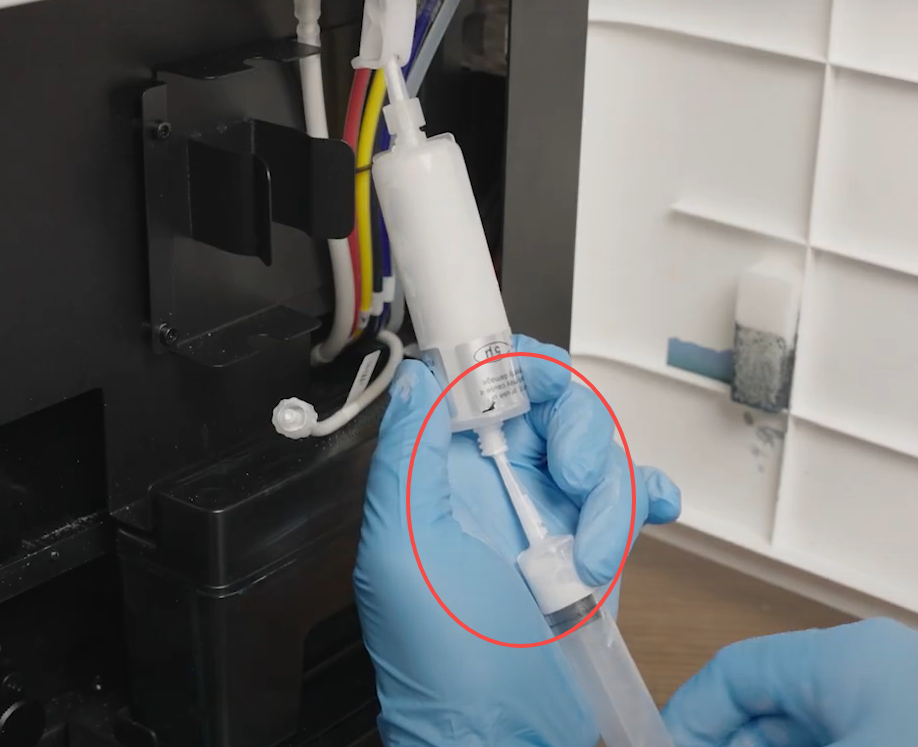
- If it can be extracted normally, it indicates there is no blockage in the ink tube of the lower end tube.
- If it cannot be extracted normally, there may be a blockage in the lower end tube. Please report this result to xTool after-sales customer service.
- If ink flows out, it means the ink tube is not clogged. Proceed to the next step.
(6) Clean the print head
If there is no issue with the above five checks, but white ink still does not print, the white print head may be severely clogged.
Please refer to the video for instructions on cleaning the color print head.
If all of the above checks have been completed and the problem persists, please provide the following information to xTool after-sales customer service to help them quickly analyze and resolve it:
· The troubleshooting conclusion for each step above;
· The information required in the “Still experiencing issues?” section at the end of the article
Still experiencing issues?
Should the issue persist after completing the preceding steps, submit a ticket via the "Submit a Ticket" button in the "Help Ticket" section below. The standard response time for xTool Customer Service is one business day.
For a prompt resolution, please include the following details:
- Issue description: A detailed explanation of the observed problem.
- Video evidence: Attach a video demonstrating the issue, where applicable.
- Troubleshooting performed: Any troubleshooting steps you have already attempted, along with their results.
This information is crucial for xTool technical support engineers to provide timely assistance.
Print test image
Video or photo
Any videos or photos taken during any other troubleshooting process will also be very helpful for our analysis. Please send them to us.
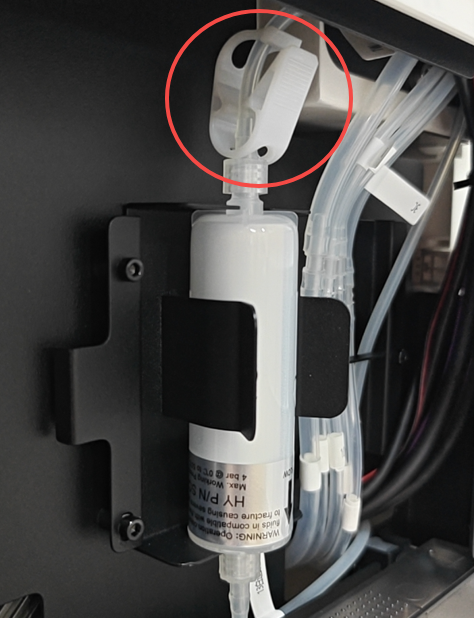
- Ink clip on the right-side filter
- Ink level in the ink damper
- Ink level in the ink tank
- Video showing the waste ink extraction process
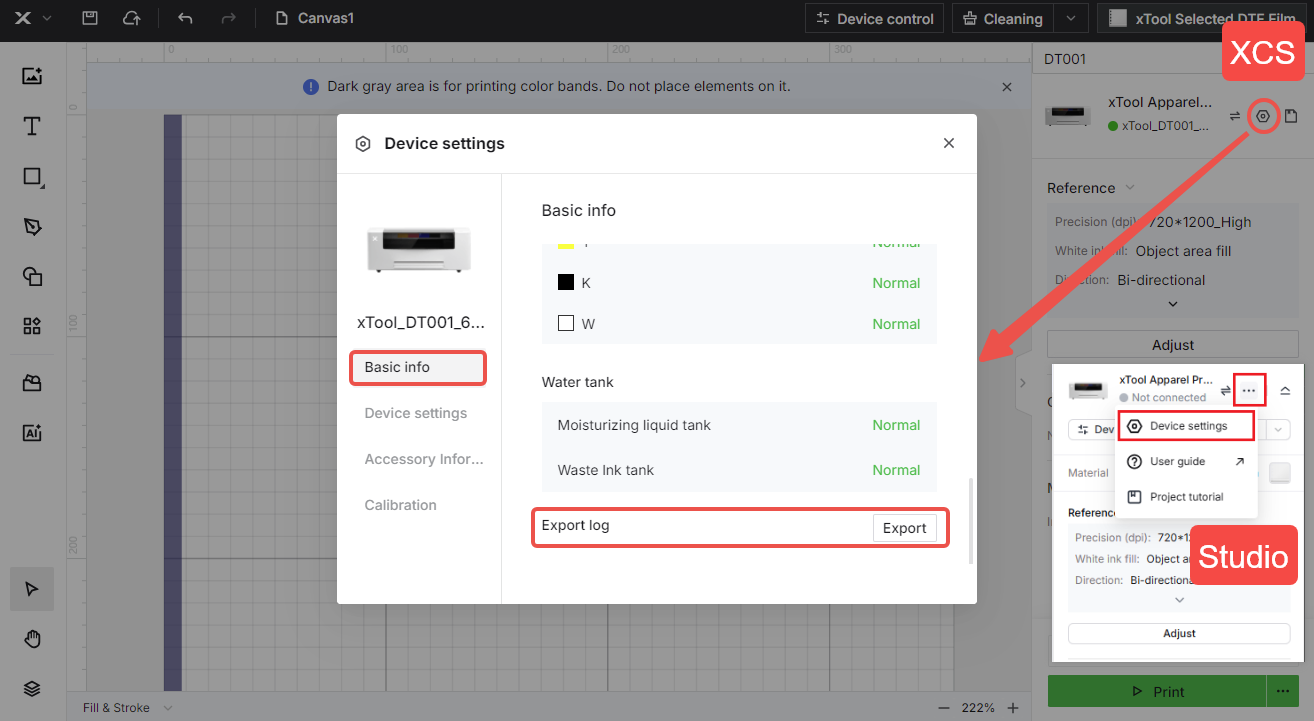
Work log
SN