xTool Store
Smart Nesting User Guide
Updated May 21,2026
Updated May 21,2026
The Smart Nesting feature utilizes advanced optimization algorithms to automatically and compactly arrange canvas elements within specified material boundaries. This minimizes material waste and maximizes overall laser processing efficiency.
Preparation Before Use
- Select Objects: Before starting, you must click and drag to select (or multi-select) all target vector graphics on the canvas that you wish to nest.
Note: If no objects are selected, a warning message stating "Please select objects on the canvas first" will appear at the top of the pop-up window, and the [Start Nesting] button at the bottom will remain grayed out and unclickable.
Parameter Configuration
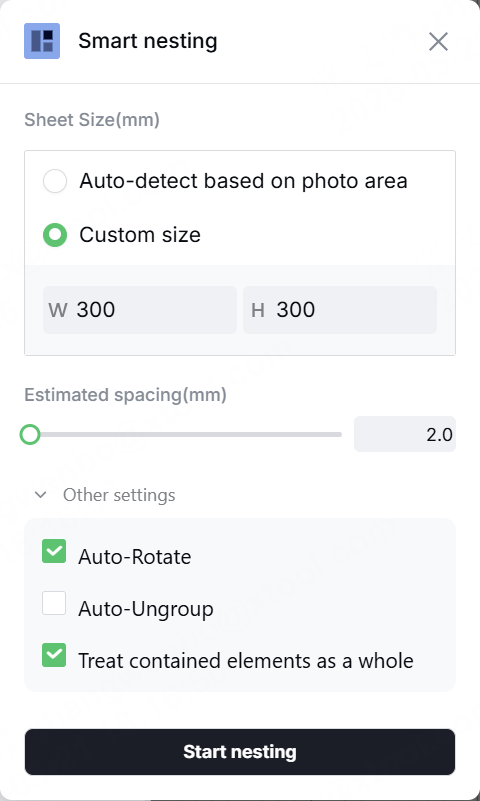
Once the "Smart Nesting" settings dialog opens, you can configure the following key parameters:
Material Size Settings
This defines the boundary limits for the nesting algorithm. The system offers two methods:
- Auto-detect based on photo area: Used in conjunction with the device camera to automatically capture the actual contour and dimensions of the material currently in the workspace.
- Auto-refresh background during nesting: You can toggle this option on or off. When enabled, the system takes a new photo to capture the material contours every time you nest. When disabled, the system uses the existing background image on the canvas.
- Custom size: Manually enter the width (W) and height (H) of your material. The default input is 600 mm × 600 mm.
Estimated Spacing
- Definition: Sets the minimum safe distance (in mm) between individual graphics, as well as between the graphics and the material edges.
- Adjustment: Use the slider or the input box on the right for precise adjustments. Please note that this value is an estimated spacing; it is recommended to leave a reasonable safety margin.
Other Settings
Click to expand "Other Settings" for advanced customization:
- Auto Rotation
- On: Allows the algorithm to rotate graphics freely to find the optimal nesting angle for maximum material utilization.
- Off: Keeps the current fixed angles of the graphics during nesting.
- Note: If you need strict grid-aligned nesting, turning off "Auto Rotation" is a necessary prerequisite. However, disabling this option alone does not guarantee perfect grid alignment, as the algorithm still prioritizes packing density. True grid-aligned nesting will be fully supported in a future update.
- Auto Ungroup
- On: Automatically breaks apart complex grouped graphics during nesting, treating sub-elements as independent units to achieve ultimate material efficiency.
- Off: Retains existing grouping relationships and moves groups as single units.
- Treat contained elements as a whole
- This option determines whether overlapping or nested elements are treated as a unified whole.
- On: Ensures that smaller graphics contained within larger shapes (such as internal holes, slots, or engraving patterns inside an outer boundary) are not separated or rearranged, maintaining their relative positions.
- Note: The algorithm relies on closed vector paths to determine inner/outer relationships. If an SVG graphic contains disconnected segments or open paths, this feature will not work correctly. To resolve this, group the elements manually before nesting.
Step-by-Step Operations
- Select Graphics: Frame-select all the vector paths you want to process on the main canvas.
- Open the Feature: Click the Smart Nesting icon (Applications 㗊) on the left toolbar.
- Configure Parameters:
- Choose your material definition method and confirm the dimensions.
- Drag the slider to set an appropriate graphic spacing (use the default or your preferred safety margin).
- Check or uncheck advanced settings (such as "Auto Rotation").
- Execute Nesting: Once everything is set, click the [Start Nesting] button at the bottom of the dialog. The system will automatically calculate and rearrange the graphics within the designated nesting area on the canvas.

Preview
Was this page helpful?
0 out of 0 found this helpful
Help Ticket
Use this help ticket to submit your issue. We will respond within 1 business day
Submit a Ticket Tags
Help Ticket
Use this help ticket to submit your issue. We will respond within 1 business day
Submit a Ticket Services & Help
Learn & Education

Copyright © 2025 xTool All Rights Reserved.