Issue description
The software displays a pop-up window related to abnormal motor drive. These error codes apply to multiple different motors; the error codes and troubleshooting steps vary. Select the appropriate troubleshooting procedure for the motor driver based on the actual error code.
The code type is as follows:
Pop-up window | Error code | Motor |
The titles of the pop-up windows for motor drive errors are the same. They can be distinguished by the axis position indicated in the error code. |
| X-axis motor |
| Motor on the left side of the Y-axis | |
| Motor on the right side of the Y-axis | |
| Z-axis motor | |
| Motor on the bottom right side of the lifting platform | |
| Motor on the upper right side of the lifting platform | |
| Motor on the upper left side of the lifting platform | |
| Motor on the bottom left side of the lifting platform | |
| U-axis rotary attachment motor | |
| U-axis conveyor feeder motor | |
| CO2 gas cylinder motor |

Possible causes
- Electrostatic interference
- Motor malfunctions
- Motor connection cable malfunctions
Prerequisite
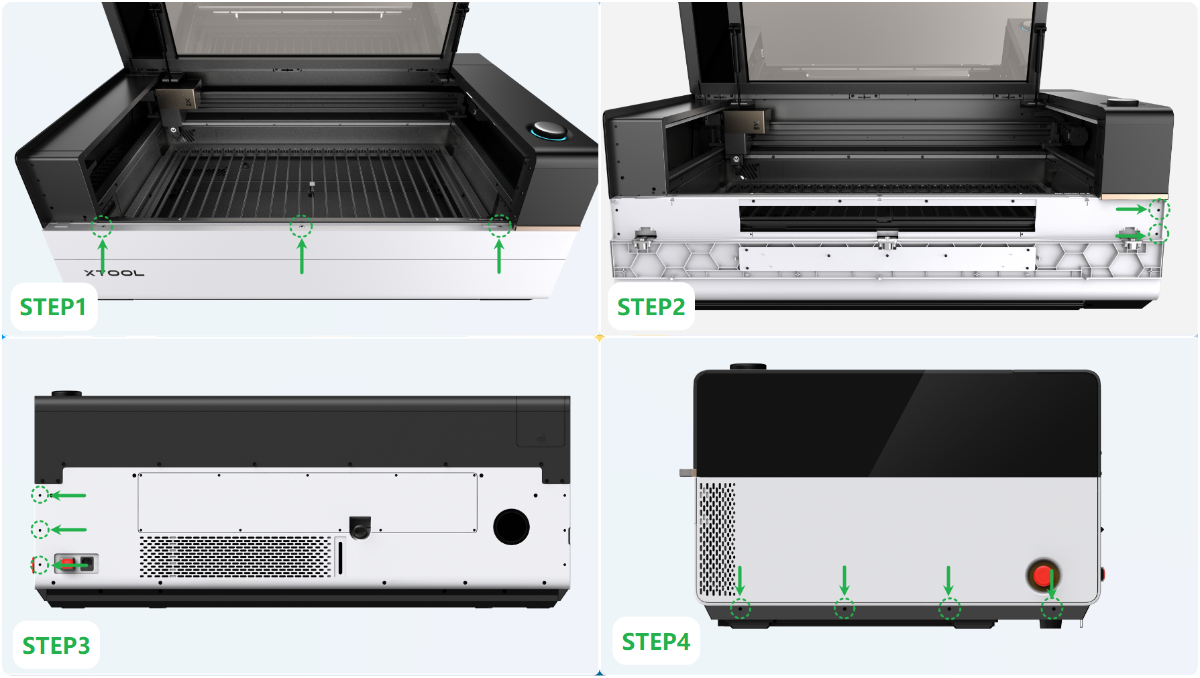
Inspect the main contorl board connectors requires removing the device's casing. Refer to the following video or step-by-step diagram for guidance.
- Remove the casing: Assemble & Disassemble the Casing of xTool P3
- Remove the left panel:
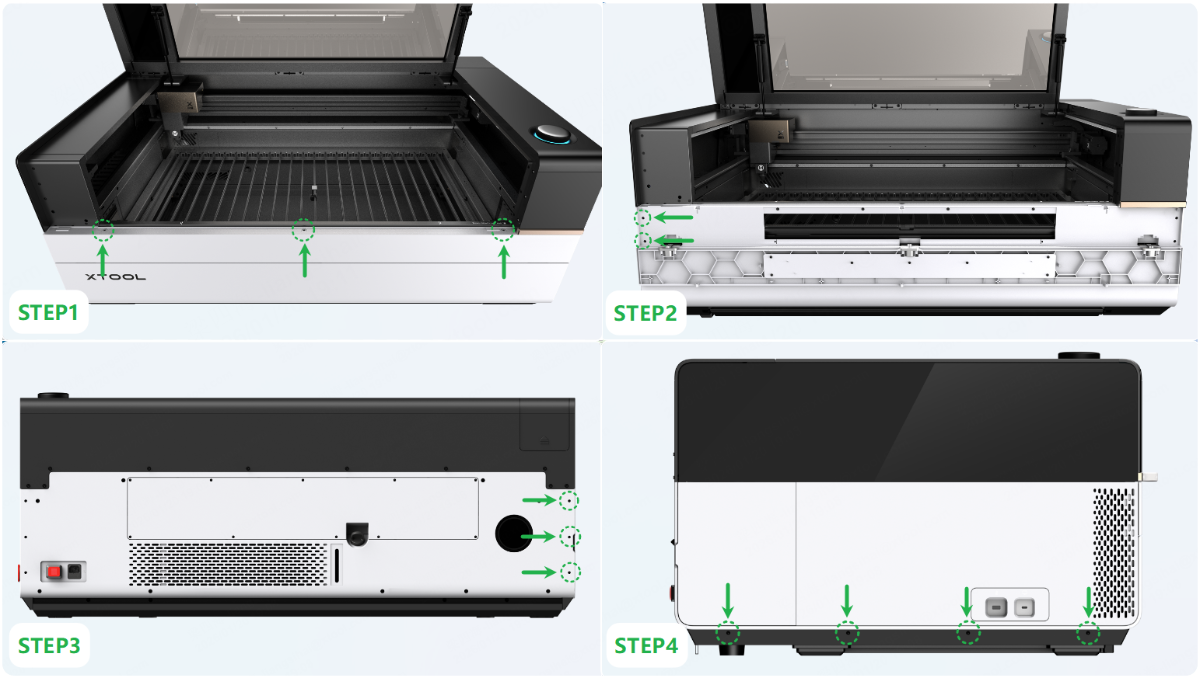
- Remove the right panel:
Troubleshooting procedures
1. X-axis motor drive exception
- Restart the device.
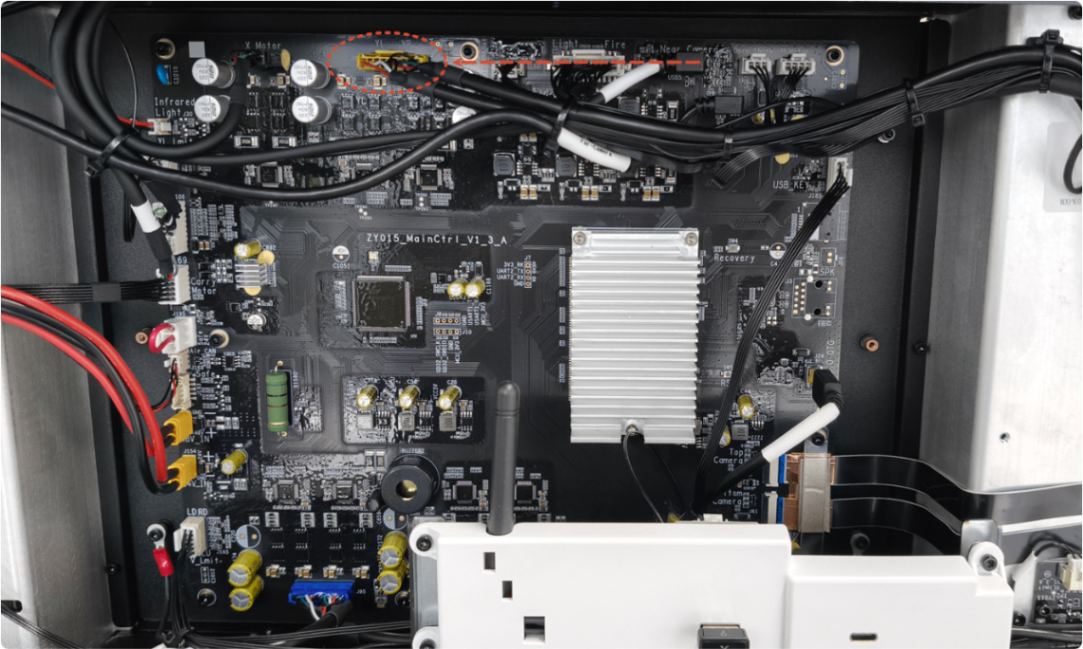
- Disconnect the power supply of the device. Remove the left panel, unplug and replug the connector on the main control board, then restart the device.
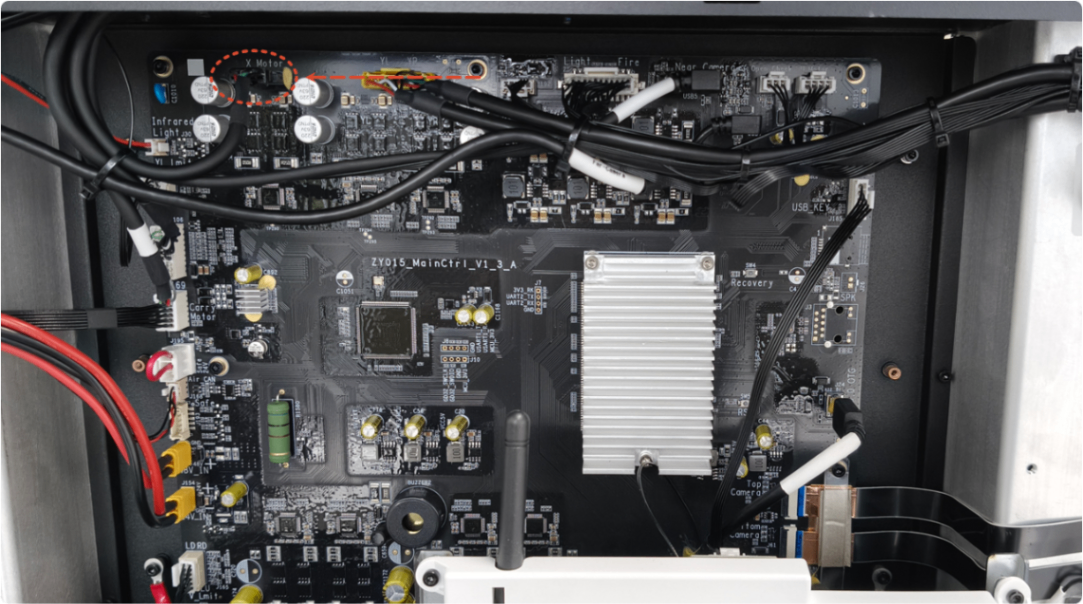
- Disconnect the power supply of the device. Refer to the tutorial, then unplug and replug the connector on the motor, then restart the device.
- The motor has failed. Please replace it with the appropriate one.
2. Y-axis motor drive exception
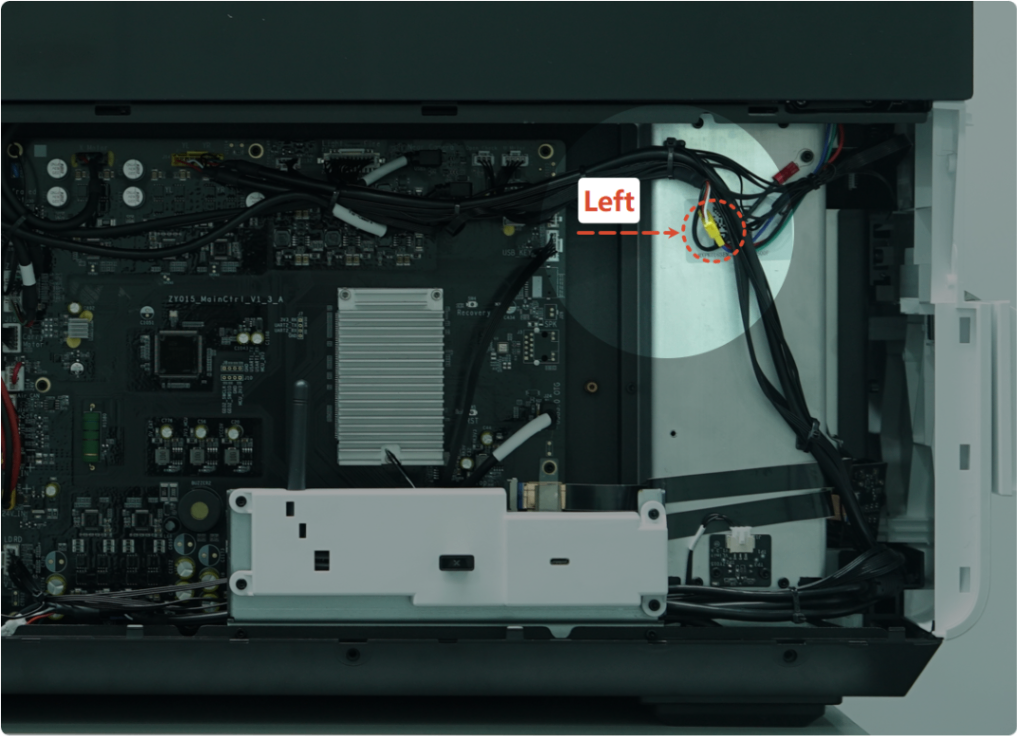
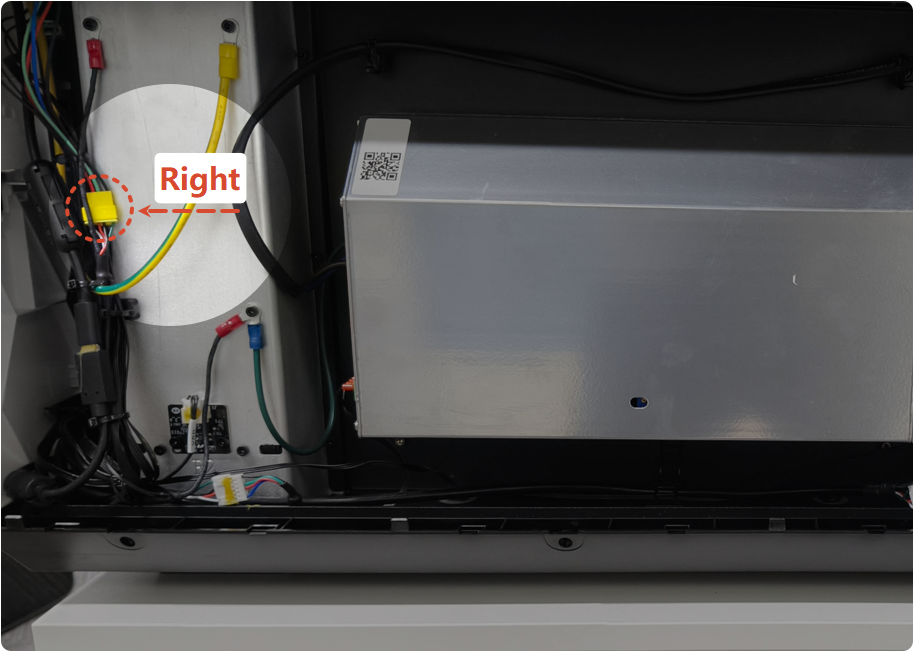
Note: There are two Y-axis motors, located on the left and right sides. Make sure to select the correct motor connector according to the error code.
Y_AXIS_L: Y-axis left motor drive exception
Y_AXIS_R: Y-axis right motor drive exception
- Restart the device.
- Disconnect the power supply of the device. Remove the left panel, unplug and replug the connector on the main control board, then restart the device.
- Disconnect the power supply of the device. Remove the panel on the side corresponding to the faulty motor, unplug and replug the connector on the motor, then restart the device.
- The motor has failed. Please replace it with the appropriate one.
3. Z-axis motor drive exception
- Restart the device.
- Disconnect the power supply of the device. Remove the magnetic cover of the laser module, unplug and replug the connector as shown, then restart the device.
- Disconnect the power supply of the device. Remove the left panel, unplug and replug the connector on the main control board, then restart the device.
- The motor has failed. Please replace the Z-axis motor.
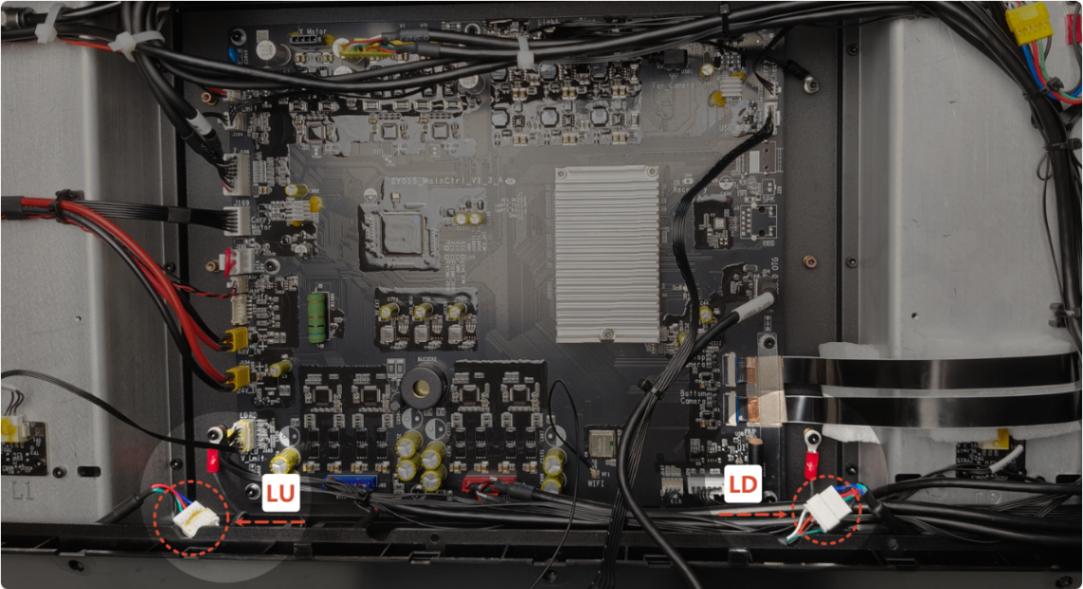
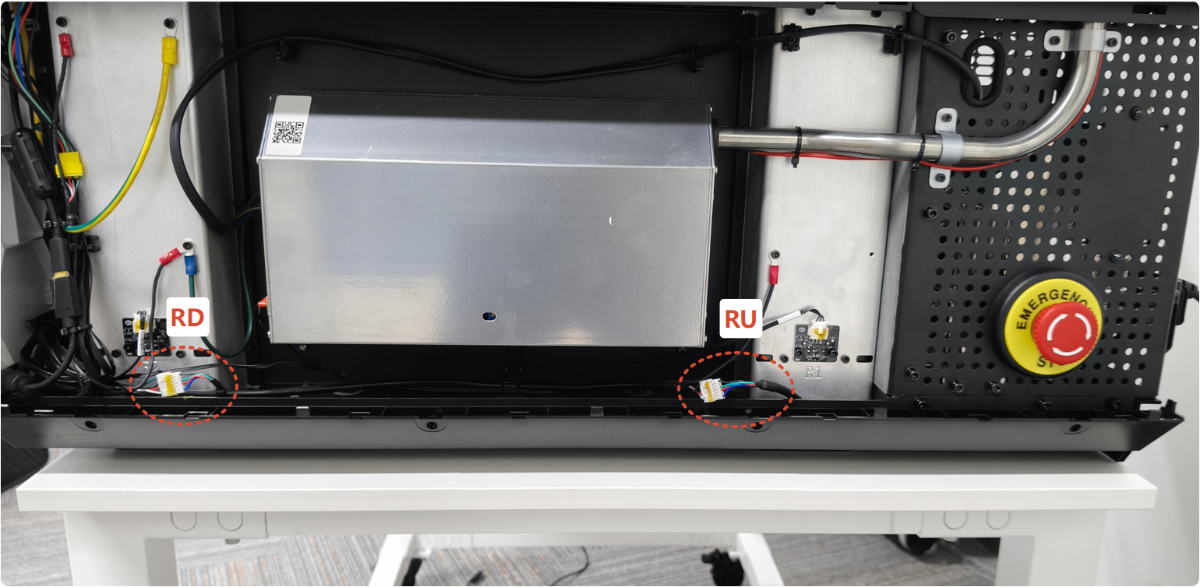
4. Lifting platform v-axis motor drive exception
Note: There are four V-axis motors located at the four corners of the device. Make sure to select the correct motor connector according to the error code.
- V_AXIS_RD: V-axis lower-right motor drive abnormality
- V_AXIS_RU: V-axis upper-right motor drive abnormality
- V_AXIS_LU: V-axis upper-left motor drive abnormality
- V_AXIS_LD: V-axis lower-left motor drive abnormality
- Restart the device.
- Disconnect the power supply of the device. Remove the left panel, unplug and replug the connector on the main control board, then restart the device.
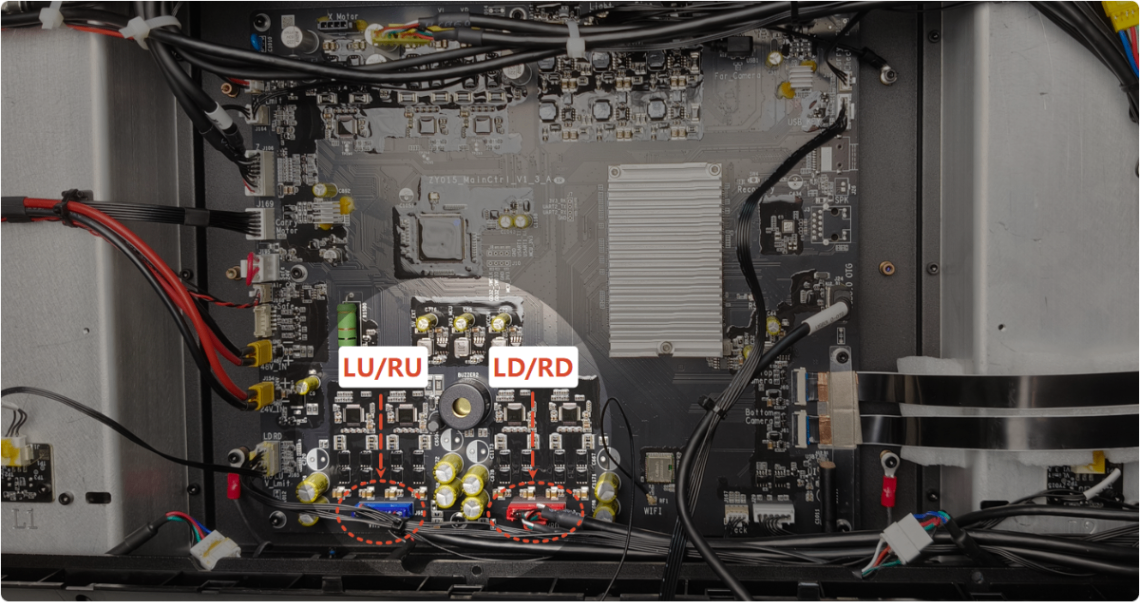
- Disconnect the power supply of the device. Remove the panel on the side corresponding to the faulty motor, unplug and replug the connector on the motor, then restart the device.
- The motor has failed. Please replace it with the appropriate one.
5. U-axis rotary attachment motor drive exception
Determine whether the abnormal operation of the rotary attachment motor occurs when the rotary attachment is connected or when it is not connected, and select the appropriate troubleshooting procedure.
Situation 1: An error occurs after connecting the rotary attachment
- Check the connection cable for the rotary attachment for damage; if damaged, replace it.
- Keep the rotary attachment cable connected to xTool P3, but do not use a cable to connect the rotary attachment itself, and then restart xTool P3:
- If the error no longer occurs, replace the motor for the rotary attachment.
- If the error persists, proceed to the next step.
- Unplug the rotary attachment cable from the P3, then restart the P3:
- If the error no longer occurs, replace the cable for the rotary attachment.
- If the error persists, refer to Situation 2 for resolution.
Situation 2: An error occurs after not connecting the rotary attachment
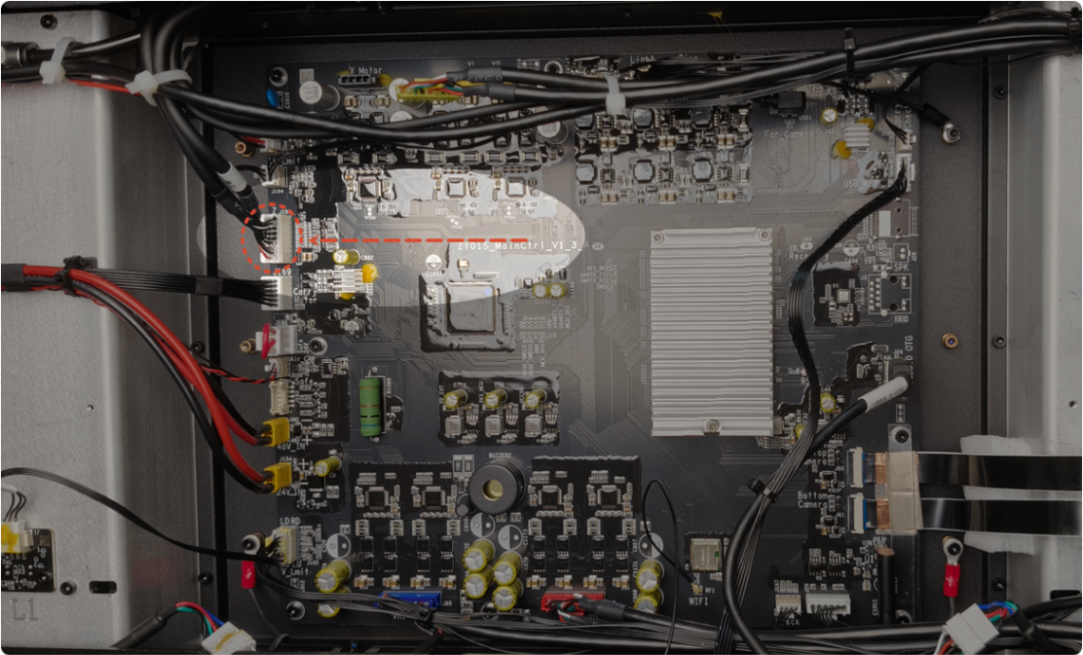
- Disconnect the power supply of the device. Remove the left panel, unplug the connector on the rotary attachment, then restart the device.
Note: There are two models of the main control board, and the connector locations for the rotary attachment are not the same on each model. Please be sure to distinguish between them.
- If the error no longer occurs, replace the rotary attachment adapter board (the PCBA located at the rotary attachment socket in the lower right corner of the device).
- If the error persists, please replace the main control board.
6. U-axis conveyor feeder motor drive exception
- Restart the device.
- Check the connection cable for the conveyor feeder for damage; if damaged, replace it.
- Disconnect the power supply of the device. Unplug and replug the connection cable of the conveyor feeder, then restart the device.
- Disconnect the power supply of the device. Remove the left panel, unplug and replug the connector on the main control board, then restart the device.
Note: There are two models of the main control board, and the connector locations for the conveyor feeder differ between models. Please be sure to distinguish between them.
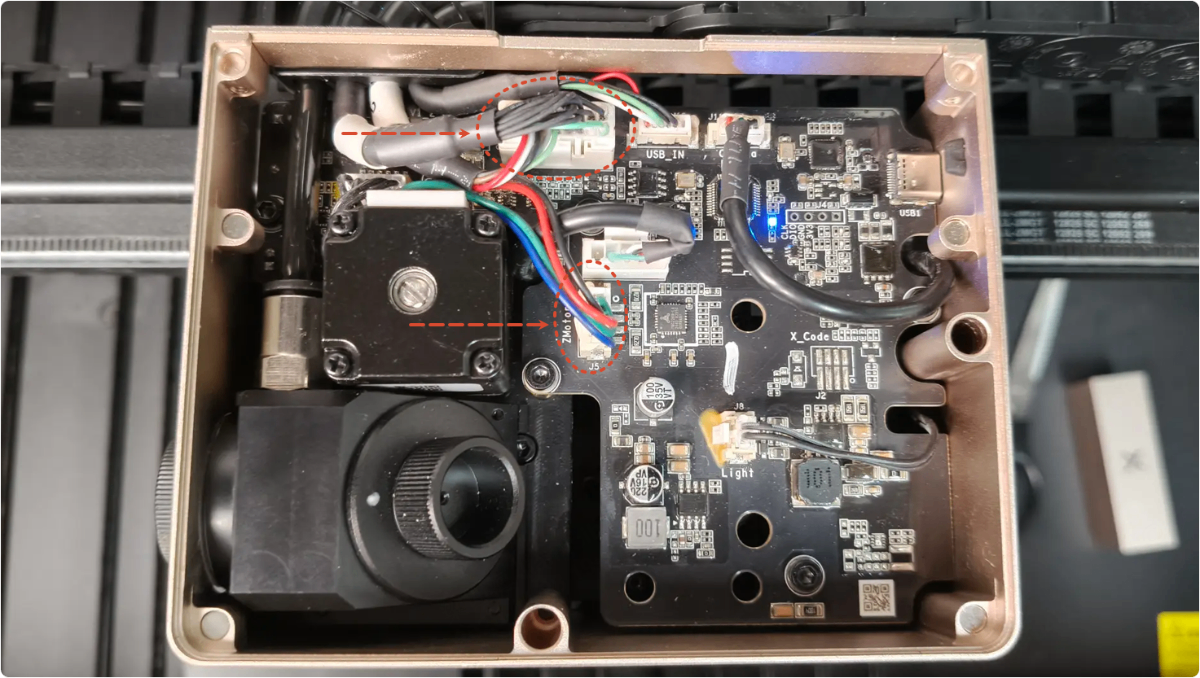
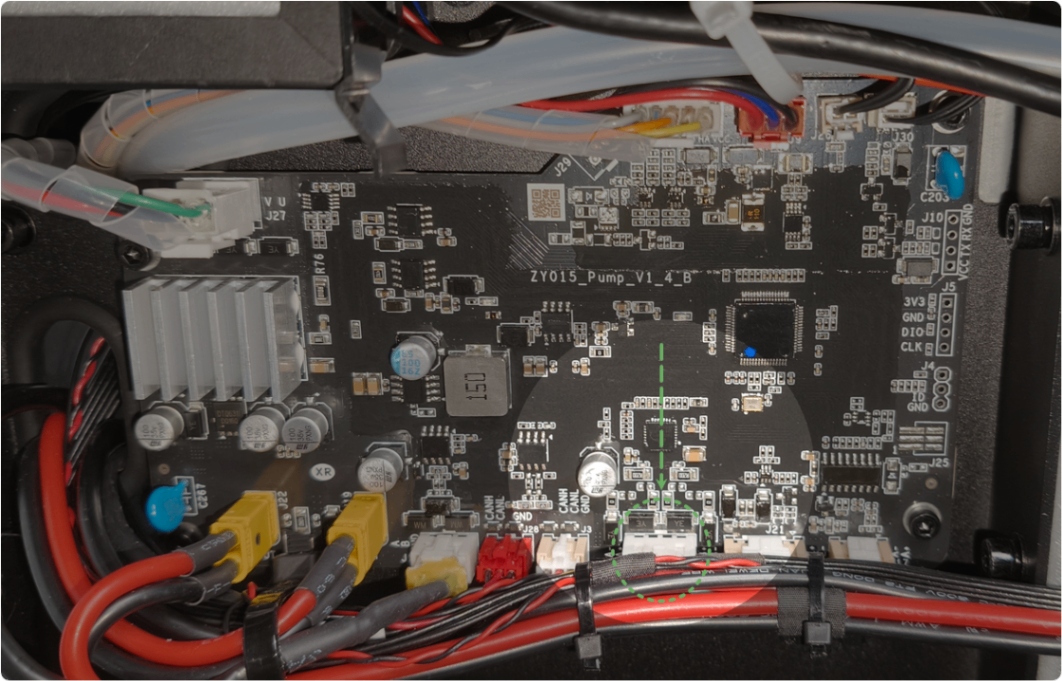
- Disconnect the power supply of the device. Refer to the diagram below to remove the screws and the conveyor feeder casing. Then, unplug and reinsert the connector on the conveyor feeder’s main control board, reassemble the device, and restart it.
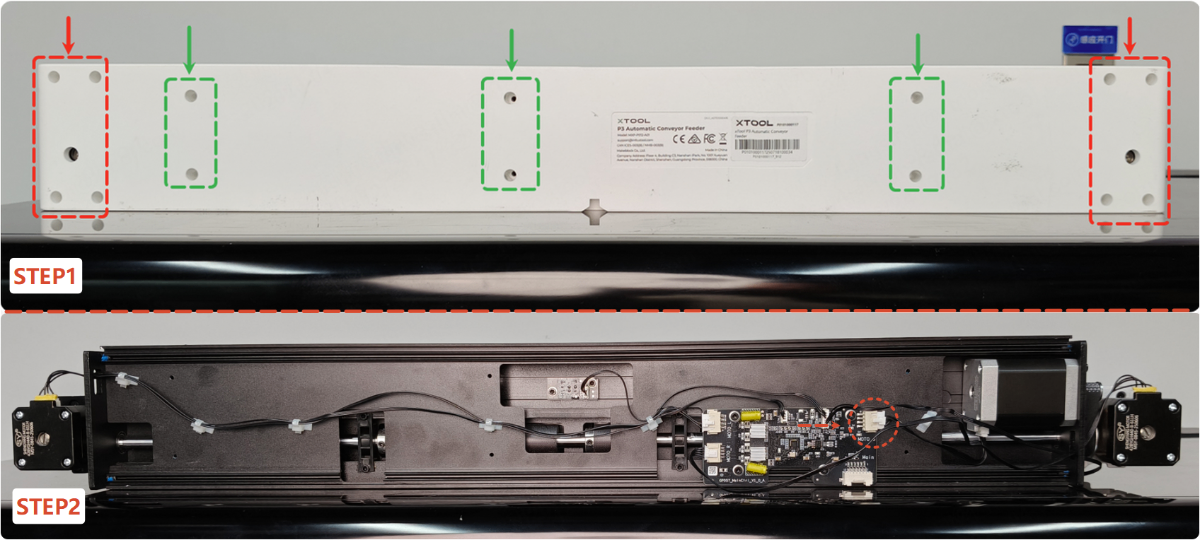
- The conveyor feeder motor has failed. Please replace it with the appropriate one.
7. CO2 gas cylinder motor drive exception
- Restart the device.
- Disconnect the power supply of the device. Remove the left panel, unplug and replug the connector on air pump board, then restart the device.
- The motor has failed. Please replace the fire safety set. (The fire safety set includes this motor).
Still experiencing issues?
Should the issue persist after completing the preceding steps, submit a ticket via the "Submit a Ticket" button in the "Help Ticket" section below. The standard response time for xTool Customer Service is one business day.
For a prompt resolution, please include the following details:
- Issue description: A detailed explanation of the observed problem.
- Video evidence: Attach a video demonstrating the issue, where applicable.
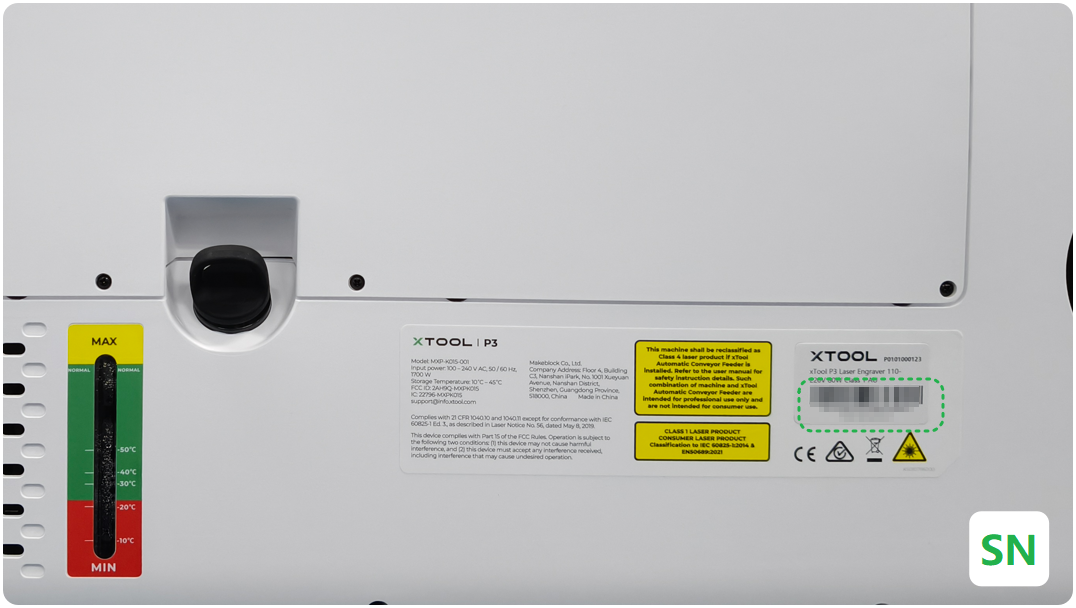
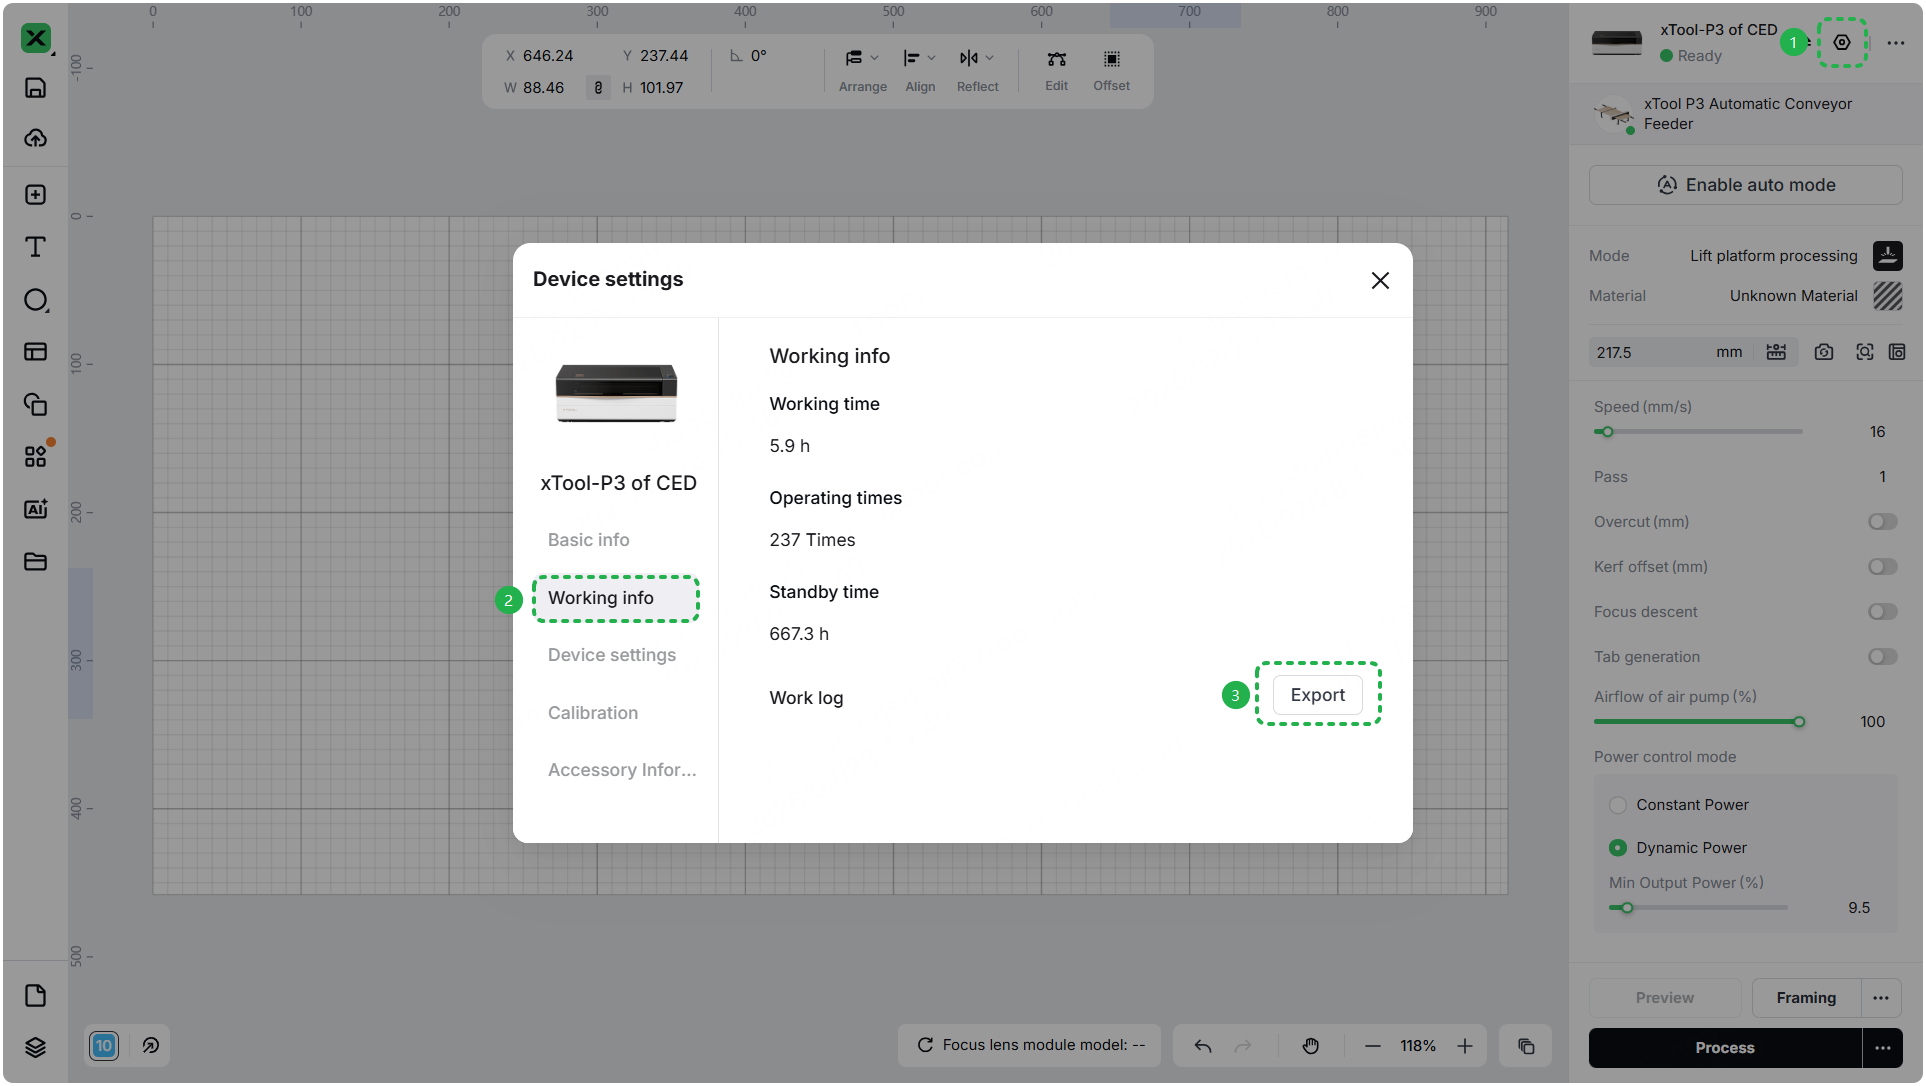
- Device information: Follow the steps to find the SN and export the work log.
- Troubleshooting performed: Any troubleshooting steps you have already attempted, along with their results.
This information is crucial for xTool technical support engineers to provide timely assistance.
Documentation feedback
Help improve this content by providing feedback. If this content did not meet your requirements, select "No" in the "Was this page helpful?" section below. Include specific details about what was unclear or missing in the pop-up suggestion box. Feedback submissions are reviewed by xTool technical writers to enhance future documentation.
Services & Help
Learn & Education

Copyright © 2025 xTool All Rights Reserved.