Issue description
You are experiencing one of the following issues regarding the color quality of your printed DTF film:
- Color Distortion (Color Difference): The colors on the printed film look significantly different from what you see on your computer screen (e.g., colors appear too dark, too light, or inaccurate).

- Missing Colors: One or more specific color is obviously absent from the printed design.
- Incorrect/Swapped Colors: A color prints as a completely different color (e.g., areas that should be magenta are printing as yellow).
Possible causes
- Color Distortion: Incorrect software color settings, or the natural color gamut difference between a backlit screen (RGB) and physical ink (CMYK).
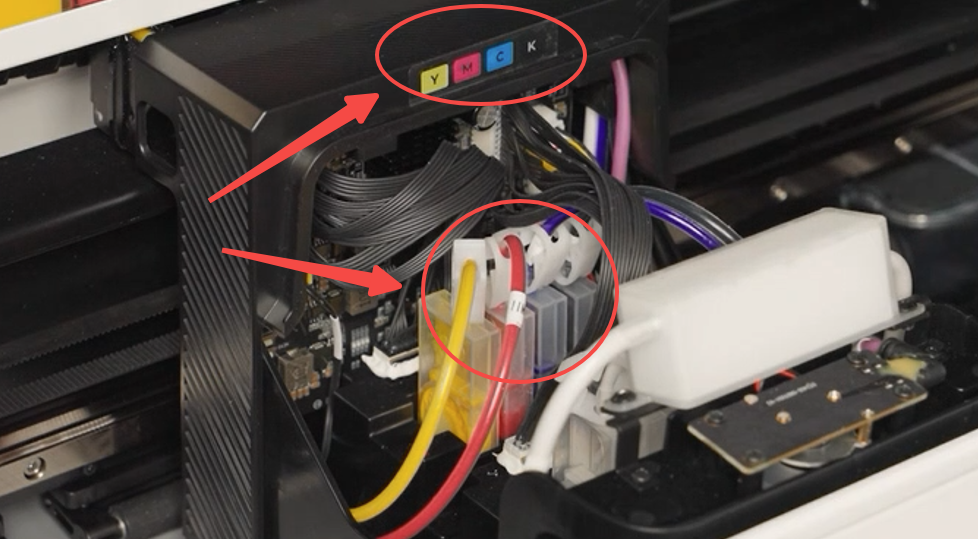
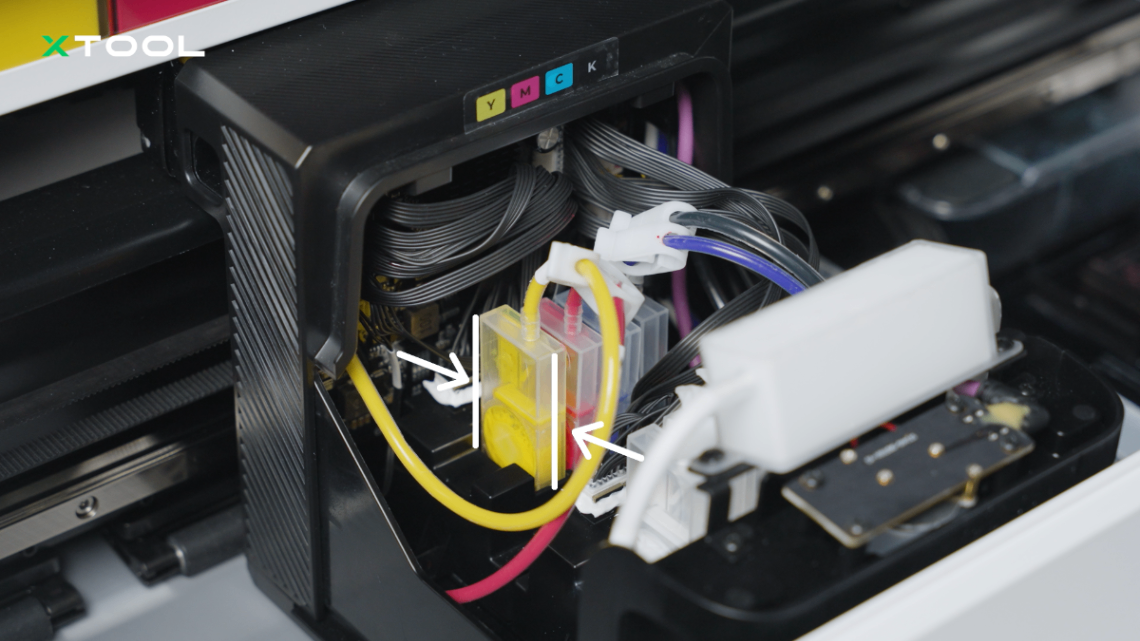
- Incorrect/Swapped Colors: The ink dampers are installed in the wrong order inside the print carriage.
Diagnostic logic
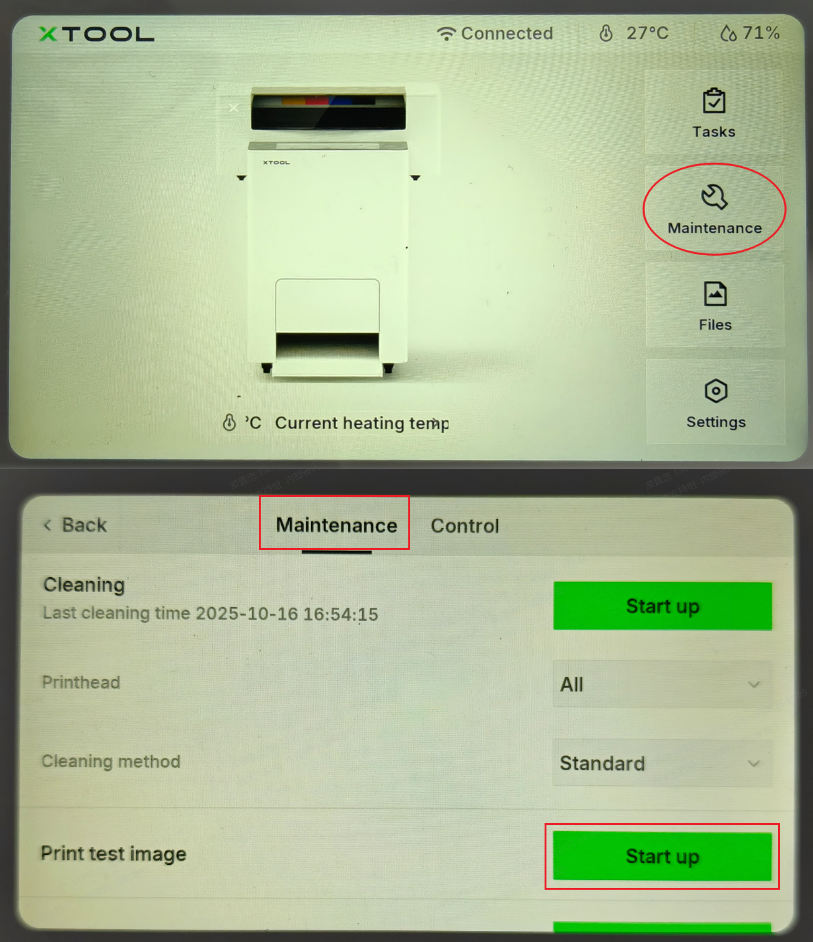
The fastest way to determine the root cause is to print a Test Image.
- On the printer control panel, tap: Maintenance > Print Test Image
- → Proceed to Step 1 for detailed instructions.

Result Interpretation:
- If the test image is perfect, the issue is likely a software Color Profile setting.
- → Proceed to Step 2.
- If a color is missing from the test image, it is an Ink Flow issue.
- If the test image is perfect but the color blocks are in the wrong order, it is an Ink Damper Installation issue.
- → Proceed to Step 3.
Troubleshooting
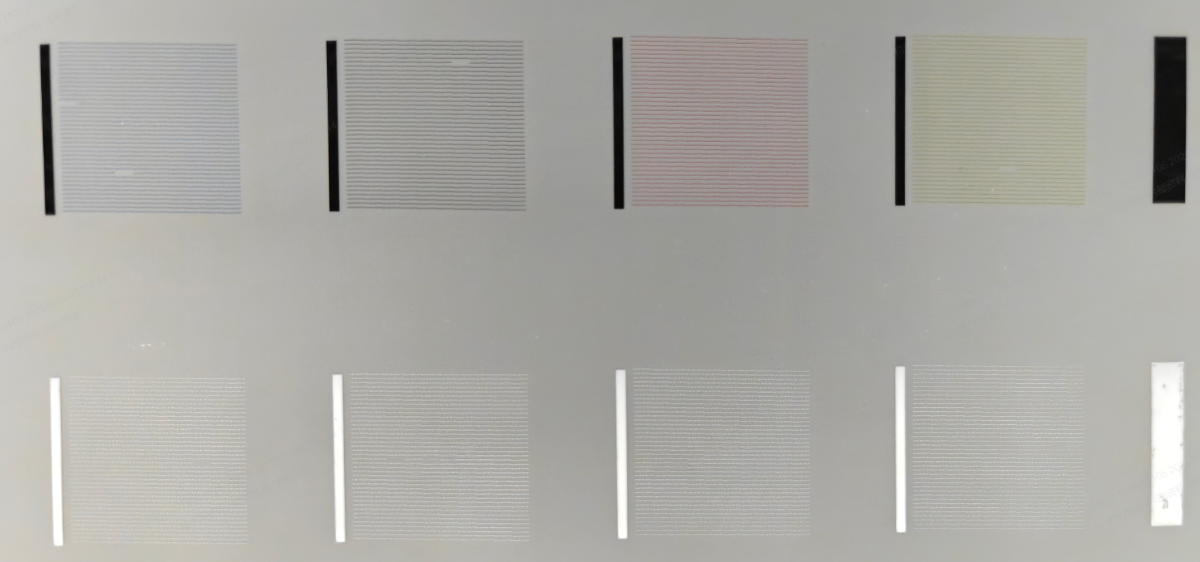
Step 1: Print & evaluate a test image
- On the printer's LCD control panel, tap: Maintenance > Print Test Image.
- Evaluate the result:
- Normal Result: All four color blocks are present. The order from left to right must be Cyan (C), Black (K), Magenta (M), and Yellow (Y). Each block should have no more than 5 missing lines.
- If a color is MISSING: Please stop here and refer to the guide: Diagnose & Fix "No Color Output" / CMYK Ink Flow Blockage on xTool Apparel Printer
- If the color order is WRONG: The C, K, M, Y blocks are not in the correct sequence. Meanwhile, the actual ink damper colors do not match the label inside the print carriage. Proceed to Step 2.
- If the test image is PERFECT, but your design's colors are distorted: Proceed to Step 3.

Step 2: Correct the ink damper order
If your colors are swapped, the ink dampers were likely installed in the wrong slots. The color of the ink in the damper must match the color label sticker inside the print carriage.
⚠️ CRITICAL SAFETY WARNING
Always unplug the printer's power cord from the wall outlet before handling the print head or liquid components to prevent fatal short circuits.
Procedure:
- Move the Carriage: Manually move the print carriage to the left for easier access.
- Remove Dampers: Pull out the incorrectly placed ink dampers. Seal them individually in clean plastic bags to prevent leaking or drying out.
- Power Off: Unplug the printer from the power source.
- Flush the Print Head:
- Remove the print head.
- Use a syringe to gently flush the incorrect ink out of the affected nozzle channels using cleaning liquid. (Only flush the channels that had the wrong ink).
- Reference Video: Refer to Troubleshoot Missing Strip Lines / Failed Printing Sample Test for xTool Apparel Printer for flushing instructions.
- Reinstall: Reinstall the print head. Insert the ink dampers into their correct slots, ensuring they perfectly match the Y, M, C, K sticker inside the carriage.
- Clean and Retest:
- Power on the printer.
- Perform a Deep Cleaning cycle 1 or 2 times.
- On the printer's LCD control panel, tap: Settings > Other > More > Deep cleaning
- Print a Test Image to verify the colors are now correct.
- Note: If you still see slight color mixing (cross-contamination), run the standard cleaning cycle a few more times until the color runs pure.
⚠️ Caution: Do not allow any liquid to spill onto or remain on the top ports of the print head. Wipe up any residual liquid immediately with a clean, lint-free cloth.
Step 3: Adjust software color settings
If the test image is perfect but color distortion still occurs, adjust the rendering intent in the software.
- Open your project in xTool Studio or xTool Creative Space (XCS).
- On the right-side settings panel, locate the Color settings section.
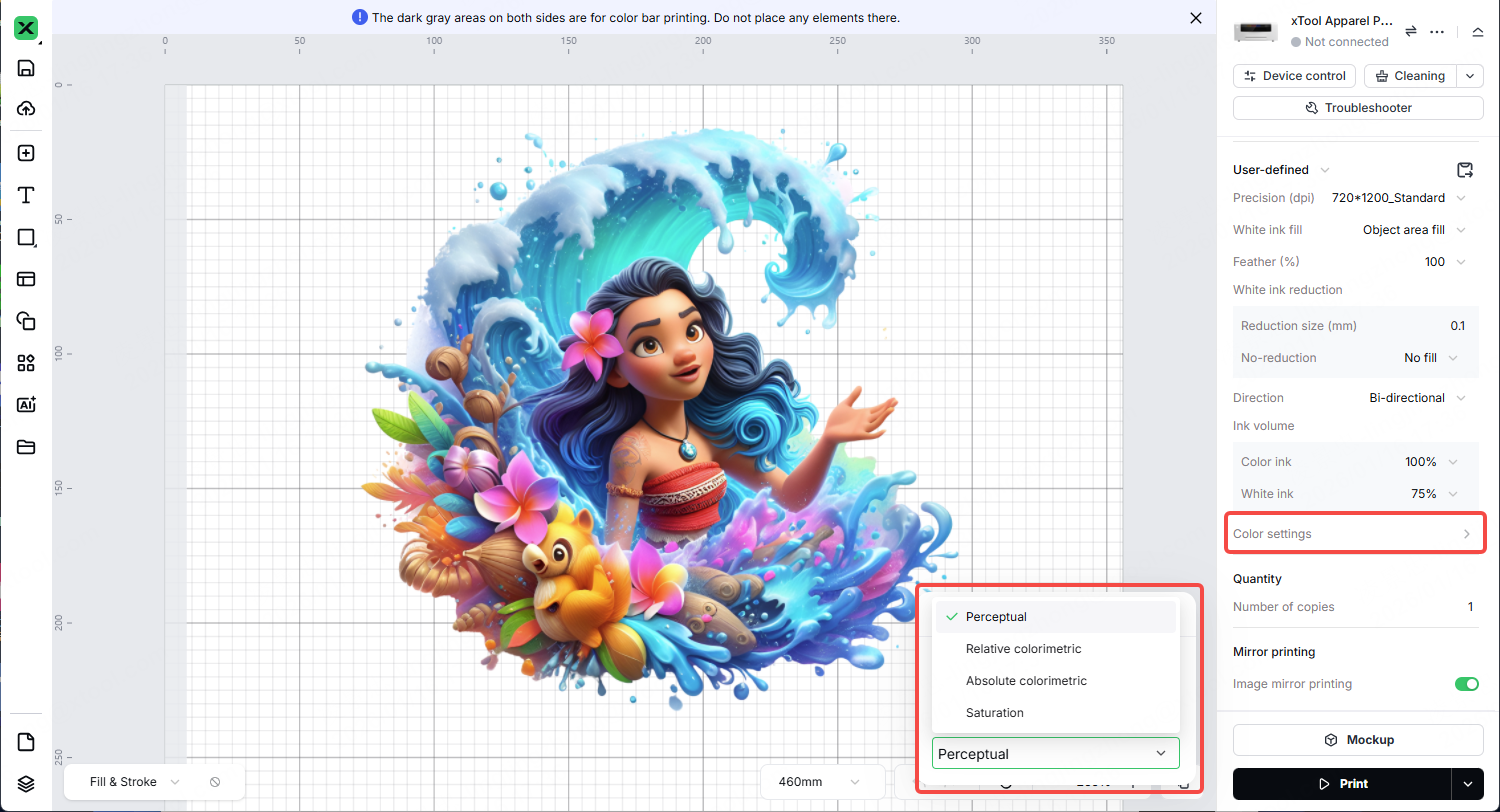
- The default setting is usually Perceptual. Try changing this to one of the other color rendering options to see which produces the best result for your specific graphic:
- Perceptual (Best for photographs and complex images)
- Relative colorimetric (Best for vector graphics and logos)
- Absolute colorimetric (Best for strict color proofing)
- Saturation (Best for vibrant charts and solid graphics)
- Print a small test sample of your design after changing the settings.
If the problem persists
Should the issue persist after completing the preceding steps, please submit a ticket via the "Submit a Ticket" button. The standard response time is one business day.
Please include the following details to facilitate a quick diagnosis:
Photo of the print test image
A clear, close-up photo of the nozzle check pattern generated from the printer's control panel.
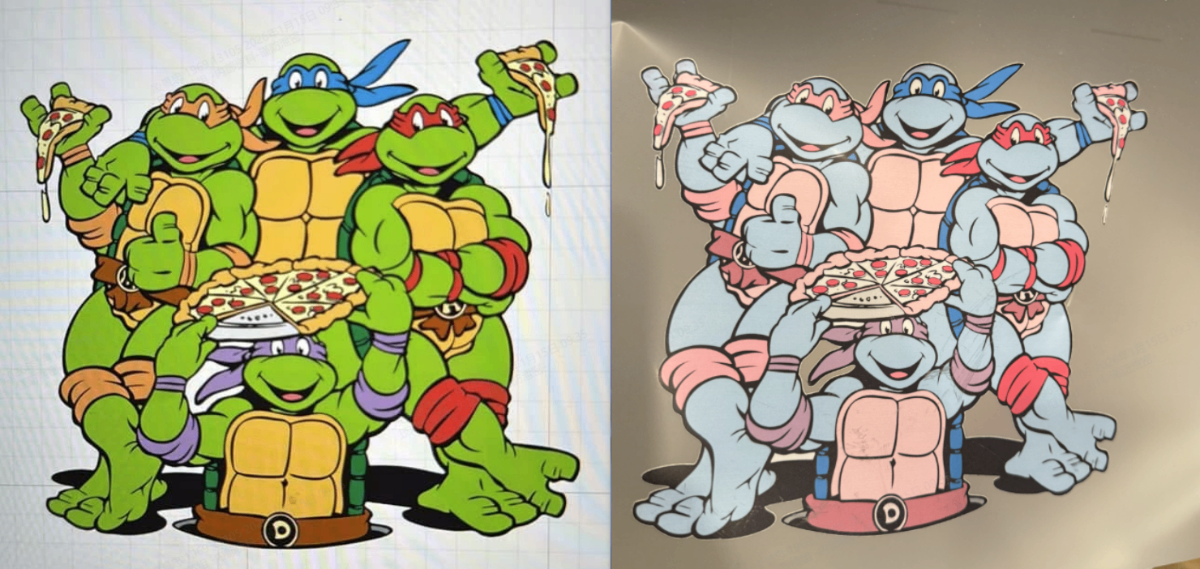
Print effect comparison photos
Provide clear photos showing the design as it appears on your computer screen side-by-side with the actual printed PET film.
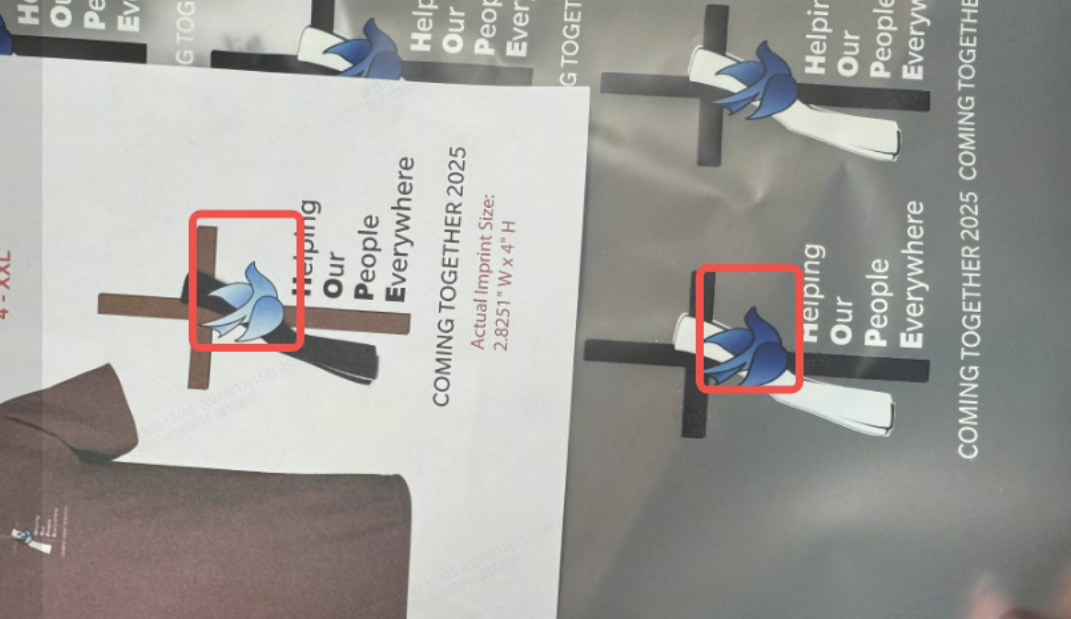
Photo of the ink damper installation
A photo showing the ink dampers installed in the print carriage, clearly showing the color order relative to the sticker label.

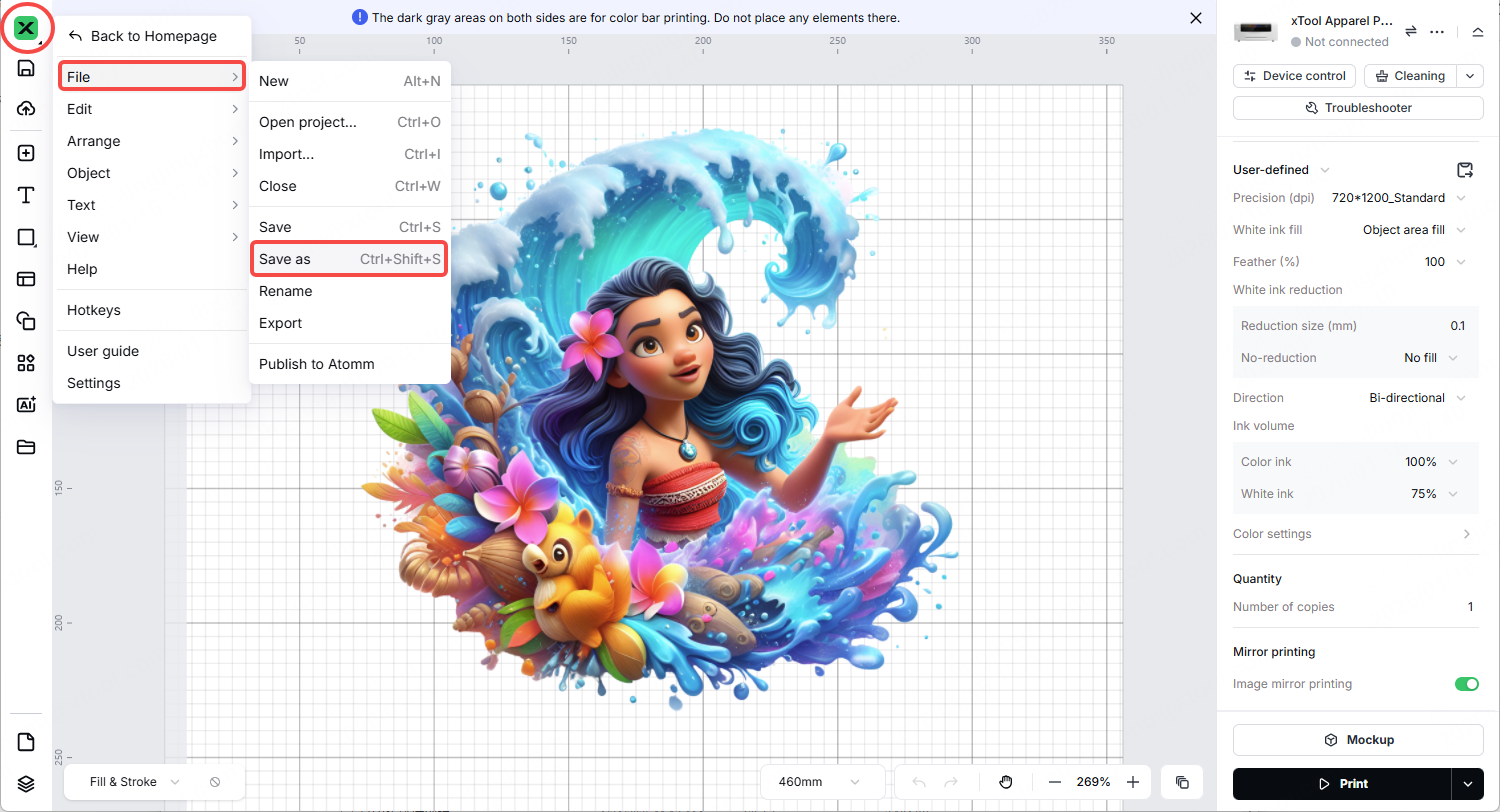
Project file
Attach the exact .xcs or .xt project file you are attempting to print so our technicians can inspect the file details and color profiles.
Documentation feedback
Help improve this content by providing feedback. If this content did not meet your requirements, select "No" in the "Was this page helpful?" section below. Include specific details about what was unclear or missing in the pop-up suggestion box. Feedback submissions are reviewed by xTool technical writers to enhance future documentation.
Services & Help
Learn & Education

Copyright © 2025 xTool All Rights Reserved.