Issue description
While operating your xTool Apparel Printer with xTool Creative Space, xTool Studio, or via the control panel, you receive an error message stating: "Print head failed to return to origin (Error code: X axis time out). Simultaneously, the X status indicator on the printer body flashes red.
- This guide provides step-by-step troubleshooting to resolve the issue.
Diagnostic logic
Understand the error
It is important to distinguish this error from the Z axis time out error:
- X axis time out: Relates to the horizontal (left/right) movement of the print head.
- Z axis time out: Relates to the vertical (up/down) movement of the ink stack (capping station).
💡 Note: If you receive the error "Z axis time out," refer to the separate troubleshooting guide: Resolve "Print Head Failed to Return to Origin" (Error Code: Z axis time out) for xTool Apparel Printer
Normal startup sequence (for reference)
To diagnose the issue, observe the printer during startup. The normal sequence is:
- Z-axis lowers: The ink stack moves down to clear the path, triggering the origin sensor.
- X-axis moves right: The print head moves right until it triggers the X-axis limit sensor.
- Z-axis raises: The ink stack moves up to seal the print head (sealed position), triggering the engagement sensor.
💡 Design rationale: The ink stack must descend first to prevent the print head from colliding with it during horizontal movement.
Error manifestation patterns
When the X axis time-out error occurs during startup, you will observe one of three scenarios:
- Scenario A: The ink stack lowers, but the print head does not move at all before the error appears.
- Likely cause: X-axis motor cable disconnection or motor malfunction
- Scenario B: The ink stack lowers, the print head moves right but hits the side of the machine (crashes) before the error appears.
- Likely cause: X-axis limit sensor contamination or malfunction
- Scenario C: The ink stack lowers, but the print head moves left and hits the side of the machine before the error appears.
- Likely cause: X-axis motor malfunction (rare)
Troubleshooting
Step 1: Check for physical obstructions
Before diagnosing electrical issues, verify that the print head can move freely along the X-axis.
- Power Off: Unplug the power cable from the printer.
Note: You cannot rotate the ink stack knob while the printer is powered on.
- Lower the Ink Stack:
- Open the right-side panel.
- Locate the ink stack knob.
- Rotate the knob toward the "Down" direction until you feel resistance.
- Then, rotate it back toward "Up" for 1 or 2 full turns to ensure it is not jammed at the bottom.

- Manual Slide Test:
- Open the printer lid.
- Gently push the print head left and right by hand.
- Check: Does it move smoothly?
- If it feels stuck, check the X-axis for debris or foreign objects.
- If the print head moves freely without obstruction, continue to Step 2.
Step 2: Diagnose based on movement behavior
Reconnect the power, turn on the printer, and observe the print head's behavior.
Scenario A: Print head does not move
This usually indicates a motor connection or hardware issue.
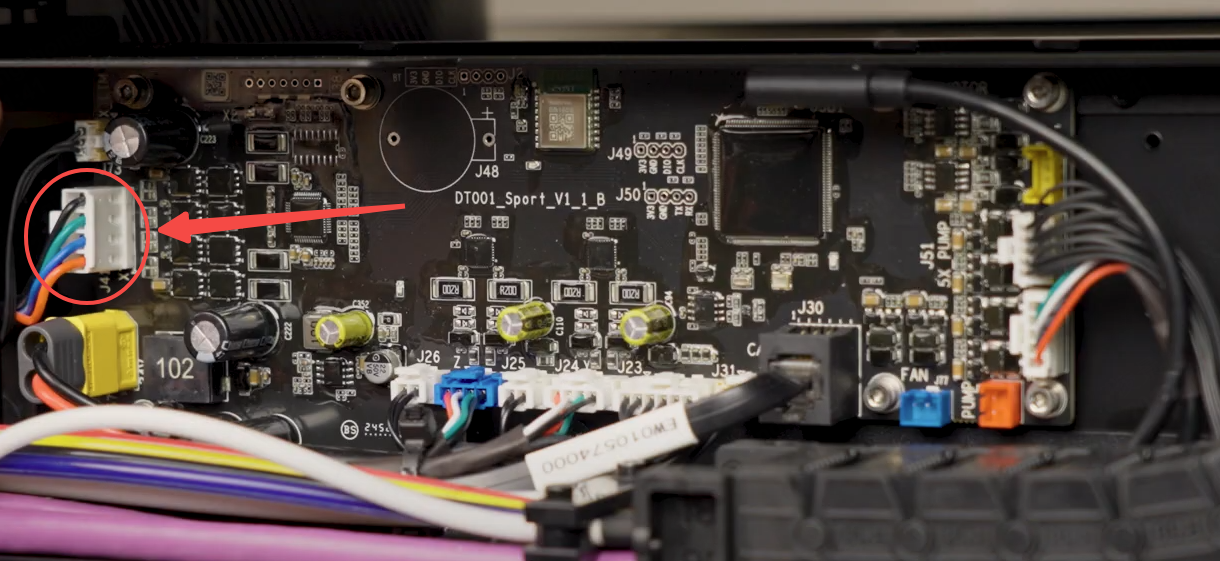
- Check X-axis Motor Cable: Refer to Replace the Motion Controller Board for xTool Apparel Printer to remove the rear panel.
- Reseat Cable: Locate the X-axis motor connection on the motion controller board. Unplug the cable and plug it back in firmly.
- Test: If the error persists, the X-axis motor may be glitching and require replacement. Contact xTool Customer Service for a replacement motor.
Scenario B: Print head crashes into the right side
This indicates that the X‑axis limit sensor is not being triggered.
- Inspect the X-axis Limit Sensor:
- Ensure the sensor is clean and free from dust or ink.
- If dirty, clean it with a cotton swab or a lint‑free cloth lightly moistened with anhydrous ethanol.
- Sensor Trigger Test:
- Locate the X-axis limit sensor.
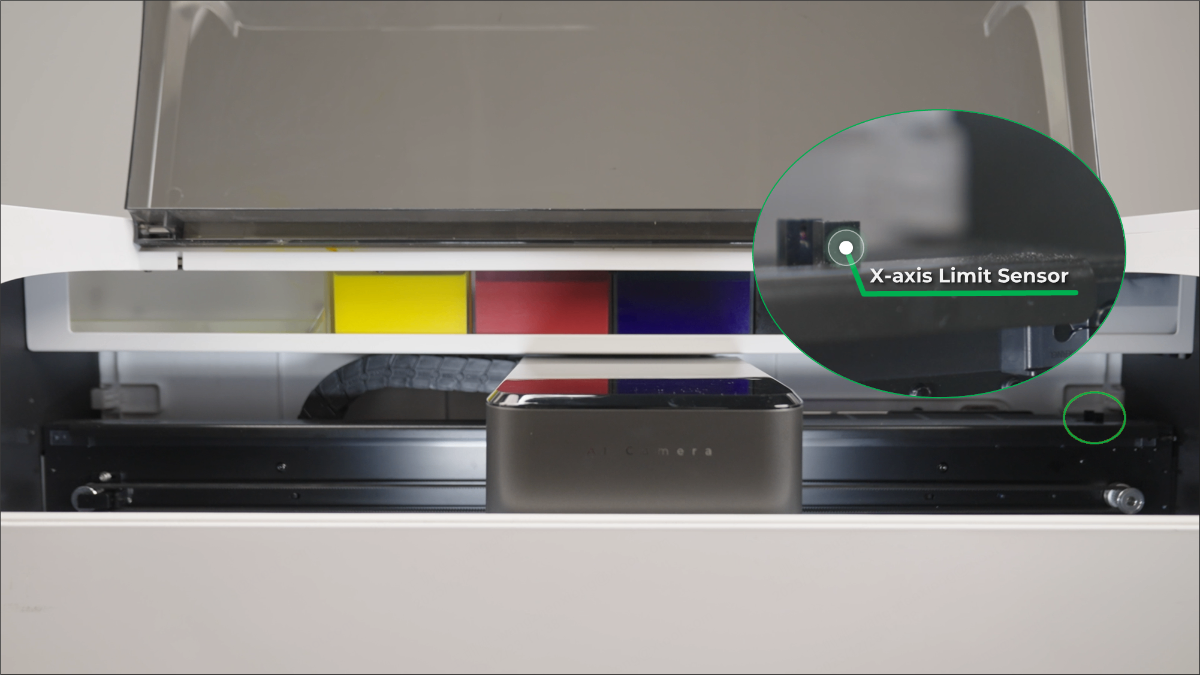
- Observe the blue indicator light on the sensor.
- Pass a thin, solid object (e.g., a pen) through the sensor's U-shaped groove.

- Result:
- Light turns off: Sensor is functioning normally → Proceed to the "If the problem persists" section.
- Light remains on: Sensor cable may be loose or sensor is glitching → Proceed to the next check.
- Locate the X-axis limit sensor.
- Check Cable: Reseat the sensor cable on the motion controller board.
- Follow the instructions in Replace the Motion Controller Board for xTool Apparel Printer
- Locate the X-axis limit sensor cable connection on the motion controller board.
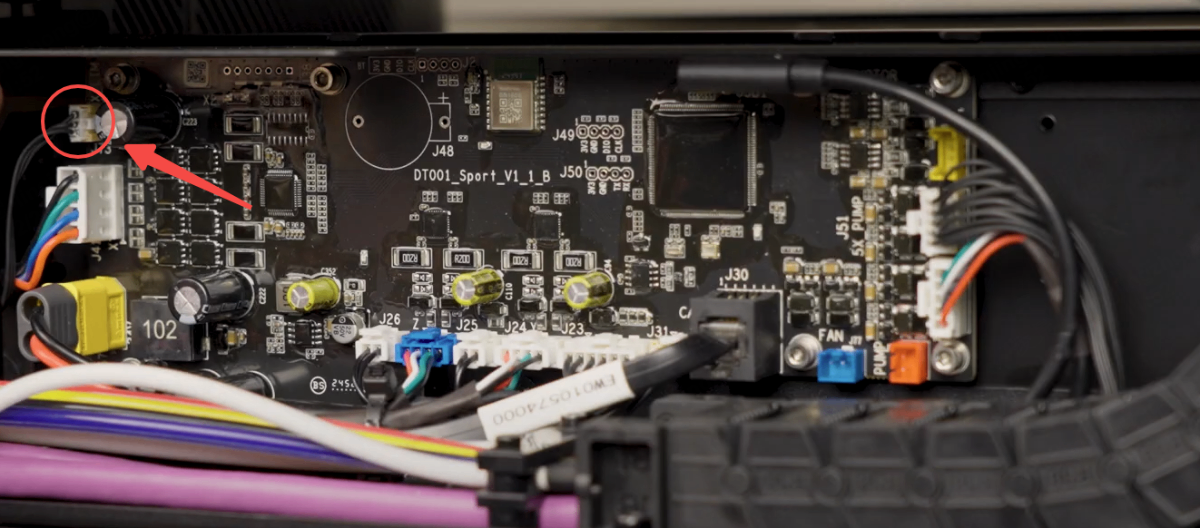
- Disconnect and reconnect the cable firmly.
- Restart the printer and test operation.
- If this fails, the sensor needs replacement.
Scenario C: Print head crashes into the left side
This is a rare occurrence usually caused by a failed motor or a malfunction in the motion controller board.
- Contact xTool Customer Service for a replacement motor or board.
If the problem persists
Should the issue persist after completing the preceding steps, submit a ticket via the "Submit a Ticket" button in the "Help Ticket" section below. The standard response time for xTool Customer Service is one business day.
Include the following details to help better diagnose the problem:
1 Work log files
Please export the logs based on the software you are using.
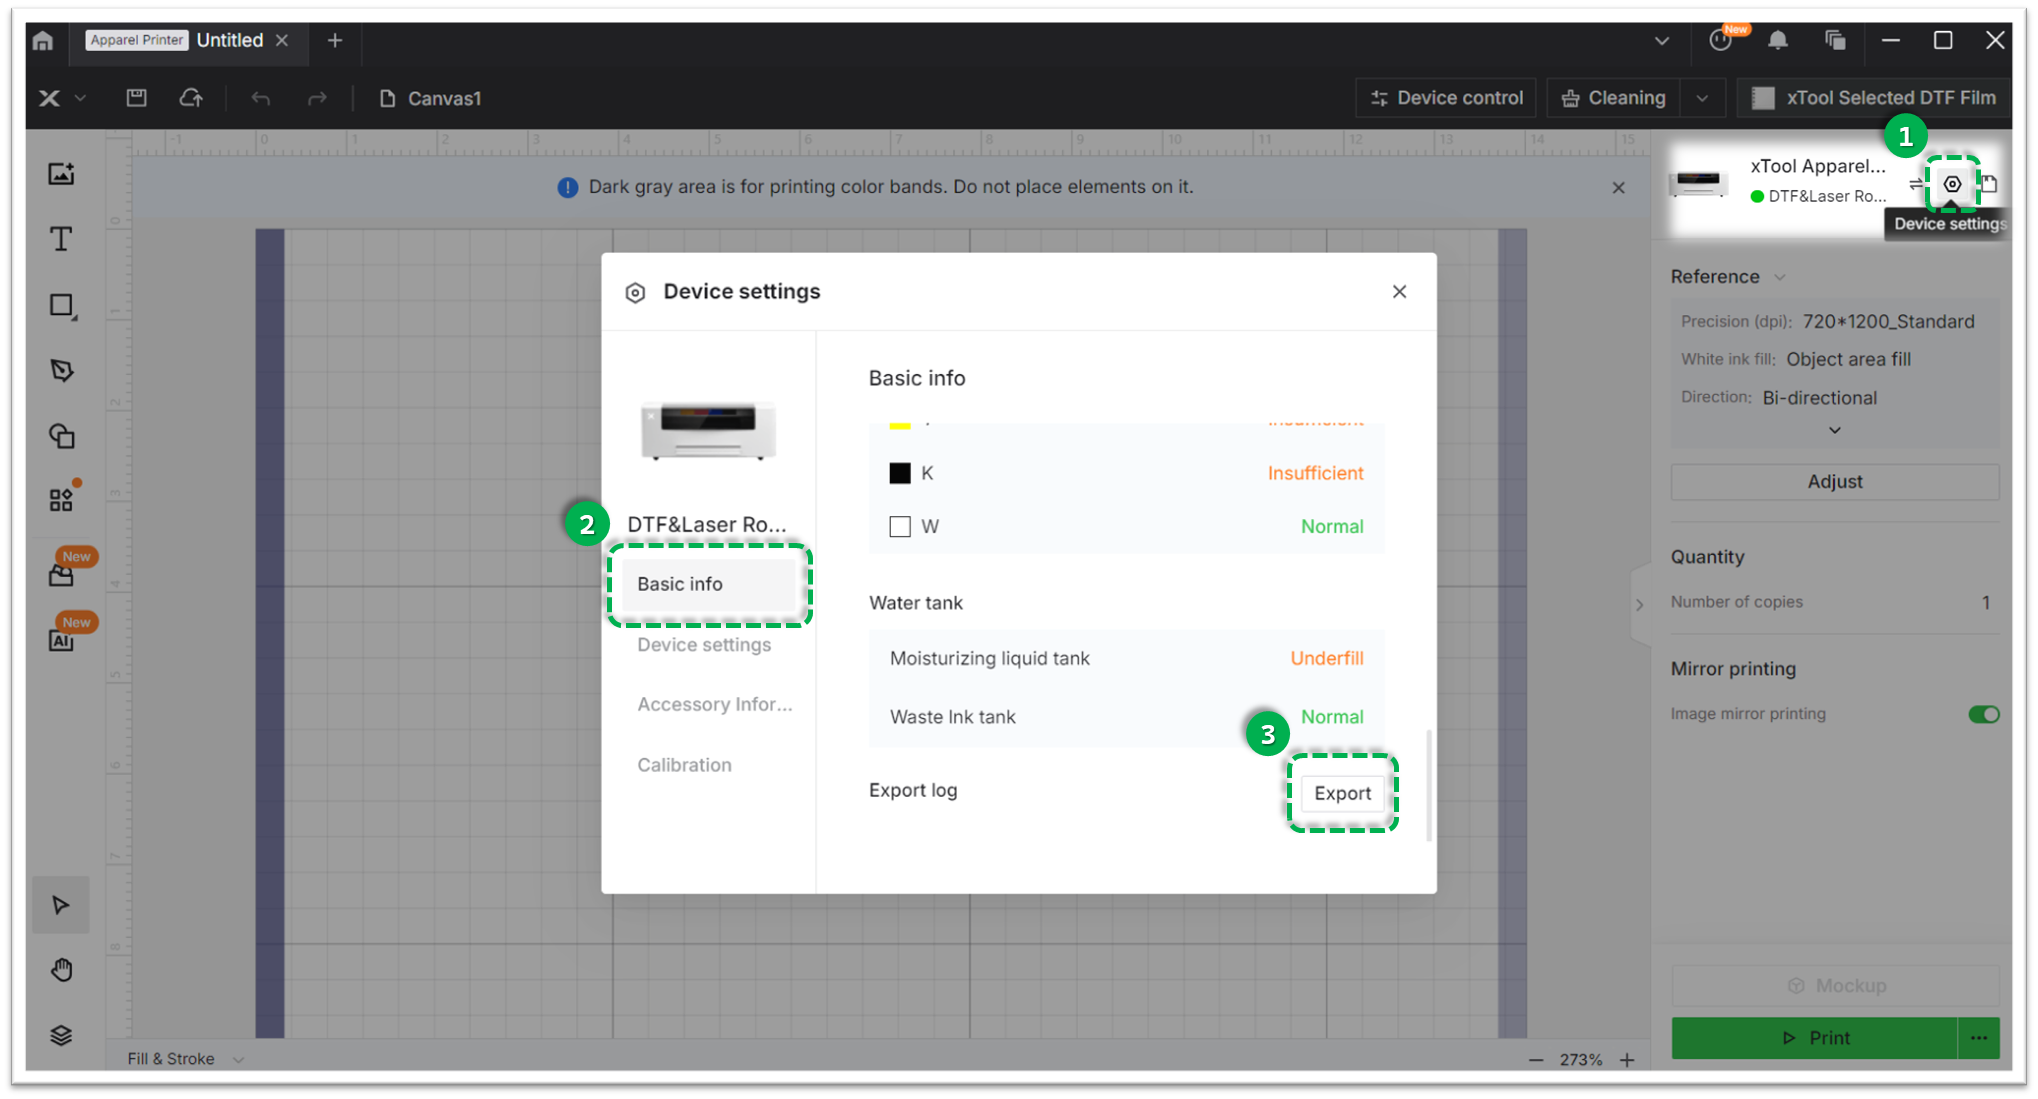
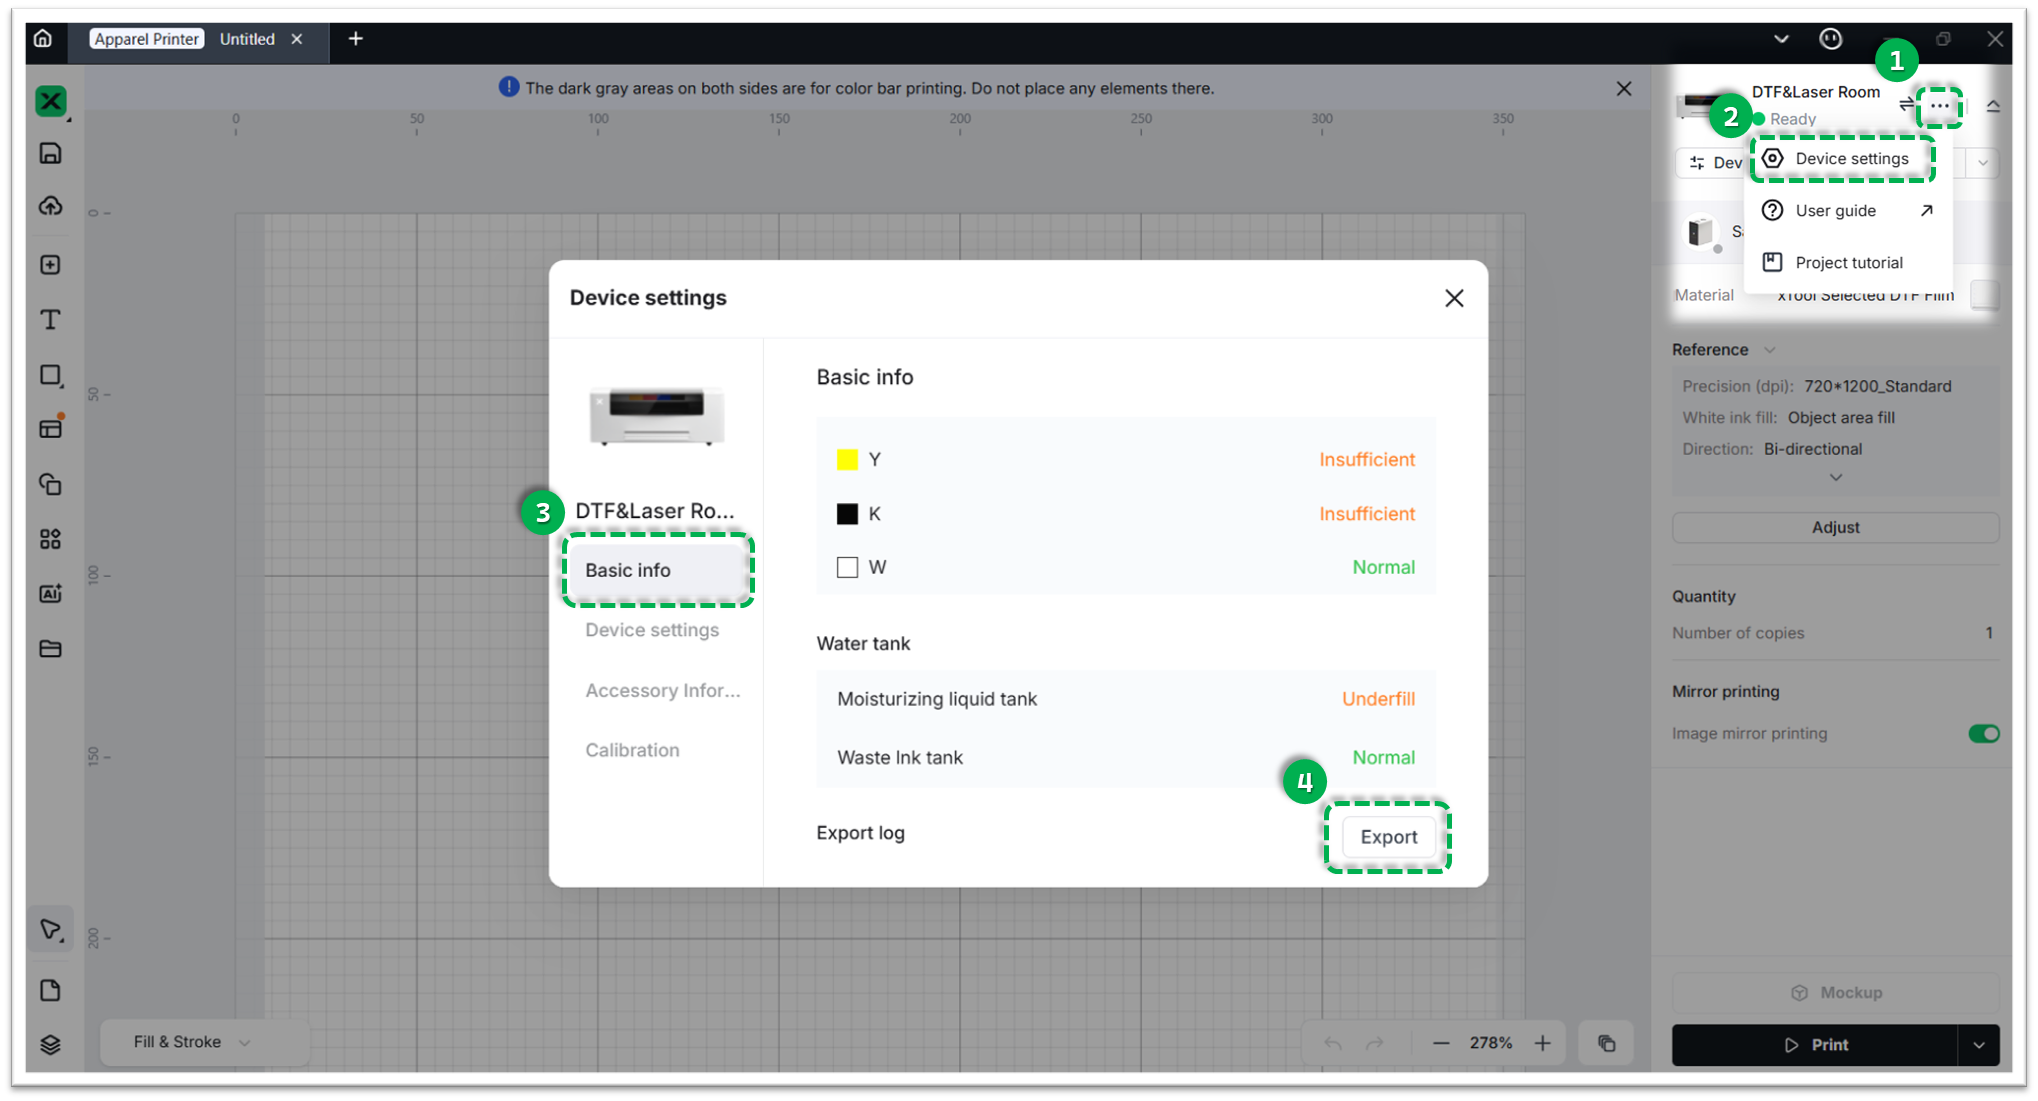
Method A: Via xTool Creative Space (XCS)
- Click the Device Settings icon (gear symbol) in the top-right corner.
- Select the Basic info tab.
- Scroll down to Export log and click Export.
- A folder will be generated. Compress (Zip) this entire folder into a single file and attach it to your ticket.
Method B: Via xTool Studio
- Click the three dots icon next to the device image.
- Select Device Settings (gear icon).
- Select the Basic info tab on the left.
- Scroll down to Export log and click Export.
- A folder will be generated. Compress (Zip) this entire folder into a single file and attach it to your ticket.
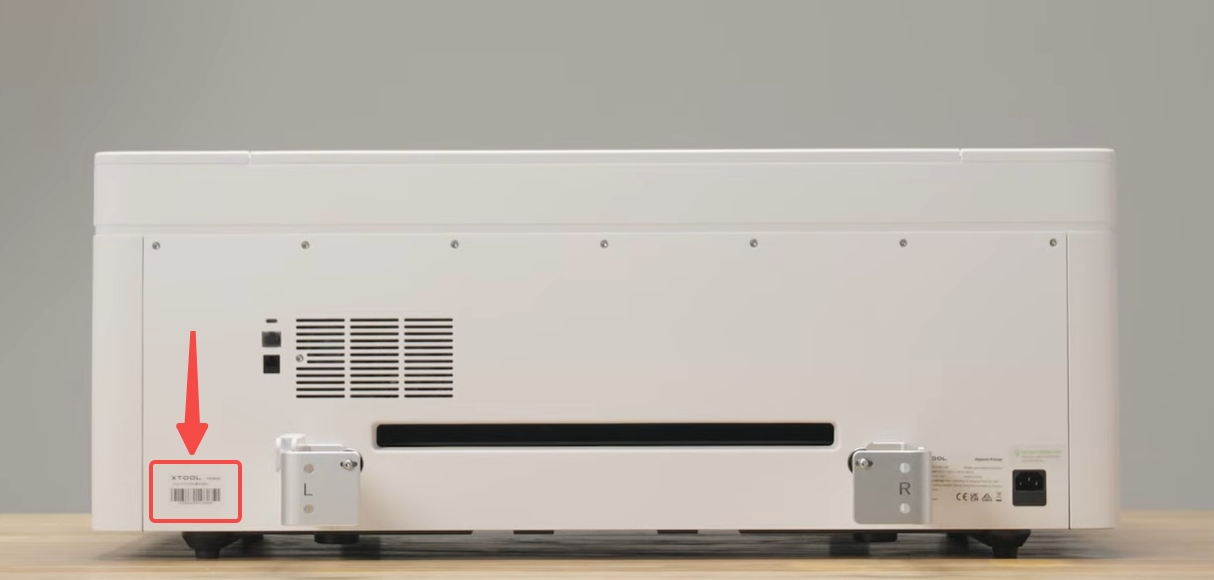
2 Serial number (SN)
The product serial number (SN) is typically located on a label in the lower left corner of the rear panel, as shown in the reference image below.
3 Video evidence (Highly recommended):
- A video of the print head movement during the startup sequence.
- A video showing the status of the X-axis limit sensor (the blue light test).

Documentation feedback
Help improve this content by providing feedback. If this content did not meet your requirements, select "No" in the "Was this page helpful?" section below. Include specific details about what was unclear or missing in the pop-up suggestion box. Feedback submissions are reviewed by xTool technical writers to enhance future documentation.
Services & Help
Learn & Education

Copyright © 2025 xTool All Rights Reserved.