Features of glass surface engraving
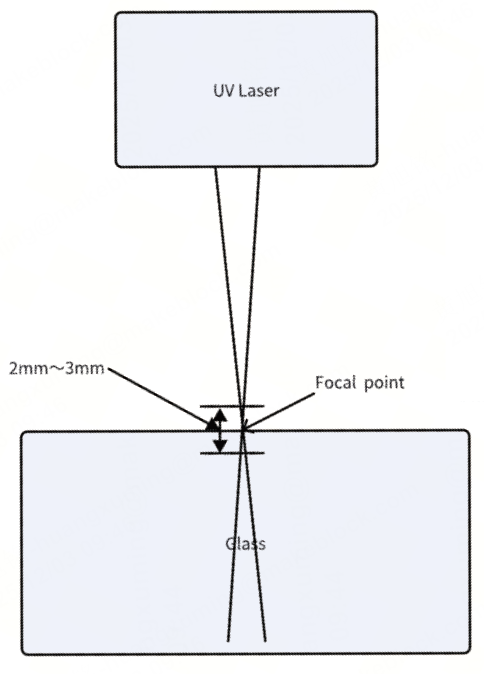
- When engraving glass surfaces with UV lasers, the effective focal depth is relatively shallow, approximately between 2 mm and 3 mm. This is an inherent physical phenomenon and cannot be avoided.
- The surface of glass is transparent, and since light passes through it, the auto-focus does not function properly. To perform auto-focus, it is necessary to place a thin, non-transparent object on the glass surface.
Therefore, focusing a UV laser on glass requires extremely precise control.
Recommended glass surface focusing methods
Method 1
Auto-focus: Place a thin object, such as paper, over the transparent object to make the measured object no longer transparent, allowing the auto-focus function to work again. Note that you need to subtract the thickness of the thin object after focusing.
Method 2
Focusing through measurement: If the thickness of the transparent object is known, directly input the thickness of the transparent object.
Actions to take if the glass surface cannot be engraved
- When performing surface engraving, ensure that the field lens installed in the machine is the surface engraving lens, but not the inner engraving lens.
- Ensure that the processing parameters are closely align with those we recommend.
- Glass materials are highly sensitive to focusing. Therefore, try adjusting the focal point to ensure accuracy.
- If the glass cannot be engraved on the surface, check whether the glass material is suitable for engraving (avoid using tempered or laminated glass) and whether the focal point is accurate. You can slightly lower the focal point by 1–2 mm to achieve better focusing results.
- If surface engraving continues to fail, try testing with glass materials purchased from our official website. Not all types of glass are suitable for surface engraving; for instance, quartz glass and borosilicate glass may not be engravable.
Techniques for engraving large pieces of glass
Due to the inherent field curvature distortion of the focal plane in the field lens, when processing large glass pieces (typically exceeding 100 mm), a single focal adjustment may not be sufficient to meet the processing requirements across the entire surface.
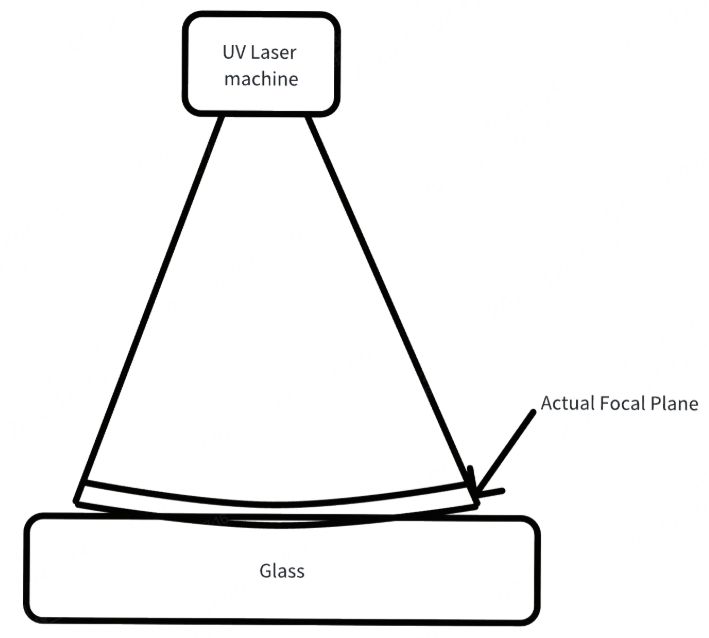
We recommend increasing the number of processing passes and gradually lowering the focal height with each pass to achieve optimal surface engraving results.
Precautions
1. Prevent damage to F2 Ultra UV's baseplate and the glass to be engraved
- Since glass is transparent, the laser can easily pass through the surface and strike the area beneath it. To prevent damage to the baseplate from laser, it is recommended to place the glass on the slatted panel provided during surface engraving.
- If the glass to be engraved is too thin (with a thickness of 5 mm or less), the focal depth range may extend to the slatted panel, and any supporting material beneath the glass could be affected by laser engraving, potentially causing damage to the back of the glass. In this case, it is recommended to suspend the glass by supporting its edges to prevent the supporting material from being engraved and to avoid damage to the glass.
2. Minimize temperature fluctuations
The focal length can be slightly affected by temperature changes. Maintaining a stable temperature in the laser optical cavity ensures more accurate focal length.
- When the ambient temperature is between 20°C and 30°C, it is recommended to start processing after the device has been running for 5 minutes, allowing the laser module to warm up.
- When the ambient temperature is between 15°C and 20°C, it is recommended to warm up the device for 5–20 minutes.
- When the ambient temperature is between 10°C and 15°C, it is recommended to warm up the device for approximately 20 minutes to allow the laser module to reach thermal equilibrium before starting processing.
- The device must not be used at ambient temperatures above 30°C or below 10°C.
More information
xTool F2 Ultra UV Unboxing and First Use
A Guide to Glass for Inner Engraving
Tips for Surface Engraving Glass Cups Using Rotary Attachments
