1. Principles of Laser Engraving on Glass
After UV laser is precisely focused, it penetrates the surface of the glass and forms a high-energy density light spot at a predetermined internal location. When the energy reaches the critical threshold for glass inner engraving, it triggers localized micro-explosions or micro-fractures, which, through a large number of orderly arranged microstructures, create the inner engraving pattern.
Differences in Engraving Methods for Square Glass and Spherical Glass:
The core difference between inner engraving on rectangular square glass and spherical glass lies in the nature of the incidence interface:
The former has a flat surface as the incidence interface, which makes the laser refraction pattern predictable and allows for precise focus positioning. It does not require additional materials for support, is easy to fix, and can use uniform parameters across the entire area.
In contrast, the latter has a curved surface, causing the laser incidence and refraction angles to vary irregularly across the surface. The focus is prone to three-dimensional shifts, requiring the use of inner engraving oil for refractive index matching. Additionally, it must be fixed with a specialized fixture and the parameters must be adjusted in different regions to avoid edge effect degradation, making the setup significantly more complex.
Engraving Tool Combination Required for Crystal Ball Engraving:
- Container (should be larger in diameter and height than the crystal ball)
- Base (used inside the container to secure the crystal ball)
- Crystal Ball (must be a regular spherical shape, free of internal impurities)
- Inner Engraving Oil (clean and transparent liquid)
2.Crystal Ball Assembly Placement Scenario
Step 1:Take out the crystal ball and clean its surface
Note:Remember to wear gloves and avoid leaving fingerprints or other marks on the surface of the crystal ball, as this could affect the inner engraving quality.
.png)
Step 2:Measure the diameter of the crystal ball
Note:The size of the crystal ball determines the size of the container that needs to be prepared. A crystal ball that is too large will exceed the inner engraving work area of xTool F2 Ultra UV, and any part that falls outside the inner engraving work area cannot be processed by the laser.
.png)
Step 3:Find a suitable container for the crystal ball
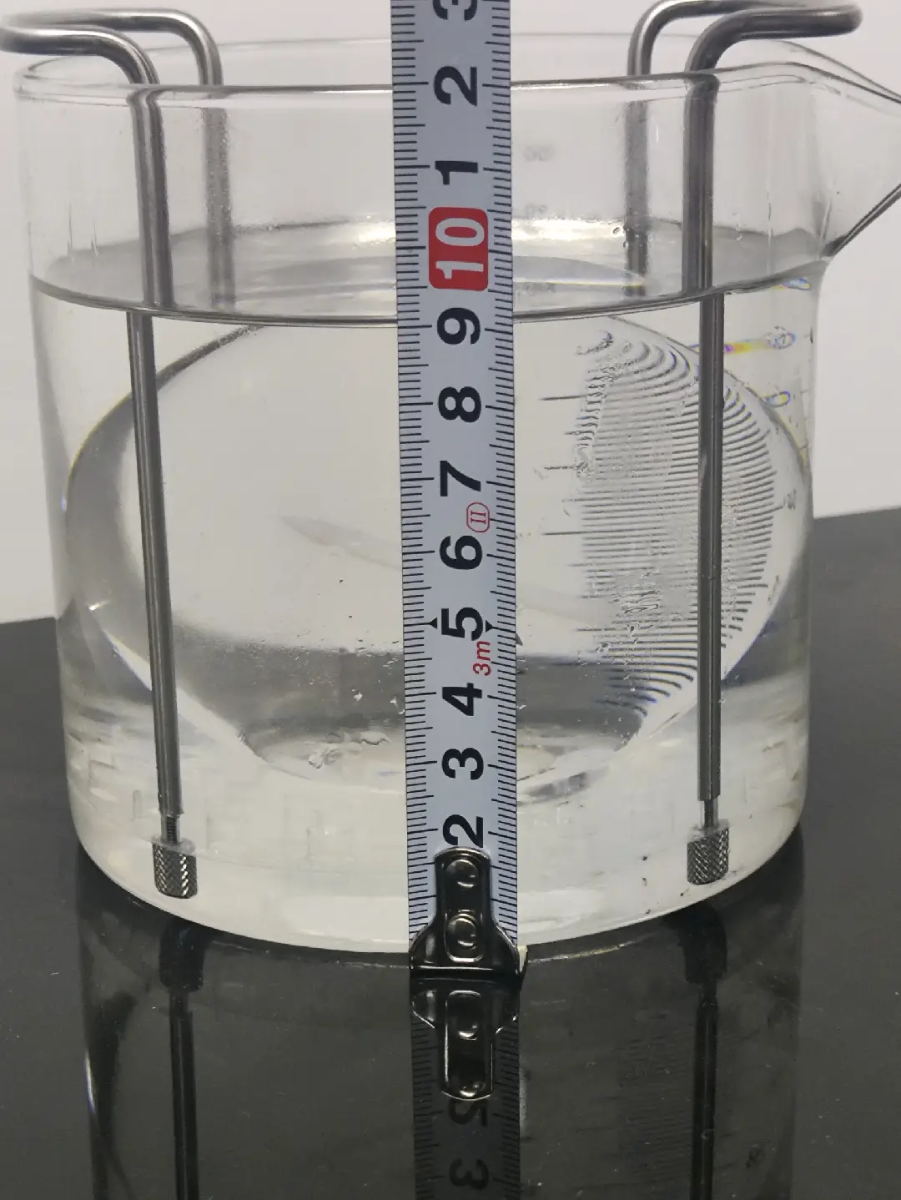
Measure the container’s diameter and height to ensure it can accommodate both the crystal ball and its base.
.png)
.png)
Shape: A regular cylinder or rectangular prism is ideal for placing the crystal ball. A well-shaped container also ensures more accurate measurements of the container's position in the following steps. The bottom of the container must be flat; avoid choosing containers with uneven or textured bottoms. An uneven bottom can affect the stability of the crystal ball in the container, potentially causing it to shift during inner engraving.
Function: Hold the oil for inner engraving as well as the crystal ball and its base. It facilitates determining the position of the crystal ball within the processing area.
Size: The container must have a diameter larger than that of the crystal ball and a height greater than the combined size of the crystal ball and its base. This ensures that when the inner engraving oil is poured in, it can fully submerge the crystal ball without spilling over the edges of the container.
Step 4:Prepare an appropriate base to hold the crystal ball
Note:The base made from these materials will be immersed in inner engraving oil. After cutting, clean the base thoroughly before use. The materials chosen should be non-fading.
Material Selection
Materials required for cutting the base using a UV laser device:
You can use 5-6mm thick plywood as the material to make the base for fixing the crystal ball. Alternatively, other materials that meet the thickness requirement and can be cut by UV laser can also be used for the base.
Materials required for cutting the base using a CO2 laser device:
You can use 5-6mm thick acrylic as the material to make the base for fixing the crystal ball.
Adjusting the Base Size in the File
Function of the Base:
The base is used to fix the crystal ball inside the container, preventing movement during the engraving process that could affect the inner engraving result.
Base Structure:
Click here to access the DIY Blueprint for the Crystal Ball Fixing Base.
Adjusting the Base to the Crystal Ball:
The size of the base’s outer contour should vary according to the size of the container. The ideal size of the base should fit snugly at the bottom of the container. The key is to ensure engraving stability and accurate light path: the base must securely hold the crystal ball in place, preventing rolling or shifting during the engraving process, which could cause focal displacement or pattern distortion. At the same time, the base should naturally center the crystal ball, ensuring that the laser enters from all angles symmetrically and reduces curved surface refraction interference. Additionally, minimizing the gap between the base and the container reduces air bubbles, prevents liquid movement from shaking the base, and allows reasonable control of liquid volume, balancing optical stability with operational convenience. When laser cutting the base, the outer contour size should be set slightly smaller than the container size.
Base Center's Circular Contour Size Adjustment:
The circular contour in the center of the base should change proportionally with the size of the crystal ball. Proportional design ensures that the hollow contour closely fits the surface of the crystal ball, preventing the ball from shifting or wobbling due to an oversized contour, which would result in focal shift and pattern distortion. This design also ensures that the crystal ball stays securely fixed in place during the engraving process. Conversely, if the base contour is too small, the crystal ball may not be properly fixed and may touch the bottom of the container, leading to movement during engraving.
Relationship Adjustment:
For a crystal ball with a diameter of 80mm, adjust the diameter of the circular contour at the center of the base to 40mm.
For a crystal ball with a diameter of 60mm, adjust the diameter of the circular contour at the center of the base to 30mm.
Note:
You may add custom design features to the base used for securing the crystal ball. For example, multiple holes can be added around the edge of the base to attach a metal handle or to thread a cord through. These additional structures make it easier to quickly lift the crystal ball out of the container after engraving.

Step 5:Pour the inner engraving oil into the container
.png)
.png)
.png)
Note:The crystal ball must be securely fixed within the container. Use a fixed base at the bottom to assist with stabilization. If additional fixation is required, items can be used to press against the sides of the crystal ball to ensure it is completely secured in the container. Be careful not to place any objects that obstruct the top of the crystal ball, as any obstruction above the crystal ball will block the laser and interfere with the engraving process.
Liquid Selection for Crystal Ball Inner Engraving:
Purpose of the Liquid:
Inner engraving of crystal balls requires liquid assistance due to the irregular refraction caused by their curved surface. The liquid (inner engraving oil) helps match the refractive index of the crystal ball, reducing laser reflection and scattering, stabilizing the light path and focus, and ensuring that energy is evenly applied to the internal preset location. Additionally, it alleviates thermal stress, preventing cracks and surface damage, which ensures engraving precision and product quality.
Criteria for Liquid Selection
Point 1:
Refractive Index Matching (Primary Criterion): The refractive index of the liquid should closely match that of the crystal ball (typically 1.5–1.6 for K9 crystal), with a difference of ≤0.05, to avoid refraction interference at the interface.
Point 2:
Optical Purity: The liquid must be highly transparent, free from impurities or bubbles, and have a UV laser absorption rate of ≤5%, ensuring no scattering of laser energy.
Point 3:
Chemical Inertness: The liquid should not corrode the crystal ball's surface or cause chemical reactions. It should leave no residue or cloudiness after long-term contact.
Point 4:
Physical Stability: The liquid should be non-volatile, non-absorbent, and have moderate viscosity (easy for soaking and cleaning) under normal temperatures. It should also have minimal refractive index fluctuation with temperature changes (e.g., during engraving temperature increases).
Point 5:
Auxiliary Functionality: The liquid should have some degree of thermal conductivity to alleviate engraving thermal stress, without interfering with the laser system’s optical components.
Methods for Observing Liquid and Crystal Ball Compatibility
Method 1:
Visual Optical Observation:
Fill a transparent container with the liquid and completely submerge the crystal ball. Observe from the side:
- If there is no obvious reflection or visible boundary between the crystal ball and the liquid (the interface is "invisible"), the refractive index matching is high.
- If the interface reflects strongly, shows clear light shadow layering, or the liquid is cloudy with bubbles or sediment, compatibility is poor.
Method 2:
Test Engraving (Core Method):
Perform a test engraving on a small model and observe:
- Ensure the engraving focus is accurate with no pattern distortion or edge blurring (to avoid refraction deviation).
- Verify that the interior of the crystal ball has no irregular cracks and that micro-explosions are evenly distributed, indicating good heat transfer and refractive index compatibility.
- After engraving, check the crystal ball's surface for no corrosion or cloudy residue, ensuring good chemical compatibility.
Method 3:
Long-Term Stability Observation:
Soak the crystal ball in the liquid for 24 hours and check:
- The liquid should show no discoloration or layering, and the crystal ball surface should be undamaged.
- Test engraving again and ensure the results are consistent with the initial test, with no decline in parameter compatibility, indicating the liquid’s stability.
3. Test Procedure
3.1 Preparation Before Inner Engraving
3.2 Inner Engraving Settings
Open xTool Studio, connect your xTool F2 Ultra UV in xTool Studio, and set the mode to “Inner Engraving”.
.png)
Step 1:Ensure the riser is secured on the baseplate of xTool F2 Ultra UV with the two thumb screws.
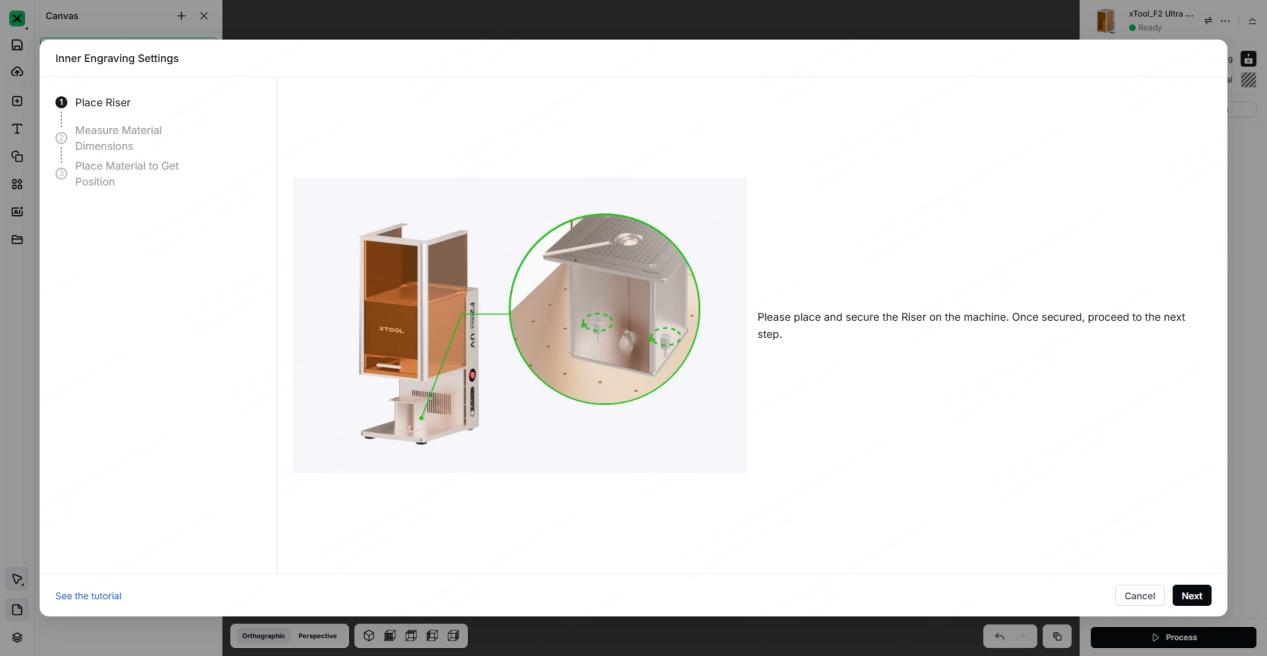
Step 2:Select the cylindrical shape, input the diameter and height of the container, input the reflactive index, and then click “Next”.
.png)
- When processing a crystal ball, it needs to be used in conjunction with inner engraving oil. Therefore, the container holding the crystal ball and the inner engraving oil determines the choice of material shape. For example, if using a cylindrical container, simply select the cylindrical shape. Note that the container must have a regular shape.
- The choice of material shape must match the actual container being used. Matching shapes ensure accurate measurements of the container's position within the processing area of the device and guarantee that the software-generated model aligns with the actual scenario.
- It is recommended that the material size matches the container dimensions. The material size should ideally remain within the equipment's processing range.
- The setting of the refractive index value can affect the engraving effect inside the crystal ball. Here, simply input the refractive index value of the crystal ball. The refractive index of the crystal ball provided is 1.5.
Step 3:Input the X-axis value and Y-axis value, and then click “Import Canvas”.
.png)
The X-axis value and Y-axis value are determined by the size of the container. In this tutorial, the diameter of the container is about 100 mm. Since the container is placed in the center of the riser top plate, the X-axis value to input is “-15” (0 mm - 15 mm) and the Y-axis value is “85” (70 mm + 15 mm).
.png)
.png)
Container Parameter Measurement
3.3 3D Model Processing
Step 1:
Place the 3D model you want to process into the workable area within the software, or use AI Make to intelligently generate the 3D engraving model you need.
.png)
.png)
.png)
Step 2:
After the 3D model is created, you can click “Scale to Fit” to adjust its size. Ensure that the 3D model is within the boundaries of the container model and fits within the inner engraving work area (70 mm x 70 mm).
The size of the 3D model can be scaled proportionally up or down, or the length, width, and height can be adjusted individually. You can adjust the X-axis value, Y-axis value, and Z-axis value behind “Size” on the top of the page. The size of the 3D model determines the size of the image inside the crystal ball after engraving.
Move the 3D model to the position where you want it to be engraved. You can adjust the X-axis value, Y-axis value, and Z-axis value behind “Position” on the top of the page.
.png)
.png)
.png)
Step 3:
Select the material “K9 Inner Carved Glass”. (1) Click “Unknown Material”. (2) Click “Other”. (3) Click “Glass”. (4) Click “K9 Inner Carved Glass”. (5) Click “Apply”.
Set the engraving parameters:It is recommended to use the suggested parameters for processing. If the engraving effect needs adjustment, you can modify the laser output by adjusting the power and speed. The laser energy output determines the clarity of the engraving effect inside the crystal ball.
.png)
.png)
After clicking Process, pull down the protective enclosure to begin engraving the crystal ball.
Step 4:
Wait for the processing to complete,After processing, press the power button to turn off xTool F2 Ultra UV, and take out the container.
.png)
Lift the brackets and take out the crystal ball,If the metal support bracket is not installed on the base, you may slightly tilt the container and then use your hand to remove the crystal ball from the container.
.png)
.png)
Step 5:
Clean the surface of the crystal ball using detergent, then place the crystal ball on a fixed base.
.png)
