Applicable scenarios
When using the xTool P3, it is essential to clean, maintain, and replace the parts regularly.
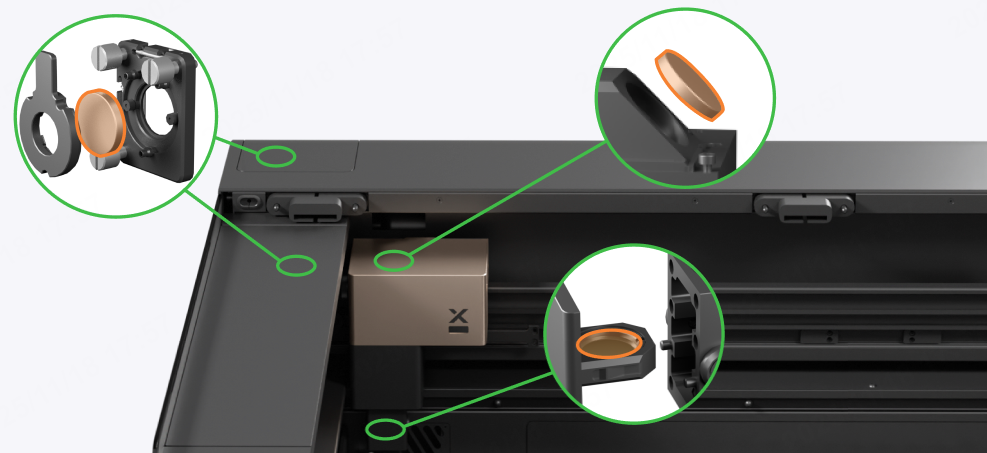
1. Focus lens, window lens, and laser mirror
1.1 Maintenance frequency
- It is recommended that you check and clean the lenses every day.
- For high-power, continuous processing over extended periods, it is recommended to clean the lenses every 4 hours to maintain optimal performance.
1.2 Tools required
- Optical lens cleaner (such as high-concentration alcohol, isopropyl alcohol, etc.)
- Microfiber lens cleaning cloth or other optical lens cleaning cloth
- Air blower
- Rubber gloves
- Phillips screwdriver
1.3 Cautions
- Alcohol and isopropyl alcohol are flammable. Keep away from high temperatures and open flames. Do not spray on other items.
- Store alcohol and isopropyl alcohol properly in a cool, dry place out of reach of children.
- Do not place the lenses directly on the table or device. Instead, put them on a clean cloth to avoid scratching.
- If the focus lens, window lens, or laser mirror is severely oxidized, resulting in significant power loss, please replace it.
- Inspect the optical path after cleaning the lenses.
1.4 Maintenance procedures
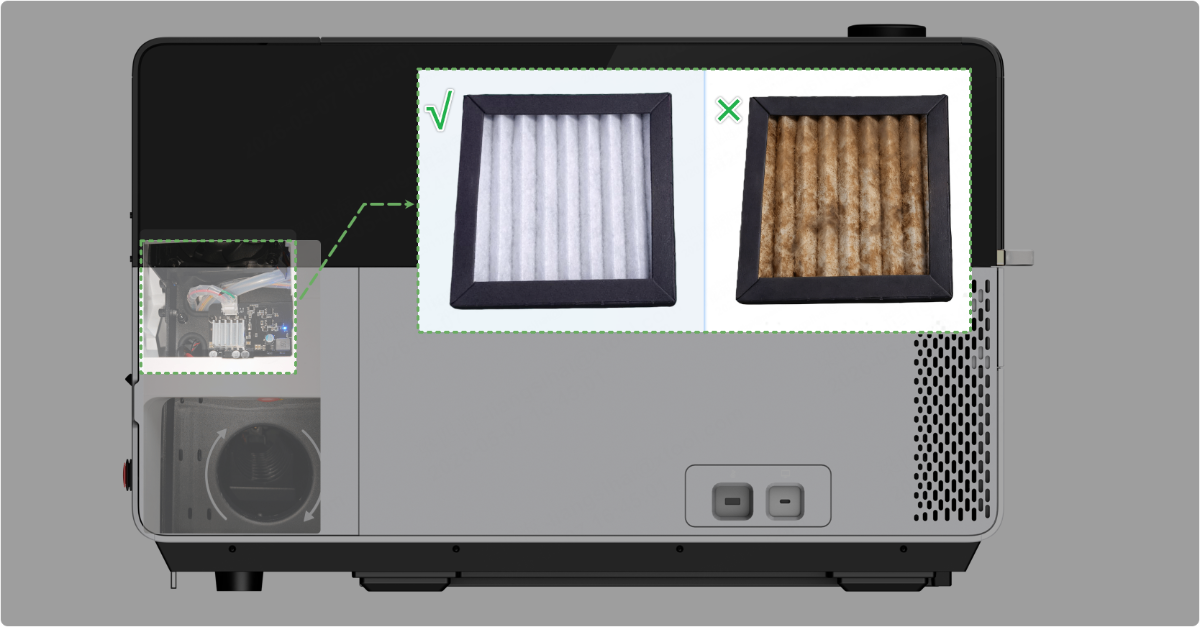
2. Filter screen of the air pump
2.1 Maintenance frequency
- It is recommended that you check and clean the filter screen every day.
- For high-power, continuous processing over extended periods, it is recommended to clean the filter screen every 8 hours to maintain optimal heat dispersion of the air pump.
2.2 Tools required
- Brush
- Dust mask
2.3 Cautions
- The cleaning process generates dust. Please wear a dust mask.
- If the filter screen continues to clog easily after multiple cleanings, replace it with a new one.
- If the filter screen becomes severely dirty, it should be cleaned or replaced promptly. Otherwise, it may cause the air pump silencer to clog and affect the processing results.
2.4 Maintenance procedures
(1) Turn off the power switch and disconnect the power supply from the device.
(2) Open the cover on the left plate.

(3) Pull out the filter screen from the upper window.
(4) Use a brush to gently remove lint and large particles from the surface of the filter screen.
(5) Gently tap the filter screen to shake out the dust inside.
(6) Reinstall the filter screen.
(7) Put the cover back on the left plate.
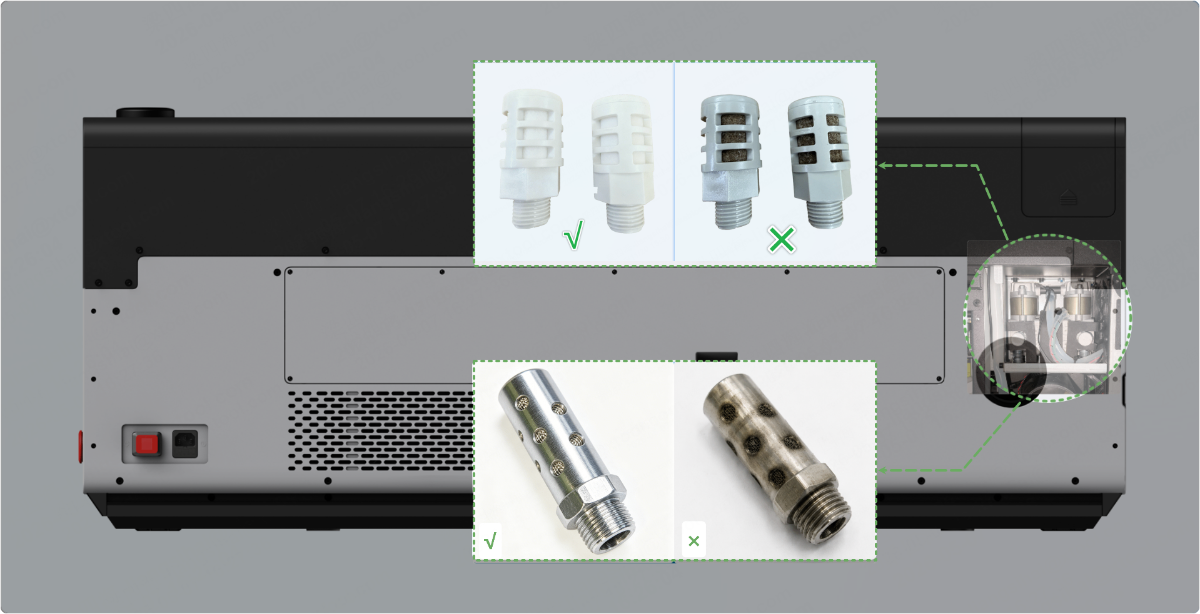
3. Air pump silencer
The silencer is available in plastic and metal versions. They serve the same purpose and are cleaned the same way, but they should not be used interchangeably.
3.1 Maintenance frequency
No fixed maintenance schedule. Clean the silencer when you notice a significant decrease in airflow.
3.2 Tools required
- Philips screwdriver
- 2.5mm hex key
- 3mm hex key
- Mild oil stain cleaner
- Purified water
- Brush
- Rubber gloves
3.3 Cautions
- Disconnect the power before processing.
- Do not operate for extended periods without a silencer installed, as this may cause air duct blockage and reduce the lifespan of the focus lens.
- If the silencer fails to restore adequate airflow after multiple cleanings, replace it with a new one.
- Improving smoke extraction during processing can extend the lifespan of the air pump silencer:
- Reduce the length of the smoke exhaust pipe and reduce the bending positions.
- Regularly clean the exhaust fan and air purifiers to ensure optimal smoke extraction performance.
- Connect to xTool SafetyPro™ AP2 Max for use (xTool SafetyPro™ AP2 Max cannot be used with xTool SafetyPro™ IF2 2.0).
3.4 Maintenance procedures
- Follow the video tutorial to remove the silencer.
- Spray a small amount of oil-based cleaner on the silencer.
- Wear rubber gloves and gently scrub the silencer in purified water.
- Allow the silencer to air dry completely or dry it at a low temperature (below 60°C).
- Reinstall the silencer.
4. Beam Combiner Mirror
4.1 Maintenance frequency
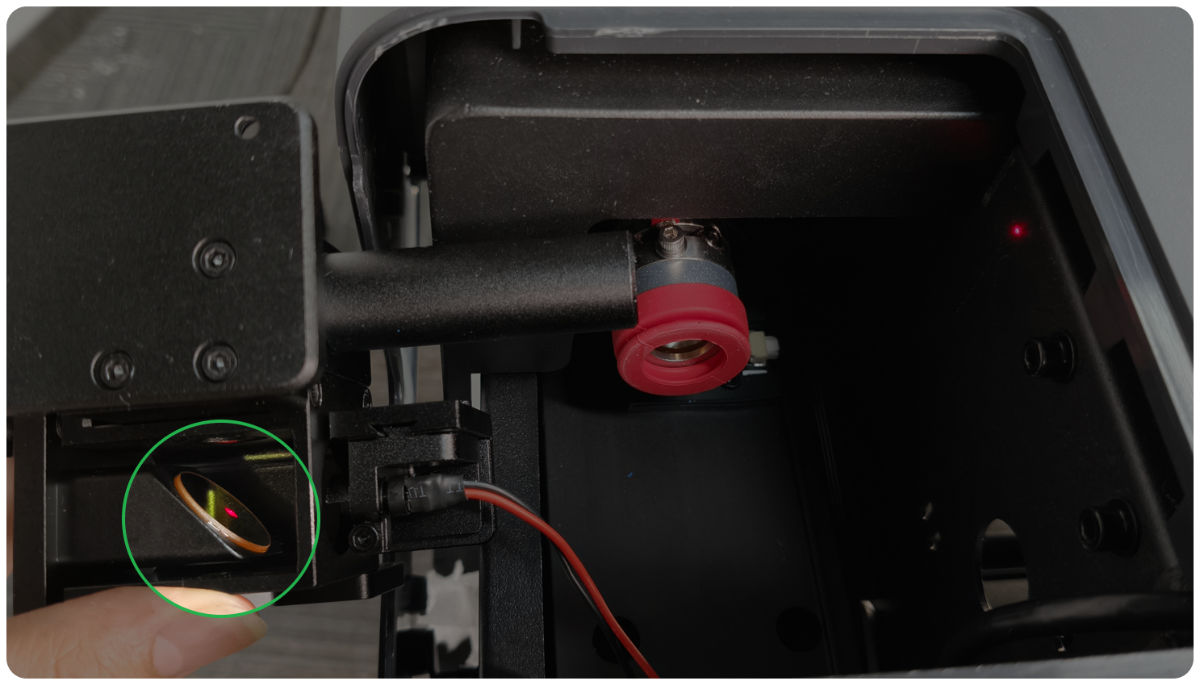
The beam combiner mirror operates in a semi-enclosed environment. Coaxial red light is reflected by it, while the CO₂ laser beam passes through it. Therefore, both surfaces of the mirror should be cleaned.
(1) For daily maintenance, you can inspect the mirror every 6 months.
For high-frequency processing (processing time:>4 hours every day), you can inspect the mirror every 3 months.
- If both surfaces of the mirror are clean, cleaning is not needed.
- If there is some dust or dirt on the surface, clean the beam combiner mirror following this tutorial.
- If the mirror is oxidized severely or broken, contact xTool after-sales service to get a new beam combiner mirror holder for replacement.
(2) If the laser cutting performance or the coaxial red light spot suddenly works abnormally, you can also follow the tutorial to check whether the beam combiner mirror is damaged or dirty after ruling out the cause of the laser mirror, focus lens, and window lens.
4.2 Tools required
- Optical lens cleaner (such as high-concentration alcohol, isopropyl alcohol, etc.)
- Microfiber lens cleaning cloth or other optical lens cleaning cloth
- Lint-free cotton swab
- Air blower
- 2.5mm hex key
- Scissors
4.3 Important notes
- Alcohol and isopropyl alcohol are flammable. Please keep away from high temperatures and fire sources. Do not spray them on the objects.
- Store the alcohol and isopropyl alcohol properly in a cool, dry place out of reach of children.
- Do not place the laser mirror directly on the table or device. It should be placed on the cleaning cloth to avoid scratches.
- When you install or uninstall the mirror holder, pay attention to prevent the mounting screws from falling into the device.
- The optical path must be recalibrated after inspecting the beam combiner mirror.
4.4 Video tutorial
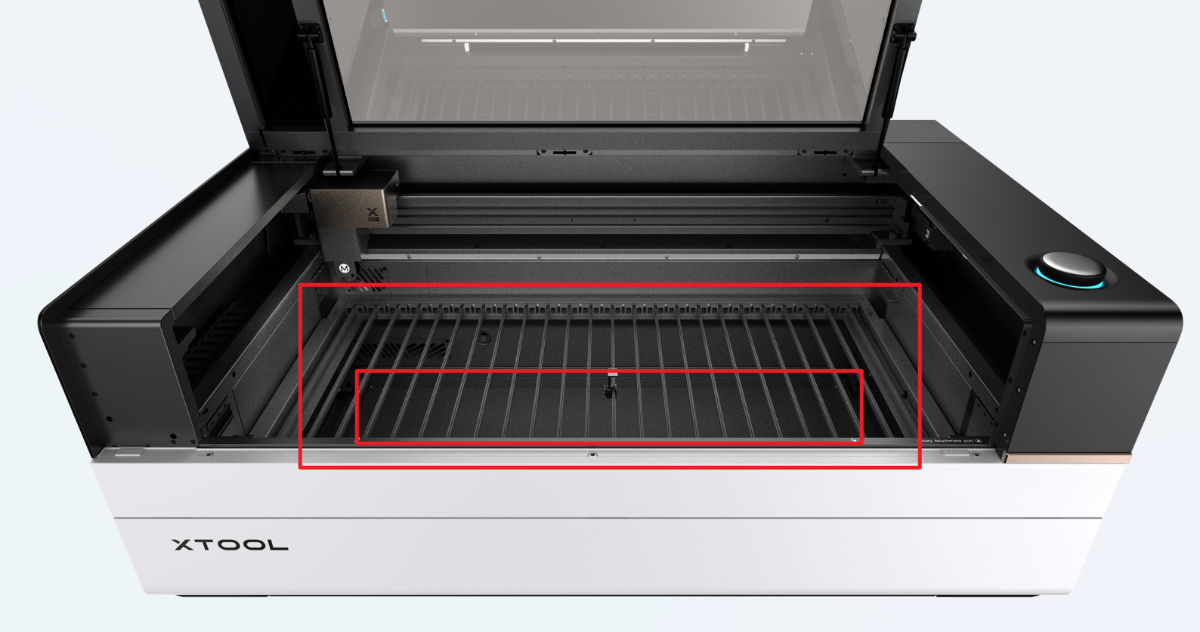
5. Baseplate and slats
5.1 Maintenance frequency
- For inspection, check residues on the slats and the baseplate after each processing, and residues should be removed promptly to reduce the risk of fire.
- For cleaning, there is no fixed schedule. When significant dust or dirt accumulates on the slats and baseplate, it is recommended to clean them when they become heavily coated with dust and oil stains to prevent staining new consumables and to reduce the risk of fire.
5.2 Tools required
- 2.5mm hex key
- Mild oil stain cleaner
- Purified water
- Cleaning cloth
- Rubber gloves
5.3 Cautions
- Sharp edges on the slats and baseplate. Handle with care.
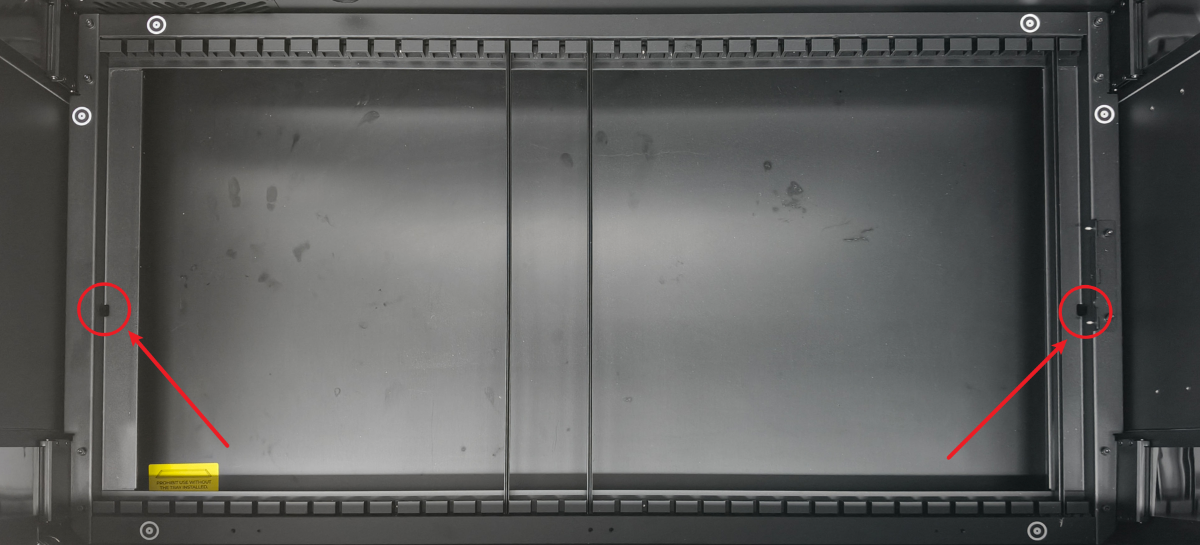
- The baseplate is secured with hex screws before shipping. Please remove the hex screws before taking it out.
5.4 Maintenance procedures
- Clean all residues on the slats and baseplate.
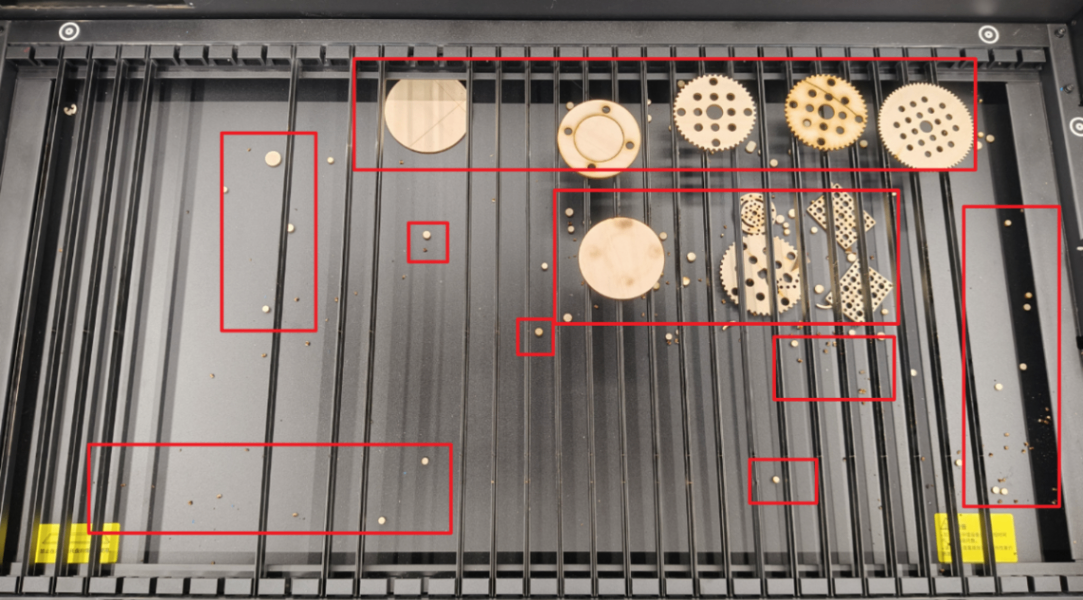
- Remove the slats and spray a small amount of oil stain cleaner on them.
- Wear rubber gloves and use a cloth to scrub the slats in purified water.
- Wet the cloth, wring it out, and clean the dirty areas of the baseplate.
- Dry the slats and baseplate promptly.
- Reinstall the slats and baseplate into the device.
6. Smoke exhaust parts
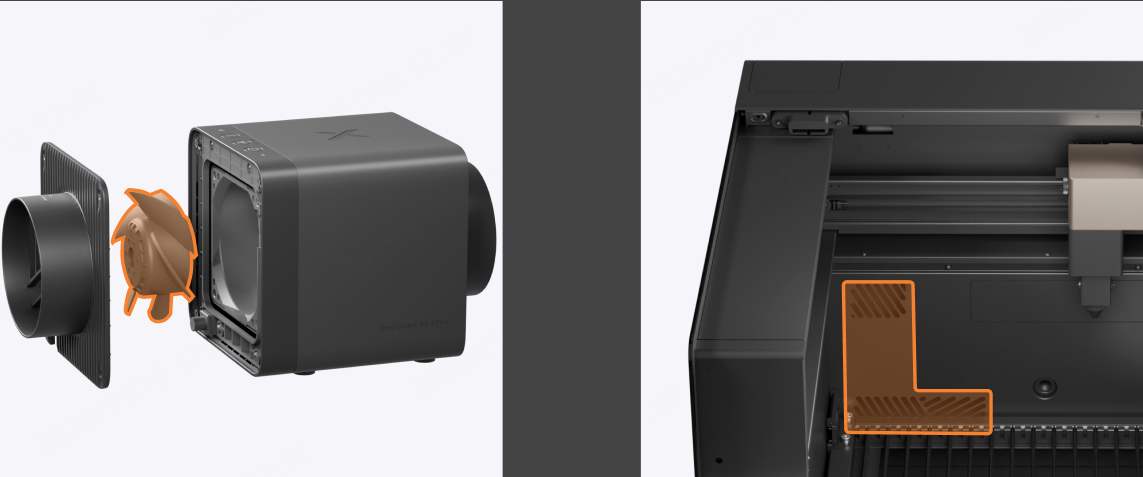
6.1 Maintenance frequency
- It is recommended that you check and clean the smoke exhaust parts every day.
- For high-power, continuous processing over extended periods, it is recommended to clean them every 8 hours to maintain optimal smoke exhaust result.
6.2 Tools required
- Hex key
- Purified water
- Cleaning cloth
6.3 Cautions
Power off the device and disconnect from a power supply before cleaning.
6.4 Maintenance procedures
- Turn the knob to lower the lifting platform to the lowest position.
- Wet the cloth, wring it out, and gently wipe the smoke exhaust outlet inside the device.
- Follow the video tutorial to clean the fan of xTool SafetyPro™ IF2 2.0.
7. Guide rail and pulleys
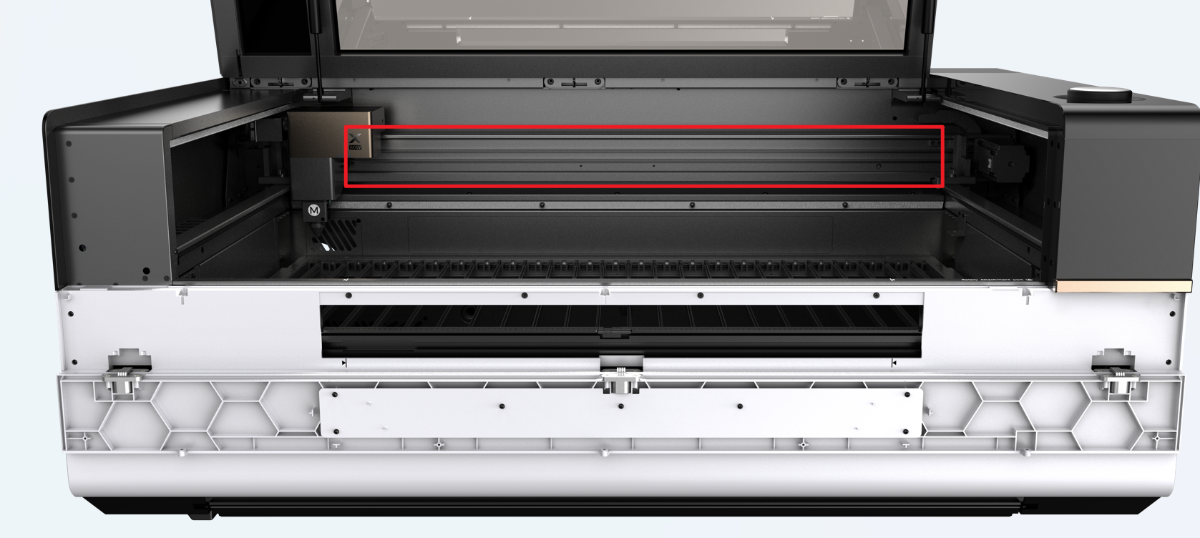
7.1 Maintenance frequency
- It is recommended that you check and clean the guide rail and pulleys every week
- For high processing frequency, it is recommended to clean them 2 to 3 times every week.
7.2 Tools required
- High concentration of ethanol
- Rubber gloves
- Cotton cloth
- Lithium-based grease
- Cotton swab
7.3 Cautions
- Power off the device and disconnect from a power supply before cleaning.
- Do not clean the guide rails or pulleys directly with water or high-moisture cleaning agents to prevent rusting.
- Keep alcohol away from high temperatures and open flames.
7.4 Maintenance procedures
- Wear the rubber gloves.
- Spray a small amount of alcohol on the cotton cloth, and wipe the upper and lower guide rails.
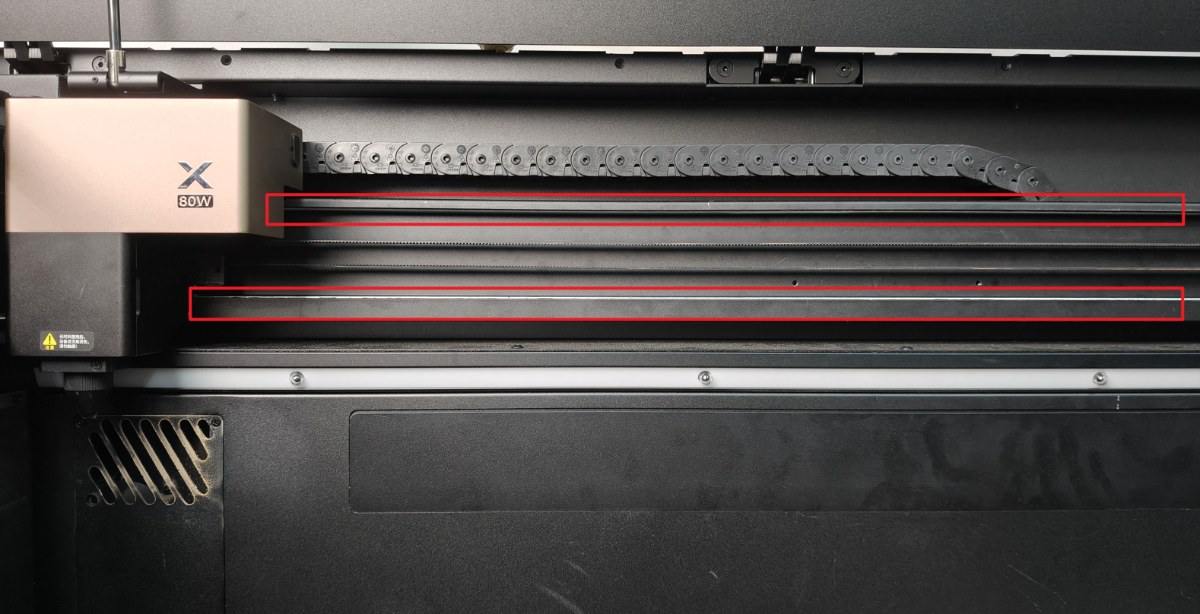
- Apply a small amount of grease to the guide rail every 10 cm.
- Use a cotton swab to apply grease along the guide rail evenly.
- Move the laser module left and right to ensure the grease is evenly applied to the guide rails and pulleys.
Services & Help
Learn & Education

Copyright © 2025 xTool All Rights Reserved.