Issue description
Issue 1: The indicator of the power switch does not light up
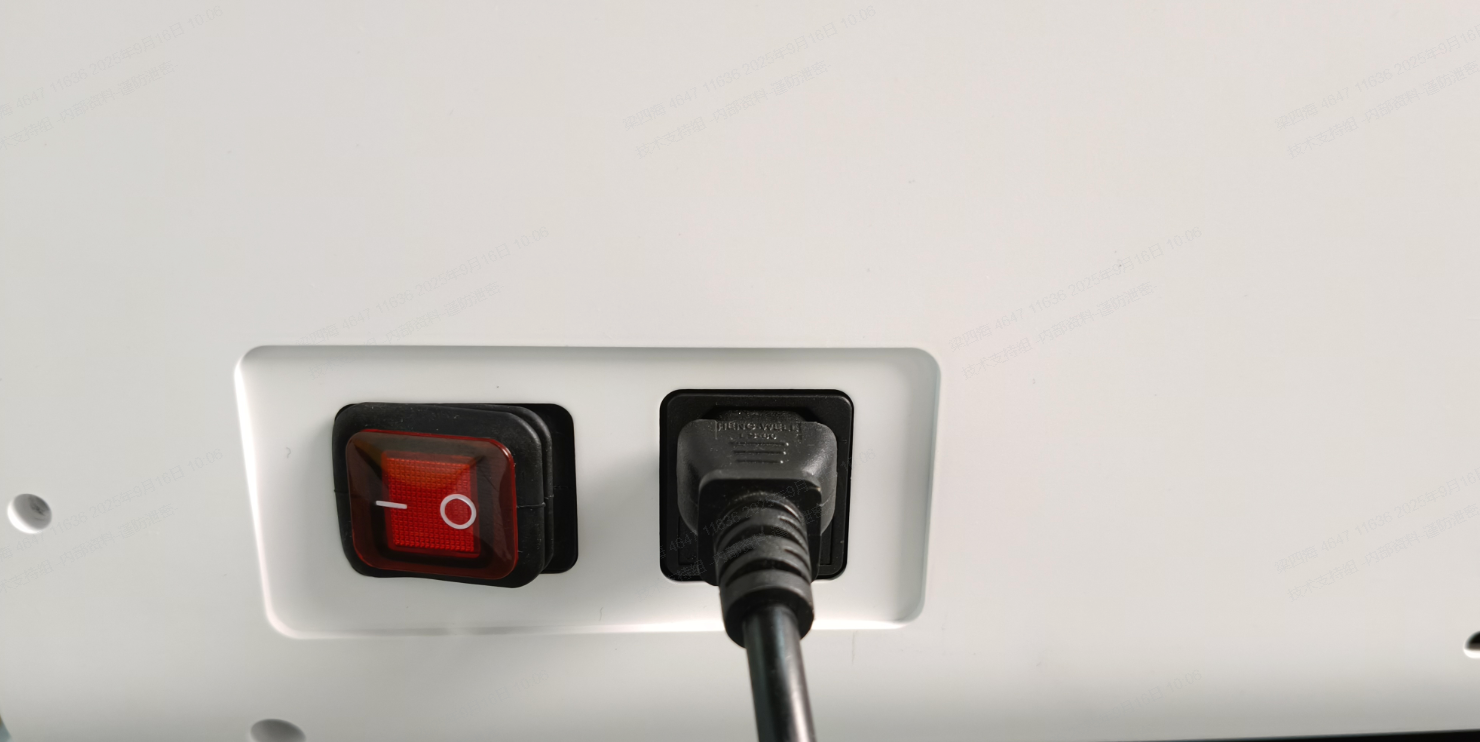
When the device is connected to a power supply and the power switch is turned on, the switch does not light up, and the device gets no response.
Issue 2: Only the indicator of the power switch lights up
When the device is connected to a power supply and the power switch is turned on, the switch lights up, but the device gets no response.

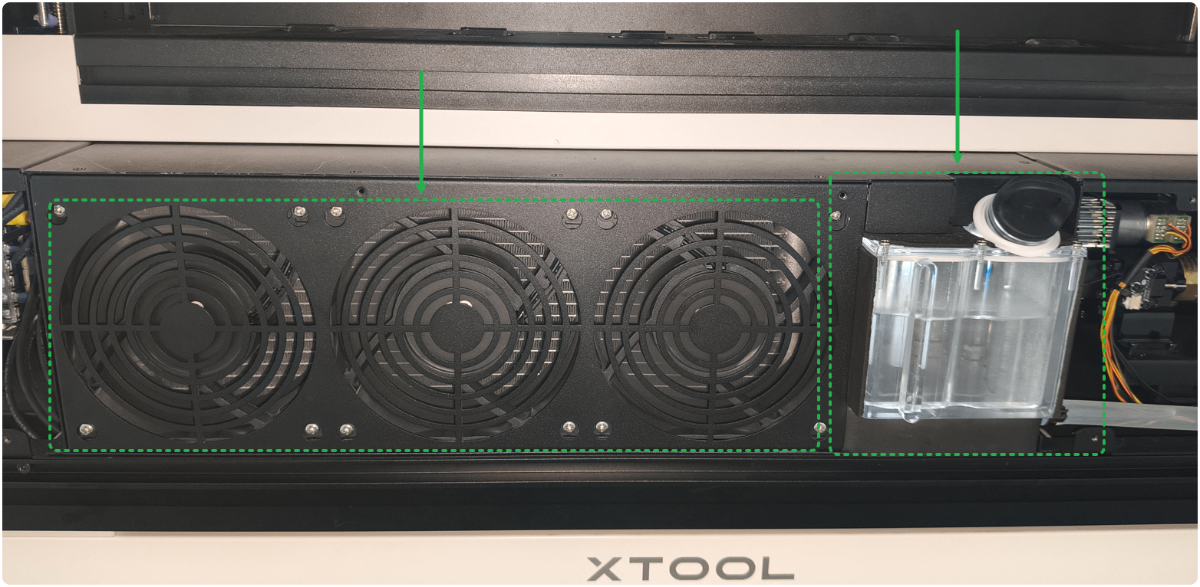
Issue 3: Only the cooling system works properly
When the device is connected to a power supply and the power switch is turned on, the switch lights up, the cooling system and the power supply cooling fan continue to operate. However, some other functions fail to work correctly, such as the display screen, motor, and LED lights.
Once powered on, the cooling system operates normally, with the water tank light staying on and the cooling fan running intermittently.
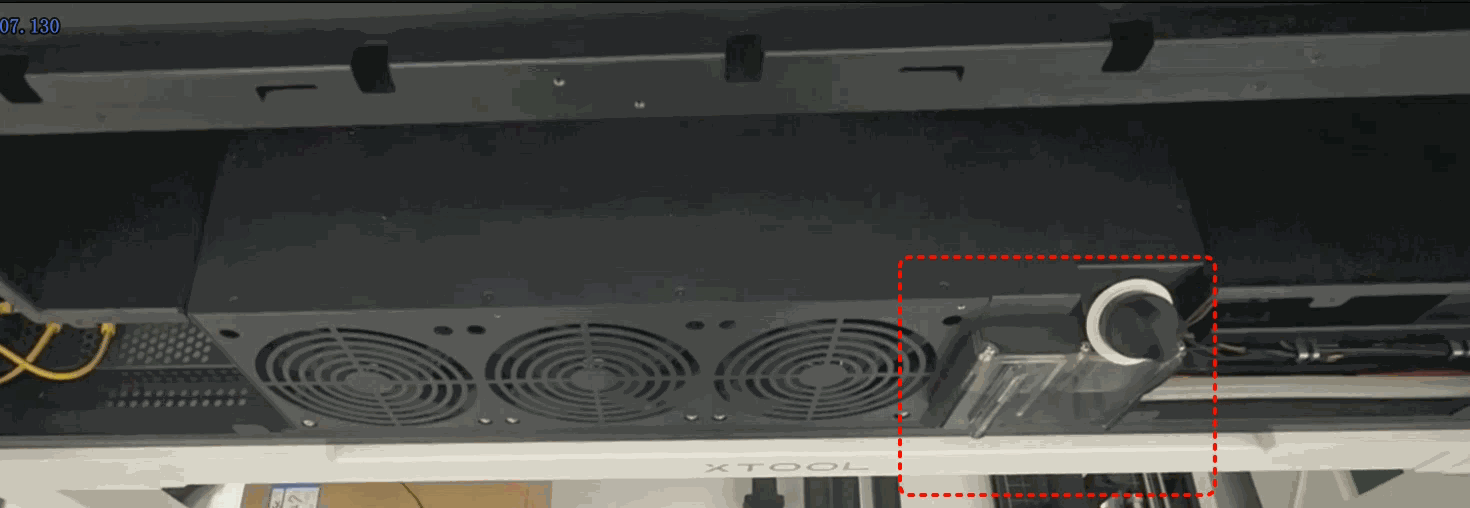
Issue 4: Only the cooling system works briefly
When the device is connected to a power supply and the power switch is turned on, the power switch lights up, the cooling system starts briefly, and turns off automatically. At the same time, some other functions fail to work, such as the display screen, motor, and LED lights.
Possible causes
- The power cable is damaged.
- The fuse is damaged.
- The power switch is damaged.
- The connection cable is disconnected.
- Some issues occur in the power supply.
- Some issues occur in the main board.
- Some issues occur in the cooling system.
Precautions
- When disassembling the device, inspecting cable connections, or reattaching cables, you must unplug the power cable. Never perform these tasks while the device is powered on. If you have any questions, please contact xTool after-sales service.
- Ensure that you have a suitable multimeter and are qualified to operate it before measuring voltage.
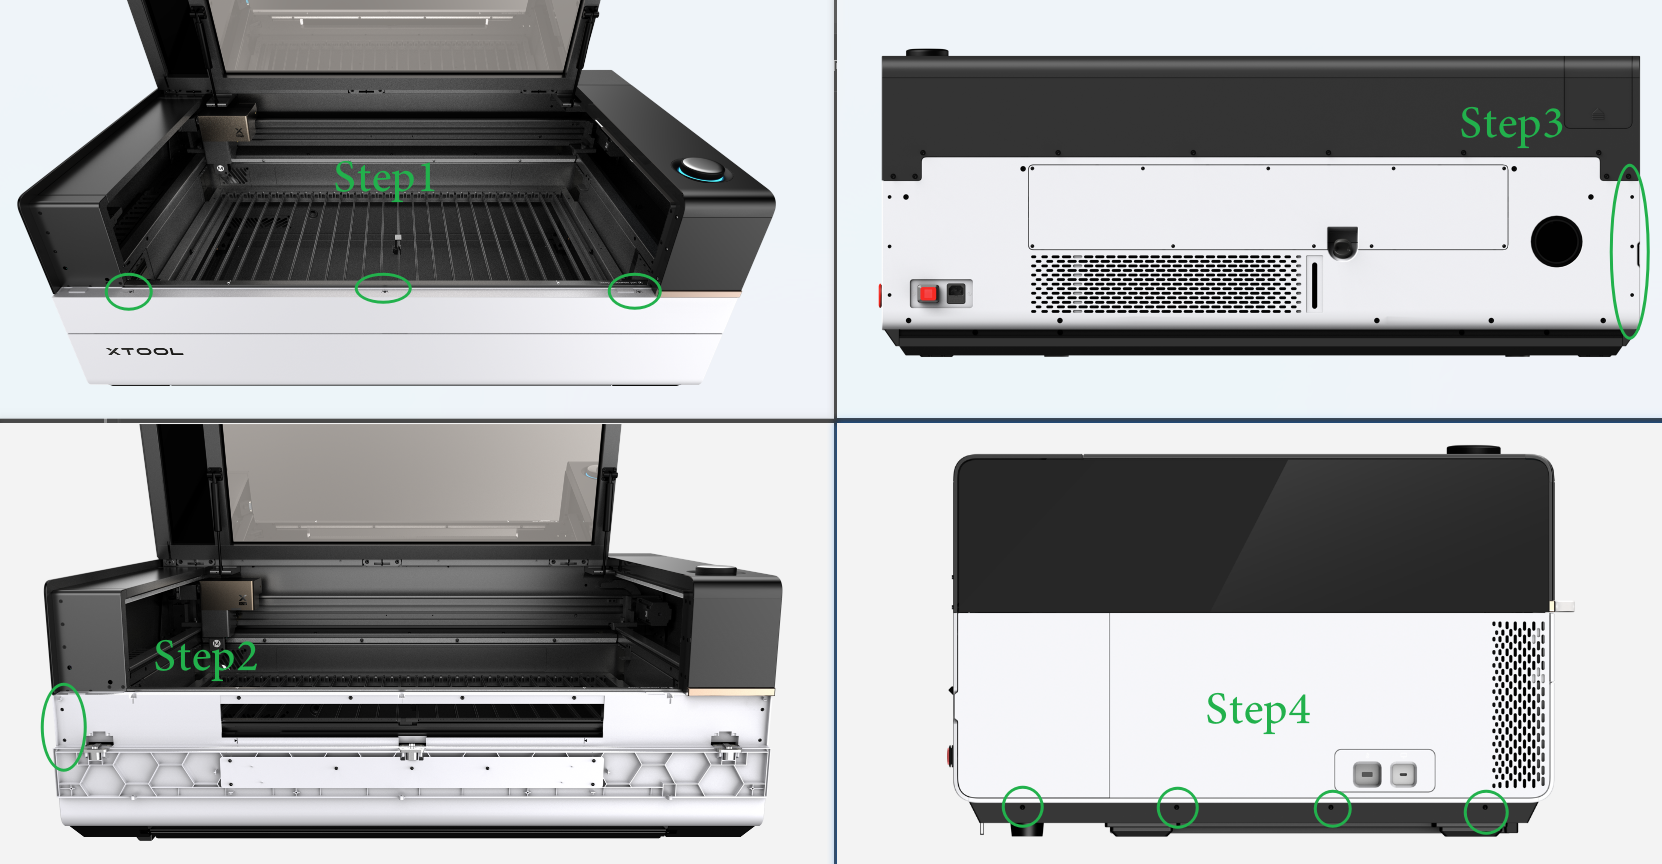
- To make troubleshooting easier, follow the video tutorial to remove the two side panels and the rear cover of the device in advance.
- If this article does not resolve or identify the issue, please record a video showing the status of the main control board, cooling system, power switch, and processing area after the device is turned on, and send it to xTool after-sales service for assistance.
Troubleshooting procedures
For issue 1
1. Check the power cable and the socket.
If the power cable and the socket are damaged, plug into another socket or use a similar power cable to try again.
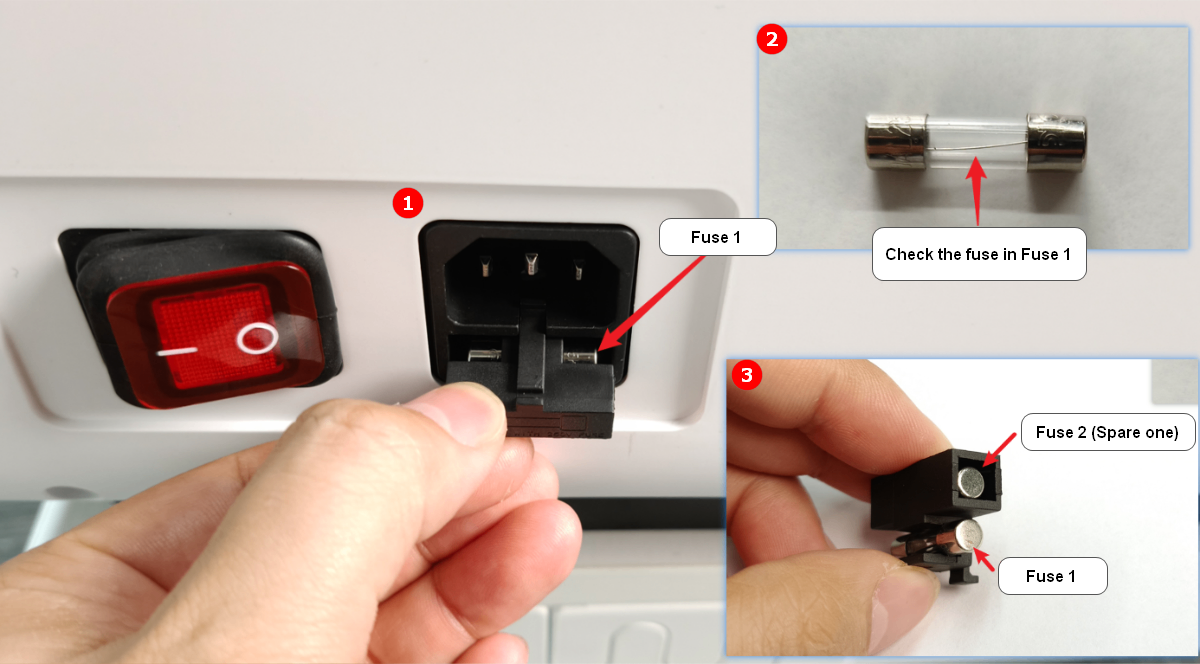
2. Check the fuse
(1) Disconnect from the power cable, use a tool to pry the fuse box under the power port, and take out Fuse 1.
(2) Observe whether Fuse 1 is fused.
(3) If yes, replace Fuse 1 with Fuse 2.
3. Check the connection cable of the power switch.
(1) Power off your device and disconnect from a power supply.
(2) Follow the video tutorial and remove the rear panel.
(3) Check if the connection cable is properly plugged at both ends (as below).
- If the cable is loose, replug both ends or take a photo and send it to xTool customer service.
If you have the tools and capability to measure AC voltage, check whether the switch connection cables are outputting standard voltage.
· If they are, please check for other issues.
· If they are not, replace the switch parts.

For issue 2
Power off your device and disconnect from a power supply. Follow the video tutorial to remove the rear panel.
1. Check the knob of the emergency stop switch
Check whether the emergency stop switch can be pressed and released normally by pressing it and then turning it clockwise.
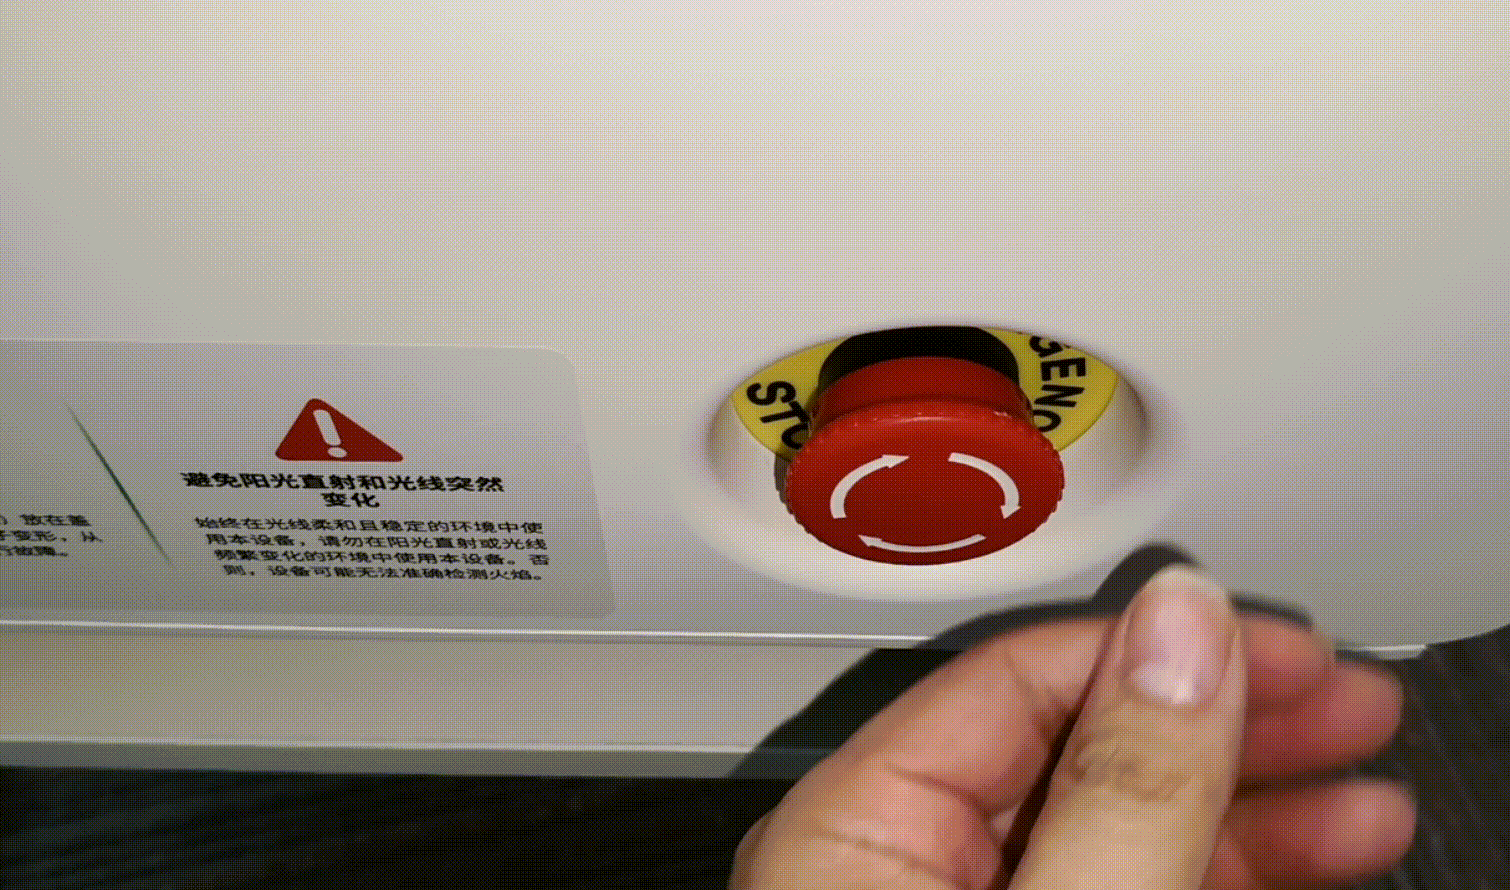
- If the switch can be pressed and released normally without looseness, please check for other issues.
- If the switch cannot be pressed and released normally or is loose:
(1) Disconnect from the power cable.
(2) Use a slot-type screwdriver to remove the switch (To reinstall, press the switch back toward the knob's direction).
(3) Check if the fixed nut on the knob is loose or damaged.

- If the fixed nut is loose, tighten it clockwise.
- If the fixed nut is not loose or is damaged, replace a new one.
2. Check the structure of the emergency stop switch
(1) Power off your device and disconnect from a power supply.
(2) Check if the emergency stop switch is loose. Press hard on the switch, and turn the knob on the left. Observe whether the metal spring sheet can be operated normally.
- If the metal sheet operates normally, restart the device and test again.
- If the metal sheet cannot operate normally, replace it with a new emergency stop switch.
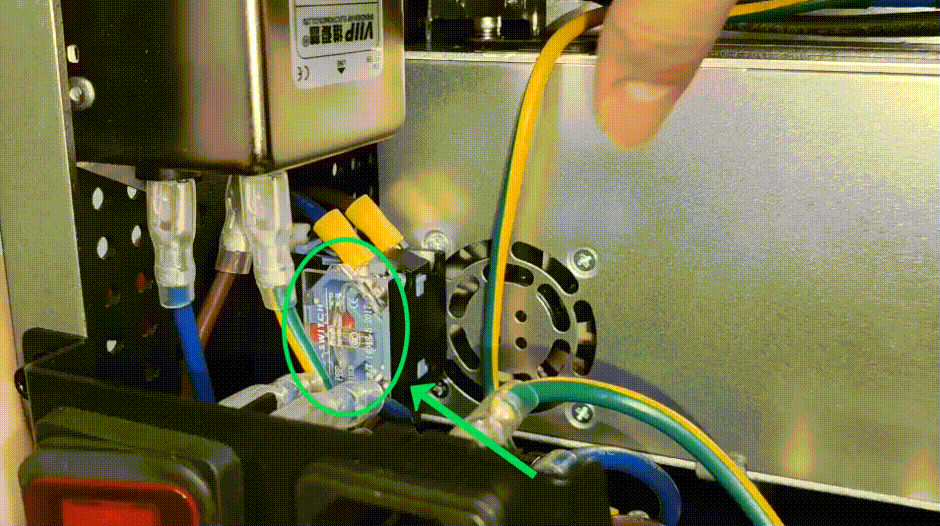
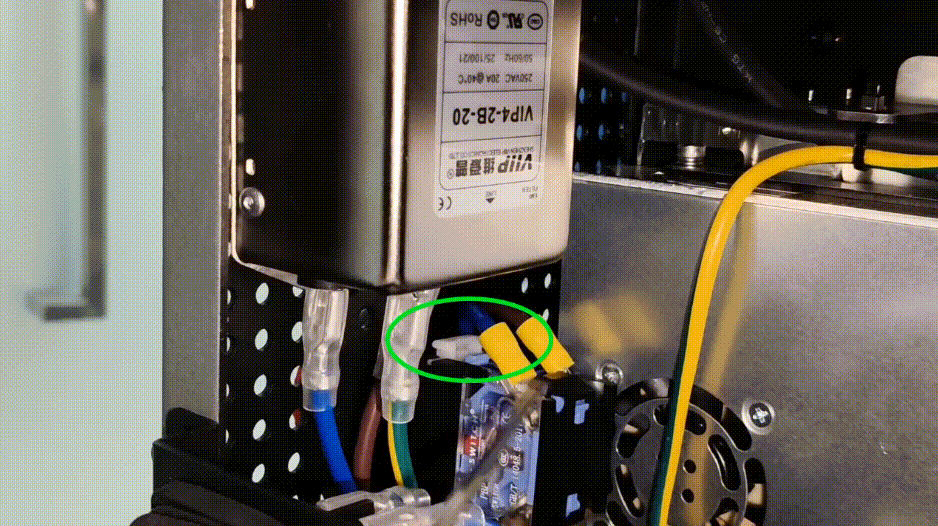
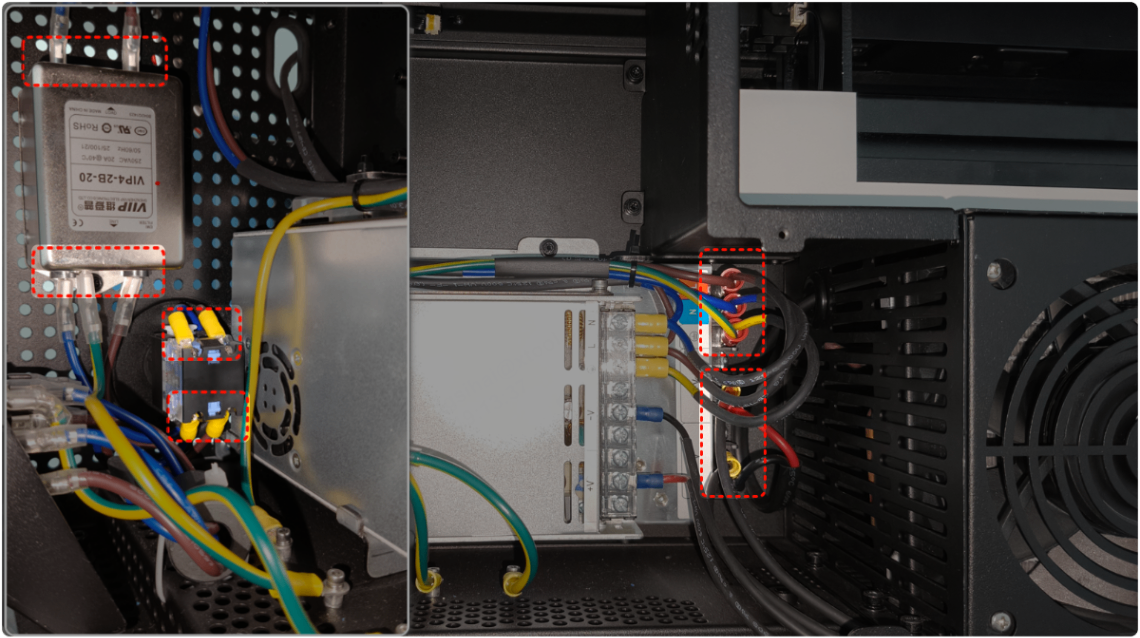
3. Check the connection cables between multiple parts
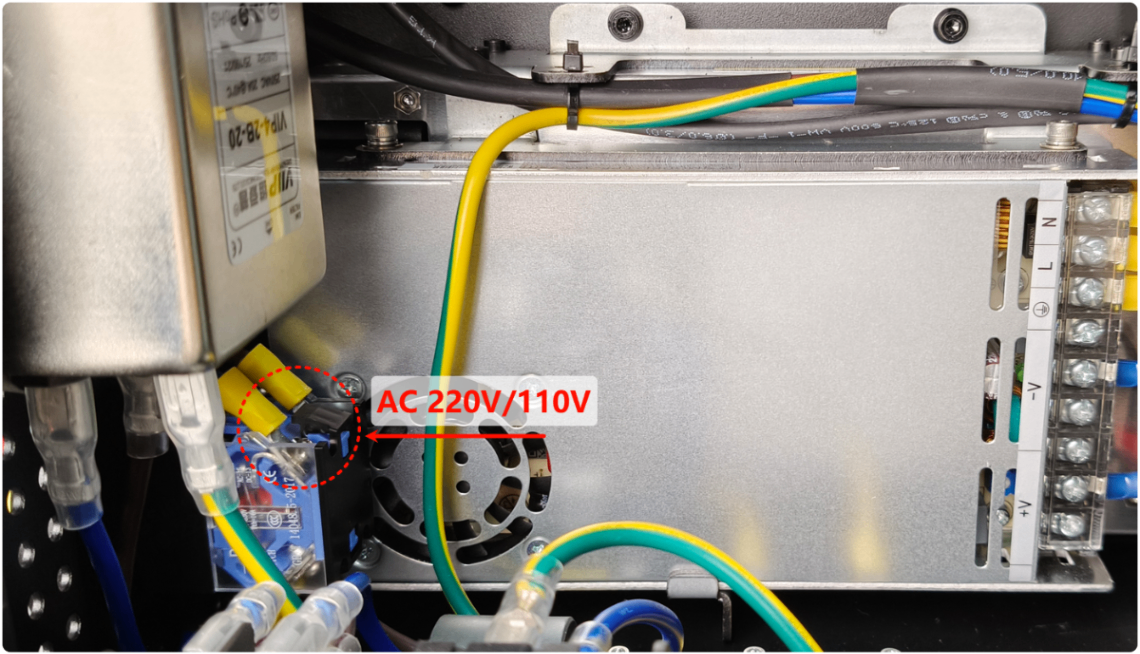
The circuit connection sequence of xTool P3: socket ➡ power switch ➡ emergency switch ➡ EMI rejector (silver metal block) ➡ power supply of power switch ➡ cooling system/main control board
(1) Power off your device and disconnect from a power supply.
(2) Check if the connection cables of multiple parts are properly plugged at both ends (as shown).
- If the cable is loose, replug both ends to secure it.
4. Check the voltage output of the emergency stop switch
Make sure you have qualified voltage measurement tools (such as a multimeter) and the operational capability before operating.
(1) Turn on the device, and release the emergency stop switch.
(2) Use a multimeter (AC voltage mode) to check if the output end of the switch outputs standard voltage.
- If it outputs standard voltage, please check for other issues.
- If not, replace it with a new emergency stop switch.
5. Check the voltage output of the power switch
Make sure you have qualified voltage measurement tools (such as a multimeter) and the operational capability before operating.
(1) Turn on the device, and release the emergency stop switch.
(2) Use a multimeter (DC voltage mode) to check whether the output end of the power switch outputs standard voltage.
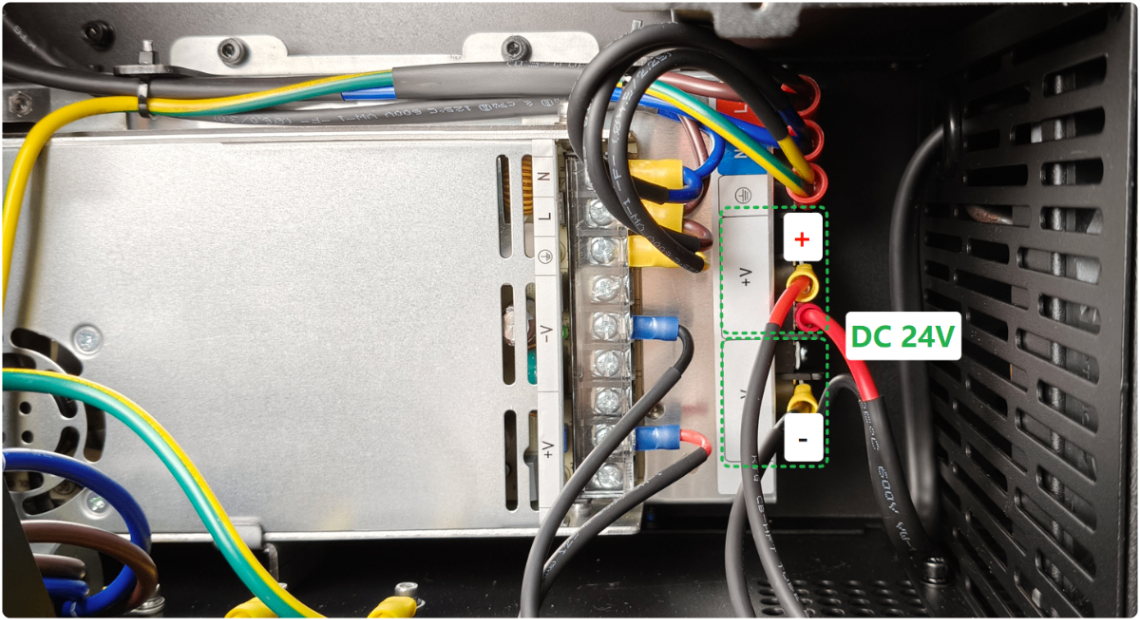
- If it outputs standard voltage, please check for other issues.
- If not, replace it with a new power switch.
For issue 3
If the device can be connected to the software or the screen can be operated after powering on, this issue does not apply to you.
1. Check the connector of the air pump board
(1) Power off your device and disconnect from a power supply.
(2) Follow the steps to remove the left plate.
(3) Check whether the connector of the air pump board is loose. If yes, replug it.
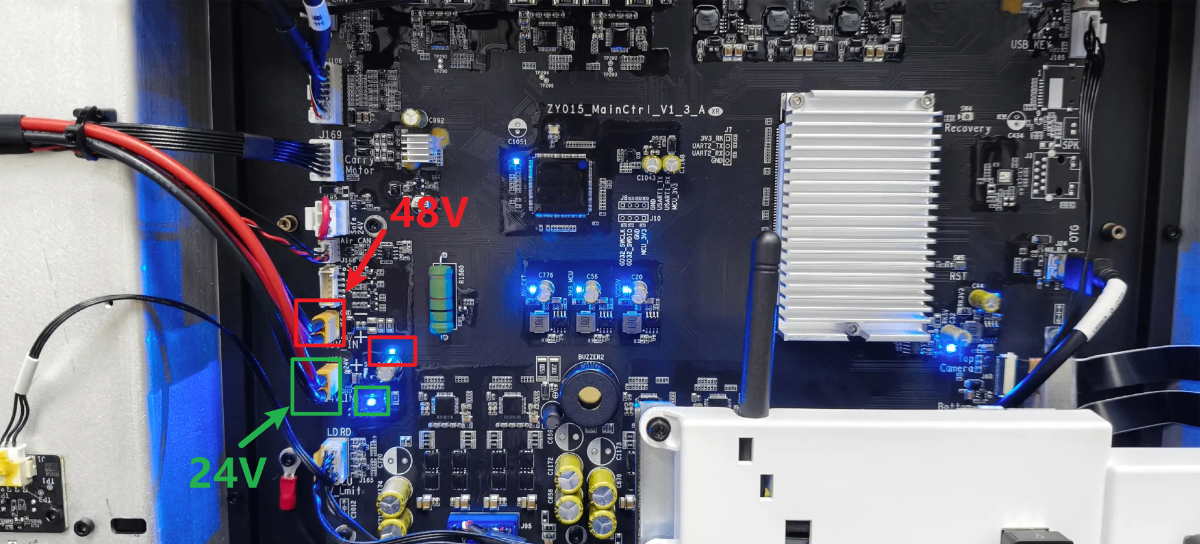
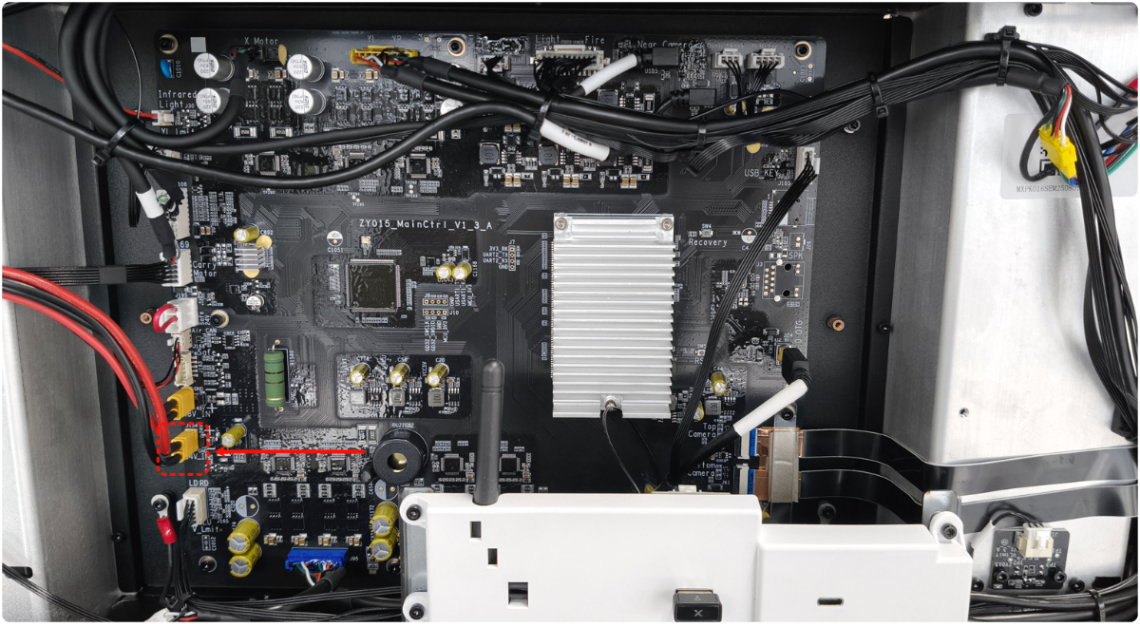
2. Check the power supply of the main control board
Check the 2 power supply indicators on the main control board.
- If the indicators do not light, use a multimeter to measure their voltage (if you don’t have a multimeter, try unplugging and replugging the connector). If there is no voltage output, replace the power supply of the power switch.
- If the indicator lights up, but the device still fails to start normally, please replace the main control board.
For issue 4
1. Disconnect the power cable of the main control board
Unplug the 24V connector on the main control board, then power on the device.
- If the cooling system can work continuously, replace the main control board.
- If the cooling system still works briefly, then powers off automatically, replug the connector, and perform the next step.
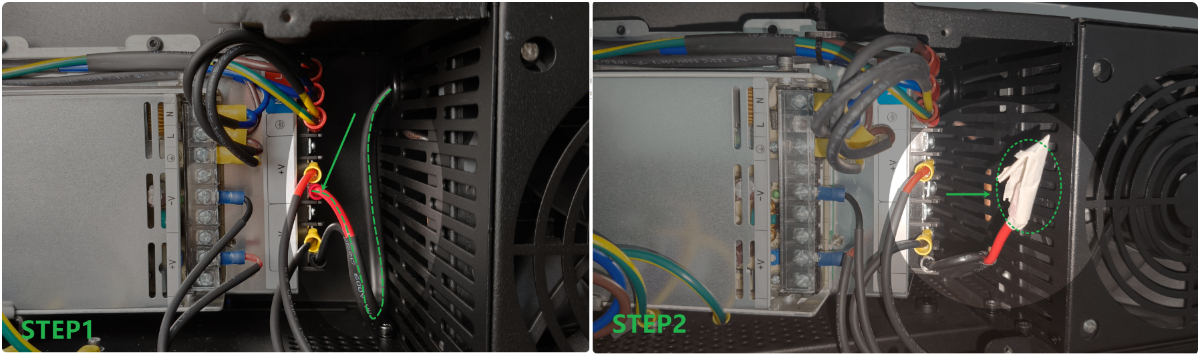
2. Disconnect the power cable of the cooling system
(1) Disconnect the power supply from the device.
(2) Follow the video tutorial.
(3) Disconnect the positive terminal of the cooling system, wrap it with insulating material, and then turn on the device.
- If the device can be powered on normally, replace the water cooling system.
- If the device can't be powered on, check for other issues.
Still experiencing issues?
Should the issue persist after completing the preceding steps, submit a ticket via the "Submit a Ticket" button in the "Help Ticket" section below. The standard response time for xTool Customer Service is one business day.
For a prompt resolution, please include the following details:
- Issue description: A detailed explanation of the observed problem.
- Video evidence: Attach a video demonstrating the issue, where applicable.
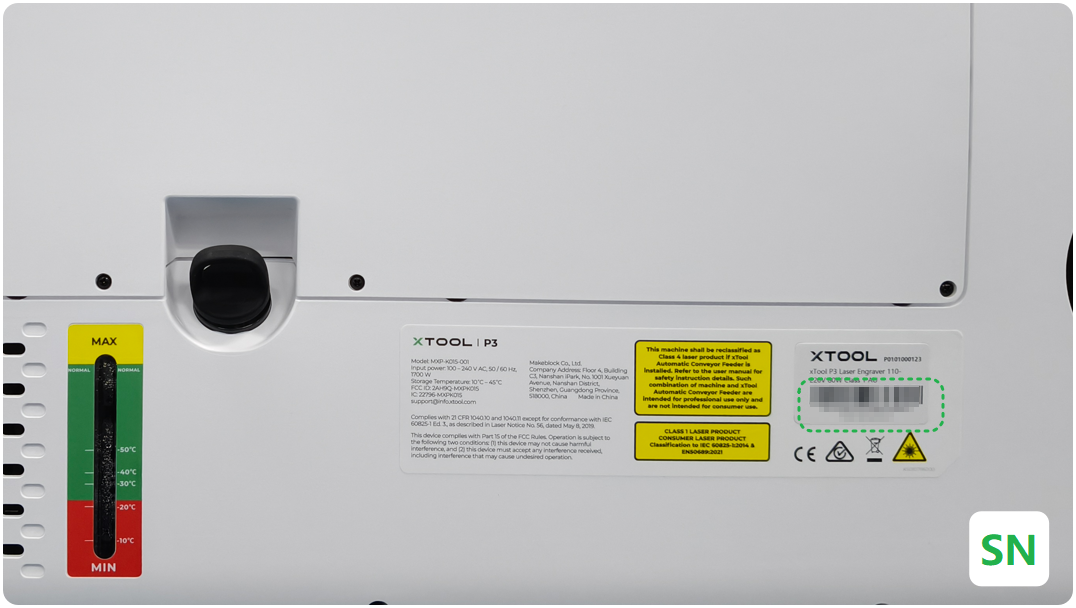
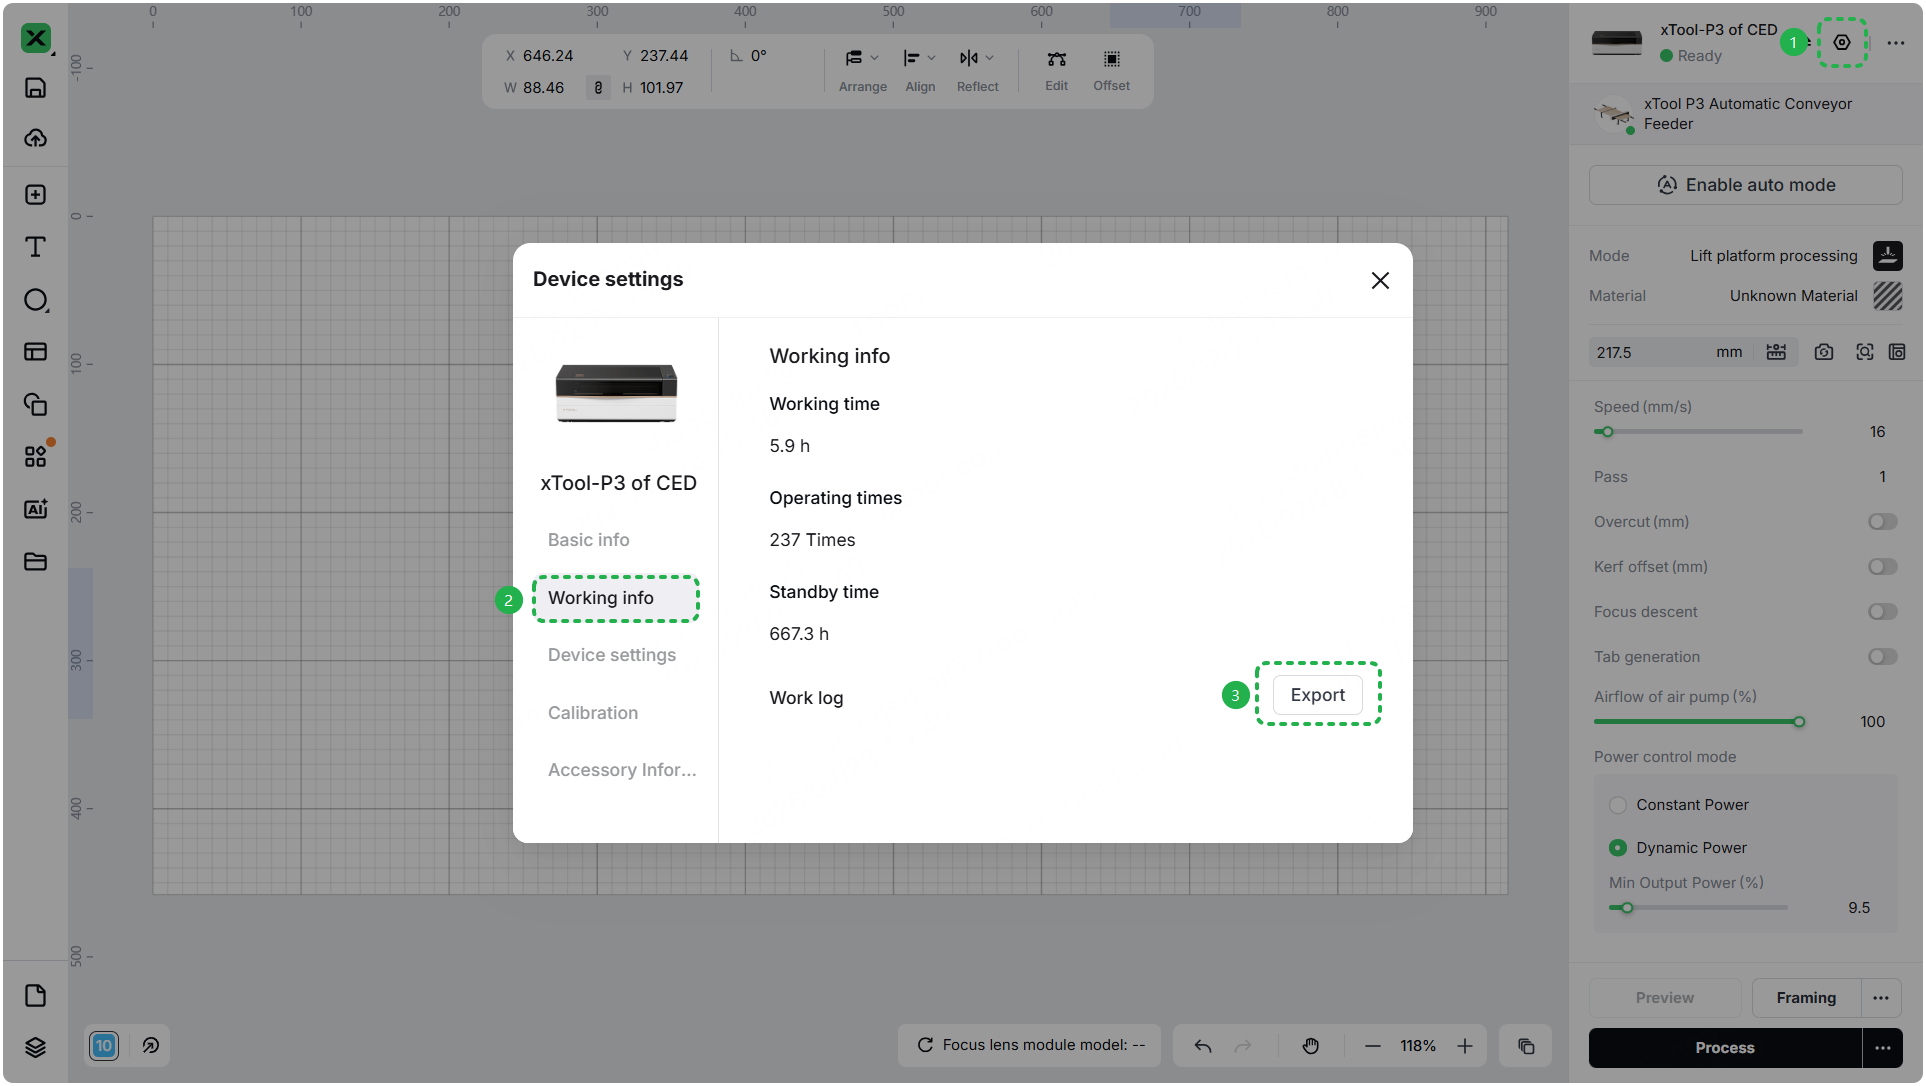
- Device information: Follow the steps to find the SN and export the work log.
- Troubleshooting performed: Any troubleshooting steps you have already attempted, along with their results.
This information is crucial for xTool technical support engineers to provide timely assistance.
Documentation feedback
Help improve this content by providing feedback. If this content did not meet your requirements, select "No" in the "Was this page helpful?" section below. Include specific details about what was unclear or missing in the pop-up suggestion box. Feedback submissions are reviewed by xTool technical writers to enhance future documentation.
Services & Help
Learn & Education

Copyright © 2025 xTool All Rights Reserved.