Issue description
You may encounter ink leakage around the waste ink tank area. This can appear in two ways:
Pooled Ink: You find ink pooled underneath the waste ink tank or on the surfaces immediately surrounding it.
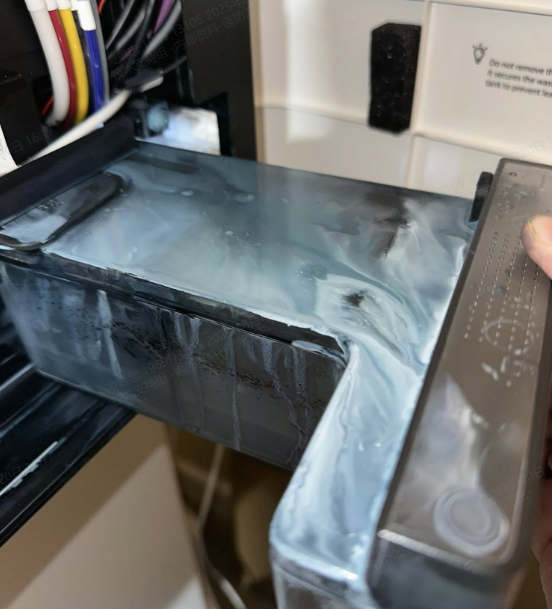
Seeping Ink: Ink is visibly seeping or leaking from the sides or seams of the waste ink tank itself. This is most common when the tank is nearly full. You may also notice that the foam pad on the inside of the right-side door is soaked with ink.
Potential causes
The ink leakage typically results from one of these issues:
- Overfilled waste ink tank: The waste ink tank is overfilled and has not been emptied in time.
- Damaged one-way valve: The one-way valve (i.e., check valve) connected to the waste ink tank is broken or damaged.
- Compromised tank seal: The waste ink tank itself has a sealing issue and is leaking.
Troubleshooting steps
Step 1: Check waste ink tank level
- Carefully remove the waste ink tank from the printer. Check the amount of ink inside.
- Assess current ink level:
- If the tank is overfull: Empty the tank immediately.
- If the tank level appears normal: Continue to Step 2.
- Clean up any spilled ink from the printer interior.
💡 Important: Regular emptying prevents overflow-related leakage. Monitor ink levels frequently during heavy printing periods.
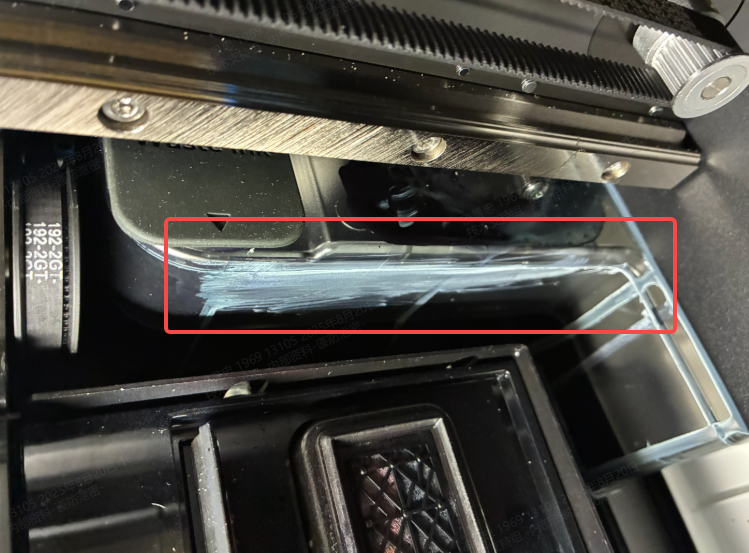
Step 2: Inspect the air vent
The waste ink tank features an air vent designed to release internal air pressure. If this vent becomes clogged, pressure builds up and forces ink to spray out of the valve opening.
- Locate the small air vent hole on the top assembly of the waste ink tank.
- Inspect it for any dried ink or foreign debris.
- Unblock: If clogged, use a fine, pointed tool (like a needle or pin) to carefully clear the obstruction.
- If the vent is clear or clearing it does not resolve the leak, proceed to Step 3.
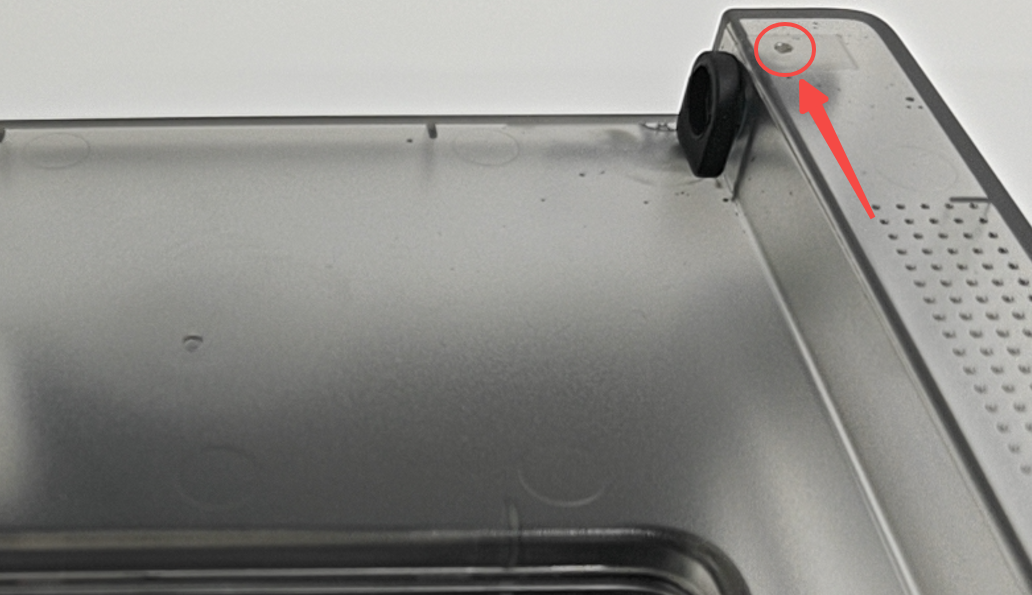
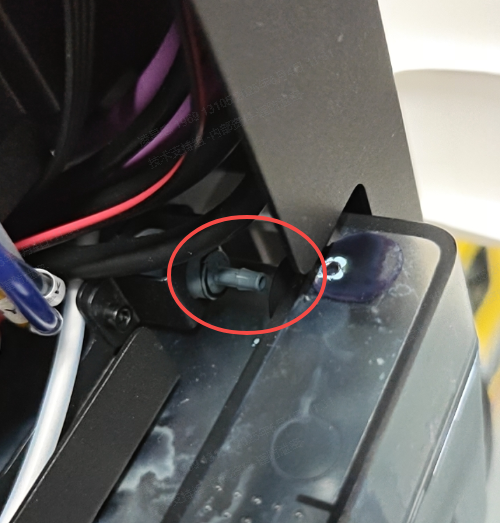
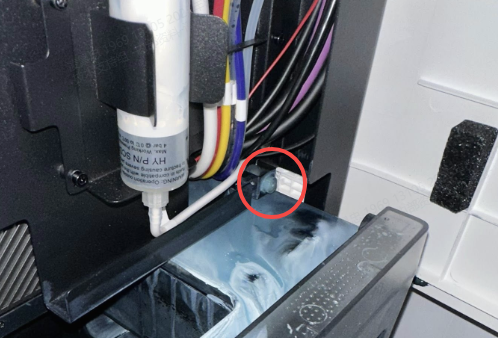
Step 3: Inspect the one-way valve
Check valve condition:
Locate the one-way valve where the waste ink tube connects to the tank area.
- Visual inspection:
- Visually inspect it for any signs of damage, such as cracks or breaks.
- Compare it to the image of a normal, undamaged valve below.
Normal One-Way Valve
Broken One-Way Valve
- If the valve is damaged:
- Contact xTool Customer Service for a replacement valve.
- Replacement guidance: Video tutorial available at: Replace the One-Way Valve (Check Valve)
- Do not attempt to operate the printer with a damaged valve.
- If the valve appears normal: Continue to Step 3.
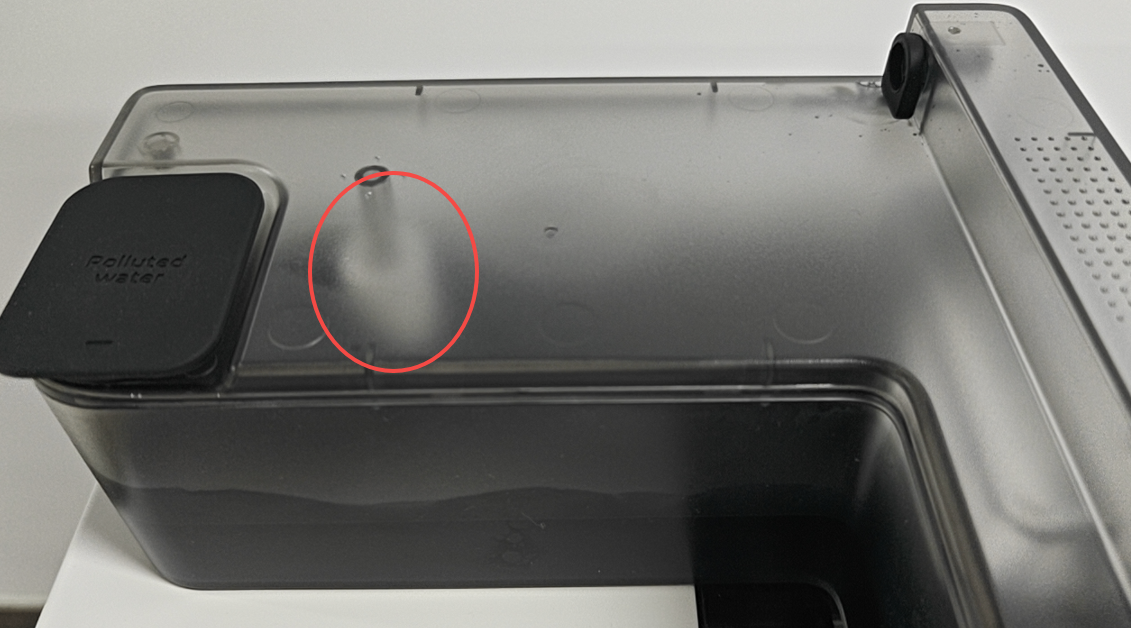
Step 4: Check for seam leakage
Sometimes the physical container itself fails.
- Thoroughly wipe the outside of the waste ink tank dry.
- Inspect the edges, bottom seams, and corners of the tank.
- Diagnosis: If you observe ink actively seeping through the plastic seams or joints, the tank's seal is compromised. Please contact xTool Customer Service to request a replacement waste ink tank.

Step 5: Test the Float Sensor
The float indicator is designed to rise with the ink level and trigger a warning when the tank is full. If it fails, the printer will overfill the tank.
- Physical Check: Remove the float from the waste ink tank. Check if it is physically jammed or stuck by dried ink.
- Buoyancy Test: Pour clean water into the tank and observe the float.
- If it fails to float: The float is defective. Contact Customer Service.
- If it floats normally: Proceed to the system test below.
- System Test: * Fill the waste ink tank with clean water and reinstall it back into the powered-on printer.
- Let it sit for approximately 5 minutes.
- Check the LCD control panel.
- Diagnosis:
- If no error appears: The magnet inside the float may be missing or the sensor is glitching. Export the device logs and contact Customer Service.
- If the "Waste ink tank full" error appears: The sensor is functioning correctly. The leakage is likely caused by another underlying issue. Proceed to the section below.
Still experiencing issues?
Should the issue persist after completing the preceding steps, submit a ticket via the "Submit a Ticket" button in the "Help Ticket" section below. The standard response time for xTool Customer Service is one business day.
For a prompt resolution, please include the following details:
- Issue description: A detailed explanation of the observed problem.
- Video evidence: Attach a video demonstrating the issue, where applicable.
- Troubleshooting performed: Any troubleshooting steps you have already attempted, along with their results.
This information is crucial for xTool technical support engineers to provide timely assistance.
Documentation feedback
Help improve this content by providing feedback. If this content did not meet your requirements, select "No" in the "Was this page helpful?" section below. Include specific details about what was unclear or missing in the pop-up suggestion box. Feedback submissions are reviewed by xTool technical writers to enhance future documentation.
Services & Help
Learn & Education

Copyright © 2025 xTool All Rights Reserved.