Issue description
- Normal: After a successful curing process in xTool OS1 Shaker Oven, the adhesive powder on the PET film should be completely melted, resulting in a uniform, slightly textured "orange peel" appearance. This ensures an appropriate bond between the ink and the film.
- Incomplete: You observe that the powder on the PET film is not fully cured, appears uneven, or remains in a powdery state.
This guide is separated into two common scenarios. Please identify which scenario best matches your situation and follow the corresponding steps.
Normal curing | Powdery state |
Potential causes
Continuous curing problems
- Temperature set too low;
- Temperature instability;
- External environmental factors;
First task cures properly, but subsequent tasks don't
- Temperature instability;
- Non-continuous printing tasks;
Scenario A: Consistent curing failure
This scenario applies if the oven consistently fails to cure the powder correctly, even on the first curing task of a session.
Step 1: Check temperature setting
- Recommended Temperature: Set the oven to 110°C (230°F).
- Temperature Adjustment: If your temperature is already at 110°C, increase the temperature by 5°C (9°F) increments and check the curing results after each adjustment.
- If temperature increases don't resolve the issue, proceed to Step 2.
Step 2: Preheat & await temperature stabilization
The oven must reach a stable operating temperature before processing begins.
- Preheating: Before starting a processing task, always preheat the oven. Begin processing only after the temperature stabilizes (fluctuation ≤ 2°C/4°F).
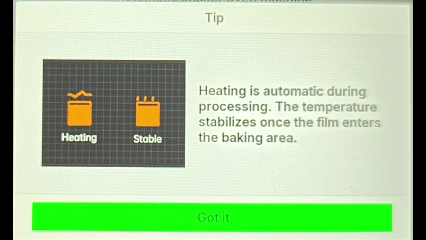
- Preheating Indicators on the LCD Panel:
- Heating icon: The temperature is still rising. Wait until the icon changes.
- Stable icon: The oven has reached the optimal processing temperature and is ready to start.
- How to Initiate Preheating:
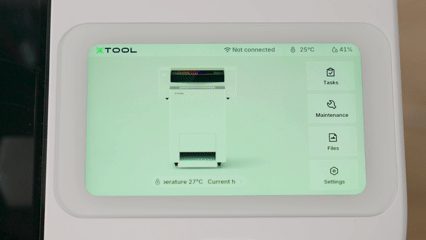
- On the printer's control panel, tap the Current heating temperature icon at the bottom of the screen.
- In the "Automatic shaker oven machine settings" menu, locate Preheat.
- Tap Start up and follow the on-screen prompts to begin preheating.
- If the problem persists even with a fully preheated and stable oven, proceed to the next step.

Step 3: Check for external environmental factors
The oven's performance can be affected by the surrounding environment.
- Recommended Environment: The ideal operating environment for the oven is a temperature between 20°C to 30°C (68°F to 86°F) and a relative humidity between 45% to 60% RH.
- Check for External Interference:
- Air conditioning vents blowing directly on the oven's film output compartment;
- Fans or other airflow equipment directed at the oven;
- Operating the oven in an extremely cold environment.
- Corrective Actions:
- Move the oven away from direct airflow sources;
- Relocate the oven to a more temperature-stable environment;
- Ensure adequate clearance around the oven for proper heat retention.
- If environmental factors cannot be eliminated, consider the solutions in Step 2 of the next scenario.
Scenario B: Inconsistent curing (First task cures properly, subsequent tasks don't)
This scenario applies if the first print job of a session cures correctly, but newly added jobs fail to cure properly.
Step 1: Ensure temperature stability for each task
The oven must reach a stable operating temperature before processing begins.
- Preheating: Before starting a processing task, always preheat the oven. Begin processing only after the temperature stabilizes (fluctuation ≤ 2°C/4°F).
- Preheating Indicators on the LCD Panel:
- Heating icon: The temperature is still rising. Wait until the icon changes.
- Stable icon: The oven has reached the optimal processing temperature and is ready to start.
- How to Initiate Preheating:
- On the printer's control panel, tap the Current heating temperature icon at the bottom of the screen.
- In the "Automatic shaker oven machine settings" menu, locate Preheat.
- Tap Start up and follow the on-screen prompts to begin preheating.
- If the problem persists even when ensuring the temperature is stable for each job, proceed to the next step.

Step 2: Optimize task scheduling
xTool Apparel Printer supports multi-job queuing. The timing of when you add a new job is crucial for maintaining consistent heat in the oven.
- Best Practices for Continuous Printing:
- Add new tasks BEFORE the previous task enters the shaker oven.
- This prevents curing issues with newly added tasks.
- When a Task is Already in the Oven:
- Wait for the current curing process to complete before adding new tasks.
- This ensures optimal curing conditions for all subsequent tasks.
- Task Queue Management:
- Continuously added print tasks will be arranged according to their creation time.
- Plan your task sequence to maintain consistent oven temperature and curing performance.
Still experiencing issues?
Should the issue persist after completing the preceding steps, submit a ticket via the "Submit a Ticket" button in the "Help Ticket" section below. The standard response time for xTool Customer Service is one business day.
For a prompt resolution, please include the following details:
- Issue description: A detailed explanation of the observed problem.
- Video evidence: Attach a video demonstrating the issue, where applicable.
- Troubleshooting performed: Any troubleshooting steps you have already attempted, along with their results.
This information is crucial for xTool technical support engineers to provide timely assistance.
Documentation feedback
Help improve this content by providing feedback. If this content did not meet your requirements, select "No" in the "Was this page helpful?" section below. Include specific details about what was unclear or missing in the pop-up suggestion box. Feedback submissions are reviewed by xTool technical writers to enhance future documentation.
Services & Help
Learn & Education

Copyright © 2025 xTool All Rights Reserved.