📍Preparations:
- Laser devices: Laser devices that can be used with Customthings.
- Terminal devices: xTool Self-Service Kiosk Floor Standing, xTool Self-Service Kiosk Desktop Standing, and xTool Self-Service Kiosk Tablet
- Account: THIS GUIDE IS ONLY FOR THE ENTERPRISE ACCOUNT.
Store account and information configuration
Add new stores
1. Log in to the Customthings backend as an administrator
(1) Click https://customthings.com/ to enter the backend of Customthings.
(2) Click Log in > Enterprise Login in the upper-right corner.
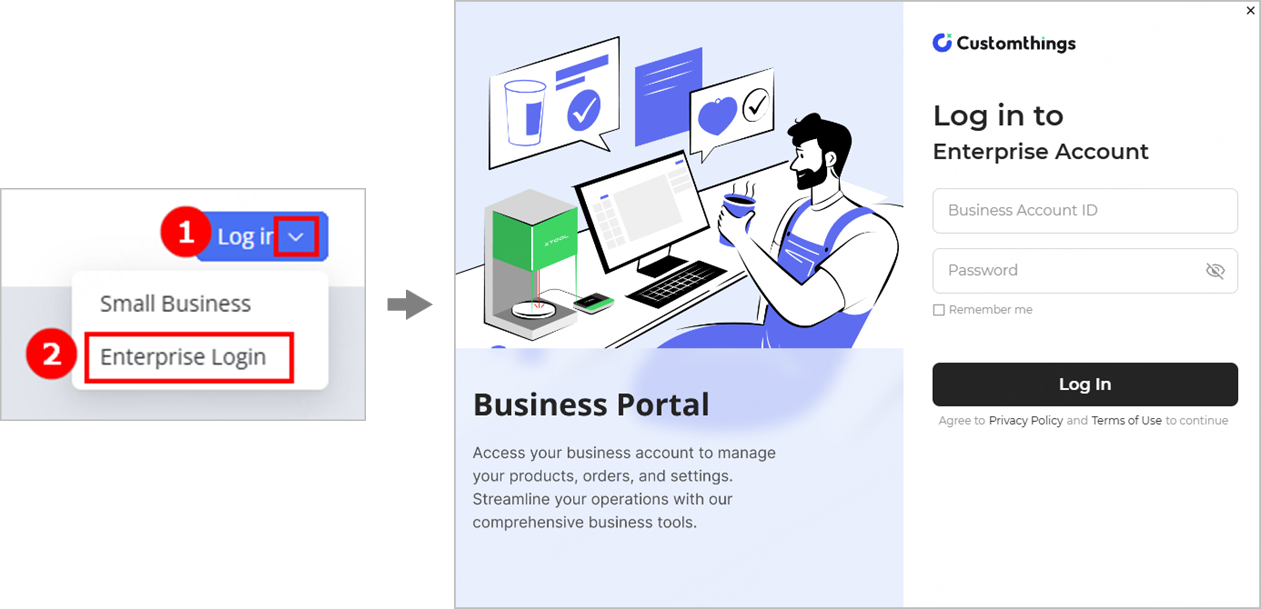
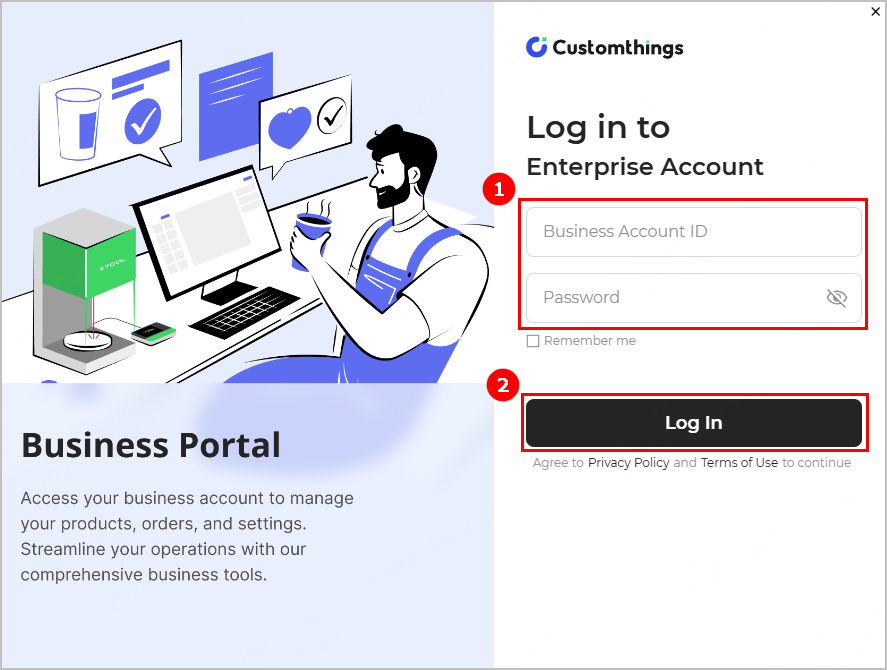
(3) Enter the administrator account and password provided by xTool and click Log In.
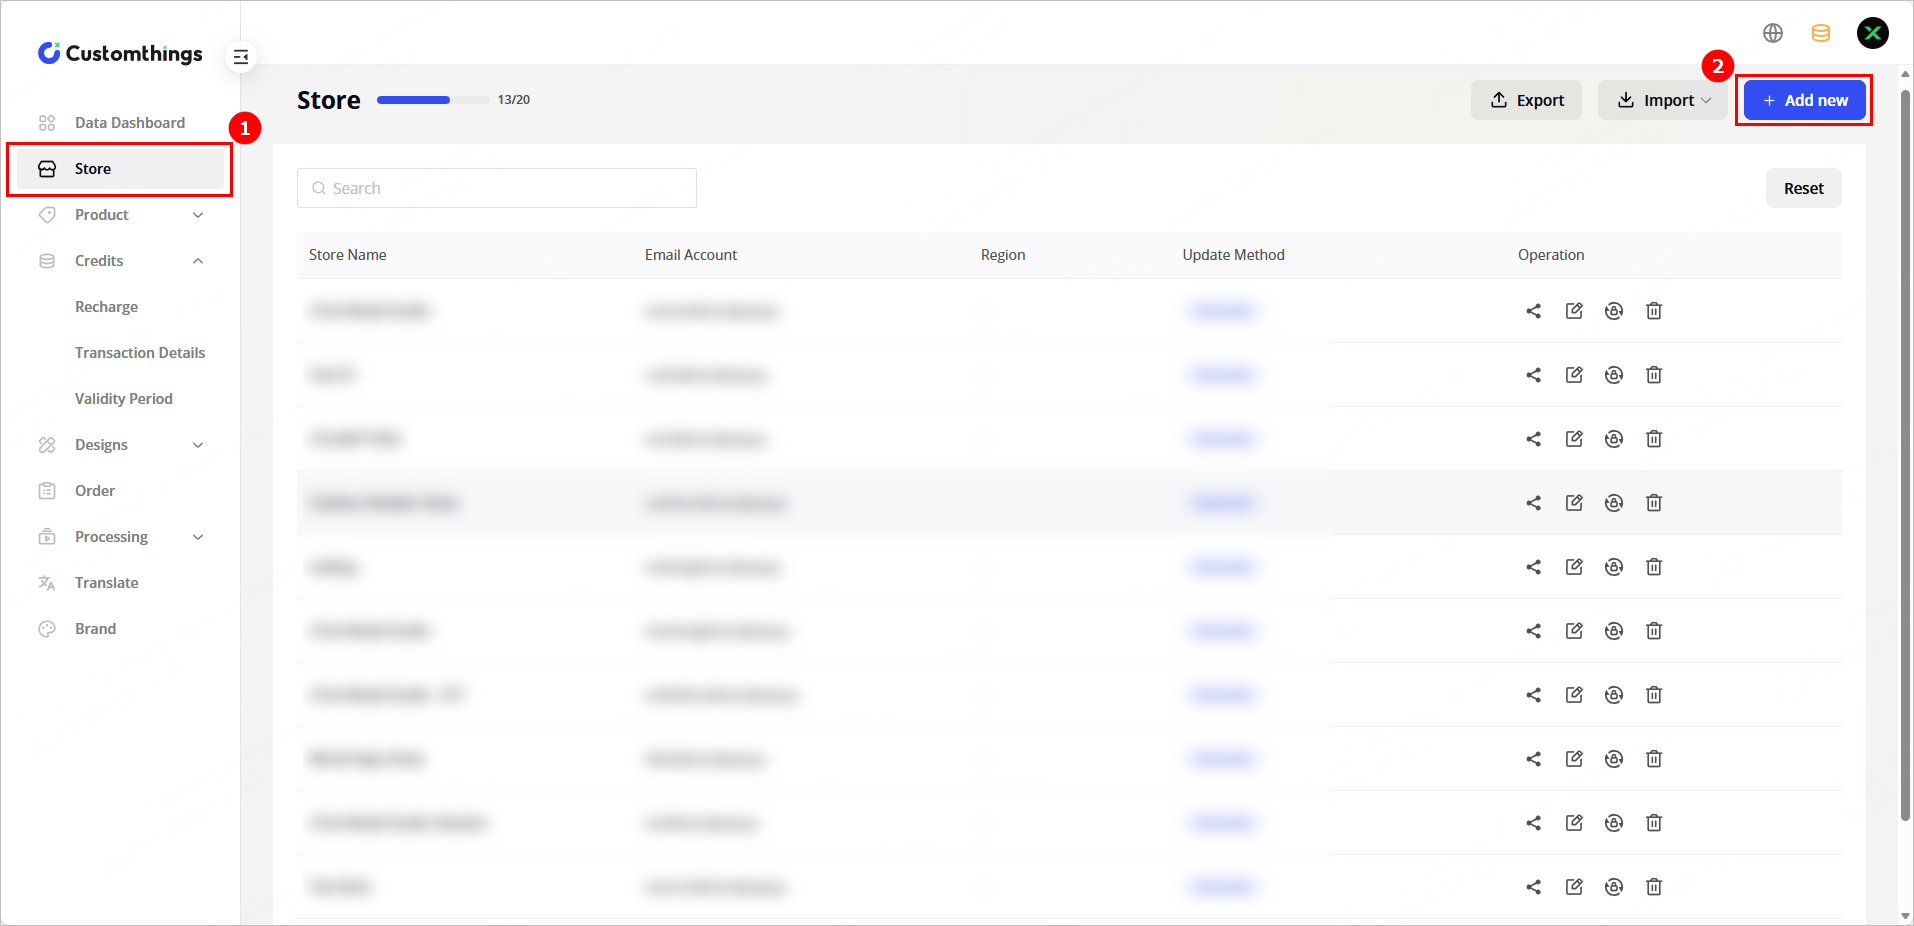
2. Add new stores
- Add a new store
(1) Click Store > +Add new to create a new store account.
(2) Set the parameters and click Save. The information of the new store displays in the store list.
🔔 Note: Parameters with * are necessary and those without * are optional.
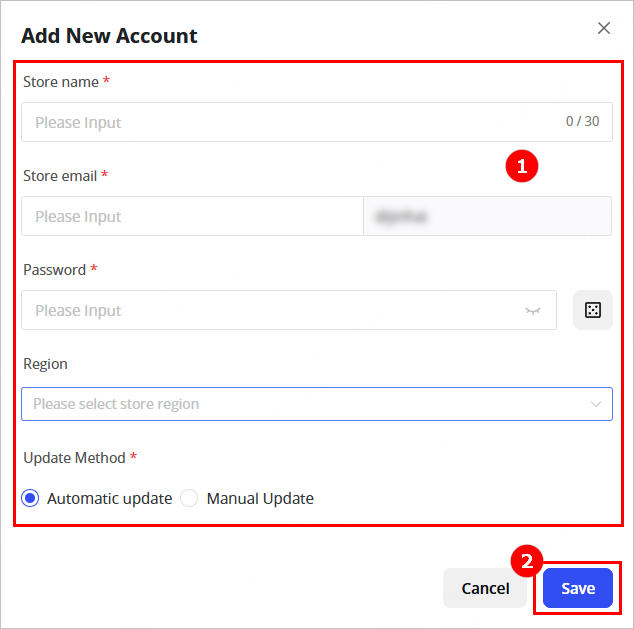
- Store name: Store name displayed on the frontend of Customthings, which can be modified.
- Store email: Account used to log in to the frontend of Customthings, which cannot be modified.
- Password: The account password used to log in to the frontend of Customthings, which cannot be modified.
- Region: The region where the store is located.
- Update method: Data update method on the frontend of Customthings.
- Add stores in batches
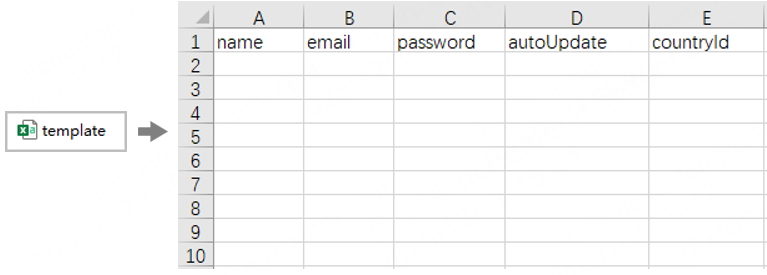
(1) On the Store page, click Import > Download template to download the template.
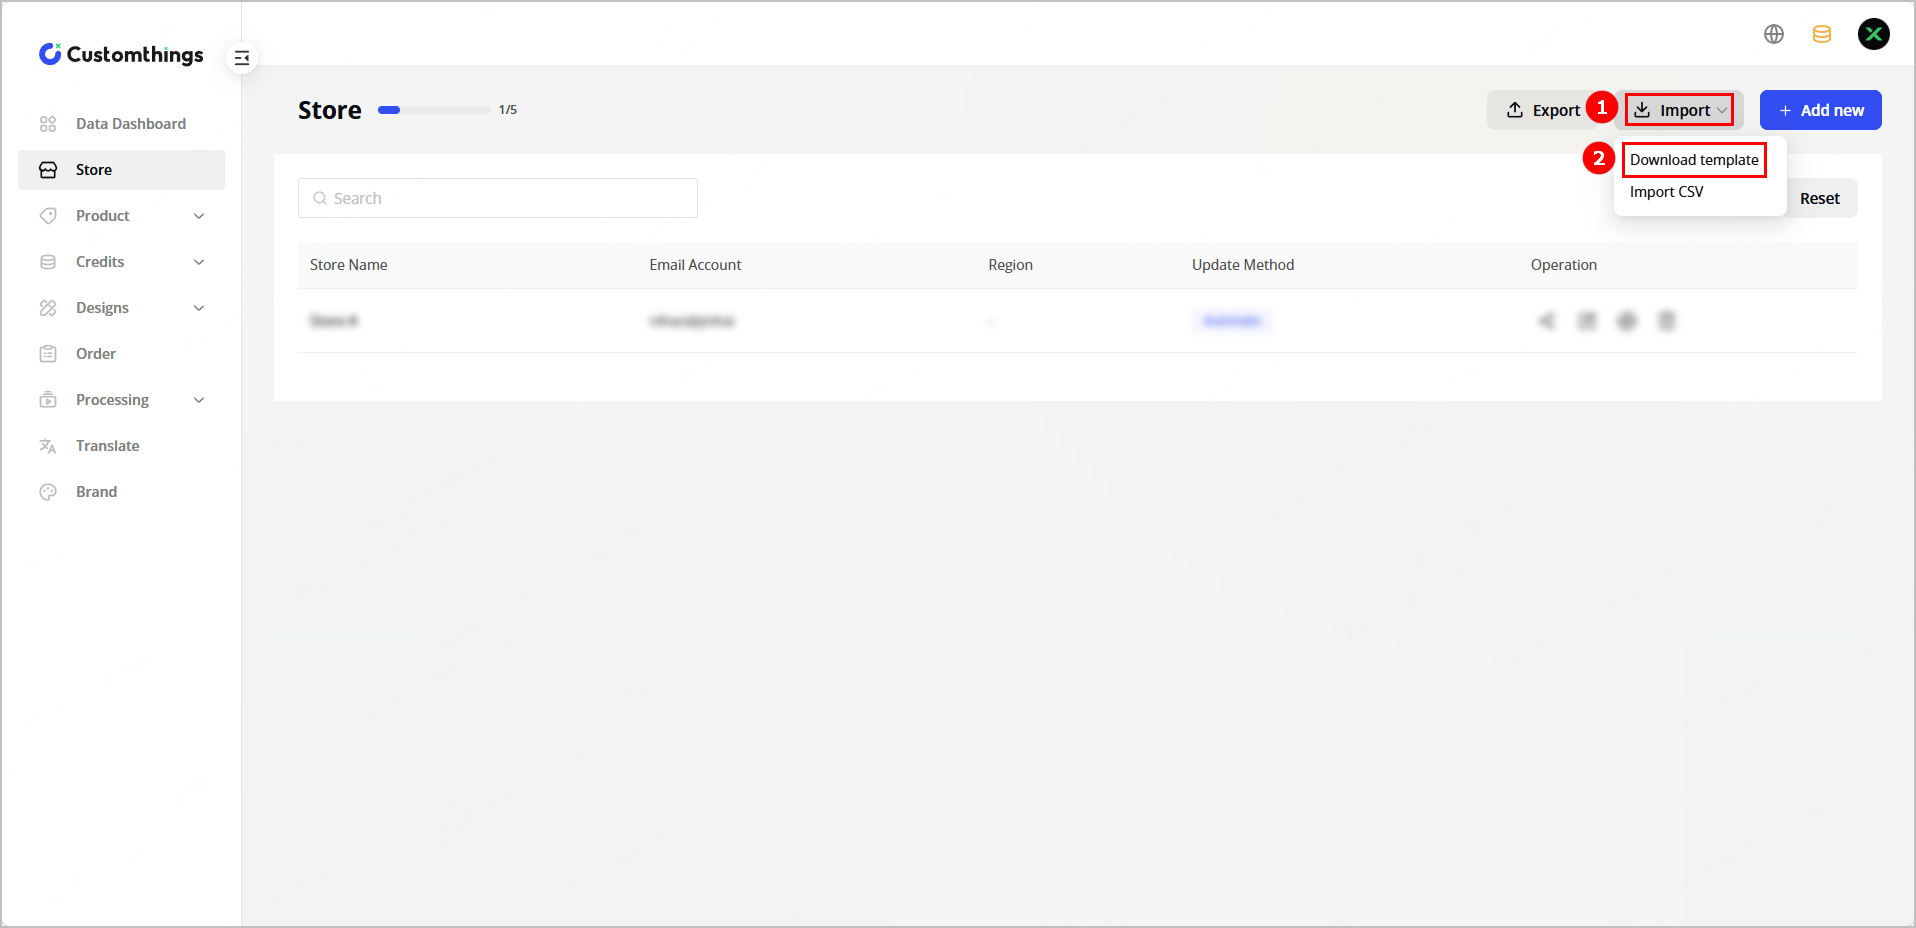
(2) Open the template downloaded locally, enter store names, login accounts, passwords, and update methods, and save the file.
(3) On Customthings, click Import CSV, select the template you have filled in step (2), and upload it. After the template is uploaded, the newly added stores will display in the store list.
3. Preview the display effect
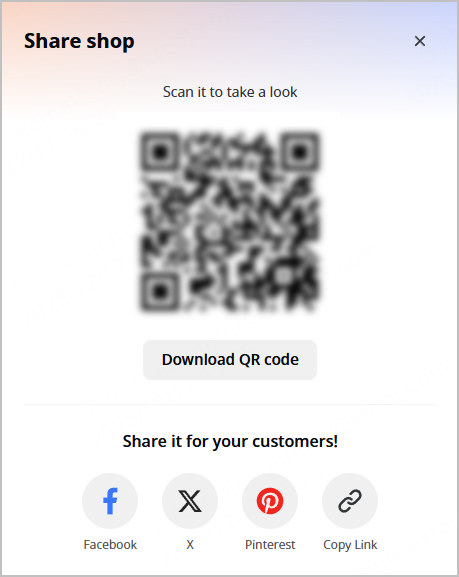
In the store list, click the Share icon for the newly added store in the Operation column. Scan the QR code with your phone or copy the link to a web browser to preview the display effect on the frontend.
Configure products
1. Add new parameters
(1) Click Processing > Parameters to enter the parameters page.
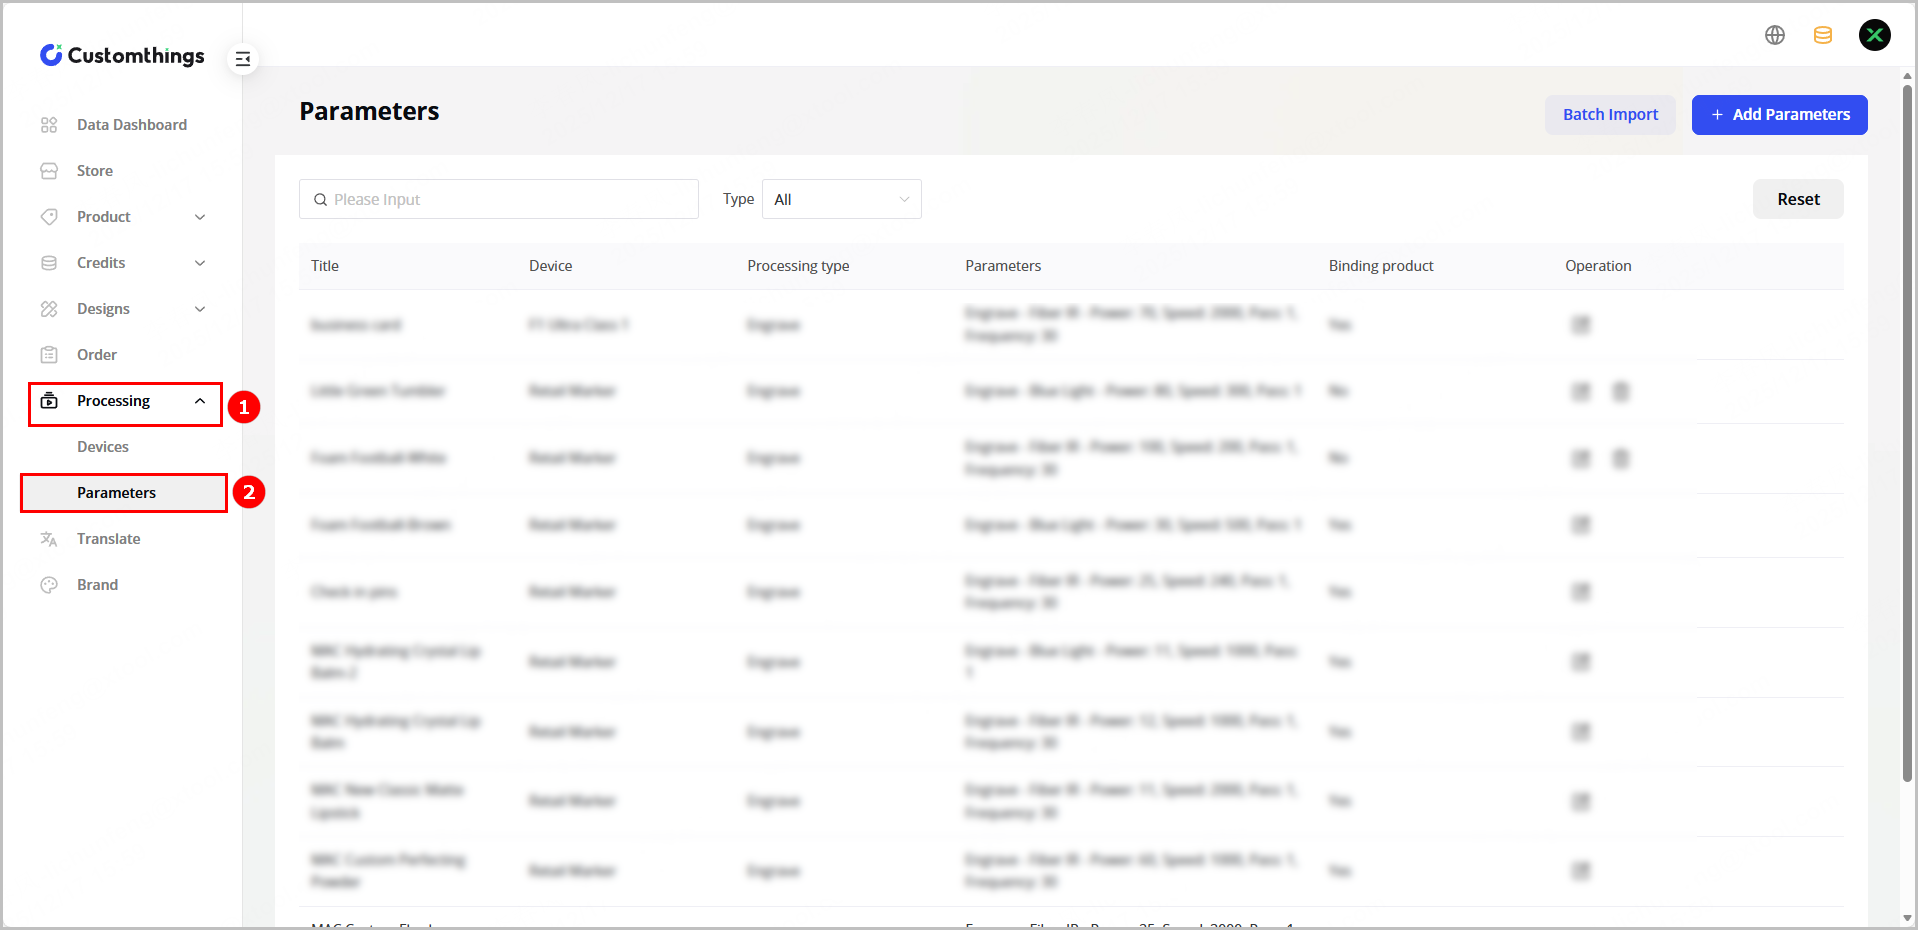
(2) Click Add Parameters, configure parameter information, and click Save.
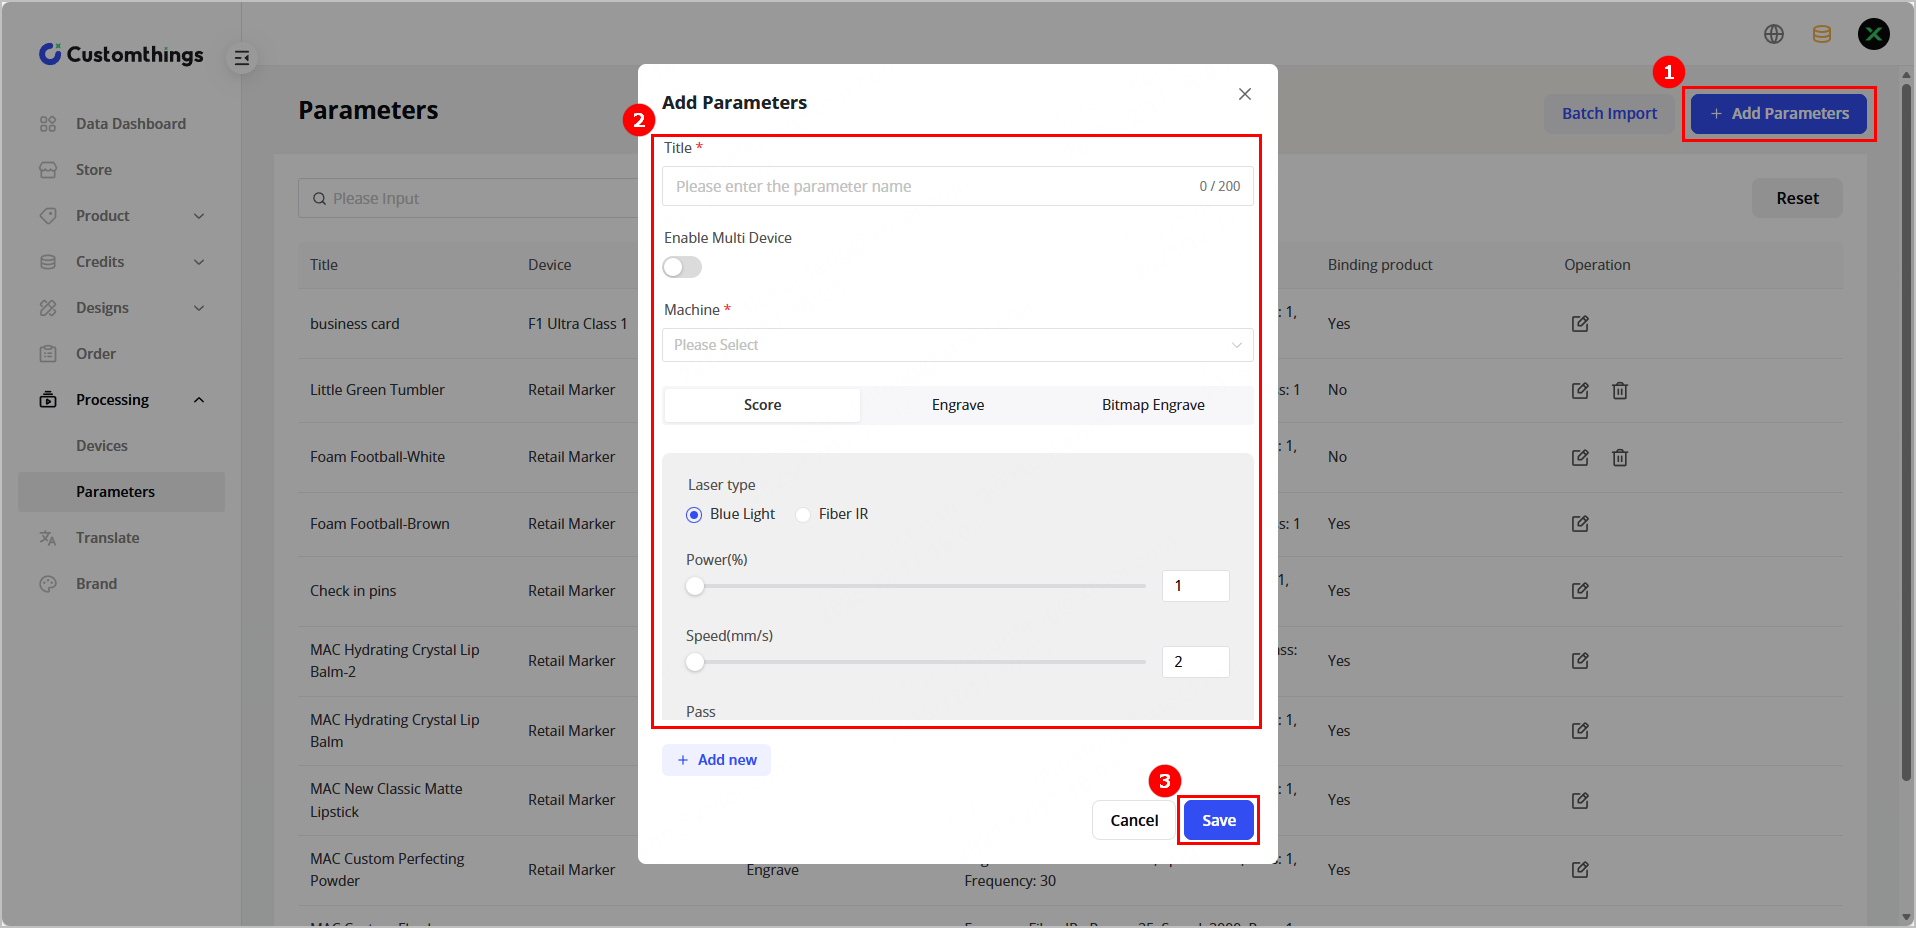
🔔 Note: You can also click Batch Import to add parameters in batches..
2. Configure basic product information
(1) Click Product > Product to enter the Products page.
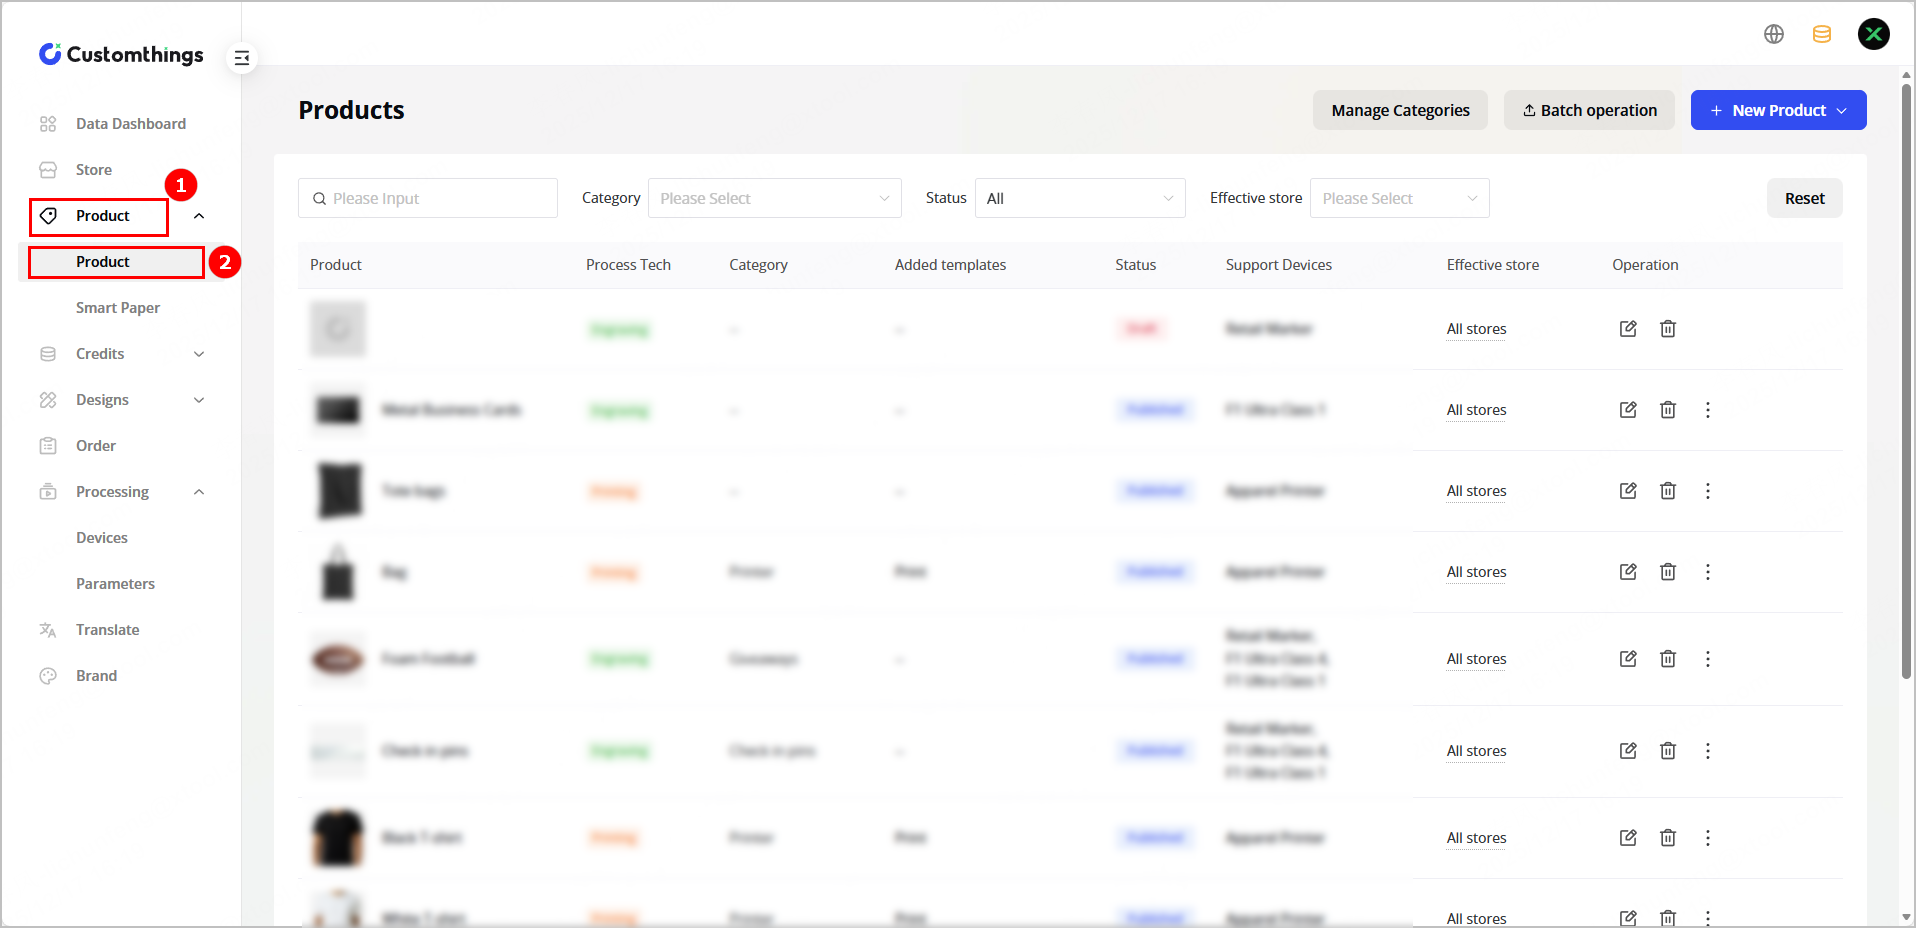
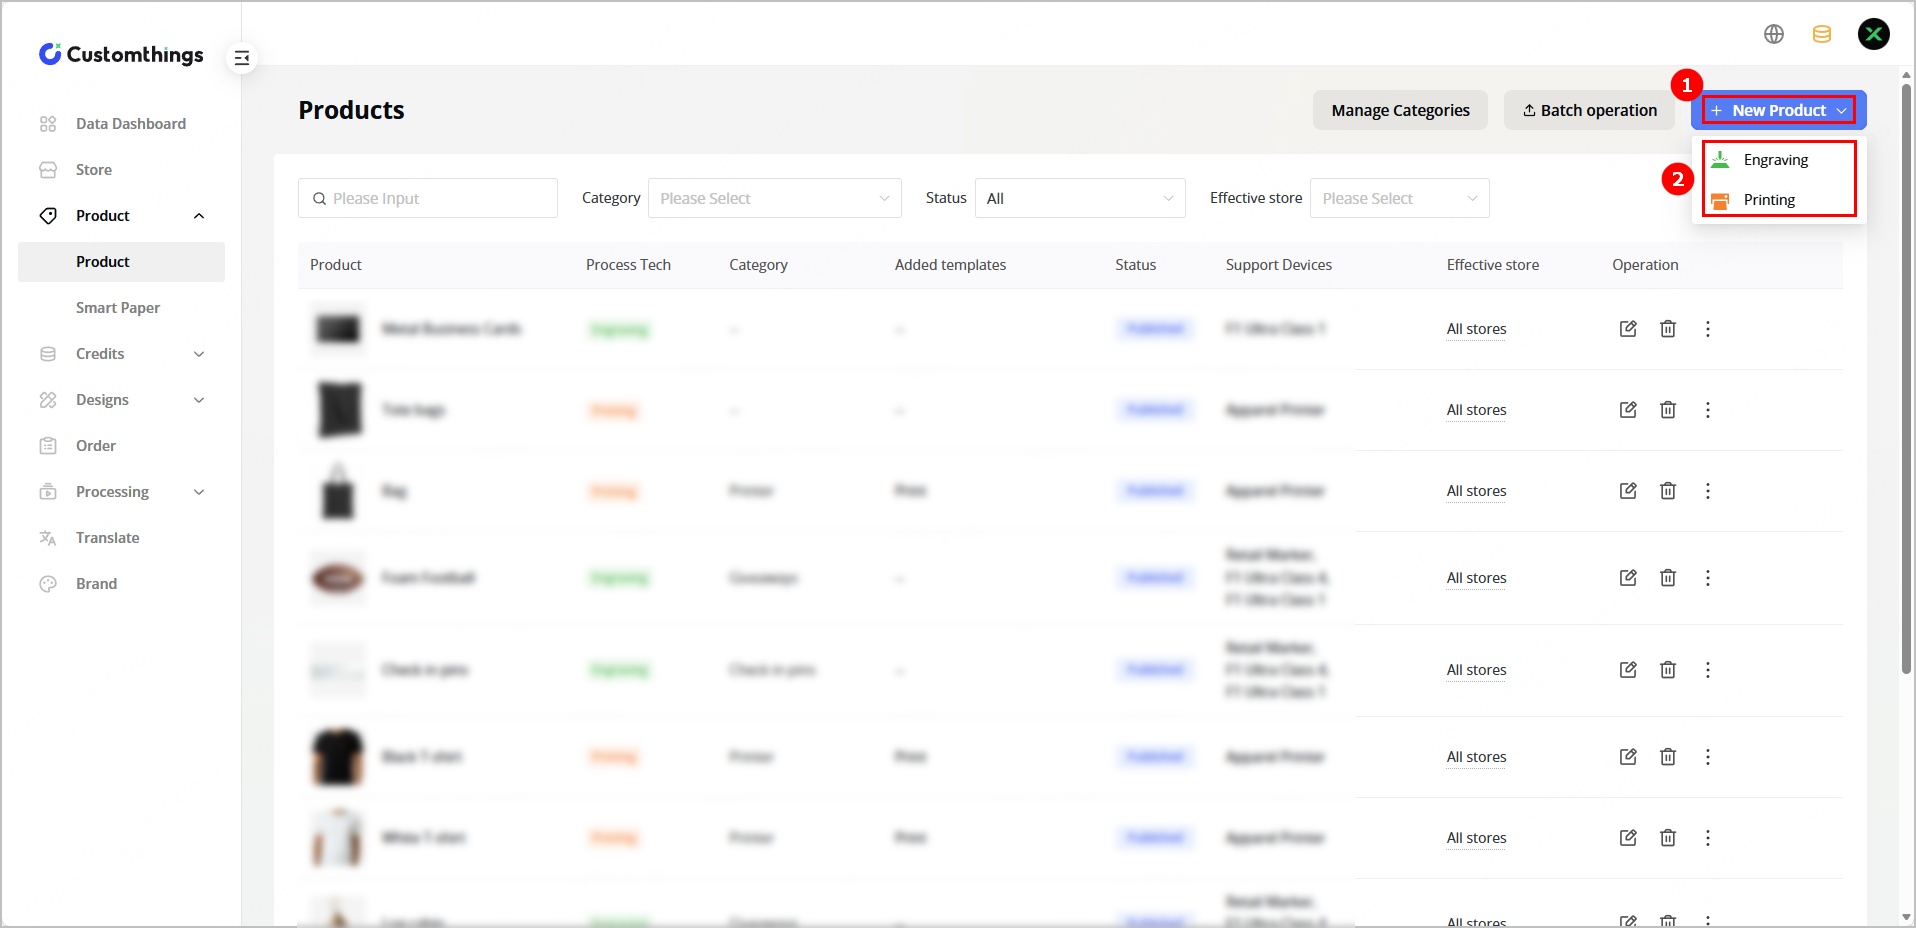
(2) Click +New Product and select the processing type. If you select Engraving, go to step (3). If you select Printing, go to step (4).
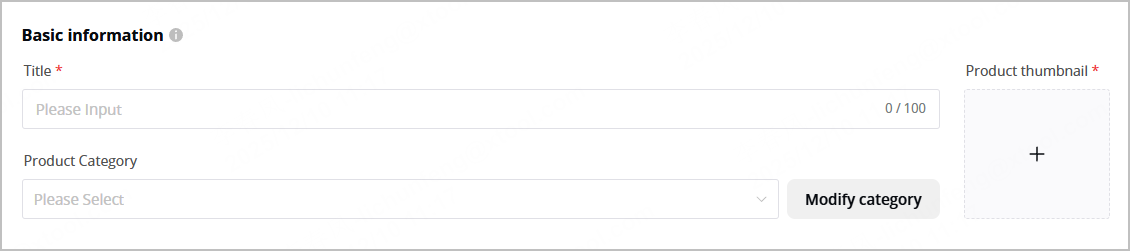
(3) Click Add New Product to enter the product information configuration page.

🔔Note: You can also click a template on the New Product page and use the information of the template.
(4) Enter the product name, select product category, and upload the product image.
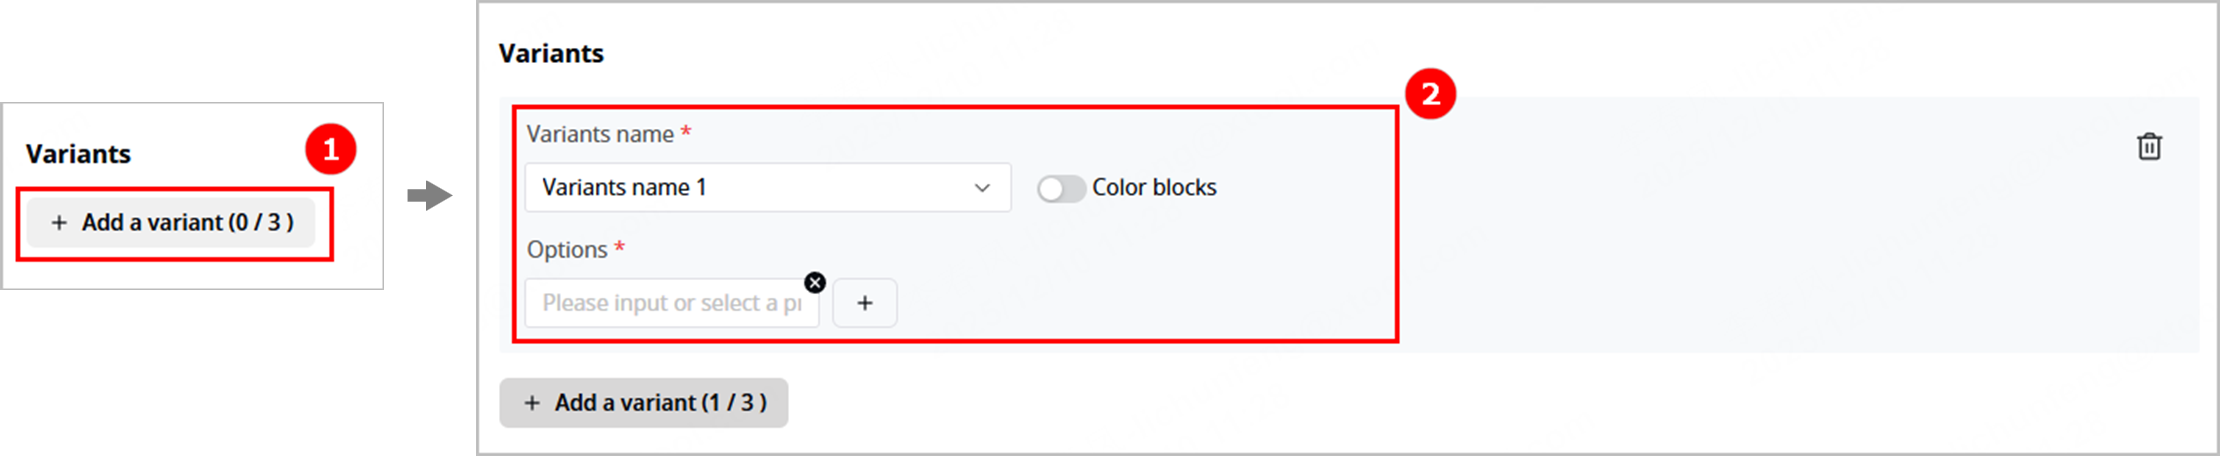
4. Configure product specifications
(1) Add variants.
If the product added has different specifications, such as colors and shapes, click + Add a variant to configure specifications for it.
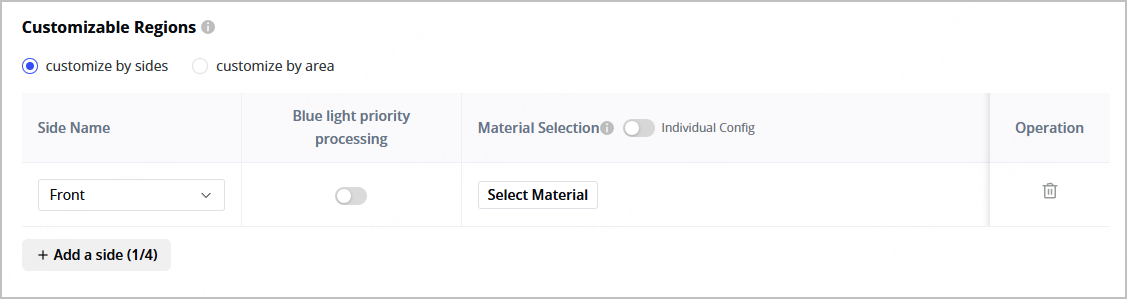
(2) In the Customizable Regions area, set processing positions.
- Customize by sides: In this mode, the user needs to turn over the product during processing to process different sides.
- Customize by area: In this mode, the user can only perform processing within one processing area.
5. Select devices for processing
🔔Note: Is Support Multi Device is disabled by default. If you want to select two or more laser devices for processing, enable Is Support Multi Device.
6. Configure customizable areas
(1) Set the status of product specifications.
- Enabled: The specification appears in the frontend of Customthings and is available.
- Disabled: The specification does not appear in the frontend of Customthings.
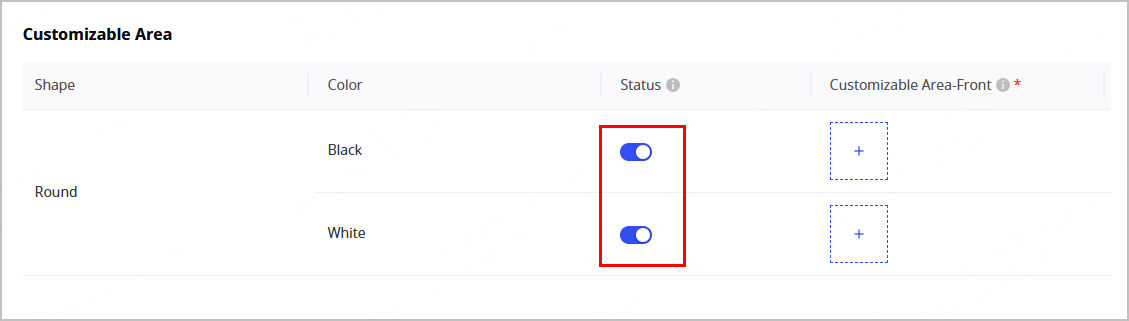
(2) Click + in the Customizable Area-Front column to upload an image to set the processing area.
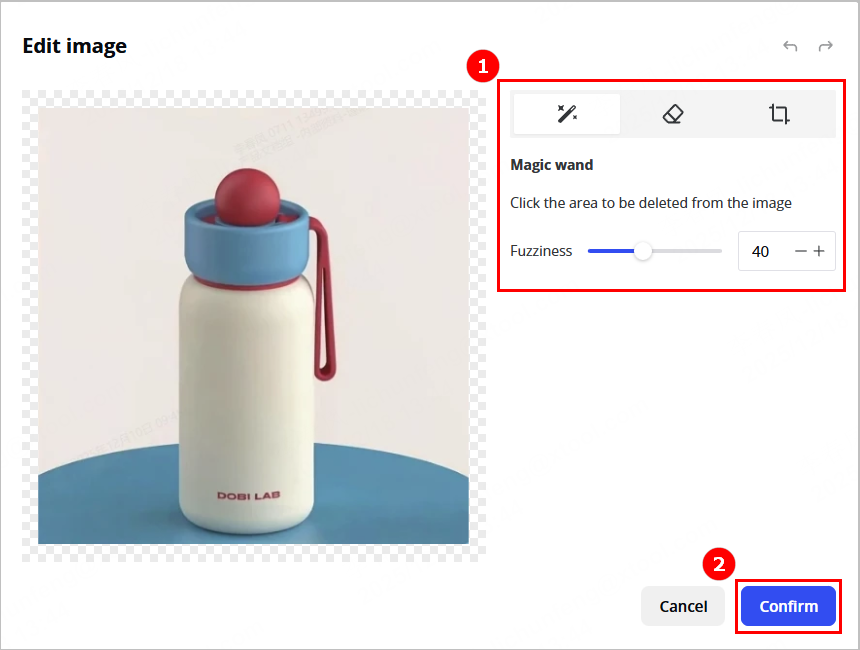
🔔 Note: The background of the image uploaded must be clean.
(3) Edit the image using the tools in the upper right corner and click Confirm.
(4) Set relevant parameters and click Confirm.
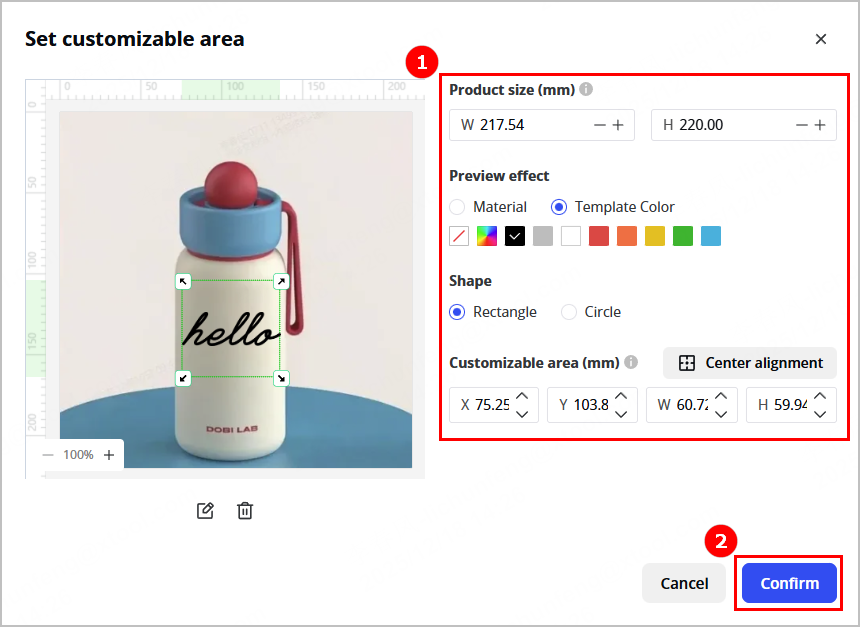
Note: The on-screen material and color are for preview only and may differ from the final laser-engraved result. To best match the actual engraving effect, please select a material and color that closely resemble the real engraved finish. For example:
- For black slate, set the template color to grayish white.
- For metal, set the material to curved stainless steel.
(5) Click the Apply to icon in the Customizable Area-Front column. In the displayed dialog box, select the attributes you want to apply to other variants and the application scope, and then click Apply.

7. Configure product parameters
Customthings allows you to configure product parameters either on the backend or the frontend. It is recommended that you perform parameter self-testing and configuration directly on the frontend.
- Configure parameters on the backend
(1) Enable Processing parameters. Click Select, set parameters for the product, and click Save.
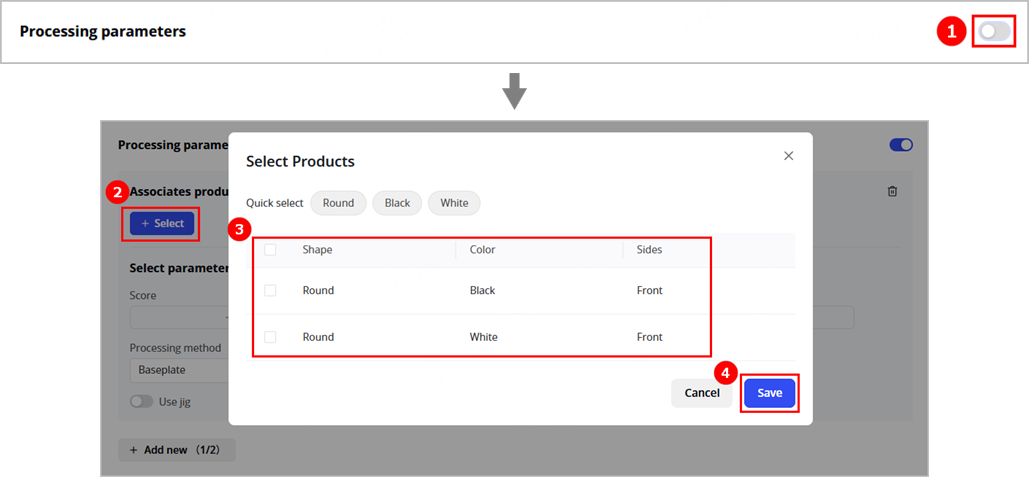
(2) In the Select parameters area, click Select to select parameters for different processing types, select the processing method, and set the start point of the processing area.
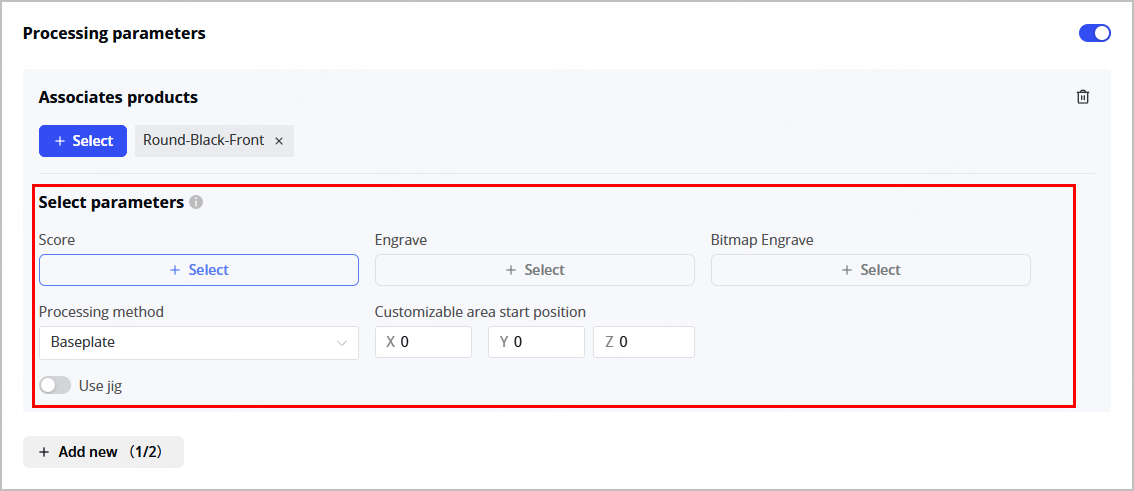
Note: Bitmap engraving is not supported.
- Configure parameters on the frontend
For details about how to configure parameters on the frontend, see the Parameters Settings and Adjustment section in this document.
8. Configure customization method
In the Design settings area, set the customization method for the product.
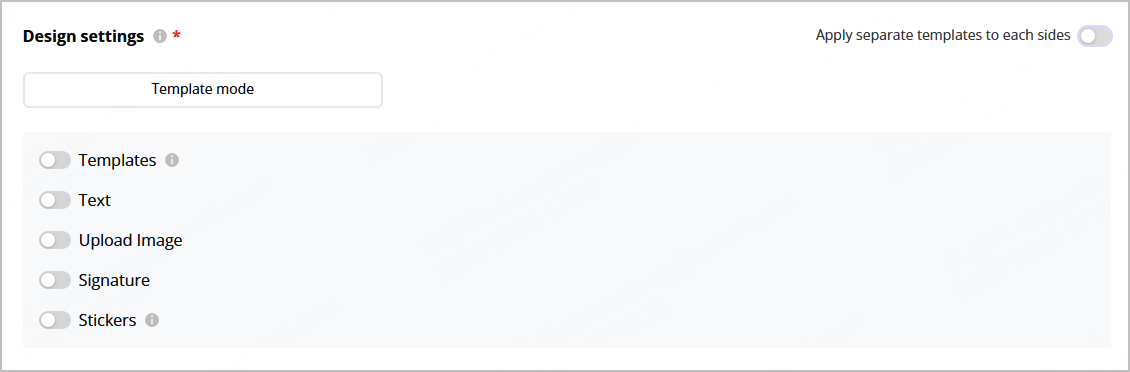
- You can enable Apply separate templates to each sides to configure a template for each side of the product. For details, see the Configure Design Resources section.
- You can design texts, images, and handwriting elements. For details, see the Configure Design Resources section.
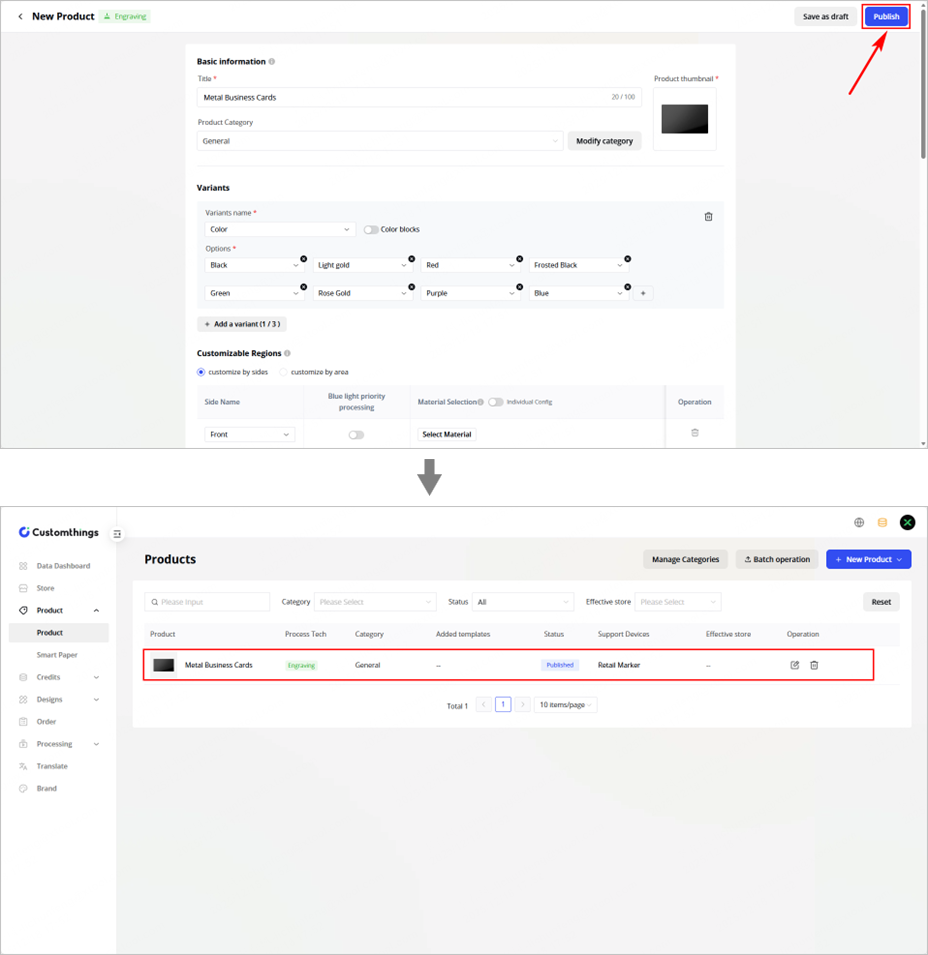
9. Complete the configuration
After the configuration is complete, click Publish in the upper-right corner of the page. The newly added product will display in the product list.
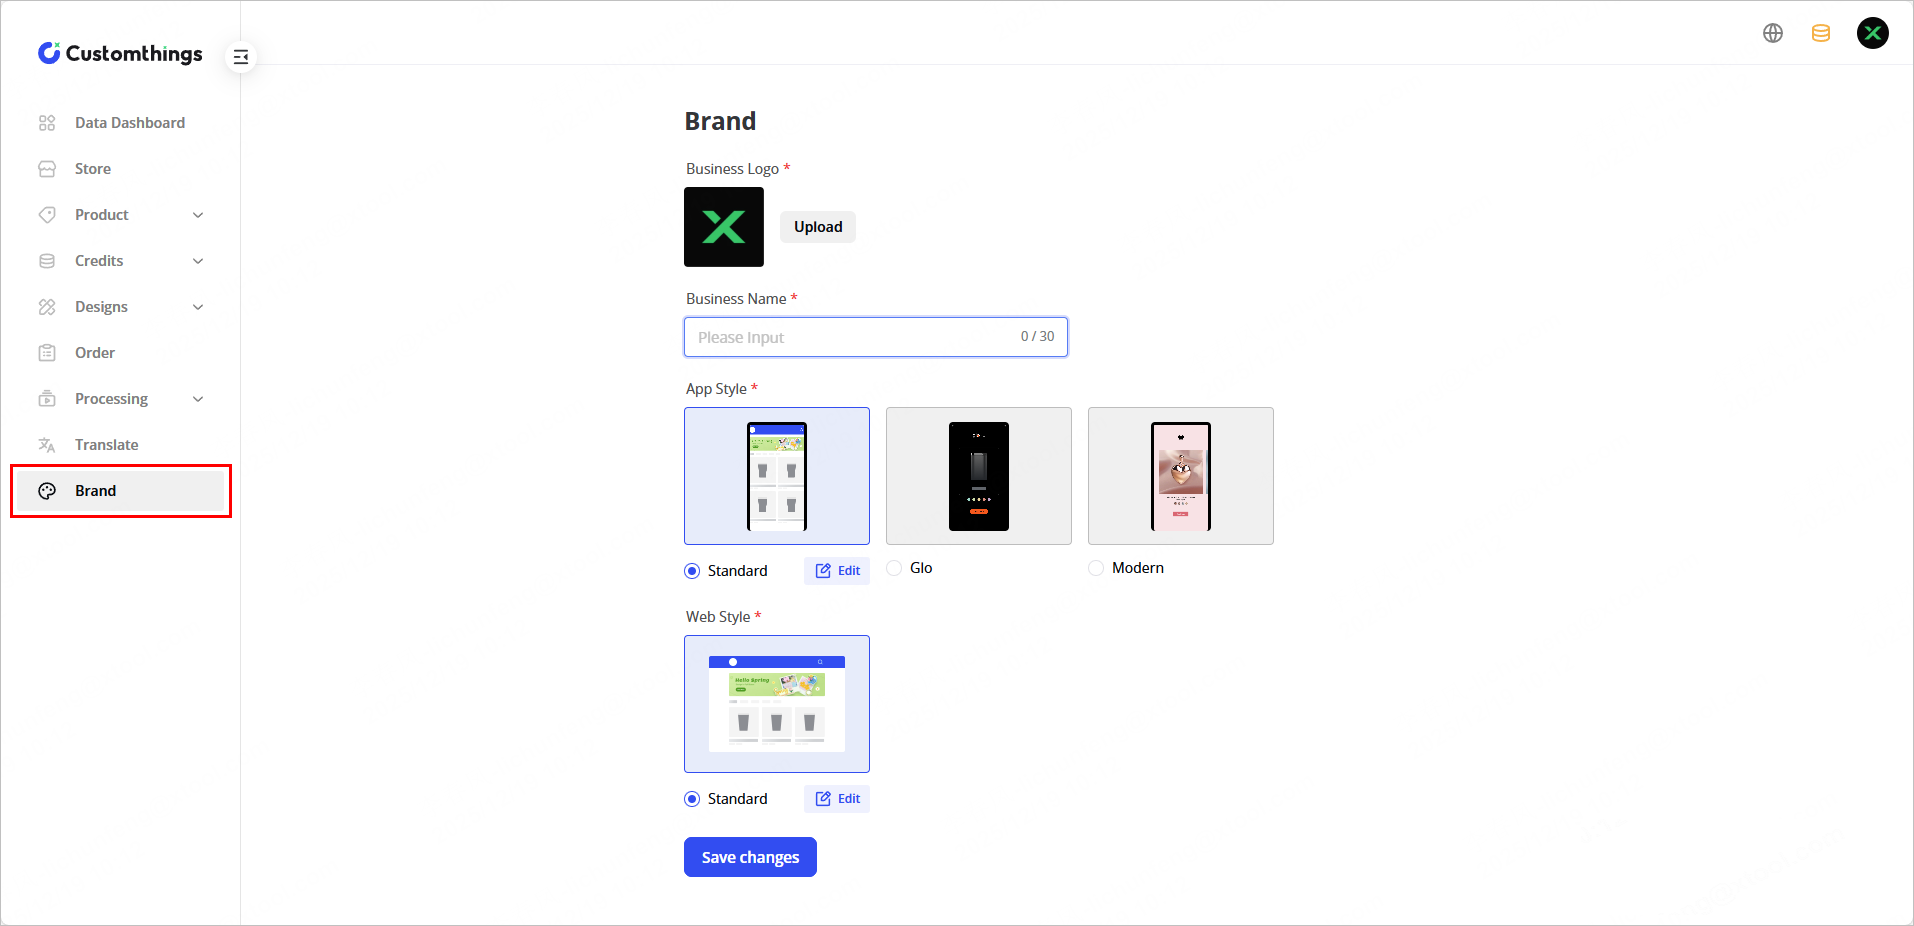
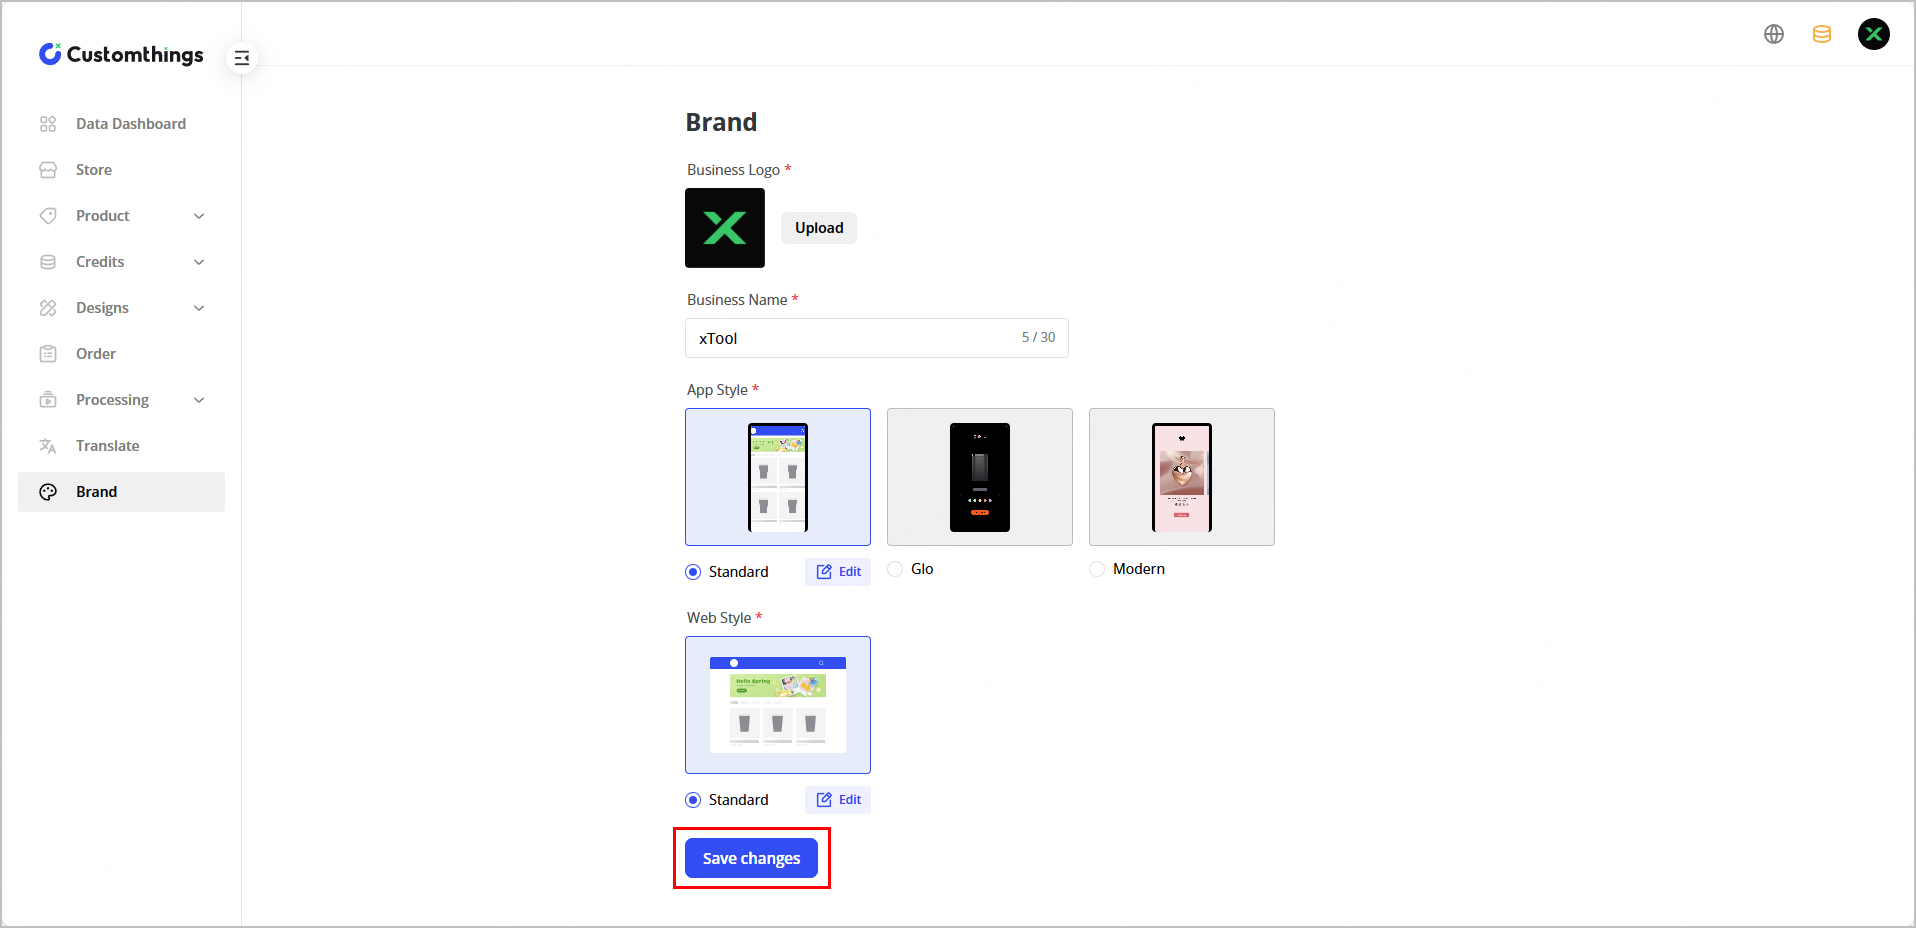
Configure brands
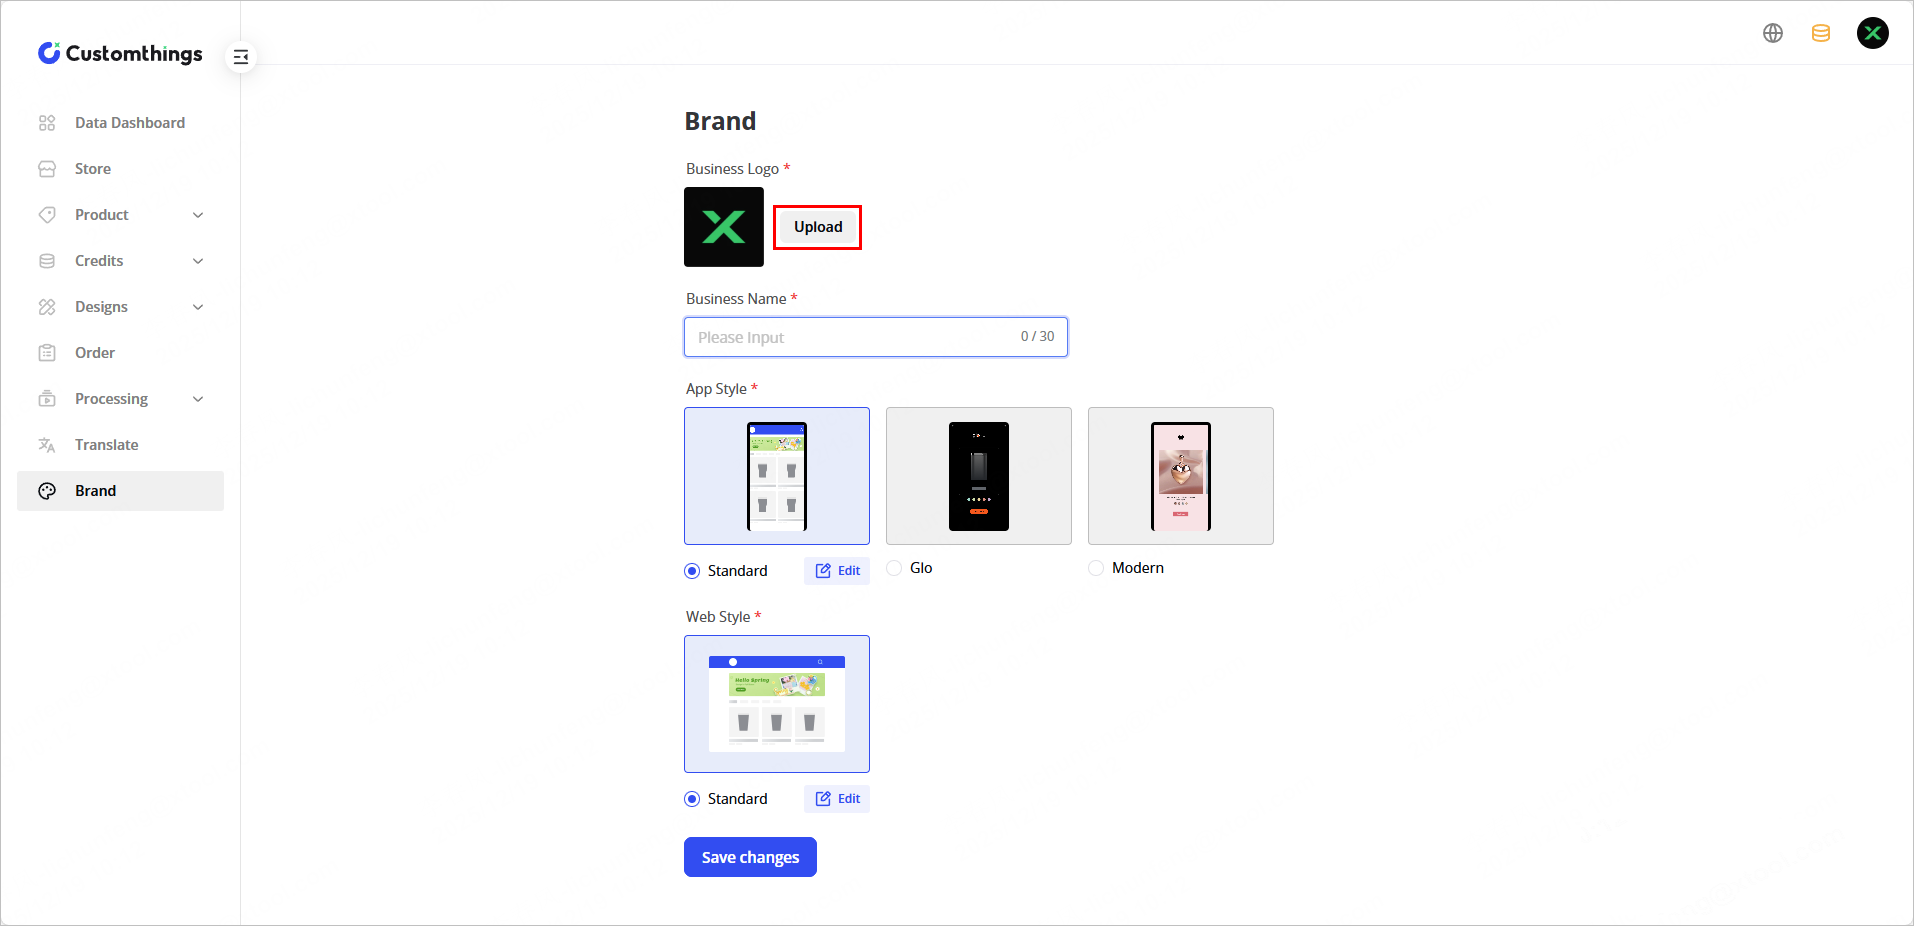
1. Upload a company logo
(1) Click Brand to enter the brand page.
(2) Click Upload to upload your company logo.
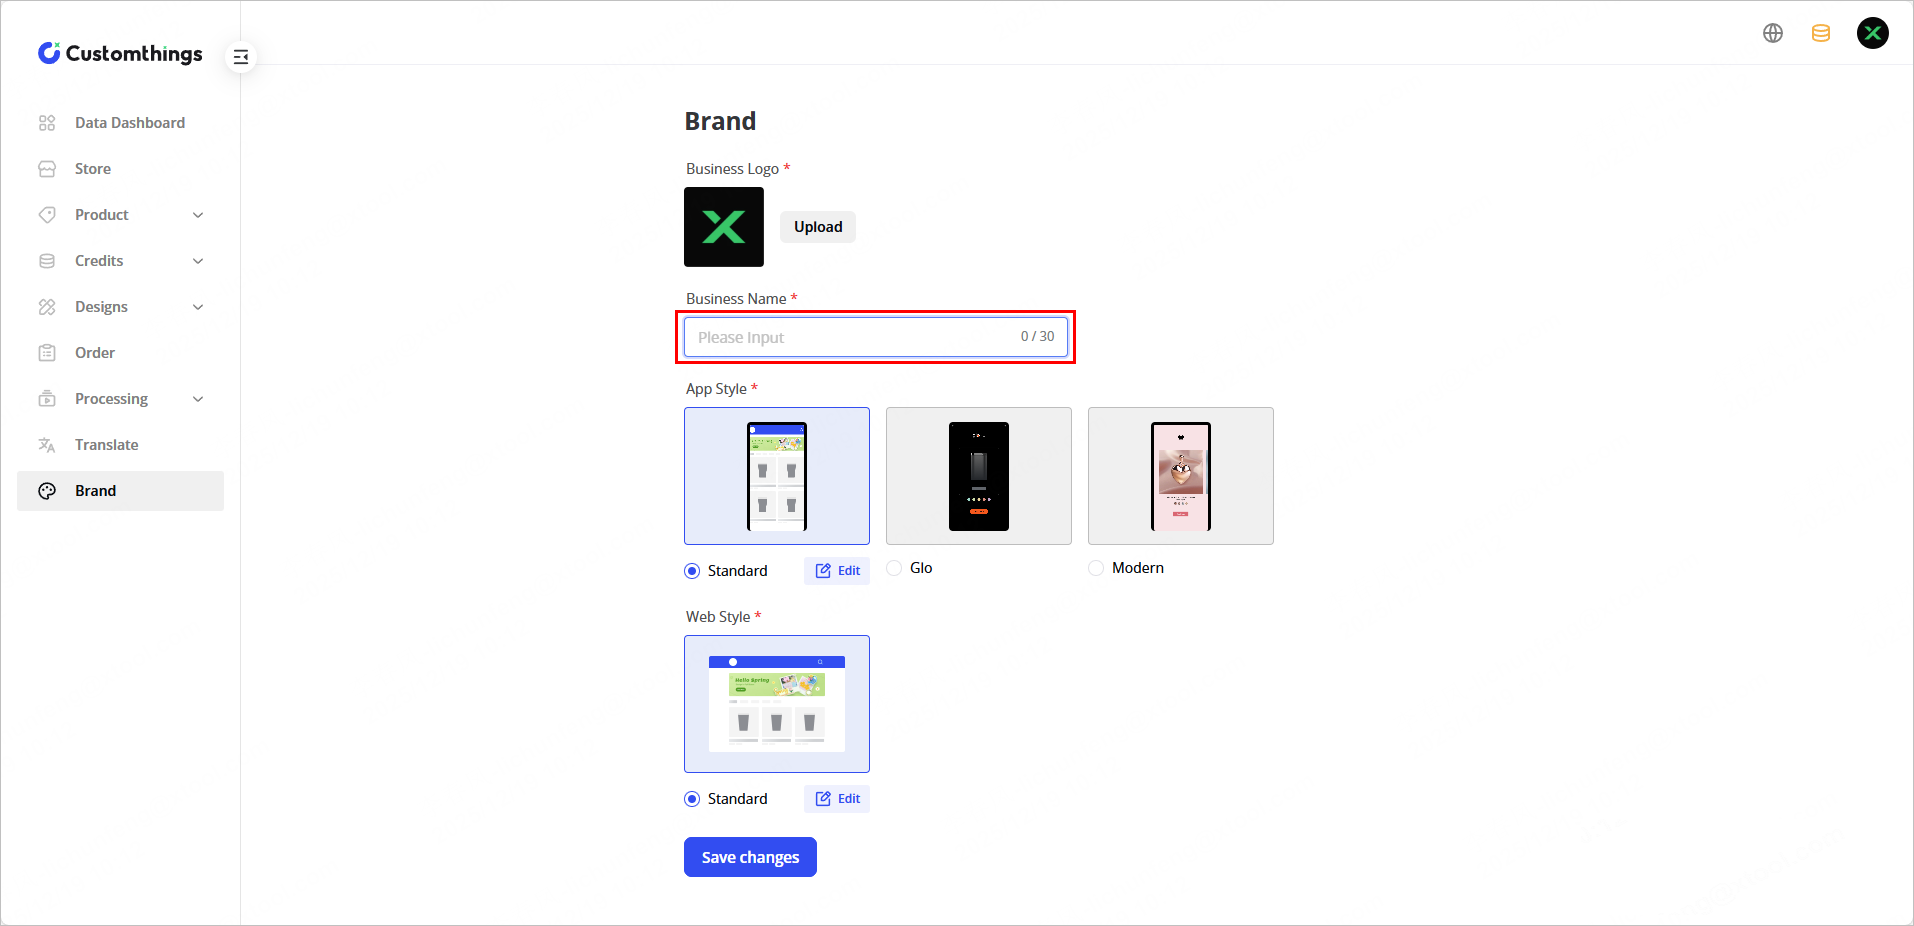
2. Set the company name
In the Business Name text box, enter your company name.
3. Set app theme style
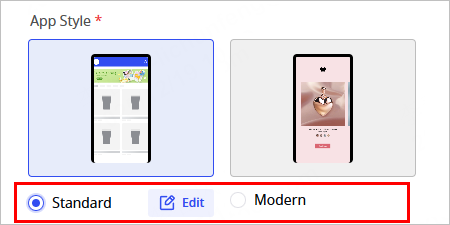
(1) In the App Style area, select the desired style and click Edit to enter the style configuration page.
- Standard: Displays product on a single page without independent category pages, suitable for industries with a wide variety of product categories, such as beauty, supermarkets, exhibitions, and sports brands.
- Modern: Features independent pages for each category, suitable for industries with fewer, well-defined product categories, such as e-cigarettes, luxury goods, eyewear, and jewelry.
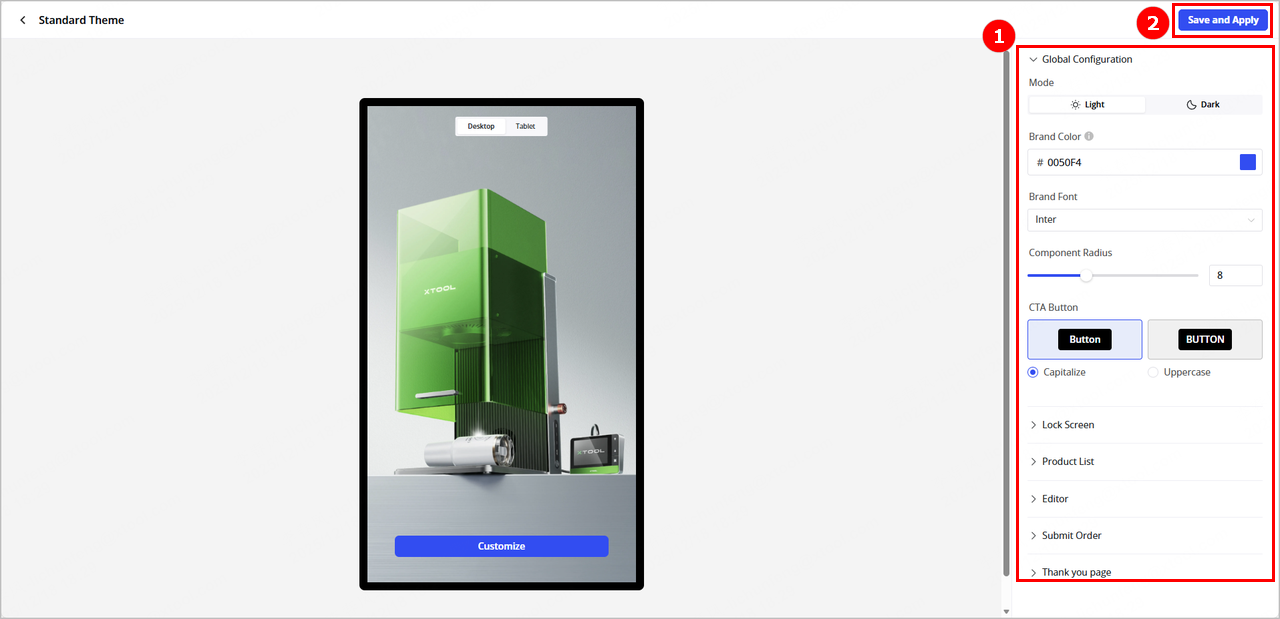
(2) Set the theme style. You can configure global configuration, lock screen page, product list page, whether to display merchant logo, order submission page, and order confirmation page. After completing the configuration, click Save and Apply.
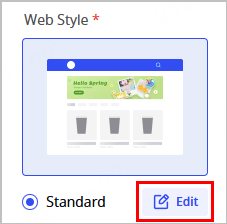
4. Set Web theme style
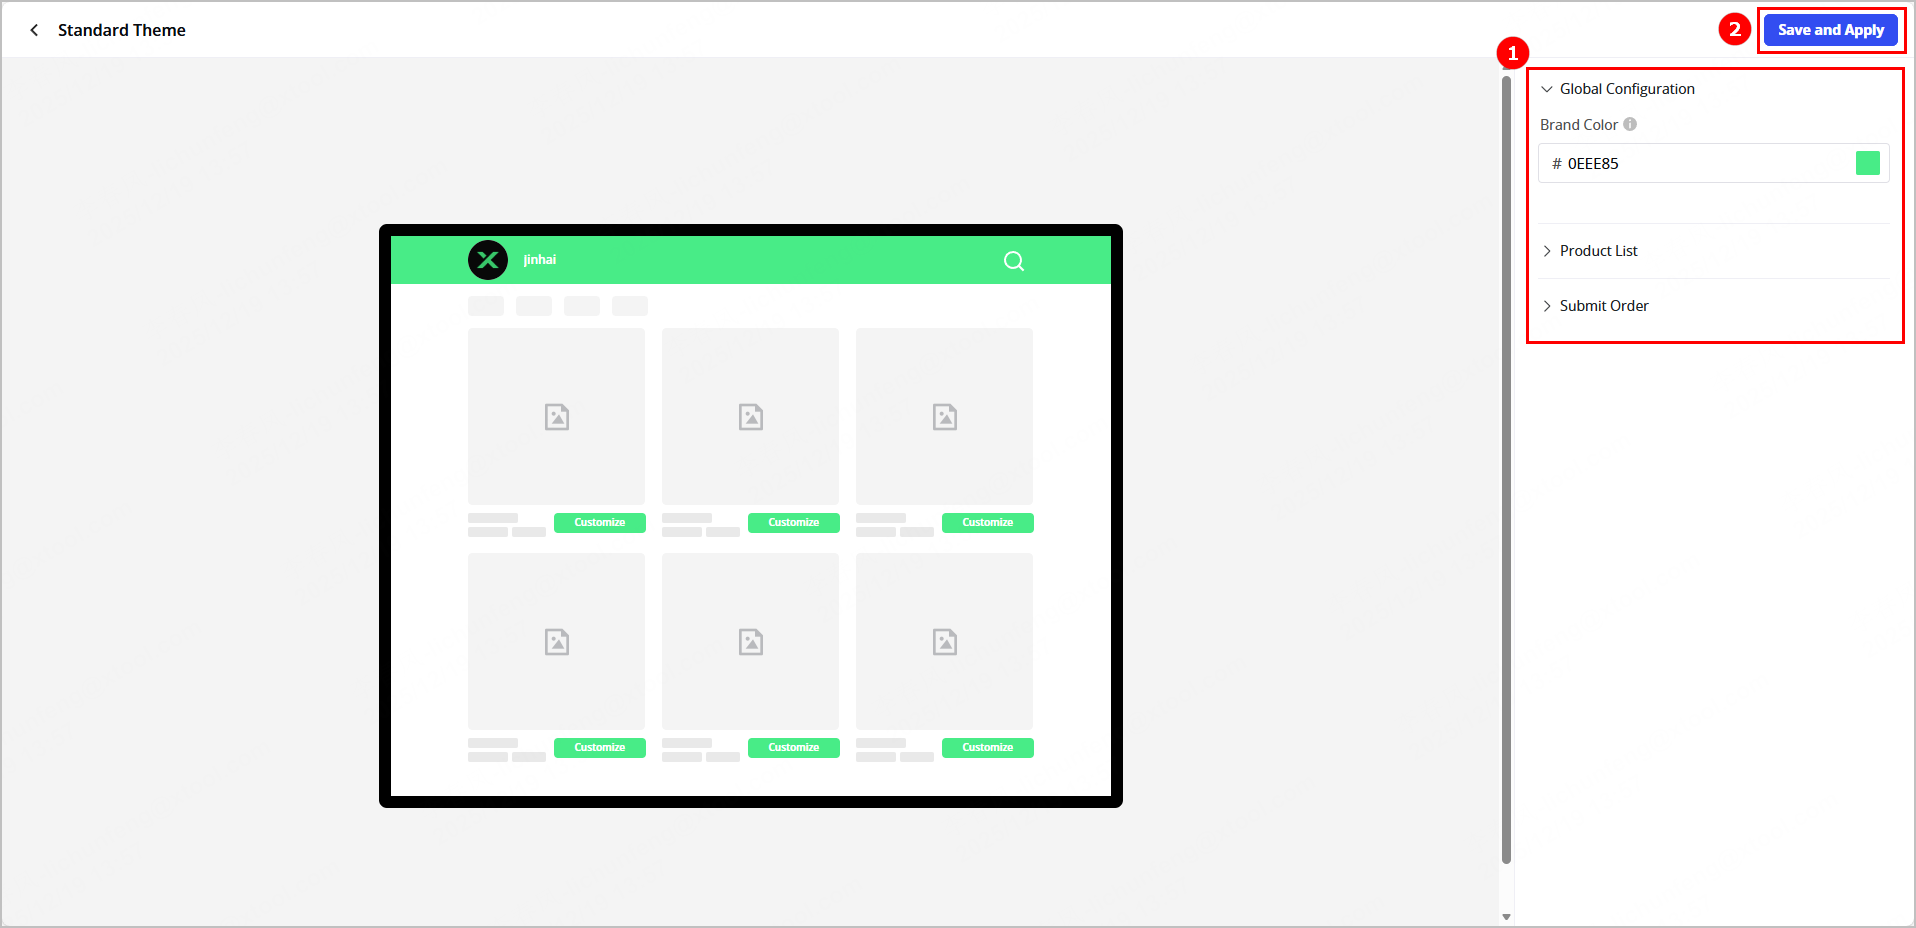
(1) In the Web Style area, click Edit to enter the configuration page.
(2) Set the theme style. You can configure global configuration, product list page, and order submission page. After completing the configuration, click Save and Apply.
 5. Complete the configuration
Click Save changes to complete brand configuration.
Configure design resources
Configure design template
(1) Click Designs > Templates to enter the Templates page.
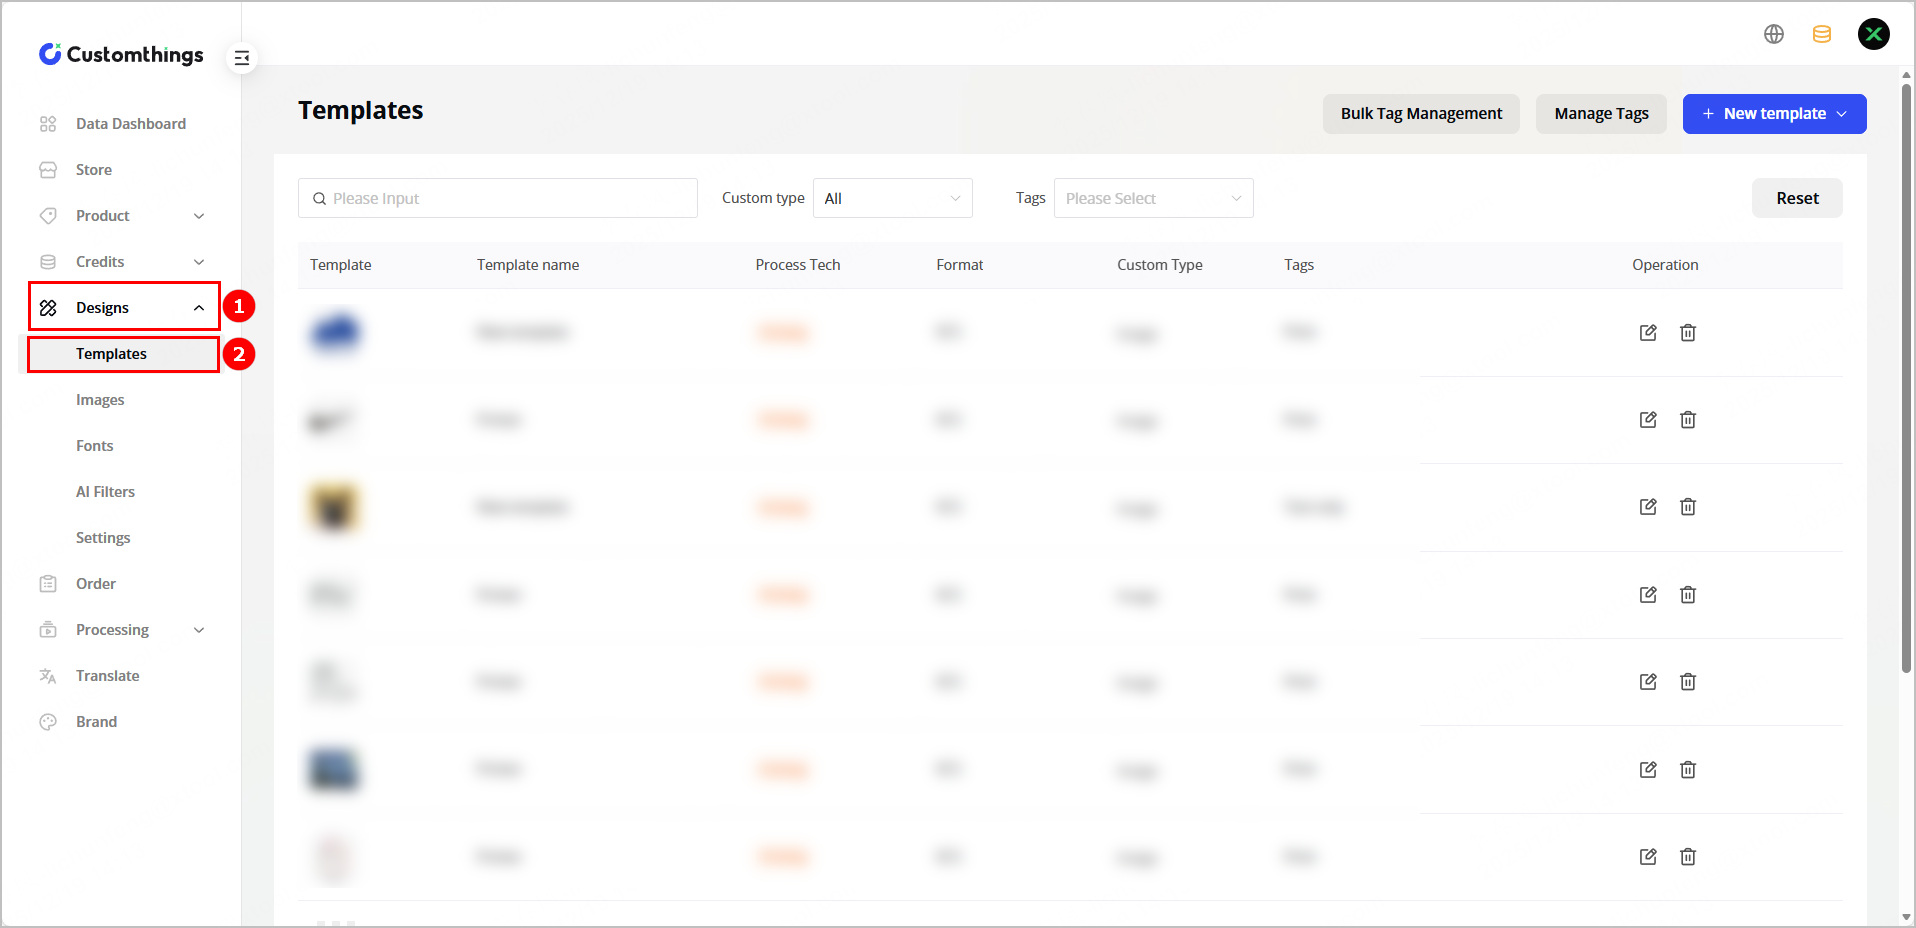
(2) Click New template, select the processing type, and click Upload to upload a template.
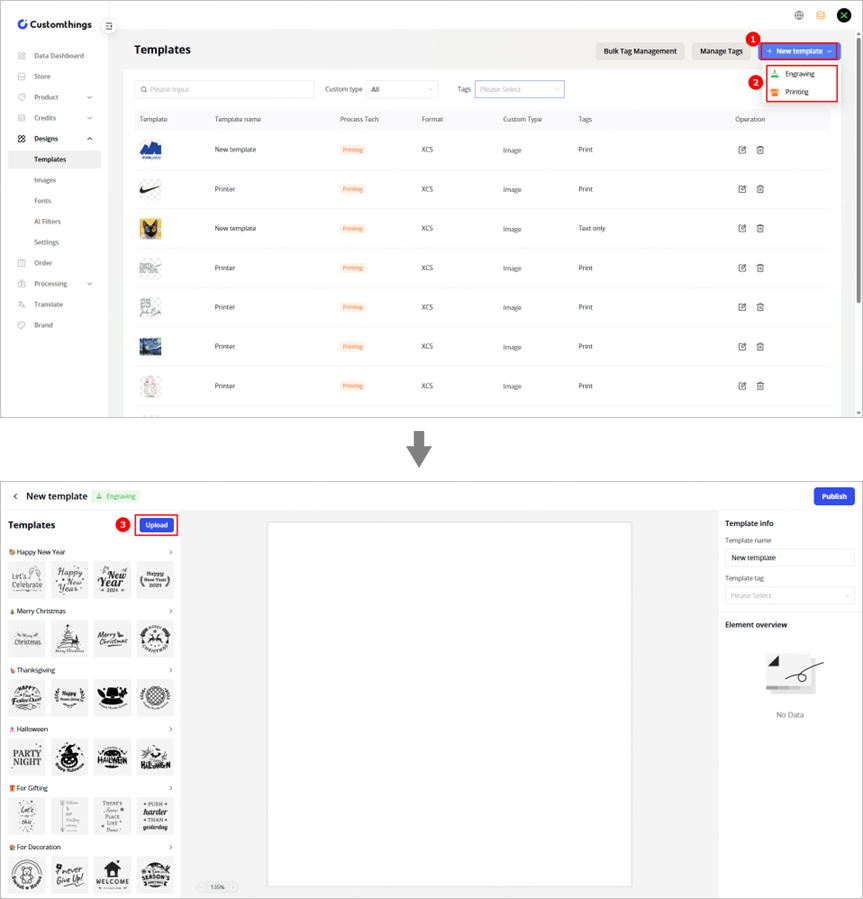
Note: If you select Engraving as the processing type, you can select a template from the template library.
(3) Set the template name, template tag, and element overview.
- Image: If enabled, users can replace the image of the template.
- Text: If enabled, users can adjust the text size.
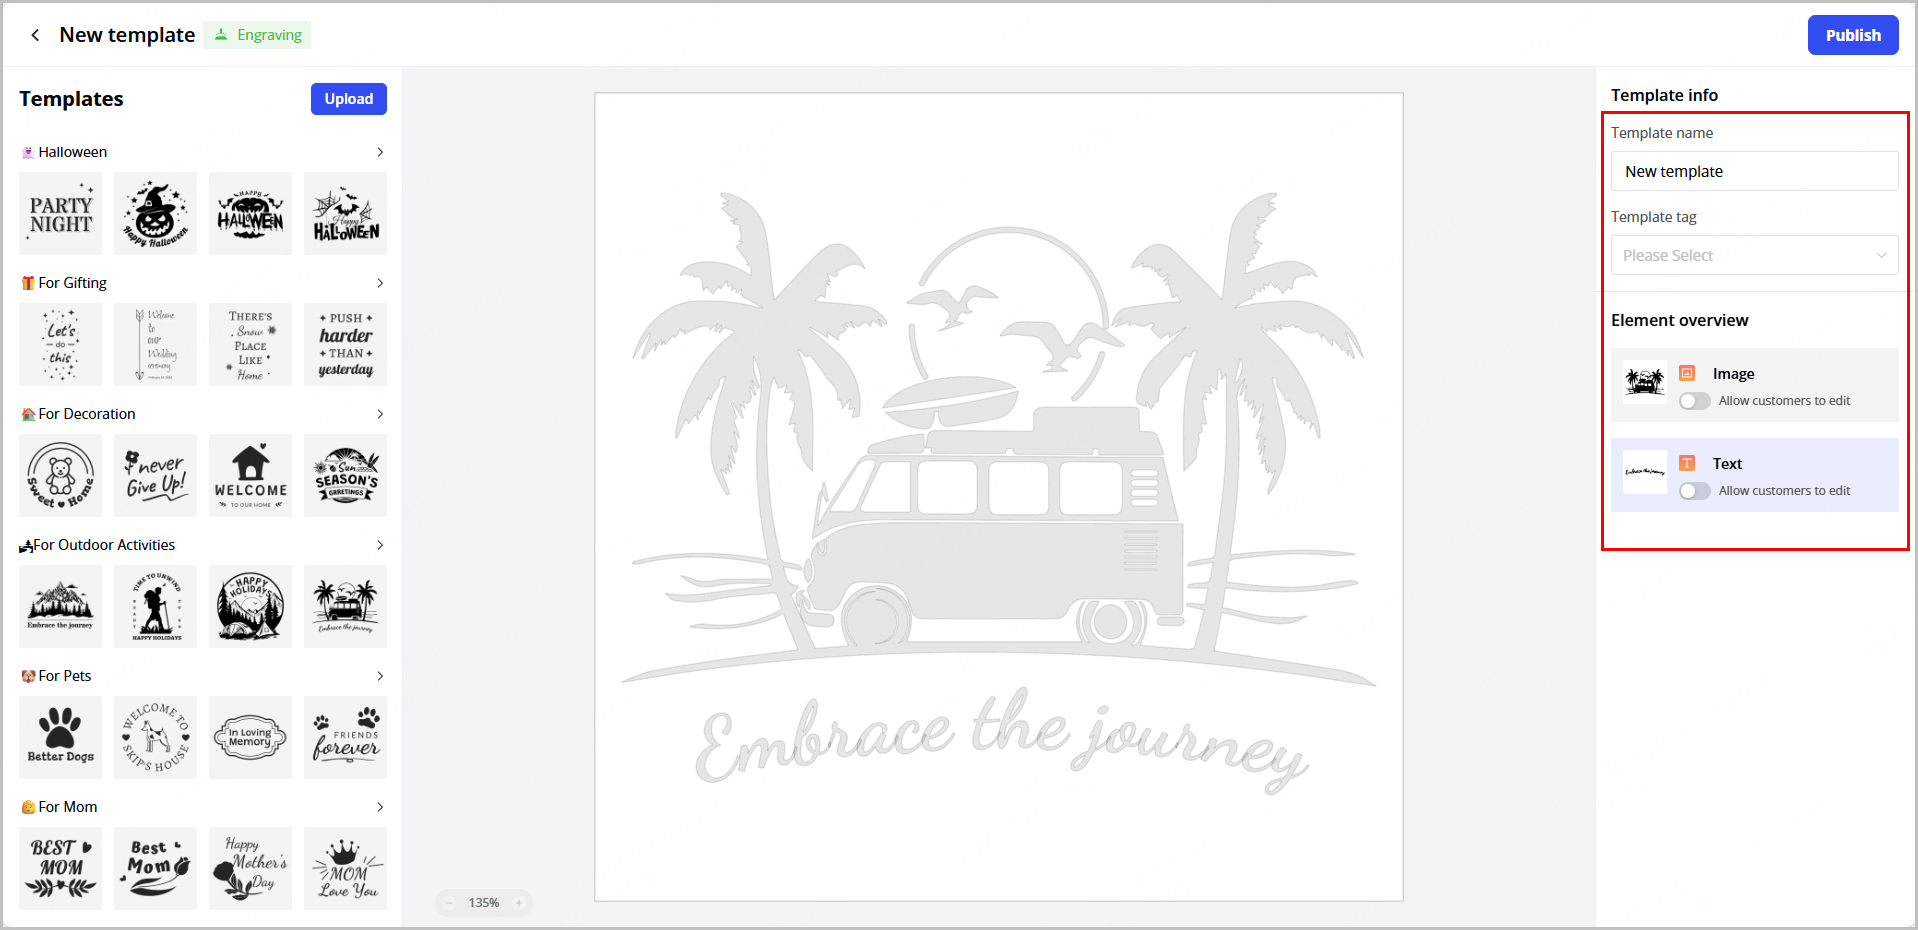
(4) After completing the settings, click Publish. The newly added template will appear on the Templates page.

Configure design images
(1) Click Designs > Images to enter the Image library page.
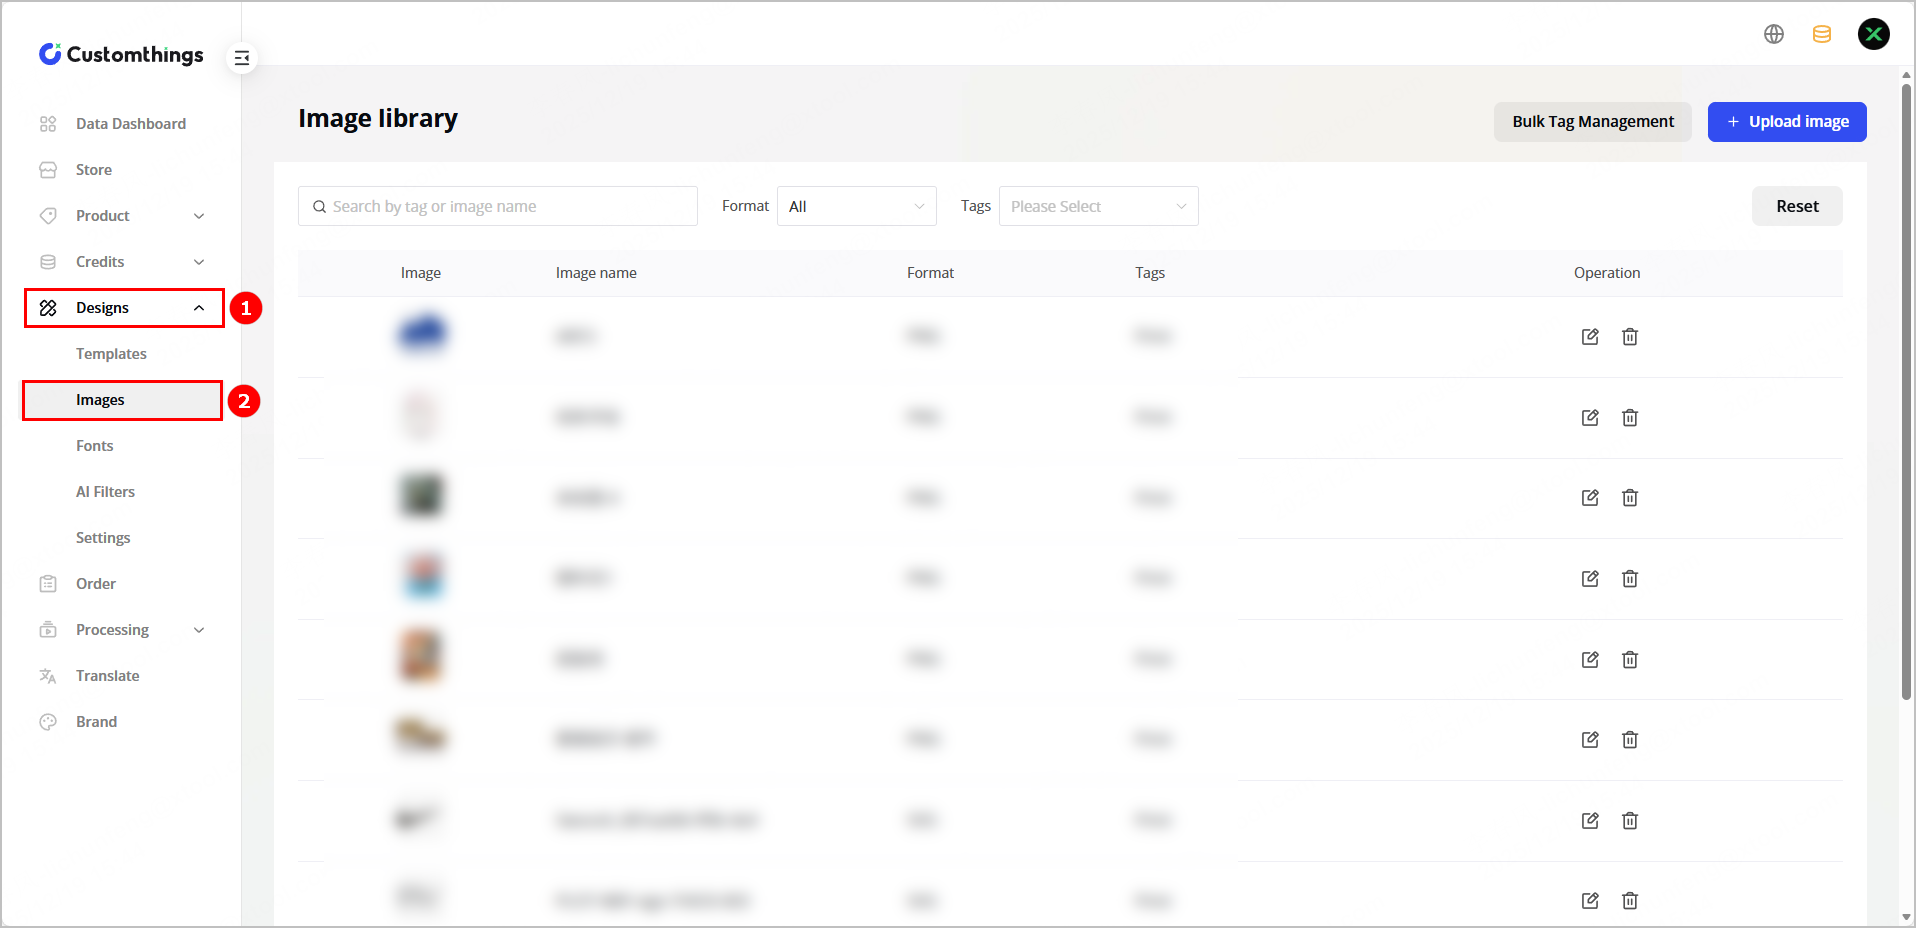
(2) Click Upload image and select an image from your local device.
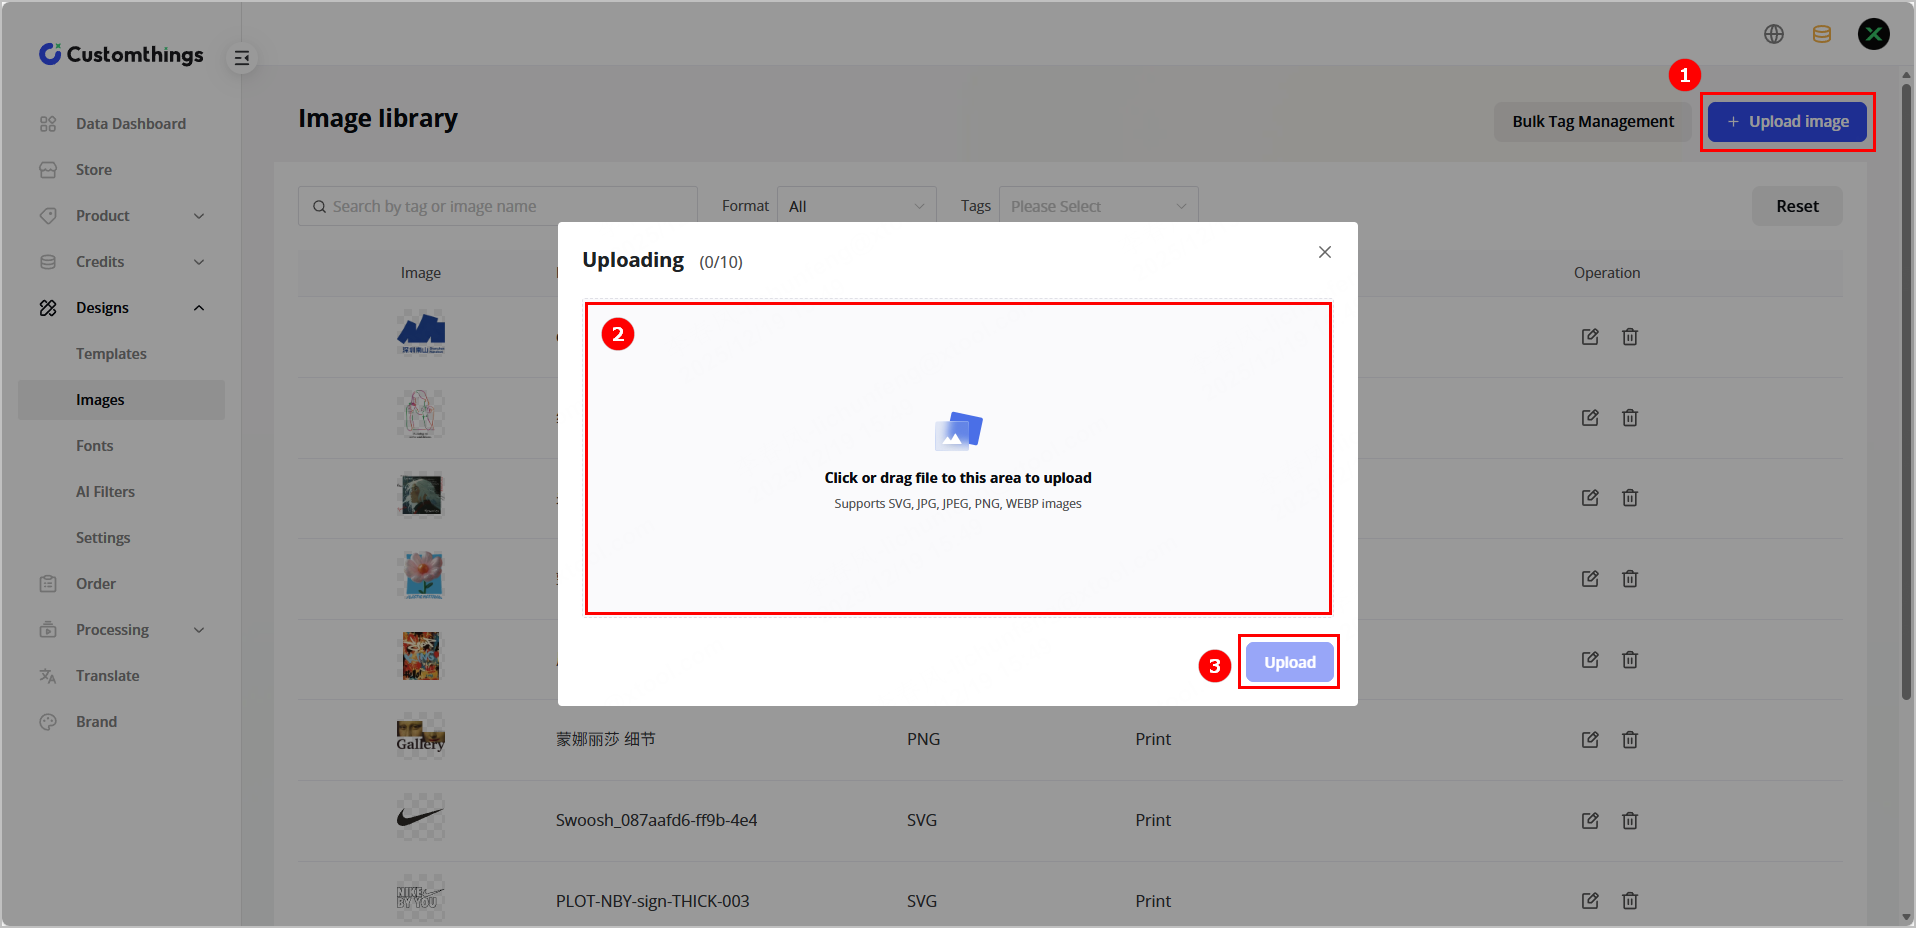
Note: The following image formats are supported: SVG, JPG, JPEG, PNG, and WEBP.
(3) (Optional) Click the edit button to change the image name and click + in the Tags column to add tags for the image.
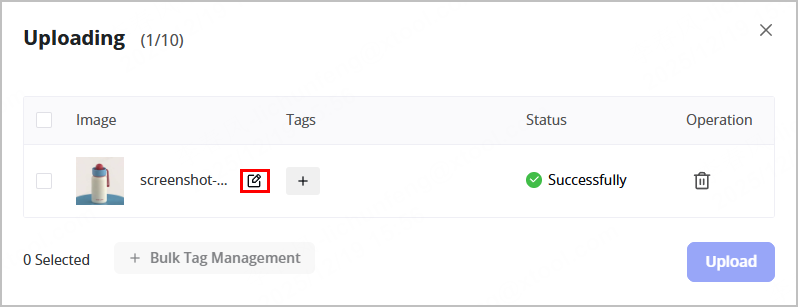
(4) Select the image and click Upload. The image uploaded will appear on the Image library page.

Configure fonts
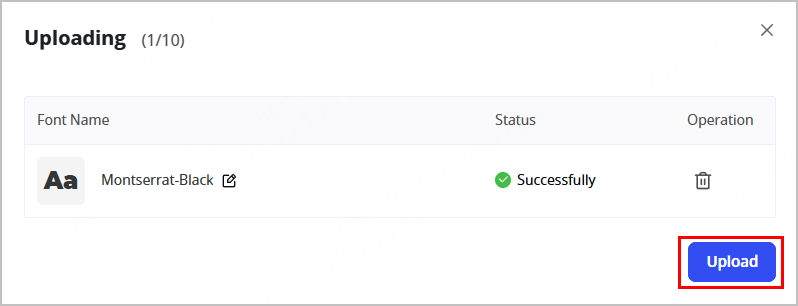
(1) Click Designs > Fonts to enter the font management page.
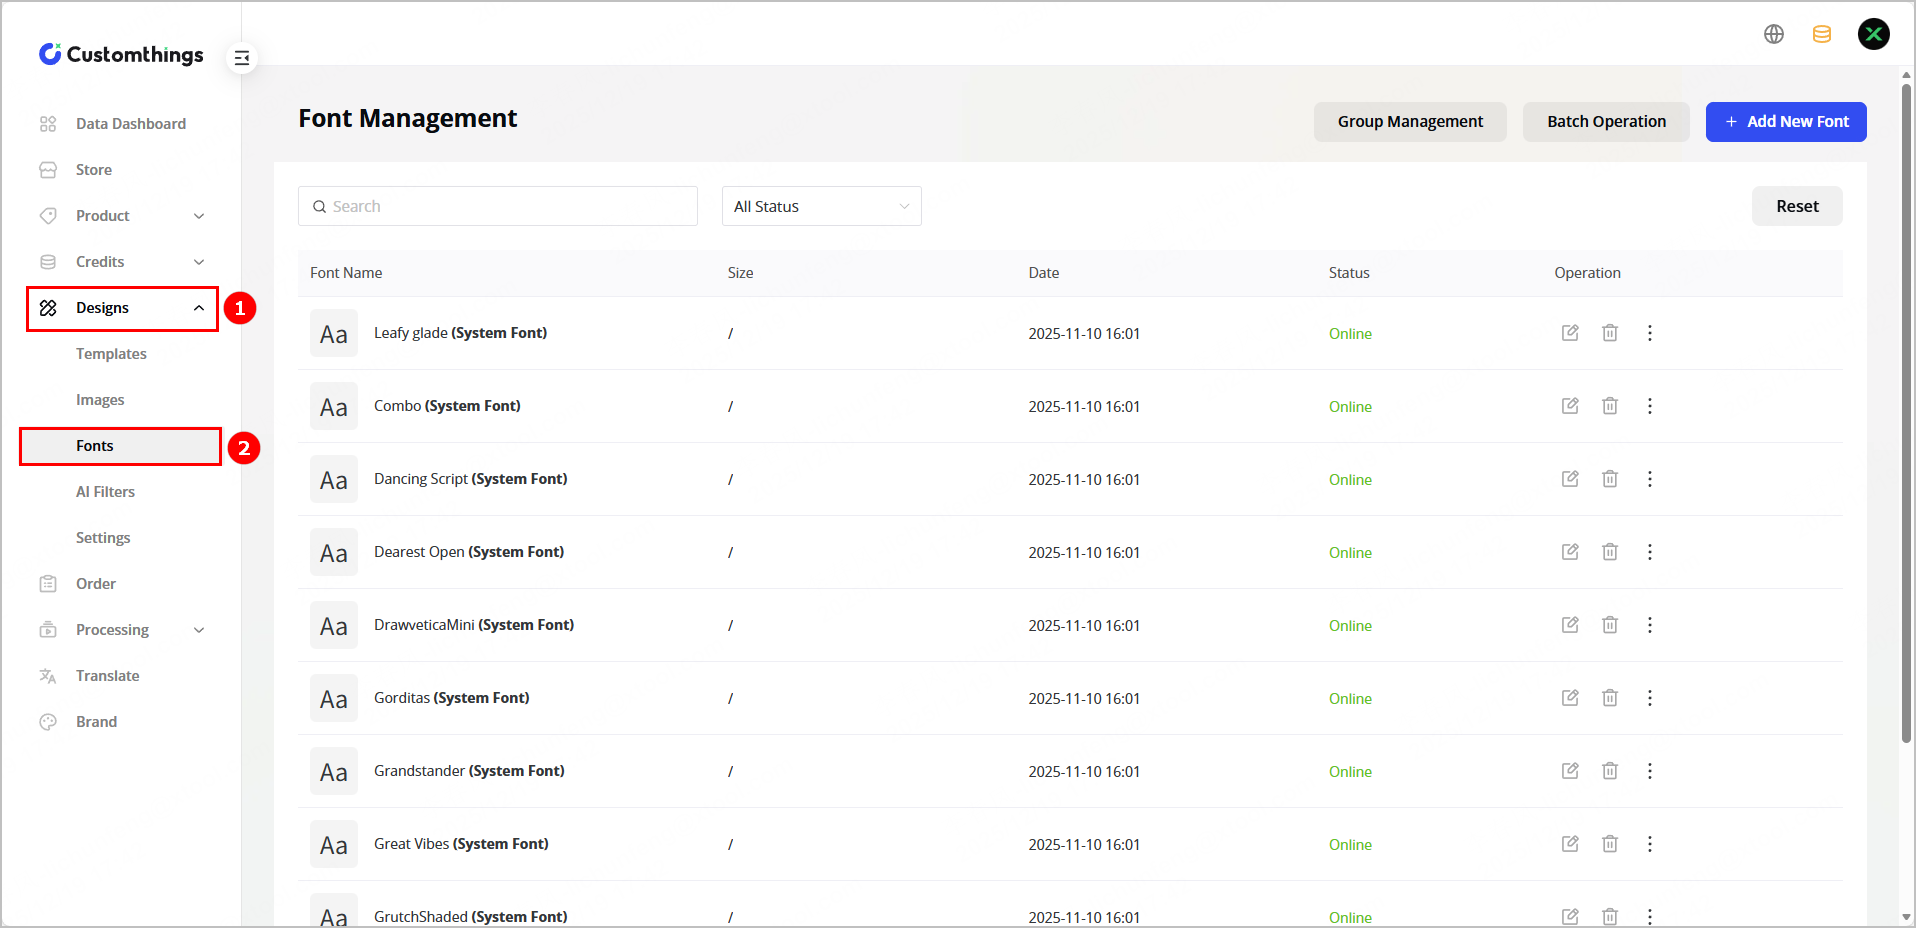
(2) Click Add New Font, and select fonts from your local device.

(3) (Optional) Click the edit button to change the font name.
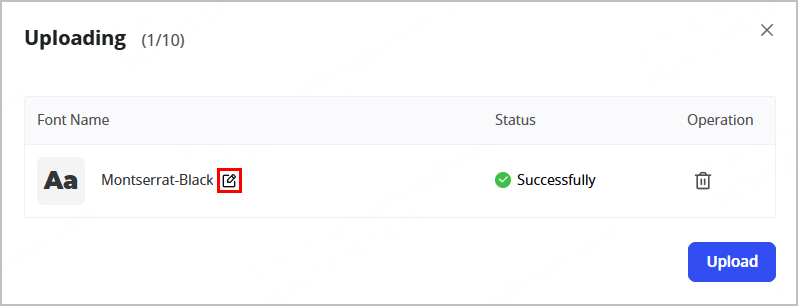
(4) Click Upload to upload the font. The font uploaded will display on the font management page.
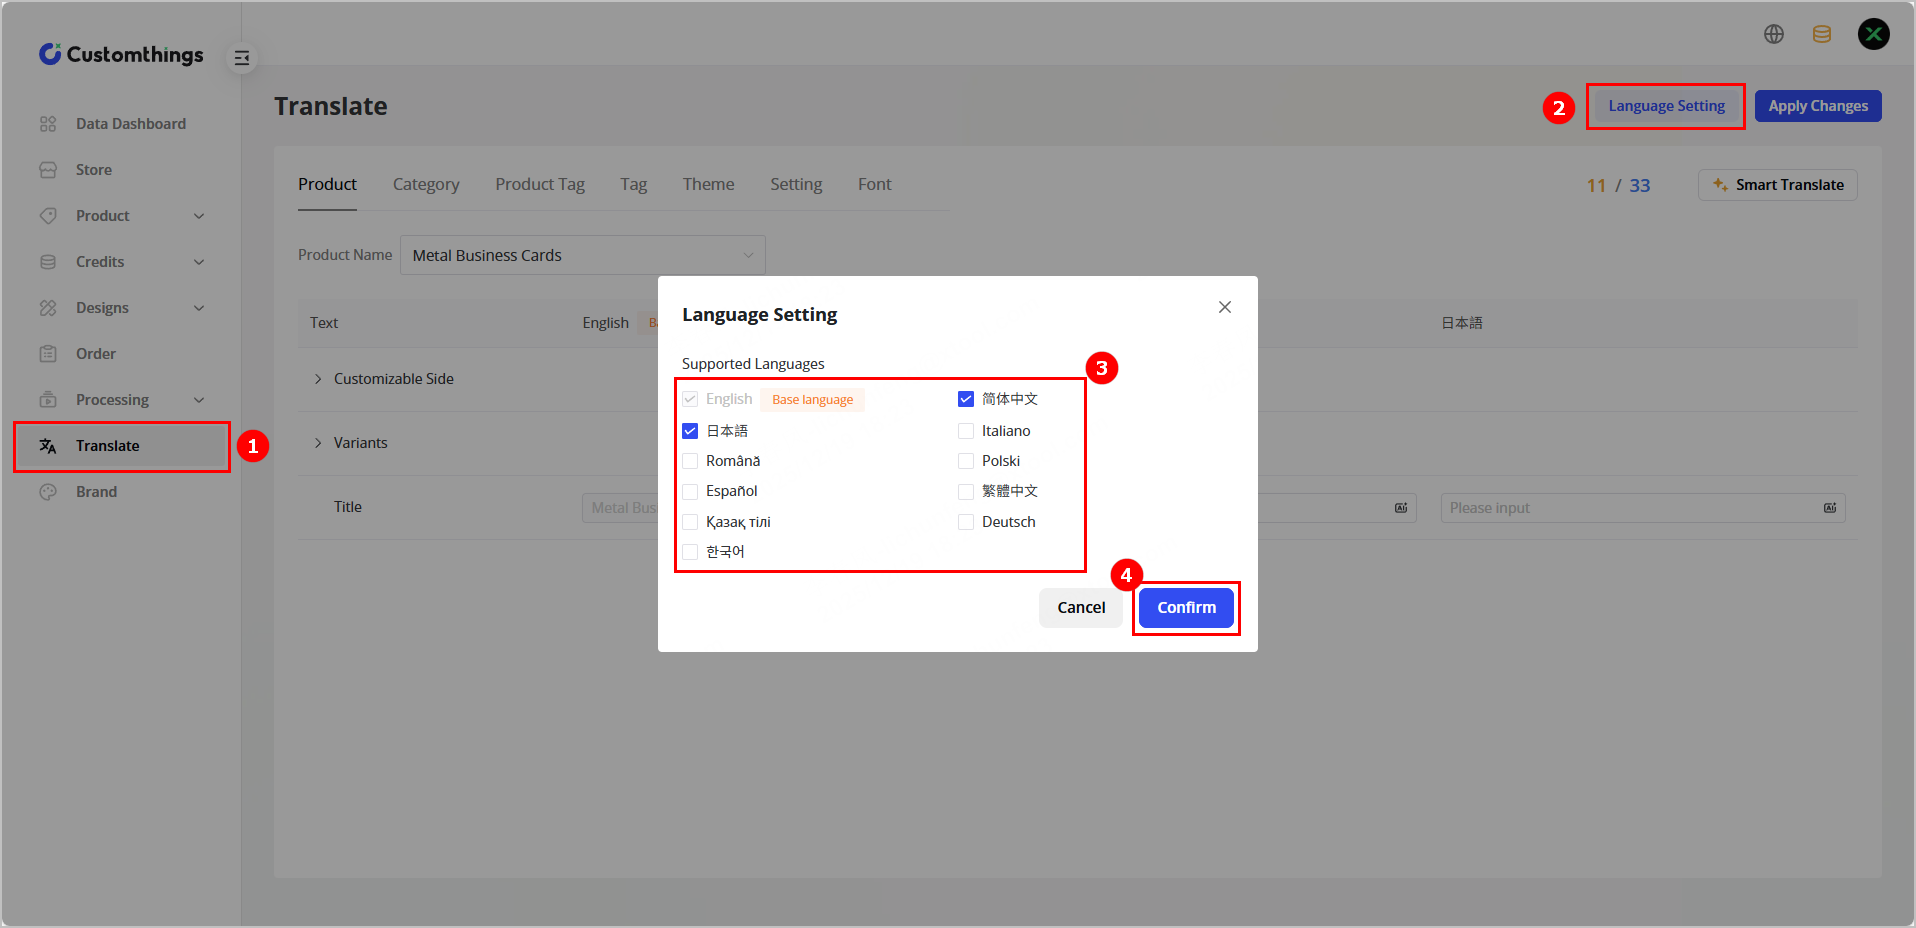
Configure languages
After configuring the languages, you can set the corresponding languages on the frontend and the backend.
(1) Click Translate > Language Setting. In the Language Setting dialog box, select the languages to be displayed on the frontend and the backend, and click Confirm.
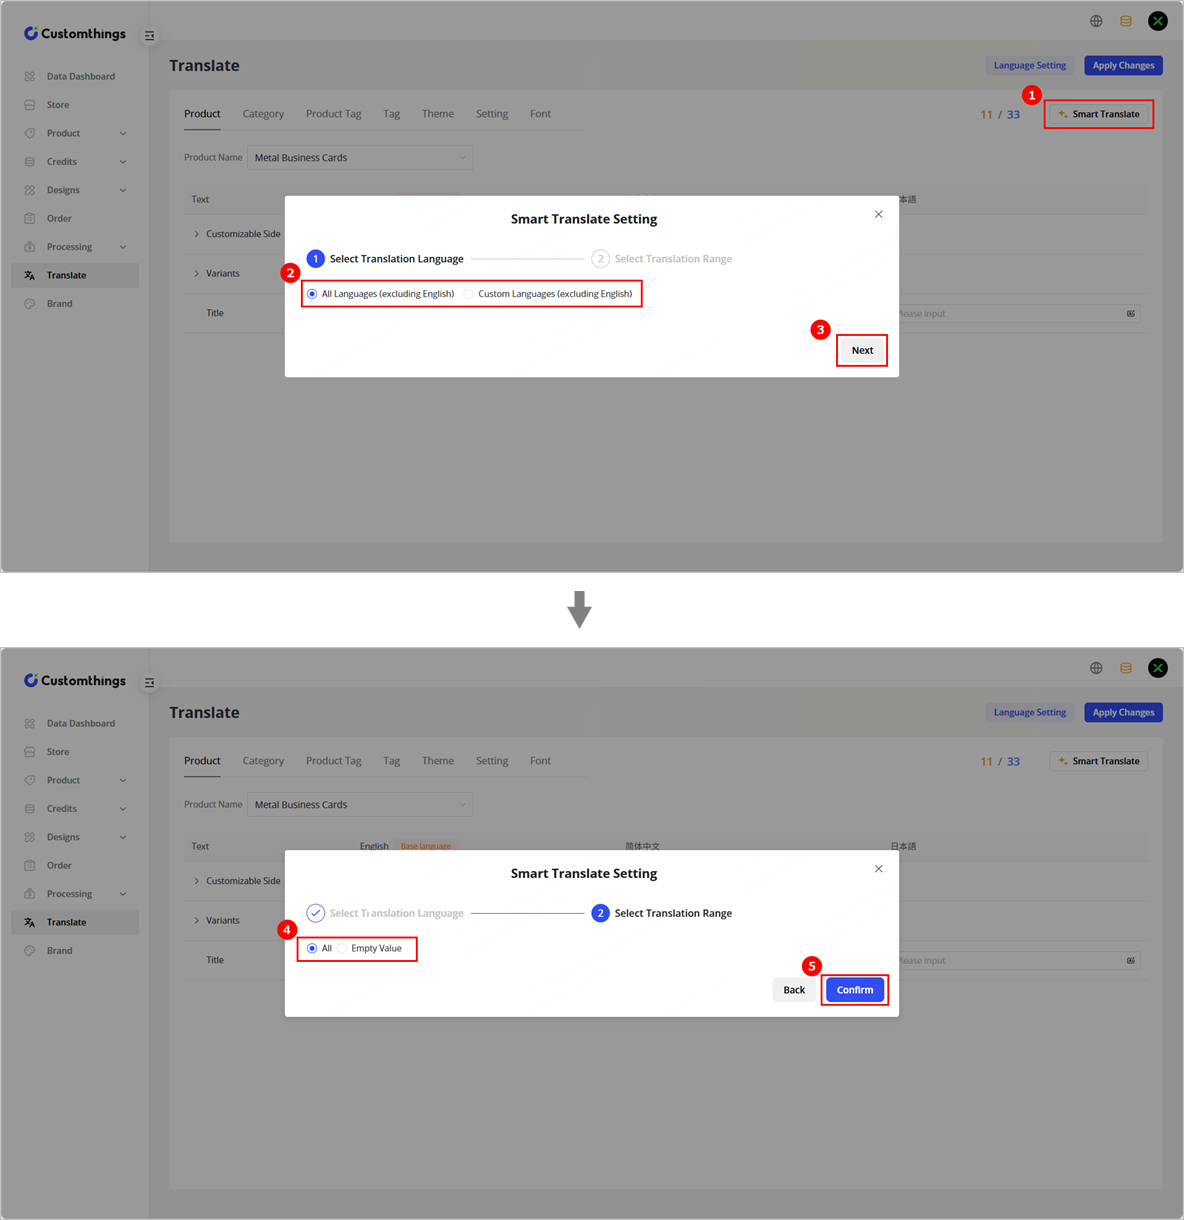
(2) Select a product name and translate the product-related text into corresponding languages. You can manually input the translation or use the smart translate function of Customthings.
- Manual input: Directly enter the translation into the text boxes.
- Smart translation: Click Smart translation. In the dialog box that is displayed, set target languages, click Next, set the translation range, and click Confirm.
Customthings frontend usage
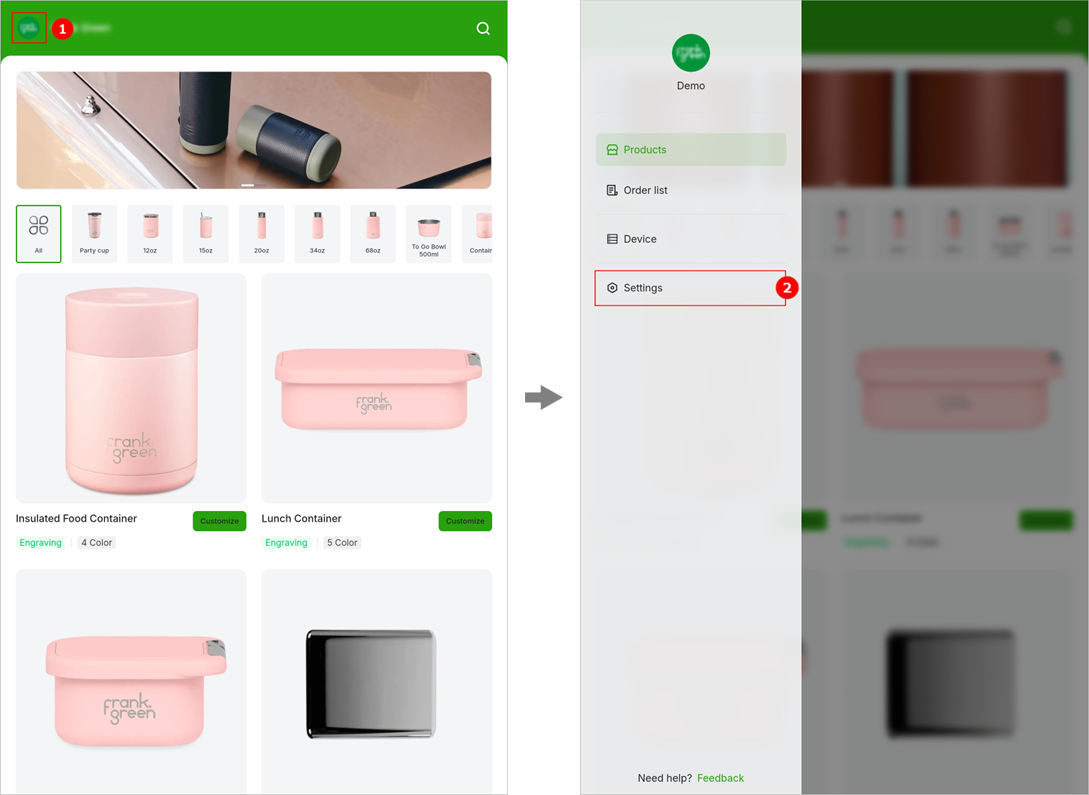
1. Log in to the frontend of Customthings
(1) Enter the account and password you have configured on the backend, select the server, and tap Log In.
- Global Server: For users in Hong Kong, Macau, Taiwan, and overseas.
- 中国服务器: For users in mainland China.
Note: You can use the app after the data loading is complete. Ensure a stable network during the loading.
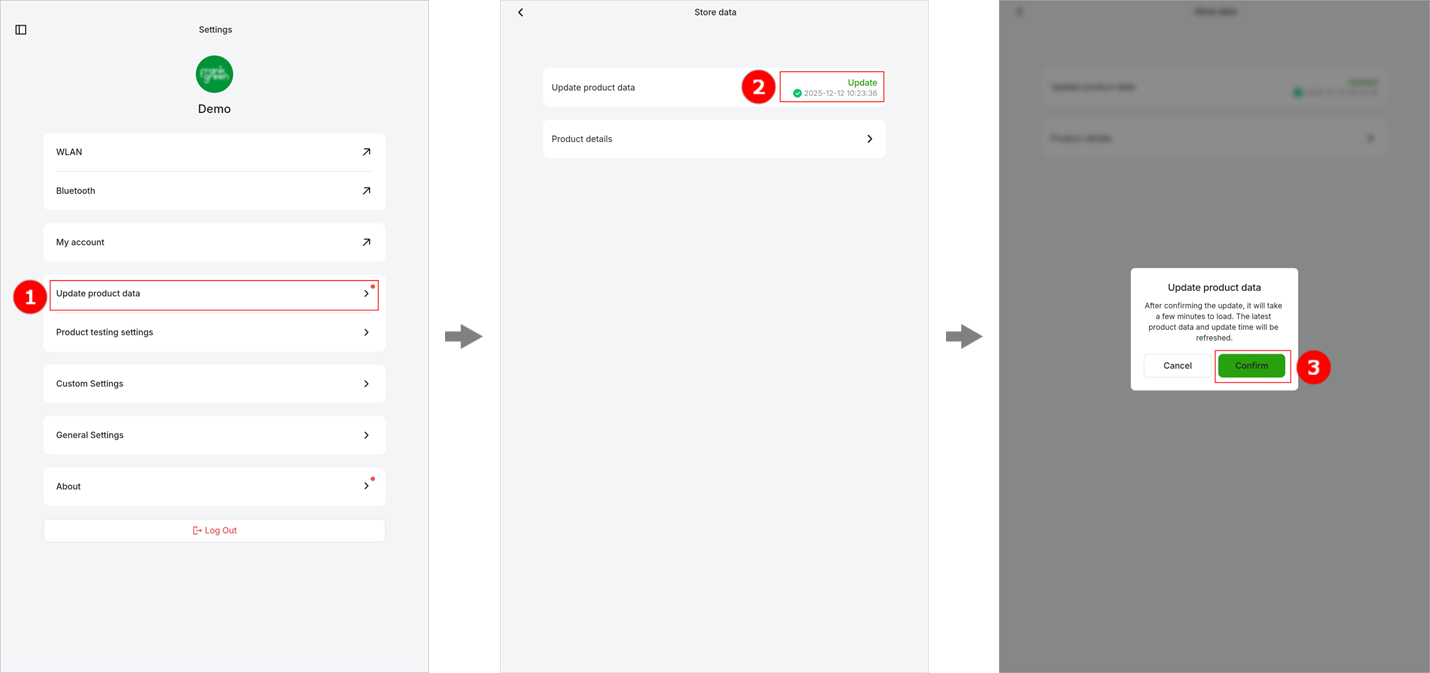
2. View merchant orders/Update data
- Update product data
(1) Tap the profile > Settings to enter the settings page.

(2) Tap Update product data > Update. In the dialog box that is displayed, tap Confirm and wait for the data update to complete.
- Update software version
(1) Tap the profile > Settings to enter the settings page.

(2) Tap About > Software update, and download the new software version.

- Switch the language/Update language pack
(1) Tap the profile > Settings to enter the settings page.

(2) Tap General Settings > Language. The system will automatically get the latest language pack.
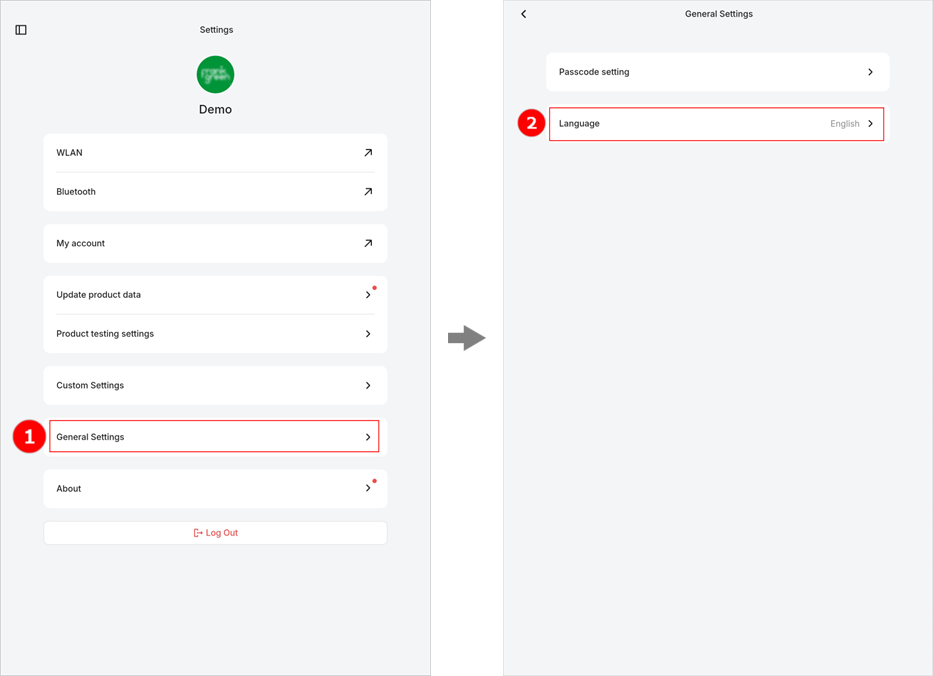
(3) After the language pack is updated, select the desired language from the language list.
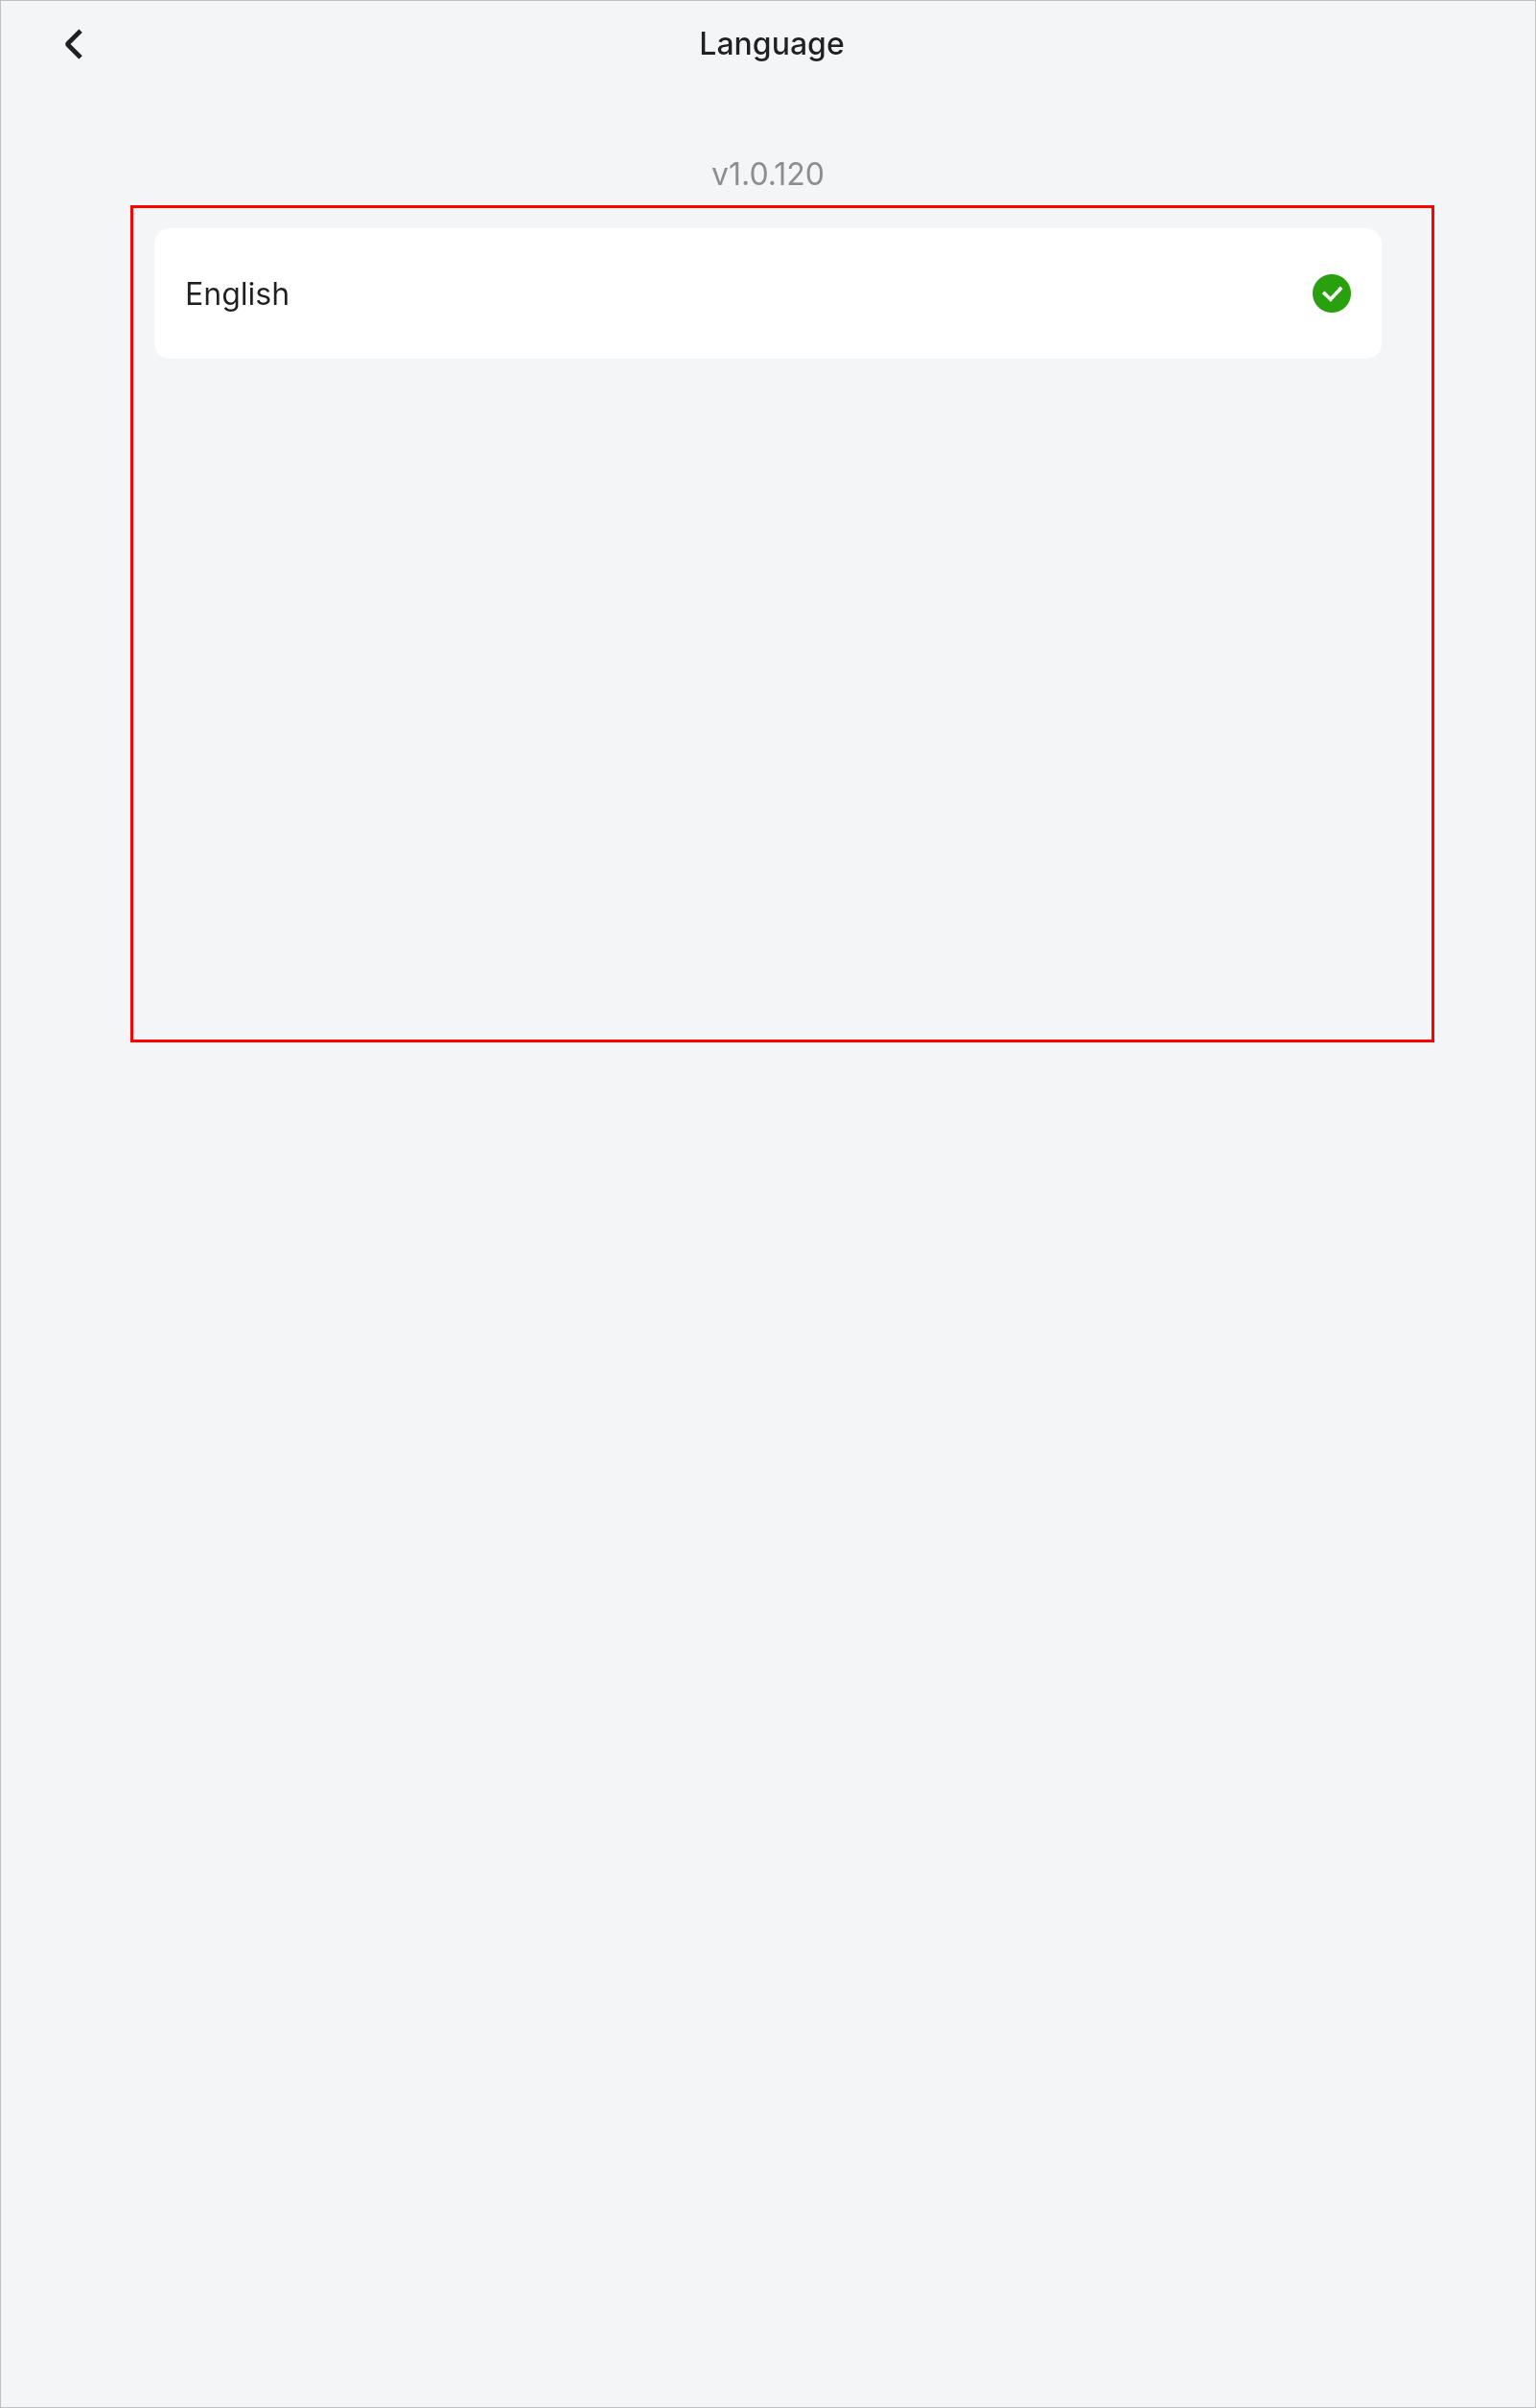
Note: The languages displayed in the language list are those configured on the backend of Customthings.
Parameter settings and adjustment
Test position focus
Note:
- A jig is used to secure the product during the processing, so you do not need to reposition the product or adjust the focus.
- Before the test, ensure that you have connected the terminal device and laser device.
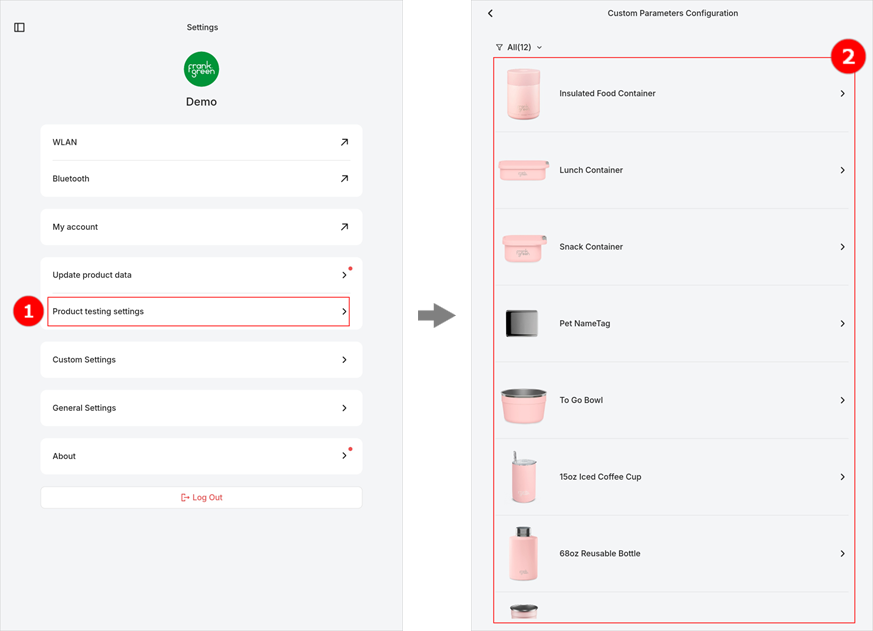
1. On the homepage, tap the profile > Settings to enter the settings page.
2. Tap Product testing settings. On the Custom Parameters Configuration page, select the product to be tested.
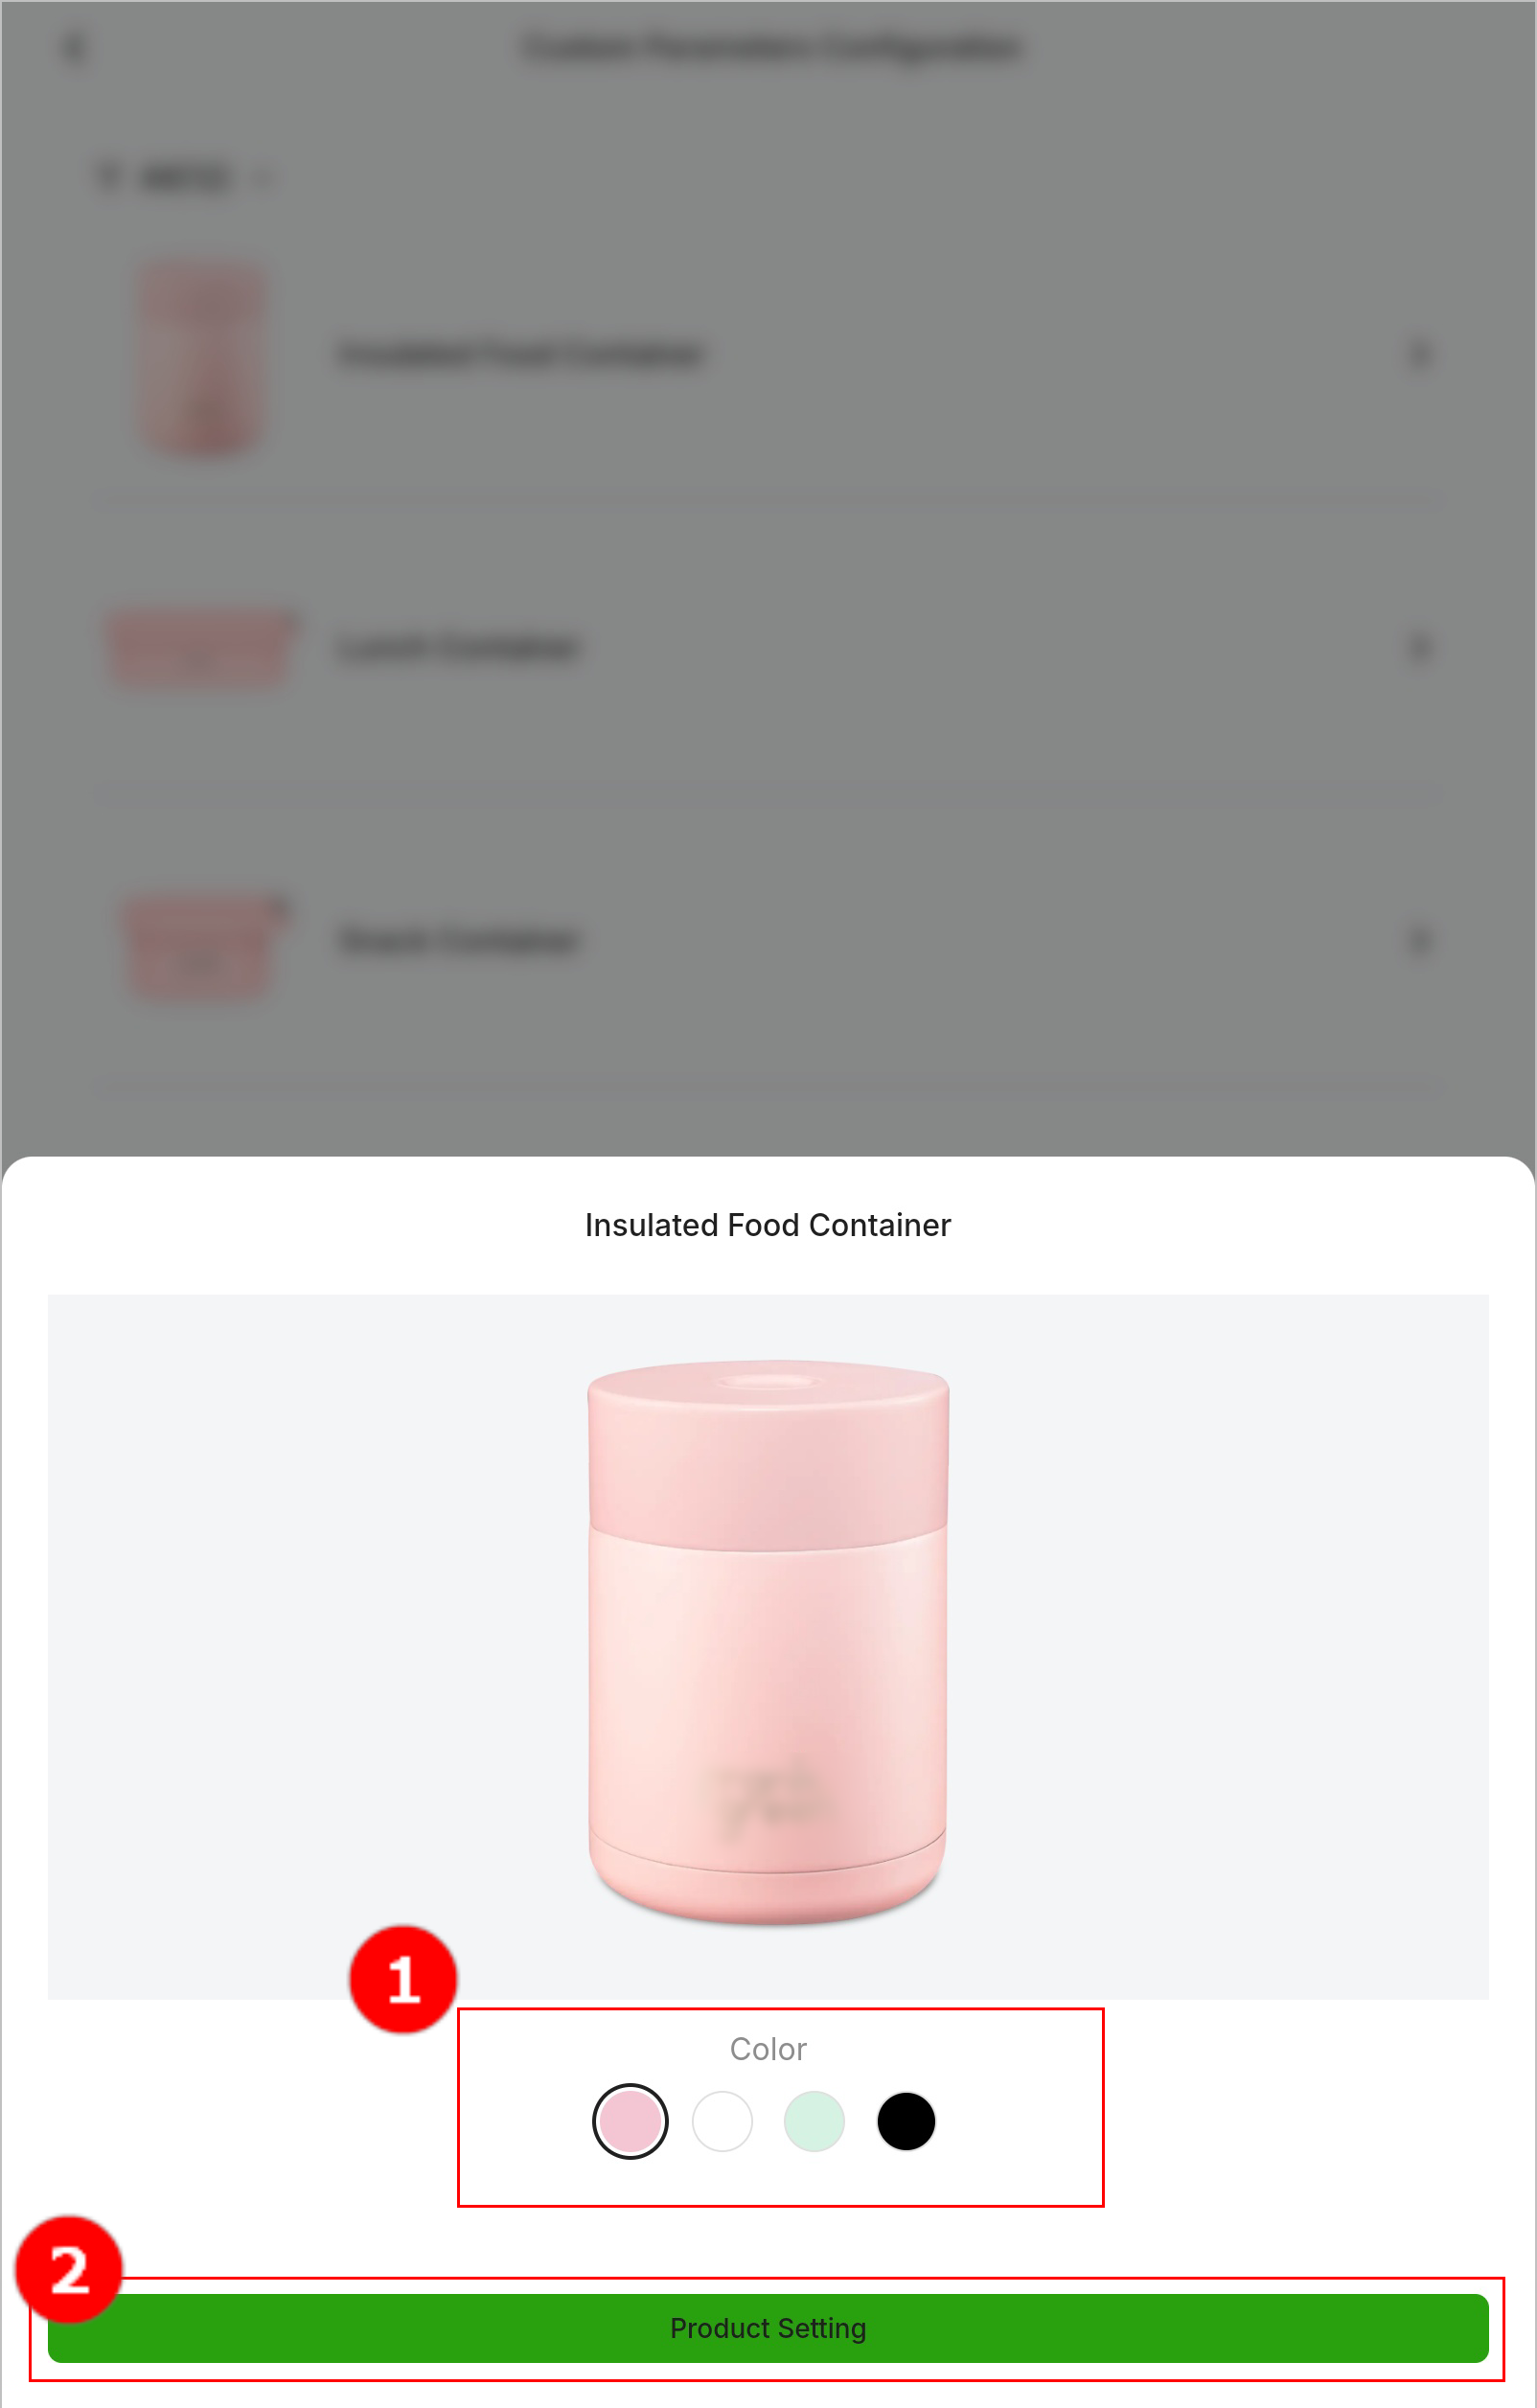
3. Select the product specification and tap Product Setting.
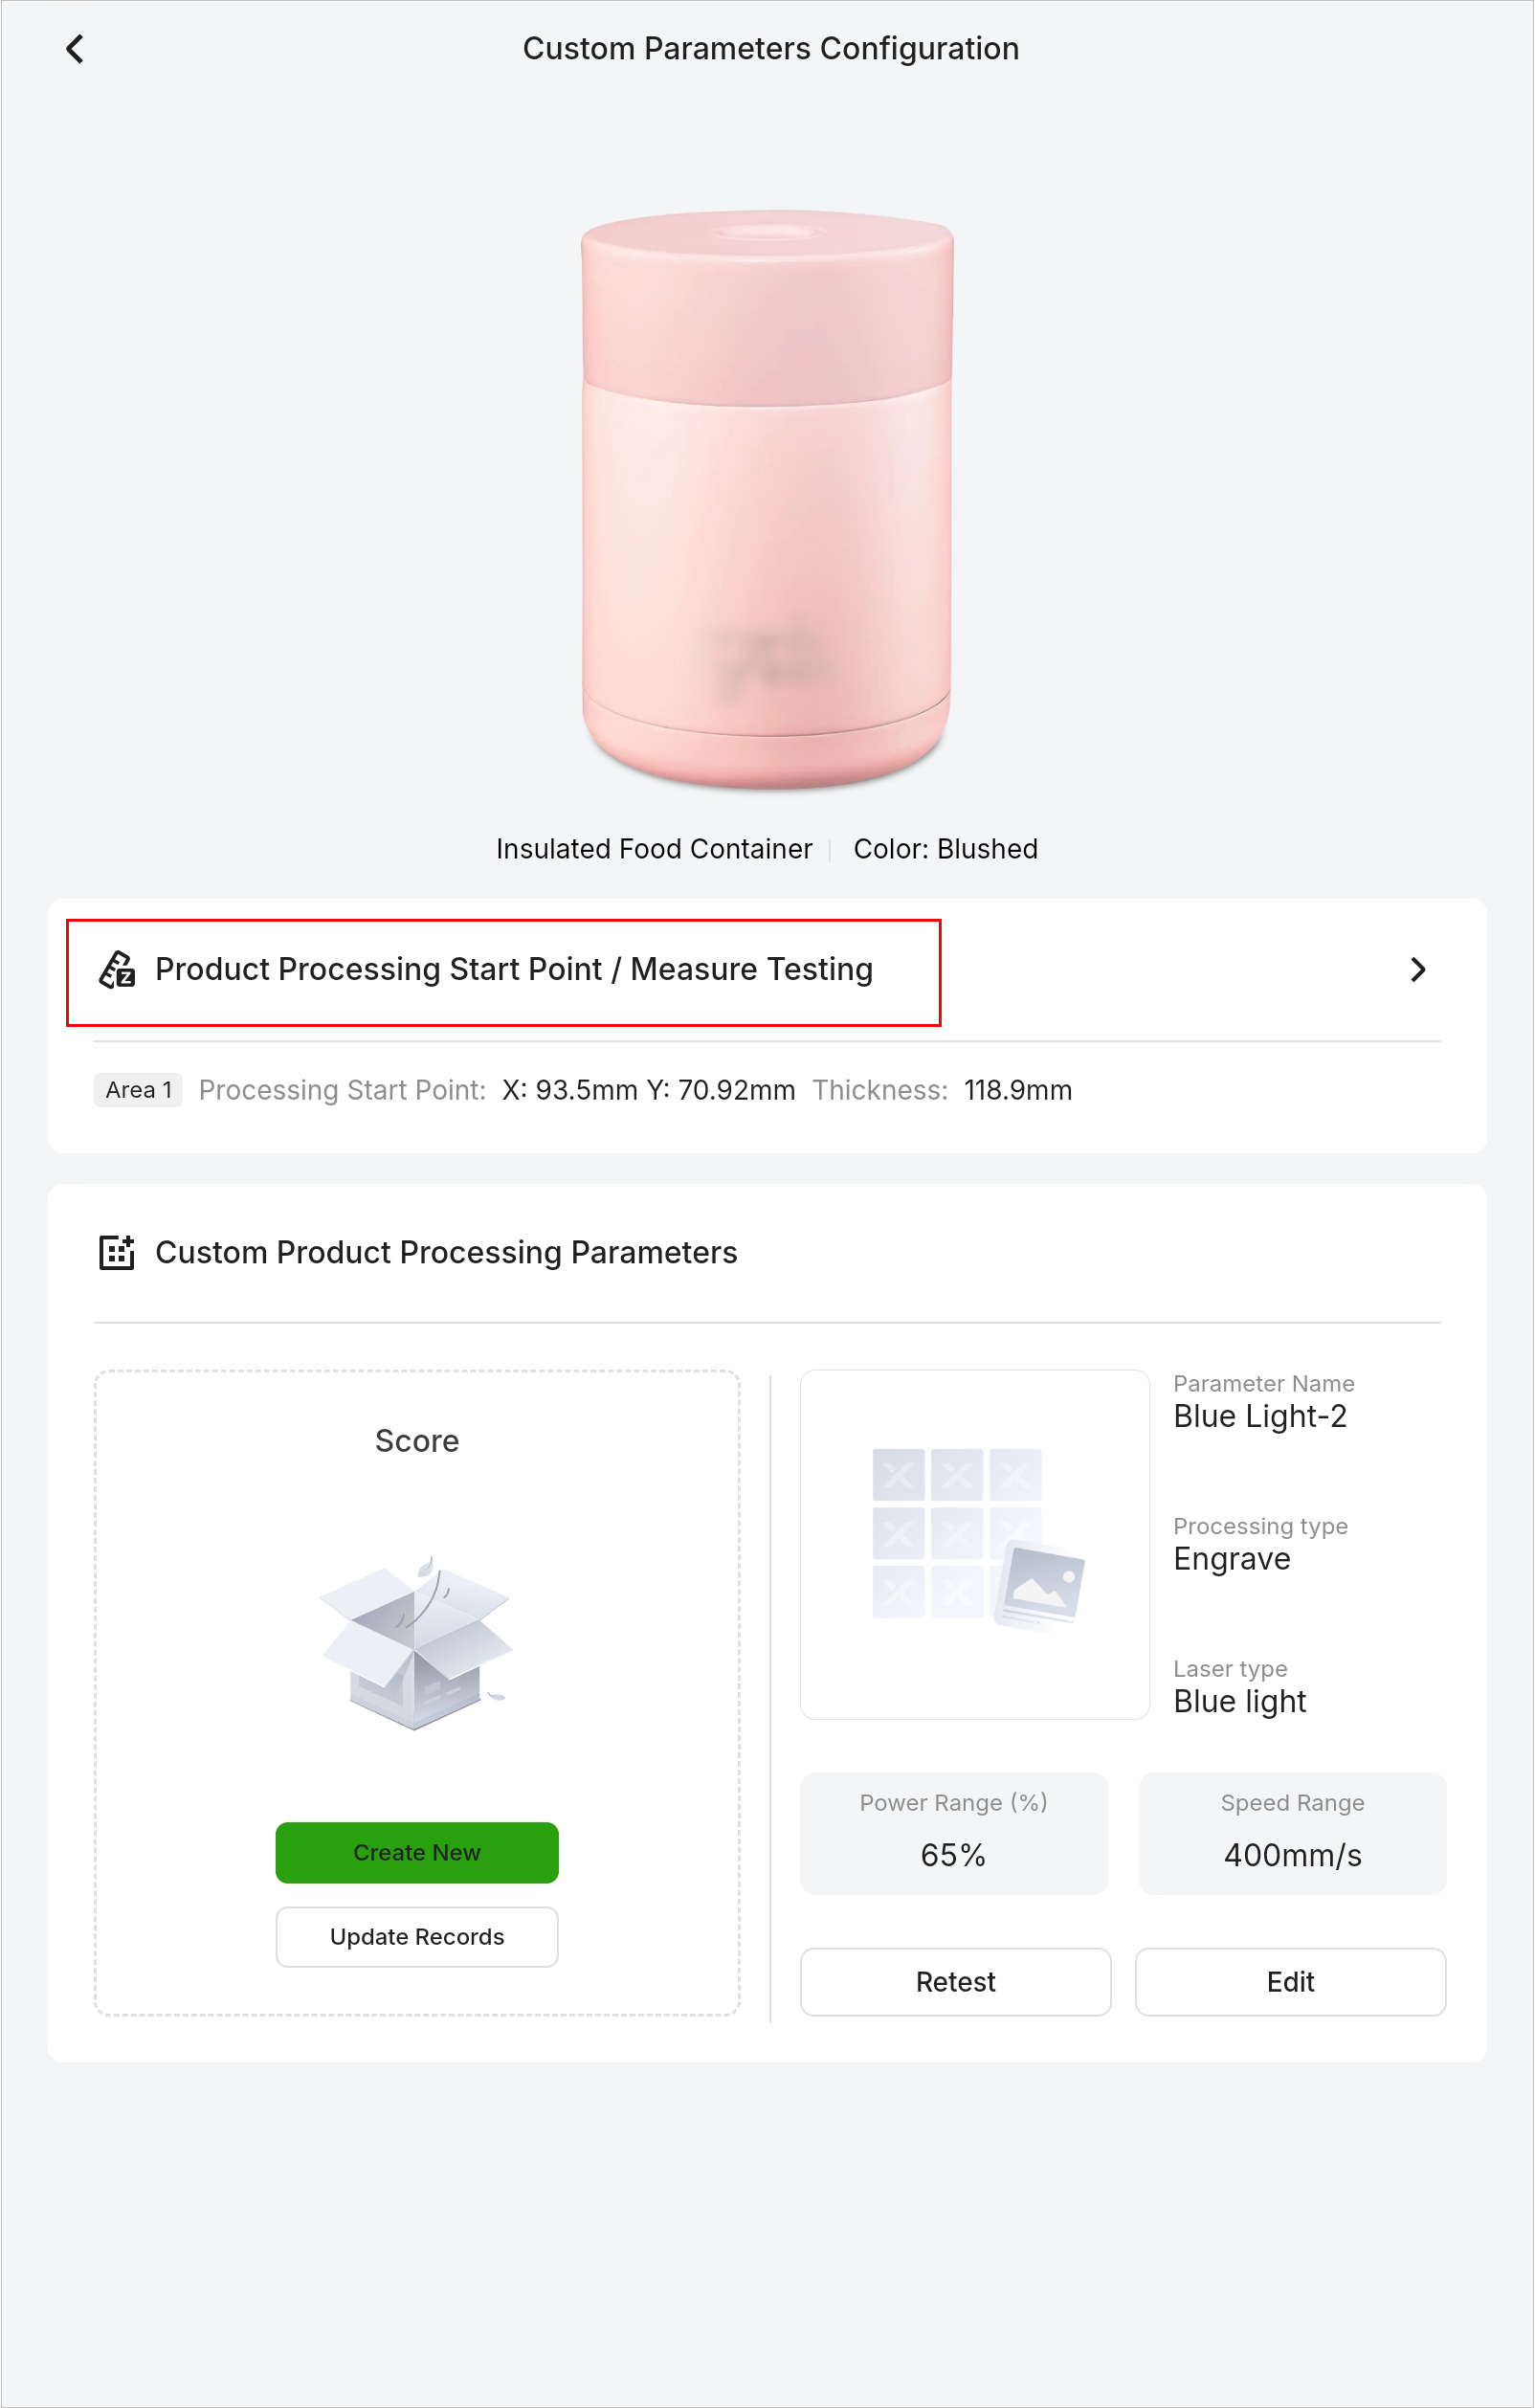
4. Tap Product Processing Start Point / Measure Testing.
5. In the displayed dialog box, select the desired device to enter the Process page.
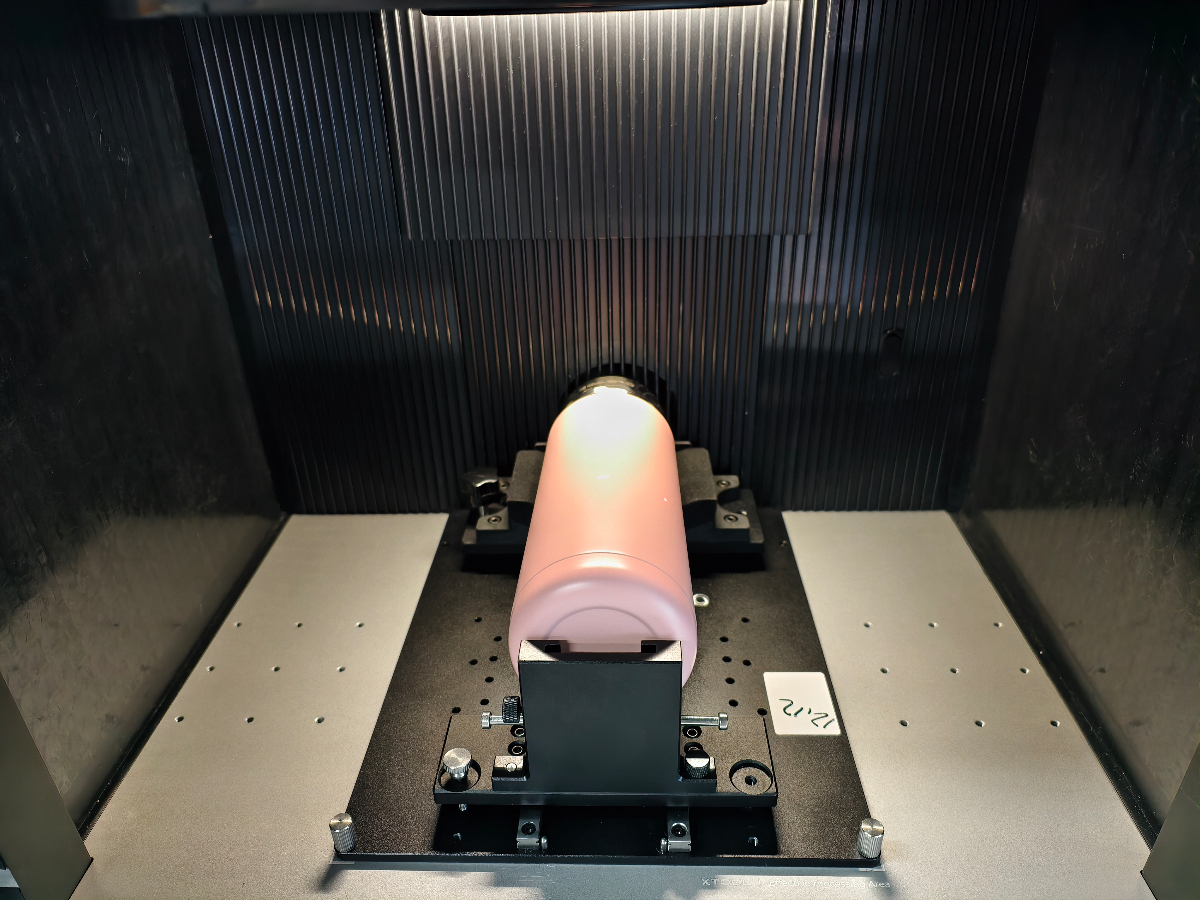
6. Secure the material to be tested using the jig, place it into the laser device, and close the protective enclosure.
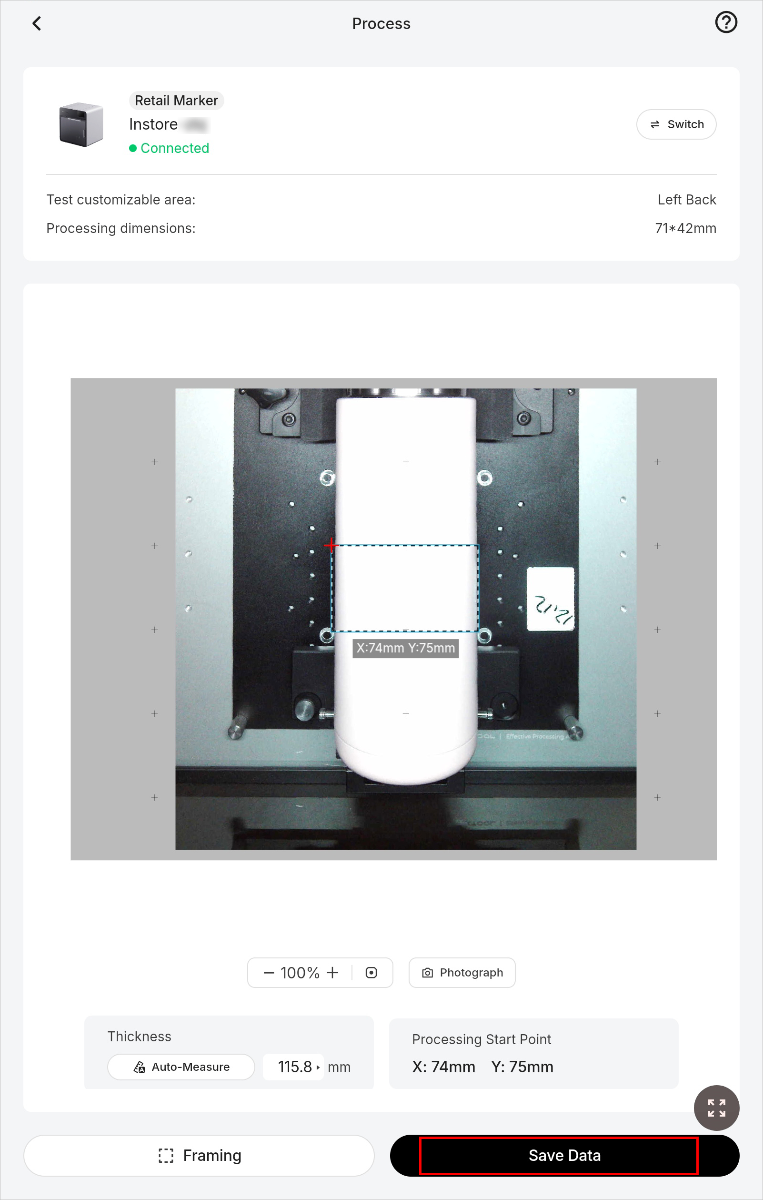
7. Tap Photograph to shoot the background. Then, tap Auto-measure. After the focusing is complete, the measured focal length is displayed in the text box to the right of the Auto-measure button.
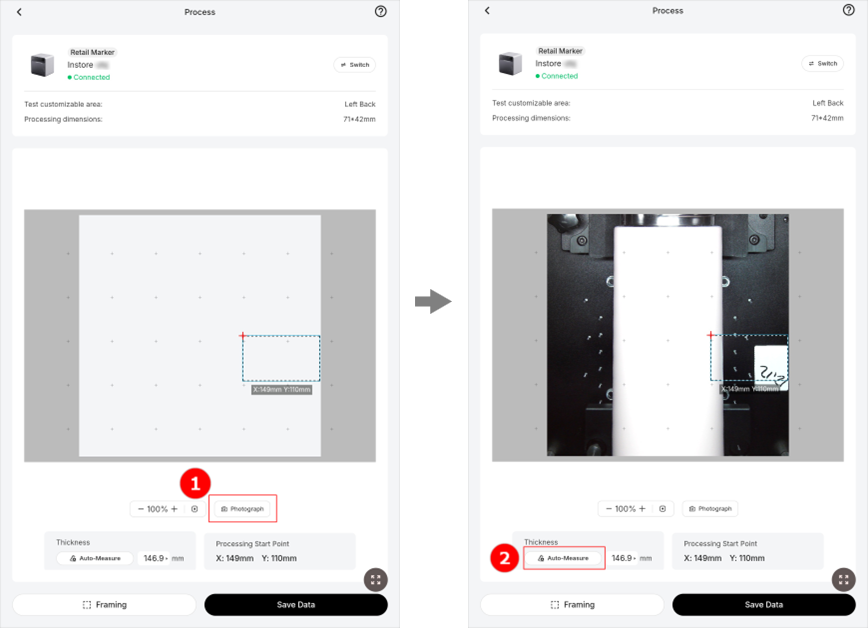
8. Manually drag the customizable area to the target position, then tap Framing to preview the processing area.
Note: If the processing area is not ideal, repeat this step until it meets expectations.
9. Tap Save data. The saved data will be applied in the processing and parameter testing process.
Test product parameters
Note:
- Currently, parameter testing is only available for Score and Engrave.
- Currently, parameter testing is only available for products with a customizable area larger than 1 cm x 1 cm.
- The parameter matrix is currently set to a small value. Before testing, take photos for reference to facilitate comparison during data entry.
1. On the homepage, tap the profile > Settings to enter the settings page.

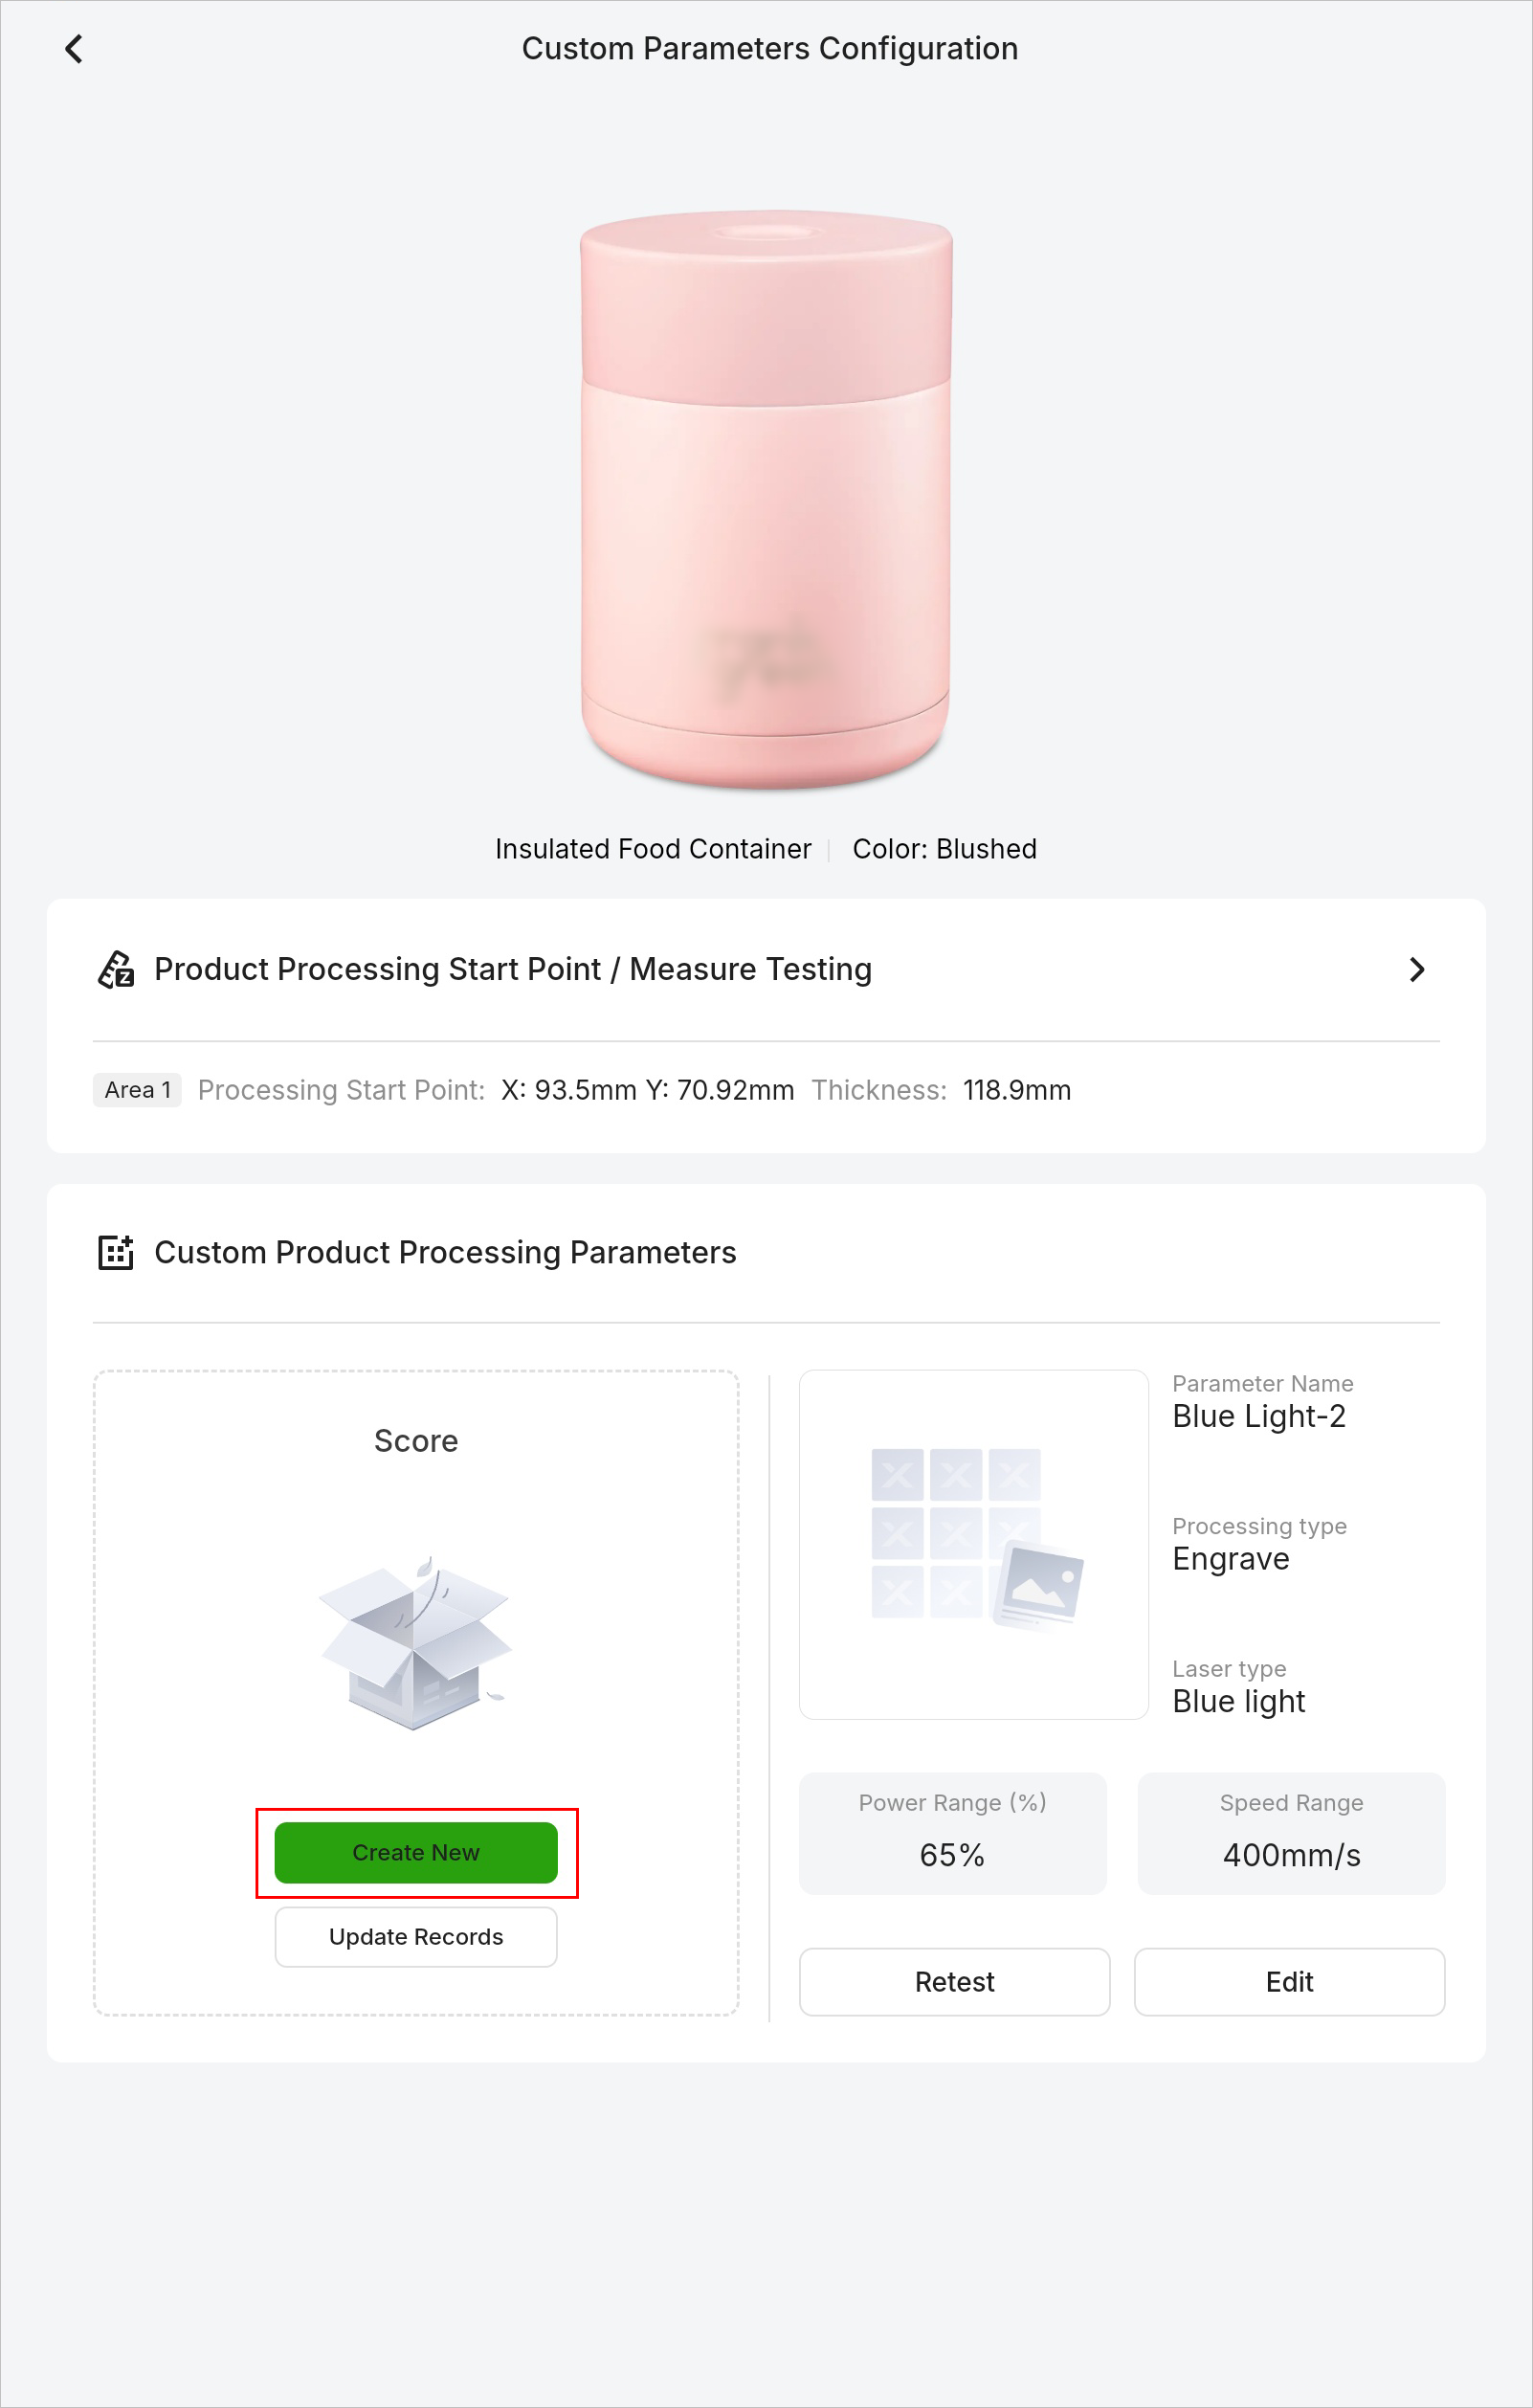
2. Tap Product testing settings. On the Custom Parameters Configuration page, select the product to be tested.

3. Select the product specification and tap Product Setting.

4. In the Custom Product Processing Parameters area, tap Create New.
5. Select the laser type and parameter matrix template for a material similar to that being tested.
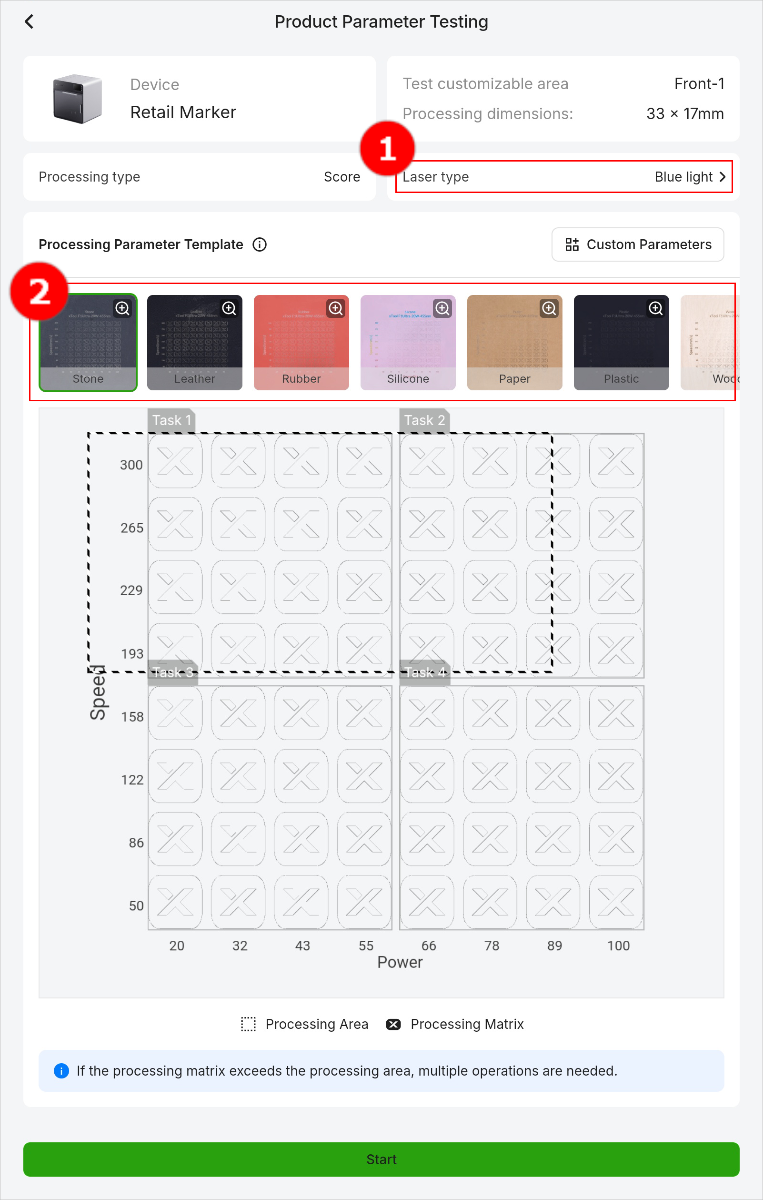
6. Record the parameter range with a clearer processing pattern in the parameter matrix template, for example, the power 50-100 and the speed range of 100-200, as reference values for further refining the parameter range in the matrix.
7. Tap Custom Parameters and set parameters.
- Number of Matrix Columns: defines the adjustment granularity of the speed dimension. The more columns, the smaller the speed adjustment step size.
- Number of Matrix Rows: defines the adjustment granularity of the power dimension. The more rows, the smaller the power adjustment step size.
- Power Range: determines the processing depth.
- Speed Range: determines the processing duration.
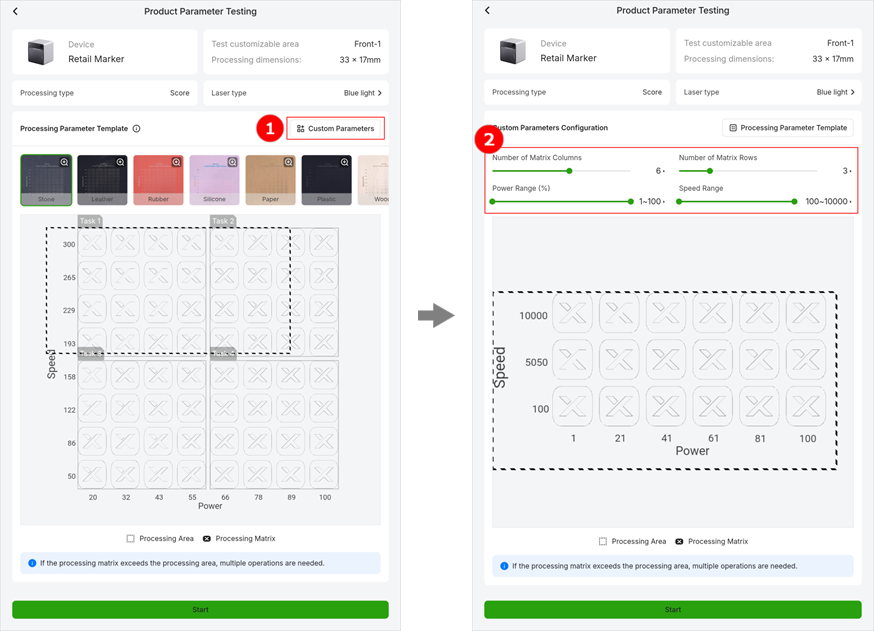
Note: If the customizable area is too small, you can split the test matrix into multiple tasks. A maximum of 4 splits is supported.
9. Tap Start. In the displayed dialog box, select the desired laser device. After entering the Process page, the system automatically performs focusing.
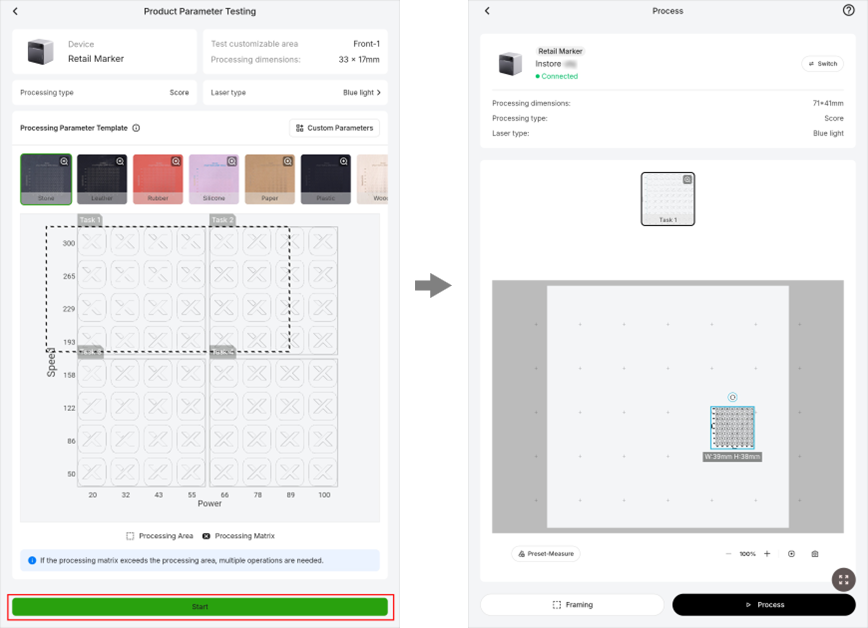
Note: The system performs focusing based on the focal length configured on the backend or the results of the focal length test on the frontend.
10. Tap the camera icon to shoot the background, and drag the matrix to adjust its position. Then, tap Framing to preview the processing area.
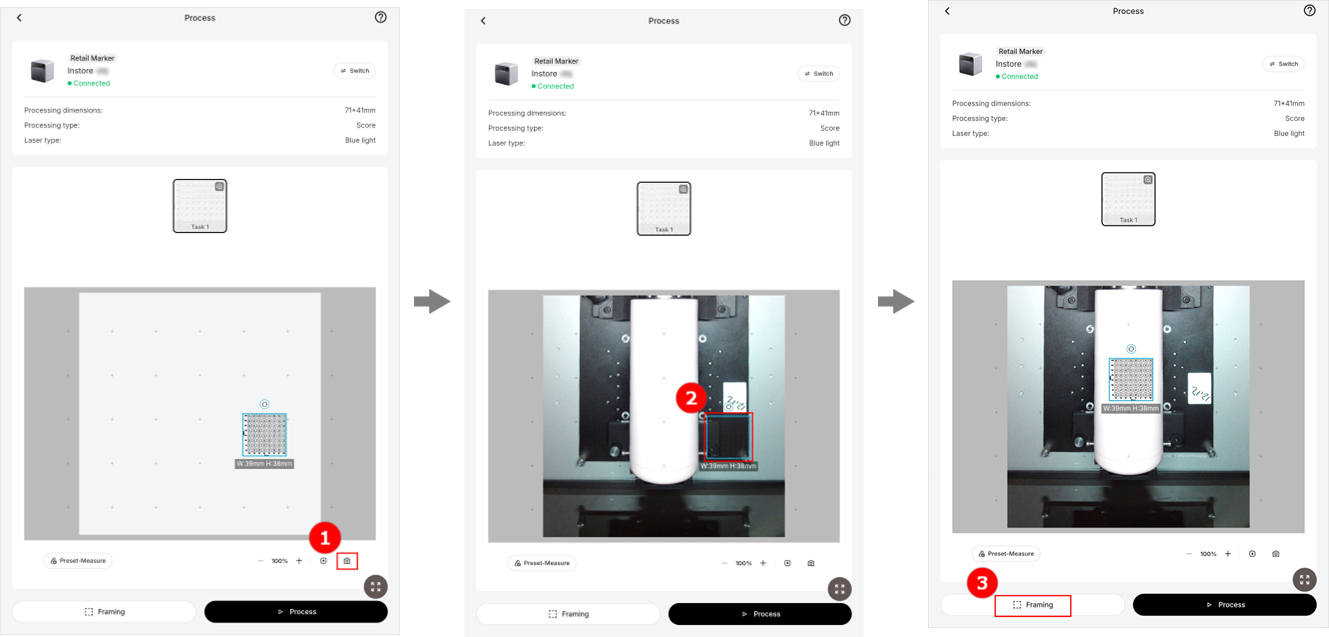
Note: If the processing area is not ideal, repeat this step until it meets expectations.
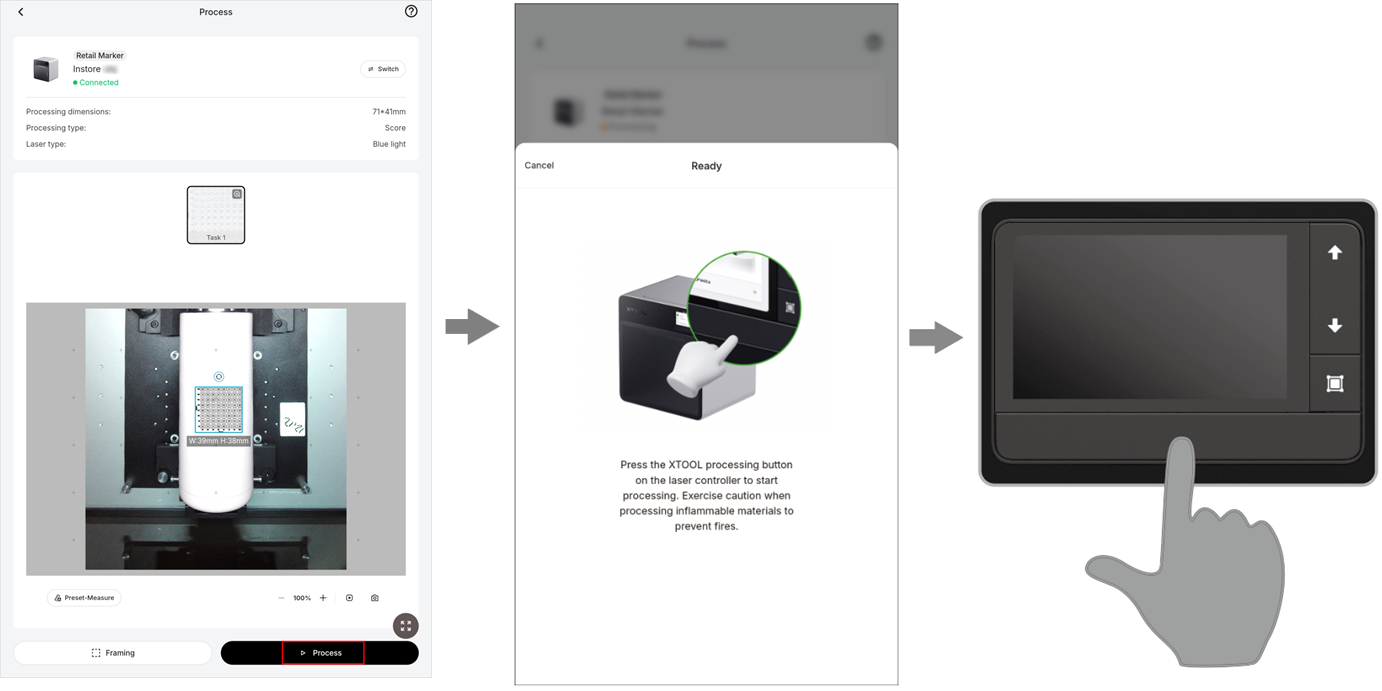
11. Tap Process, and the file is automatically delivered to the laser device. When the software shows Ready, press the start/stop button of the touchscreen controller to start processing.
12. After processing, record the parameter values for the best processing results. The X-axis represents power while the Y-axis represents speed.
13. Narrow the parameter range through multiple processing tests until precise values are obtained. For example, if initial tests show that power 40-60 and speed 100-200 produce favorable results, conduct additional matrix tests within this range to derive more precise parameter values.
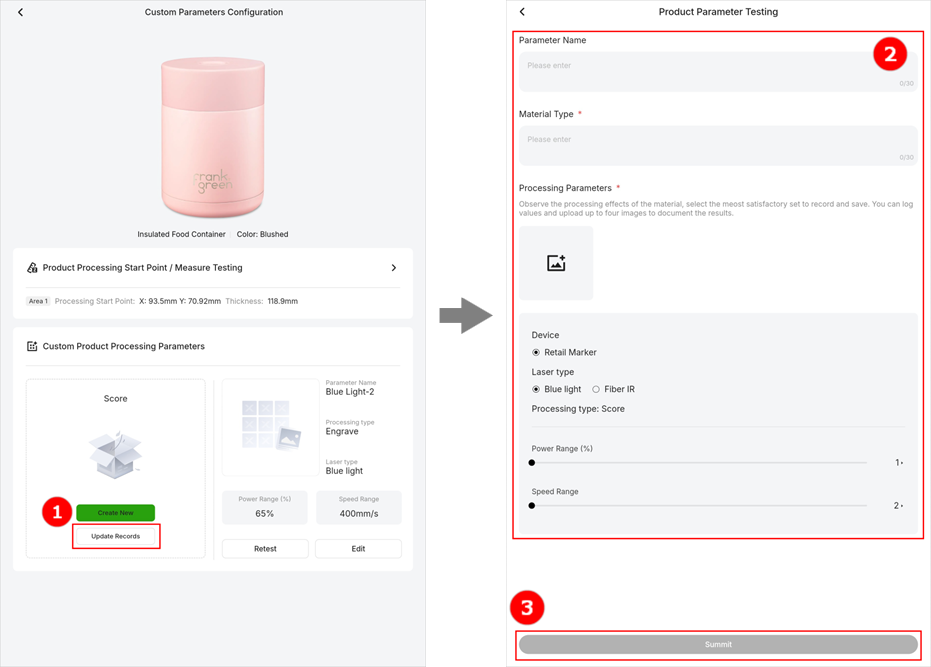
14. After obtaining the precise parameter values, return to the Custom Parameters Configuration page and tap Update Records. On the Product Parameter Testing page, enter the parameter name and material type, upload the processing image, set the power and speed, and tap Submit. Submitted parameters can be viewed on the Custom Parameters Configuration page and you can edit or test them again.
Install Customthings on iPad
Refer to the following steps to install Customthings on your iPad.
1. Access https://testflight.apple.com/join/RrcFwUfD in the browser.
2. Scroll down the page and tap Install Testflight for "beta iOS or iPadOS". Then, tap the download button and tap OPEN after “Testflight" is installed.
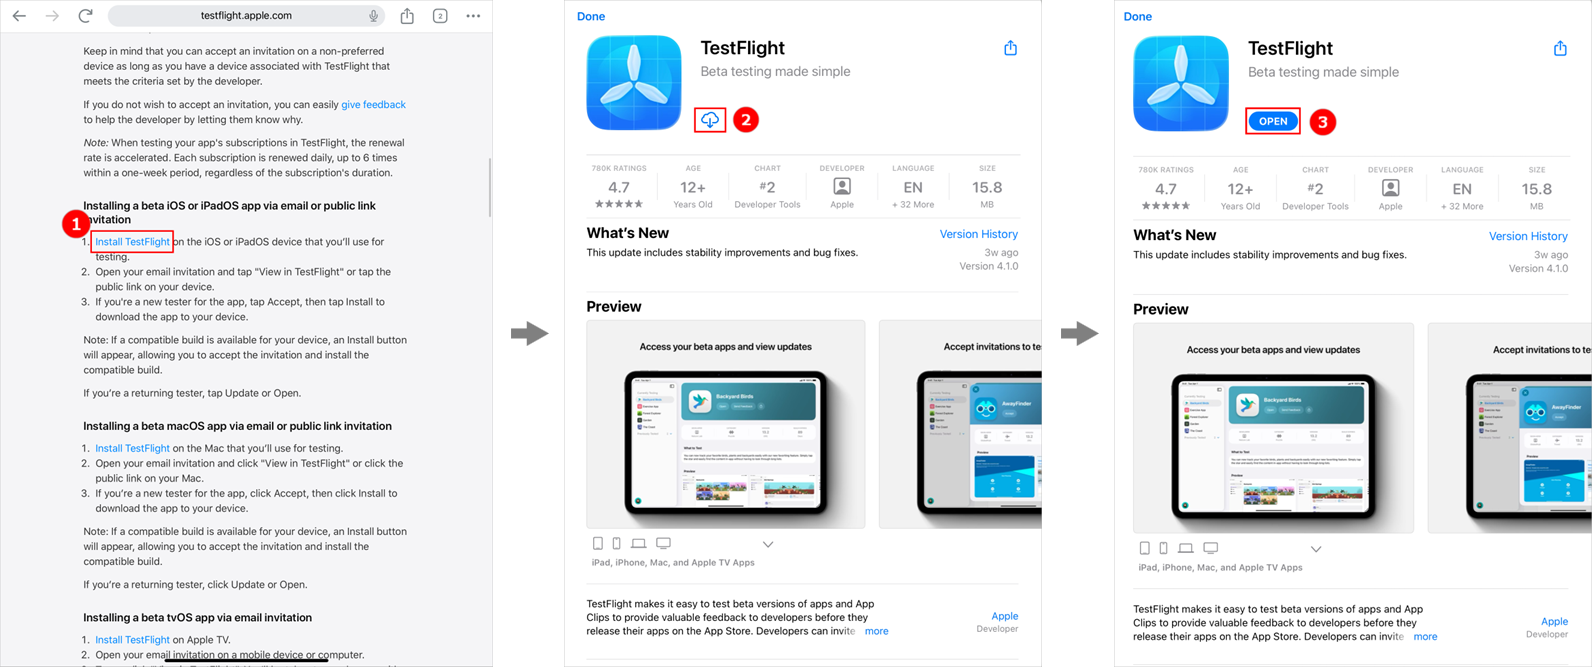
3. Tap INSTALL to install Customthings. After installation, tap OPEN to use it.

Documentation feedback
Help improve this content by providing feedback. If this content did not meet your requirements, select "No" in the "Was this page helpful?" section below. Include specific details about what was unclear or missing in the pop-up suggestion box. Feedback submissions are reviewed by xTool technical writers to enhance future documentation.
Services & Help
Learn & Education

Copyright © 2025 xTool All Rights Reserved.