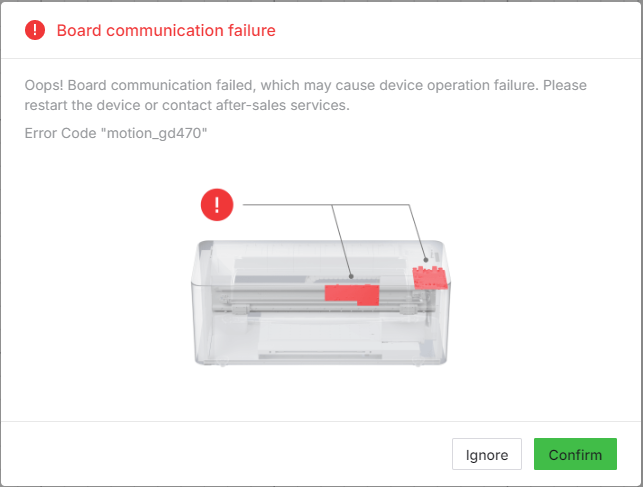
Issue description
While you are using your xTool Apparel Printer, an error message stating "Board communication failure" may appear in xTool Creative Space (XCS), xTool Studio software, or on the printer's LCD control panel. The associated error code is typically motion_gd470. This error code (motion_gd470) indicates a communication problem between the High-speed PCB and the Motion Controller Board within the printer.
- Consult the following content for troubleshooting advice.
Potential causes
- Environmental Interference: External factors may be temporarily disrupting communication.
- Poor Cable Connection: The connection cable between the High-speed PCB and the Motion Controller Board may be loose or have a poor connection.
- Board Malfunction: Either the High-speed PCB or the Motion Controller Board (or both) may be experiencing failure.
Troubleshooting procedures
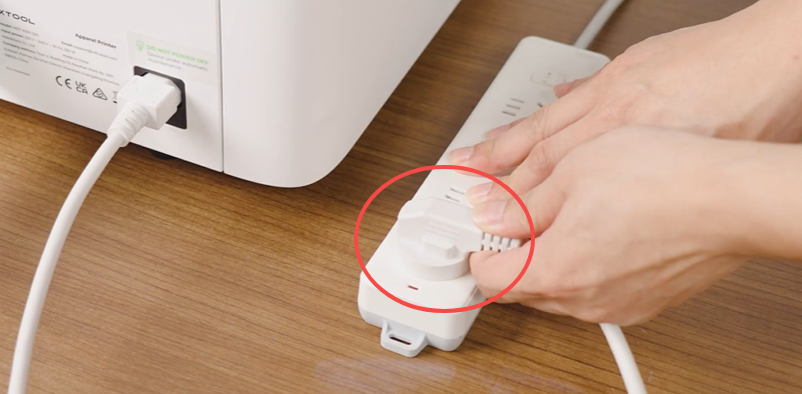
Step 1: Power cycle the printer
Environmental factors can sometimes cause temporary communication glitches. A full power cycle can often resolve these problems.
- Power cycle the printer:
- Unplug the power cord from the wall outlet (not from the machine).
- Wait 10 minutes before reconnecting.
- Plug the power cord back into the outlet and power on the machine.
- Test the connection:
- If the error persists, proceed to Step 2.
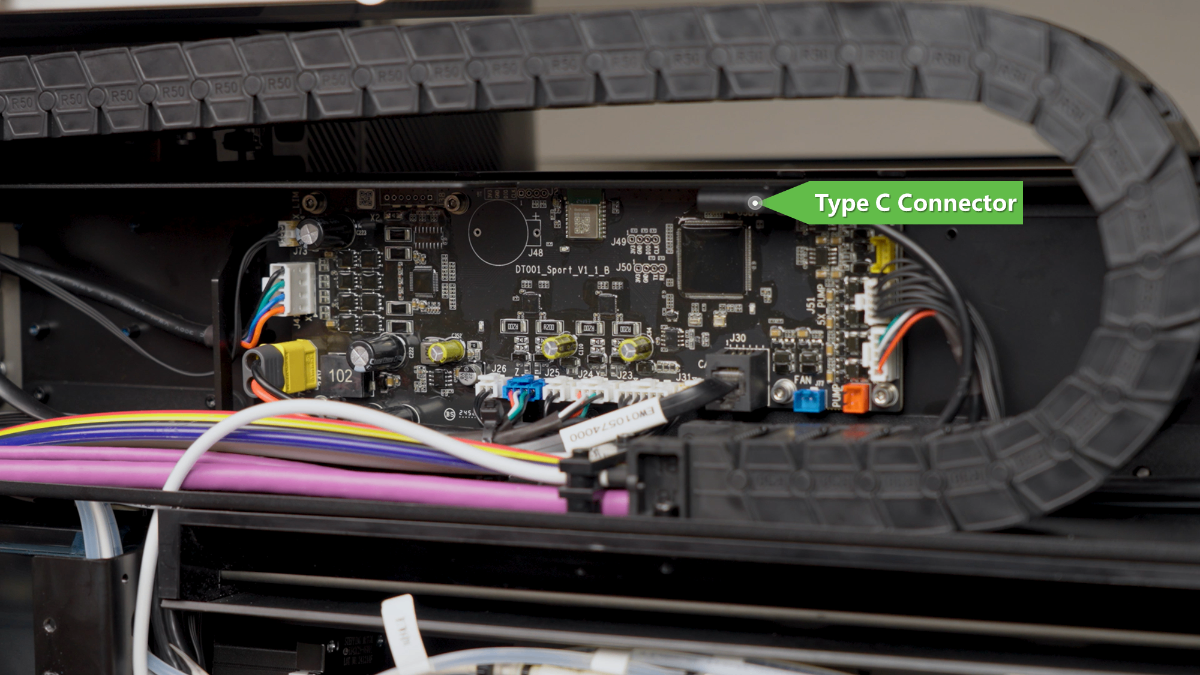
Step 2: Check & test the connection cable
This step involves inspecting the Type A to Type C data cable that connects the two boards.
⚠️ Caution: Power off and unplug the printer before beginning this procedure.
- Check Connection on the Motion Controller Board (Type-C Connector):
- To access the Motion Controller Board, you will need to remove the printer's rear panel.
- Video Guide: For detailed visual instructions, refer to the official xTool support video: Replace the Motion Controller Board for xTool Apparel Printer
- Locate the Type-C connector on the Motion Controller Board (see image below for reference).
- Carefully disconnect the connector from its port, inspect for damage, and then firmly reconnect it, ensuring it is securely seated.
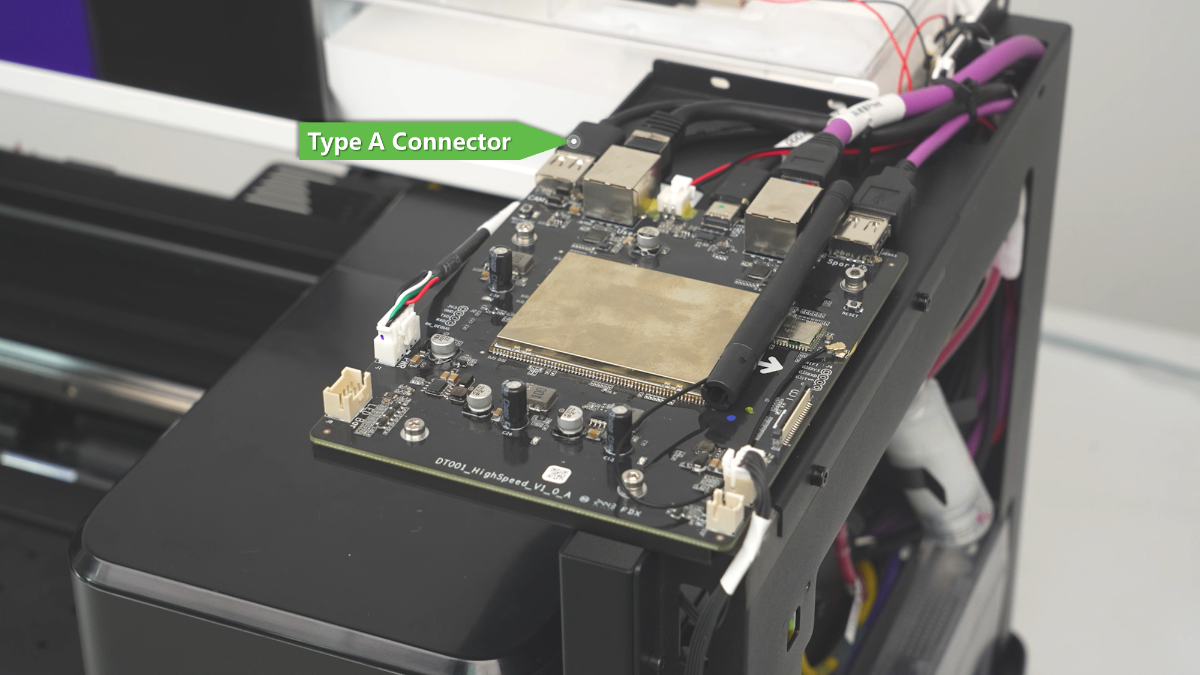
- Check Connection on the High-speed PCB (Type-A Connector):
- To access the High-speed PCB, you will need to remove the printer's right-side cover. You can use a slotted screwdriver or a similar flat tool to help release the cover clips.
- Video Guide: For detailed visual instructions, refer to the official xTool support video: Replace the High-speed PCB on xTool Apparel Printer
- Locate the Type-A connector on the High-speed PCB.
- Carefully disconnect and then firmly reconnect the connector, ensuring a secure connection.
💡 Note: You may encounter yellow adhesive glue securing the plug. Use a tool to gently clear this glue if necessary.
- Test the Connection:
- Power on the printer and check if the error message reappears.
Step 3: Test with a new cable (Optional)
If the error message still appears after reseating the original cable, the cable itself may be glitching.
- Obtain a Cable: Use a standard USB Type-A to Type-C data cable.
- External Connection Test:
- You do not need to route this test cable through the printer's internal cable chains.
- Simply run the new cable externally from the High-speed PCB port to the Motion Controller Board port.
- Test: Power on the printer.
- Error Disappears: The original internal cable is glitching. Replace the cable.
- Error Persists: The issue lies with the boards. Proceed to Step 4.
Step 4: Replace the failed board
If the "Board communication failure" error continues after the previous steps, it is likely that either the high-speed PCB or the Motion Controller board (or both) has a hardware failure.
Advanced Intervention:
- This step requires advanced technical intervention. Please proceed to the "Still experience issue" section to contact xTool Customer Service for further diagnosis.
- If deemed necessary by xTool technical experts, the upper CAN board or the Motion Controller board (or both) may need to be replaced.
- Follow the procedures outlined in this tutorial for detailed instructions:
If the problem persists
Should the issue persist after completing the preceding steps, submit a ticket via the "Submit a Ticket" button in the "Help Ticket" section below. The standard response time for xTool Customer Service is one business day.
Include the following details to help better diagnose the problem:
1 Work log files
Please export the logs based on the software you are using.
Method A: Via xTool Creative Space (XCS)
- Click the Device Settings icon (gear symbol) in the top-right corner.
- Select the Basic info tab.
- Scroll down to Export log and click Export.
- A folder will be generated. Compress (Zip) this entire folder into a single file and attach it to your ticket.
Method B: Via xTool Studio
- Click the three dots icon next to the device image.
- Select Device Settings (gear icon).
- Select the Basic info tab on the left.
- Scroll down to Export log and click Export.
- A folder will be generated. Compress (Zip) this entire folder into a single file and attach it to your ticket.
2 Serial number (SN)
Provide the SN for both your xTool Apparel Printer and xTool OS1 Oven.
3 View firmware version
Provide the firmware version currently installed on both devices.
4 Video evidence (Highly recommended):
- Any additional videos showing the issue and your troubleshooting steps where applicable.
Documentation feedback
Help improve this content by providing feedback. If this content did not meet your requirements, select "No" in the "Was this page helpful?" section below. Include specific details about what was unclear or missing in the pop-up suggestion box. Feedback submissions are reviewed by xTool technical writers to enhance future documentation.
Services & Help
Learn & Education

Copyright © 2025 xTool All Rights Reserved.