
Overview
This tutorial guides you through configuring the laser module's serial number (SN) on xTool M1 Ultra when the xTool Creative Space (XCS) software fails to recognize the installed laser module.
Applicable scenario
This procedure should be performed only if you encounter the following situation while using your xTool M1 Ultra:
- The xTool Creative Space (XCS) software does not recognize the installed processing module (e.g., the laser module).
Before proceeding, ensure that:
- All physical connections are confirmed to be secure. All connection-related issues must be ruled out.
- Technical diagnosis: xTool technical engineers have diagnosed the issue as being due to the absence of the laser module's serial number in the machine's memory, thereby necessitating manual configuration.
Once you have verified these conditions, proceed to write the module's serial number (SN) manually into the machine’s memory.
Method 1: Write the SN
Before you begin
Identify appropriate condition
The method for writing the SN differs depending on your computer's operating system and how it is connected to your M1 Ultra. Choose the appropriate section below:
- Section A: Connected via USB on a Windows computer.
- Section B: Connected via USB on a Mac computer.
- Section C: Connected via Wi-Fi (applicable to both Windows and Mac computers).
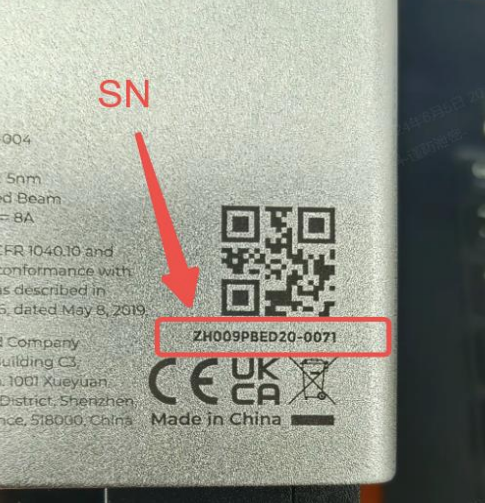
Identify laser module SN
- Locate the Serial Number (SN) for your processing module.
- It is printed directly on the body of the module itself (e.g., on the laser module).
Configure
Section A: USB connection - Windows PC
Step 1: Write SN
- Open a web browser.
- In the address bar, construct the following URL. Replace the text (
YOUR_MODULE_SN_HERE) with the actual SN from your processing module. - Command Template:
http://201.234.3.1:8080/cmd?cmd=M81S2N1C+YOUR_MODULE_SN_HERE+&dest=35&wait=false - Example: If your module's SN is
ZH009PBED20-0004, the complete URL will be:http://201.234.3.1:8080/cmd?cmd=M81S2N1CZH009PBED20-0004&dest=35&wait=false - Copy and paste the complete URL into your browser's address bar and press Enter.
Step 2: Verify SN
- In a new browser tab, enter the following URL to verify that the SN was written successfully:
http://201.234.3.1:8080/cmd?cmd=M81S2N0&dest=35&wait=true - If the SN was written successfully, the browser page will display a success message similar to this:
{"result":"ok", "value": "M81 CZH009PBED20-0004"}
💡 Note: The SN in the "value" field should match the one you entered.
Section B: USB connection - Mac PC
Step 1: Write SN
- Open a web browser.
- In the address bar, construct the following URL. Replace the text (YOUR_MODULE_SN_HERE) with the actual SN from your processing module.
- Command Template:
http://201.234.4.1:8080/cmd?cmd=M81S2N1C+YOUR_MODULE_SN_HERE+&dest=35&wait=false - Example: If your module's SN is
ZH009PBED20-0004, the complete URL will be:http://201.234.4.1:8080/cmd?cmd=M81S2N1CZH009PBED20-0004&dest=35&wait=false - Copy and paste the complete URL into your browser's address bar and press Enter.
Step 2: Verify SN
- In a new browser tab, enter the following URL to verify that the SN was written successfully:
http://201.234.4.1:8080/cmd?cmd=M81S2N0&dest=35&wait=true - If the SN was written correctly, the browser page will display a success message similar to this:
{"result":"ok", "value": "M81 CZH009PBED20-0004"}
💡 Note: The SN in the "value" field should match the one you entered.
Section C: WiFi Connection (Windows or Mac)
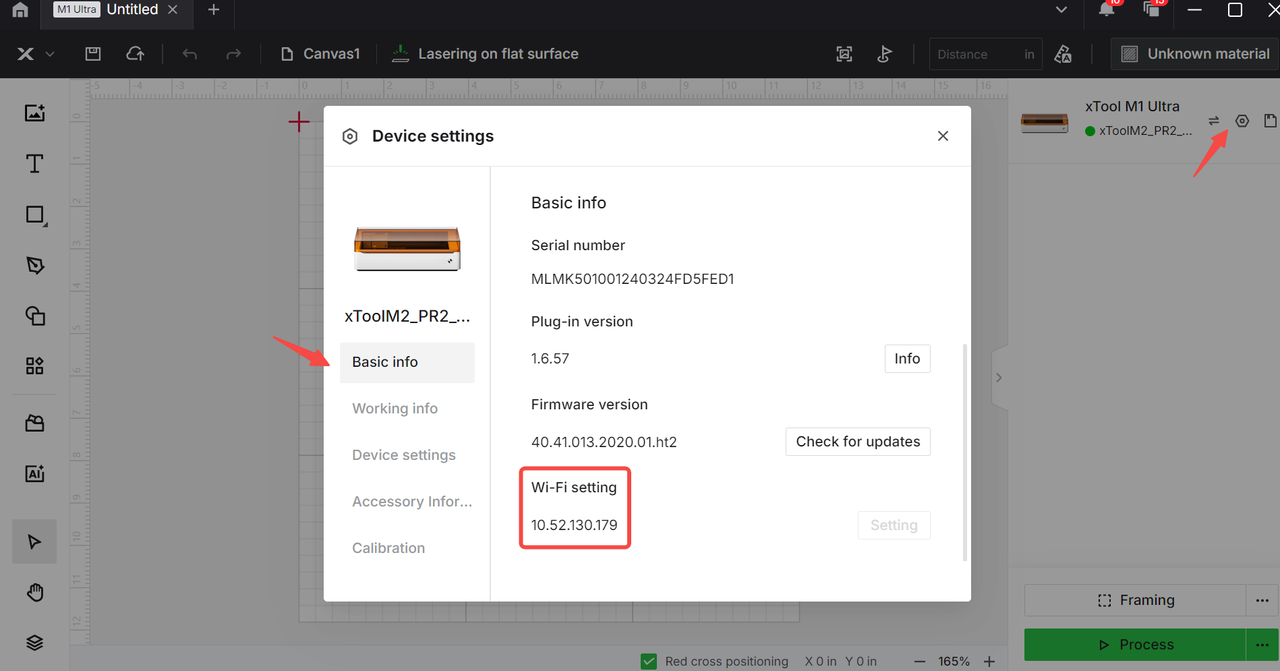
Step 1: Locate your M1 Ultra IP address
- Ensure your M1 Ultra is connected to your Wi-Fi network and is recognized in the XCS software.
- In XCS, go to the Device settings panel.
- Locate and note down your machine's IP Address.
Step 2: Write SN
- Open the Google Chrome web browser.
- In the address bar, construct the following URL.
- Replace the text (
M1_ULTRA_IP_ADDRESS) with the IP address you found in XCS. - Replace the text (
YOUR_MODULE_SN_HERE) with the actual SN from your processing module.
- Replace the text (
- Command Template:
http://+M1_ULTRA_IP_ADDRESS+:8080/cmd?cmd=M81S2N1C+YOUR_MODULE_SN_HERE+&dest=35&wait=false - Example: If your machine's IP address is
192.168.1.100and your module's SN isZH009PBED20-0004, the complete URL will be:http://192.168.1.100:8080/cmd?cmd=M81S2N1CZH009PBED20-0004&dest=35&wait=false - Copy and paste the complete URL into your browser's address bar and press Enter.
Step 3: Verify SN
- In a new browser tab, enter the following URL (again, replacing
M1_ULTRA_IP_ADDRESSwith your machine's actual IP address) to verify:http://+M1_ULTRA_IP_ADDRESS+:8080/cmd?cmd=M81S2N0&dest=35&wait=true - If the SN was written correctly, the browser page will display a success message similar to this:
{"result":"ok", "value": "M81 CZH009PBED20-0004"}
💡 Note: The SN in the "value" field should match the one you entered.
Method 2: Use the SN Repair to write SN
Note: The method supports writing the SN of laser module only. The multi-function carriage and ink module are not supported.
Step 1: Download the SN Repair
Click the link to download the SN Repair, which is a web tool. Make sure that you have a browser installed on your computer in advance. It is recommended that you use Chrome.
Step 2: Connect the device to the computer
Ensure the device is connected to the computer via USB or Wi-Fi.
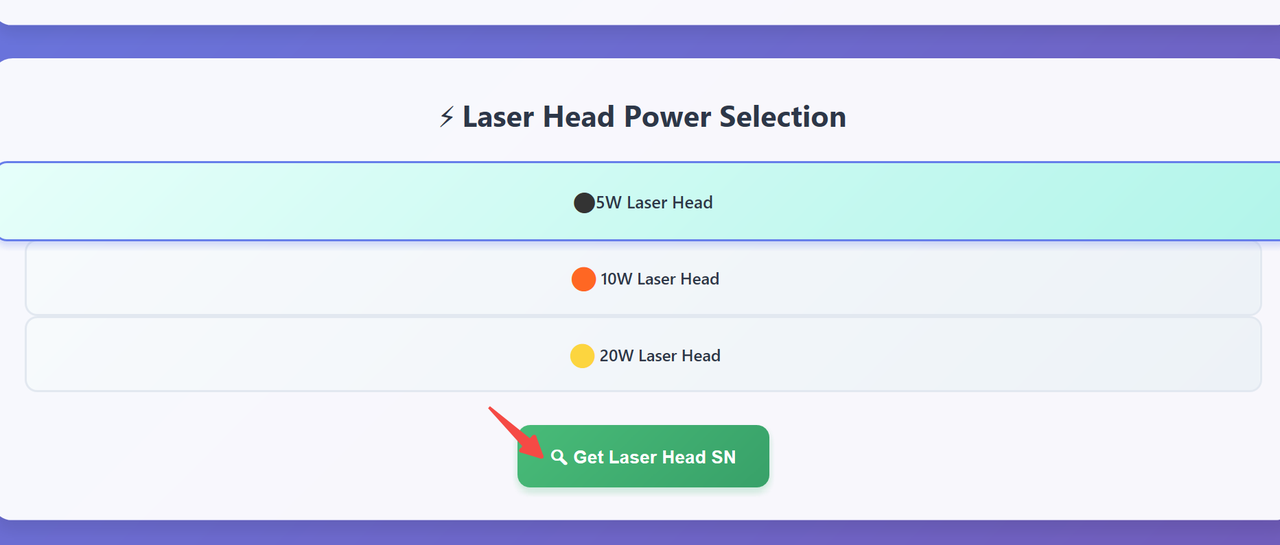
Step 3: Get the SN
Select the model of the laser module, then click Get Laser Head SN. SN Repair captures the SN automatically.
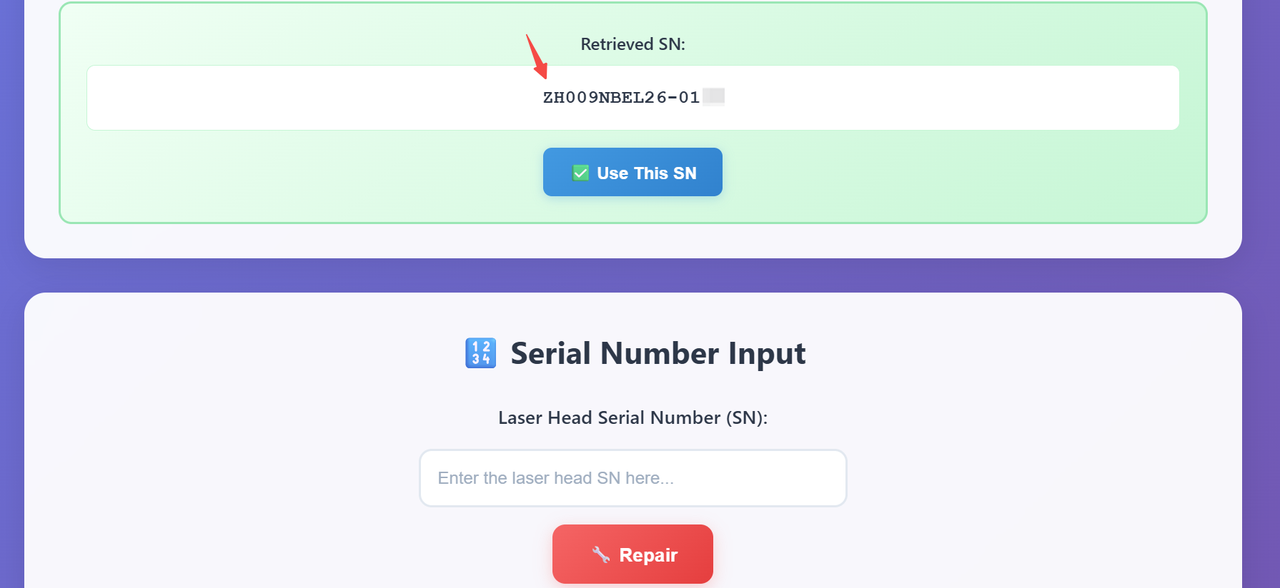
Step 4: Start repairing
Enter the SN into the text box, click Repair.

Step 5: Check the result
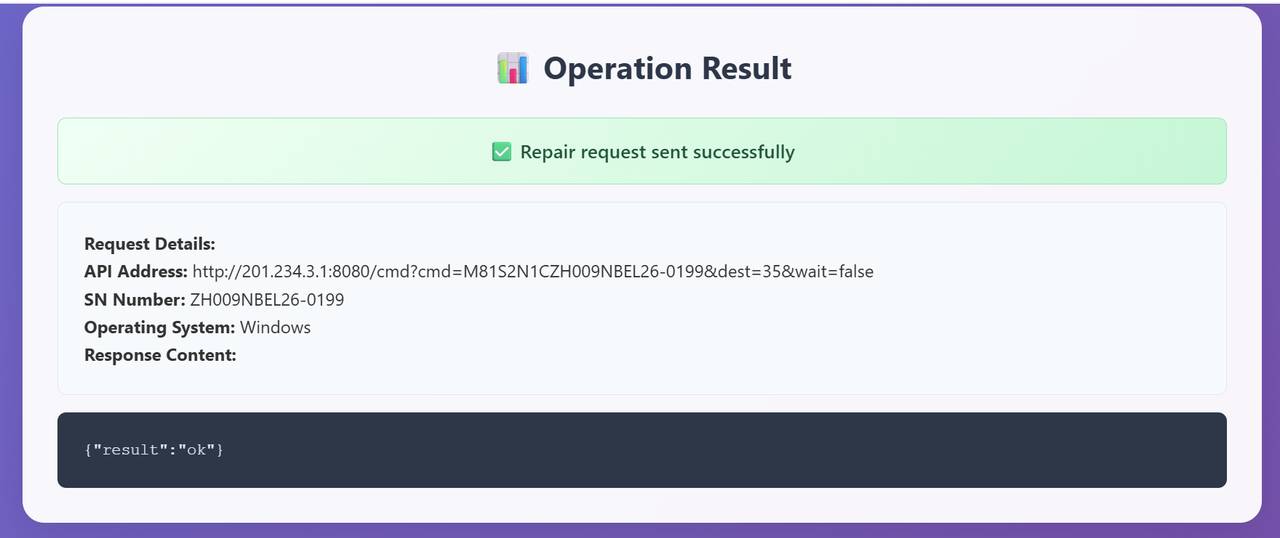
Writing SN is successful once you see the sentence "Repair request sent successfully".
After successful configuration
After successfully writing and verifying the serial number, restart xTool Creative Space software and your M1 Ultra to confirm the laser module is now recognized.
Documentation feedback
Help improve this content by providing feedback. If this content did not meet your requirements, select "No" in the "Was this page helpful?" section below. Include specific details about what was unclear or missing in the pop-up suggestion box. Feedback submissions are reviewed by xTool technical writers to enhance future documentation.

