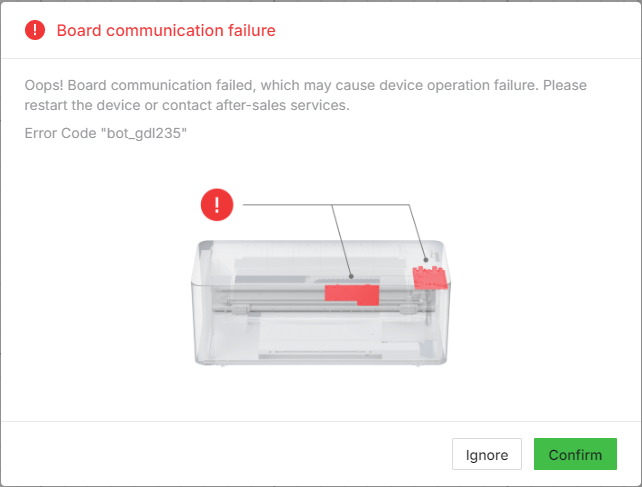
Issue description
While you are using your xTool Apparel Printer, an error message stating "Board communication failure" may appear in xTool Creative Space (XCS), xTool Studio software, or on the printer's LCD control panel. The associated error code is typically bot_gdl235.
This error code (bot_gdl235) indicates a communication problem between the lower Controller Area Network (CAN) Board and the Motion Controller Board within the printer.
- Consult the following content for troubleshooting advice.
Possible causes
Printer-related:
- Environmental interference.
- Loose connection between the Lower CAN Board and Motion Controller Board.
- Malfunction of the Lower CAN Board, Upper CAN Board, or Motion Controller Board.
Oven-related:
- Environmental interference.
- Failed data cable connecting the oven and printer.
- Failed internal adapter or Main Control Board port in the oven.
Preliminary diagnosis: Locate the source
Before performing advanced disassembly, perform these two checks to determine if the issue originates from the printer or the oven.
- Power off the printer.
- Unplug the data cable connecting the oven to the printer.
- Power the printer back on.
Analyze the Result:
- Error Disappears: The problem originates from the Oven. Proceed to Part B.
- Error Persists: The problem originates from the Printer. Proceed to Part A.
Part A: Printer troubleshooting
Follow these steps if you have determined the issue originates from the printer.
Step 1: Reboot the printer
Environmental factors can sometimes cause temporary communication glitches. A full power cycle can often resolve these problems.
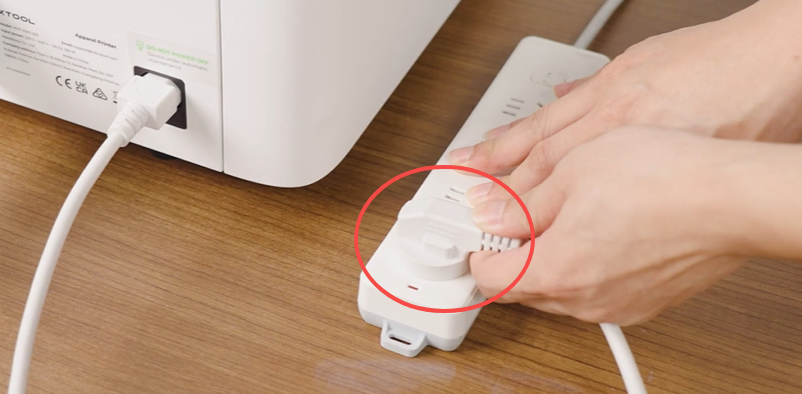
- Power cycle the printer:
- Unplug the power cord from the wall outlet (not from the machine).
- Wait 10 minutes before reconnecting.
- Plug the power cord back into the outlet and power on the machine.
- Test the connection:
- If the error persists, proceed to Step 2.
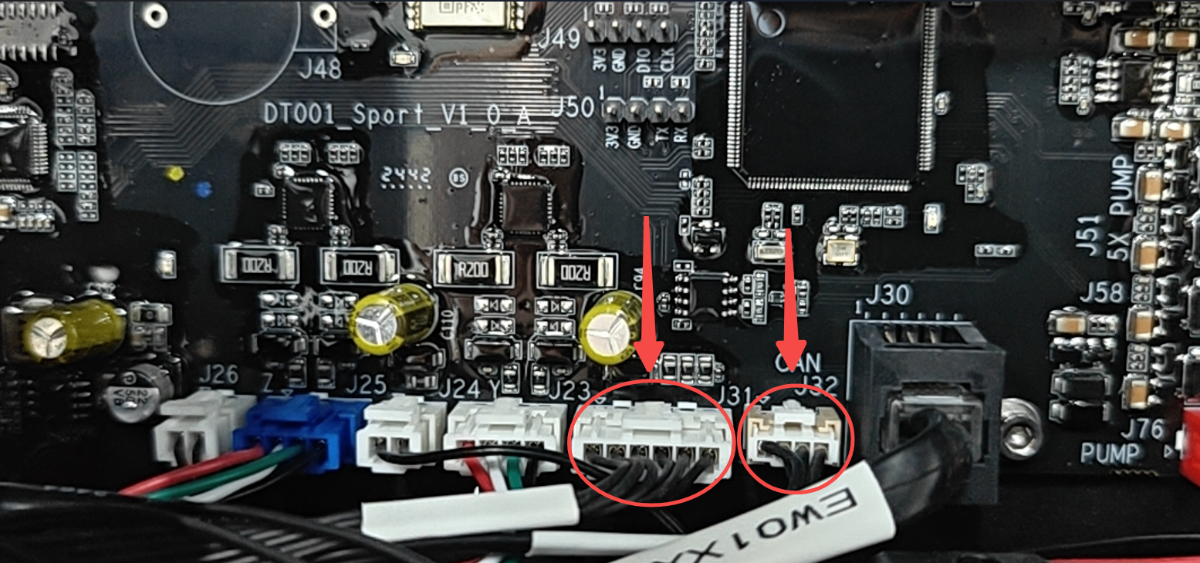
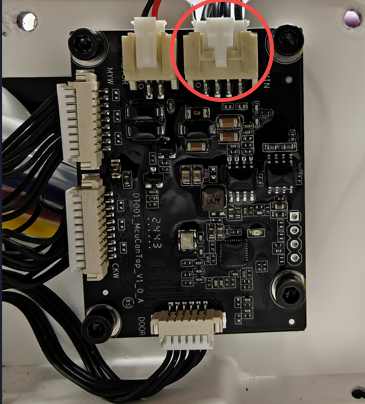
Step 2: Check the main communication cable (J32/J31)
This step involves checking the main communication cable between the two internal boards.
Access Internal Connections:
⚠️ Safety warning: Power off and unplug the printer before proceeding.
- Follow the video instructions to remove the rear panel (0:00~1:16): Disassemble & Assemble the Casings for xTool Apparel Printer
- Locate and reconnect the cable labeled "CAN J32" and "J31" on the motion controller board. See the image below.
- Carefully disconnect and firmly reconnect this cable to ensure it is securely seated.
Test the printer
- Power on the printer.
- Check if the error still appears.
Diagnosis:
- Blue light did NOT blink before and still does NOT blink after reconnection → Upper CAN board is likely glitching → Contact customer support for replacement. → Replace the Upper CAN board
- Blue light WAS blinking before, and the error still appears after reconnection → Proceed to Step 2.
Step 3: Inspect the lower CAN board
⚠️ Safety Warning: Ensure the printer is disconnected from the power source before proceeding.
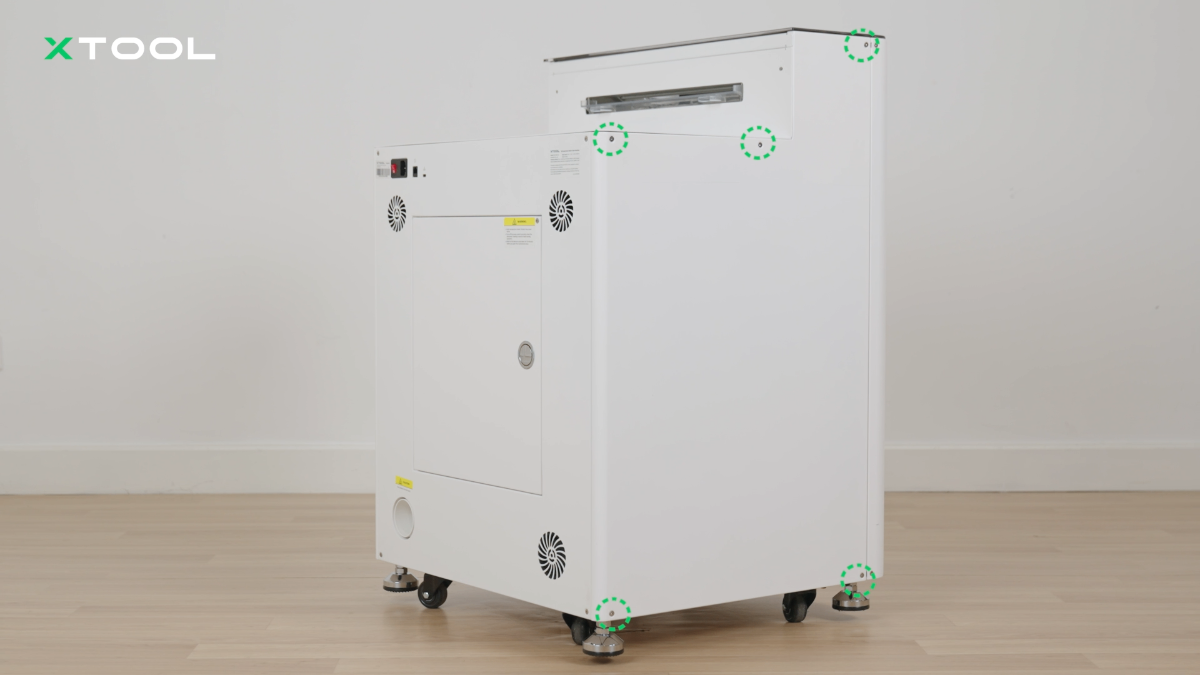
- Prepare the Printer: Carefully place the printer across two stable tables of equal height for safe access to the bottom panel.
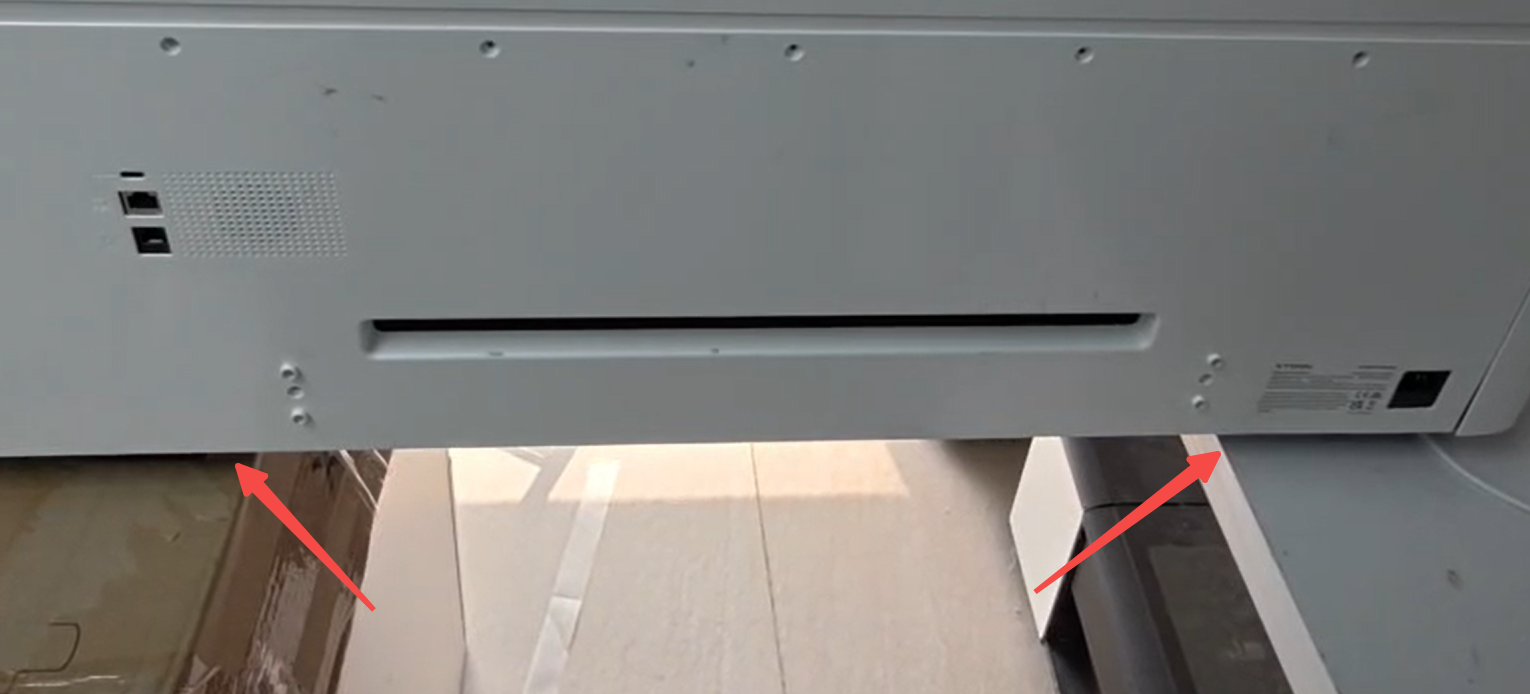
- Remove Bottom Panel:
- Use the included M2.5mm Hex screwdriver.
- Remove the 4 hex screws securing the bottom protective panel.
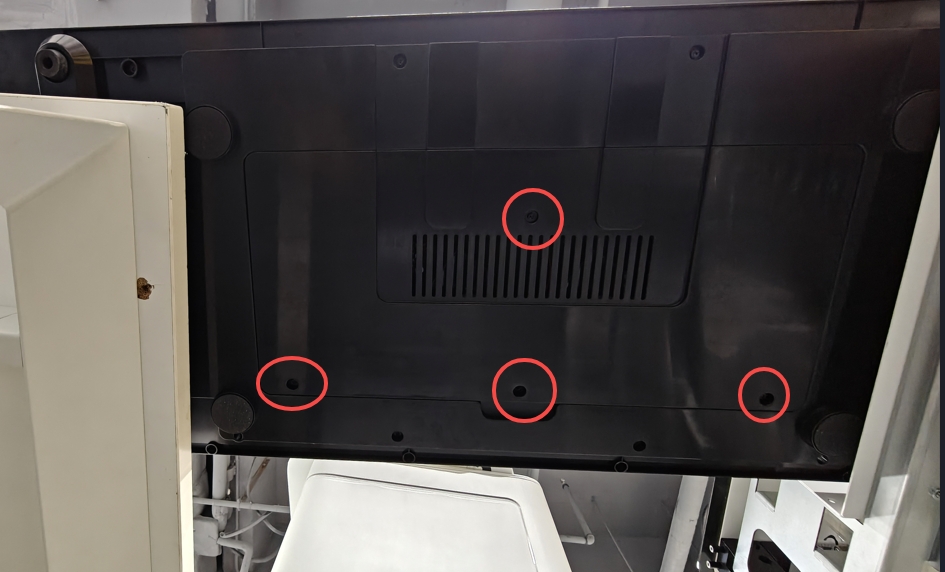
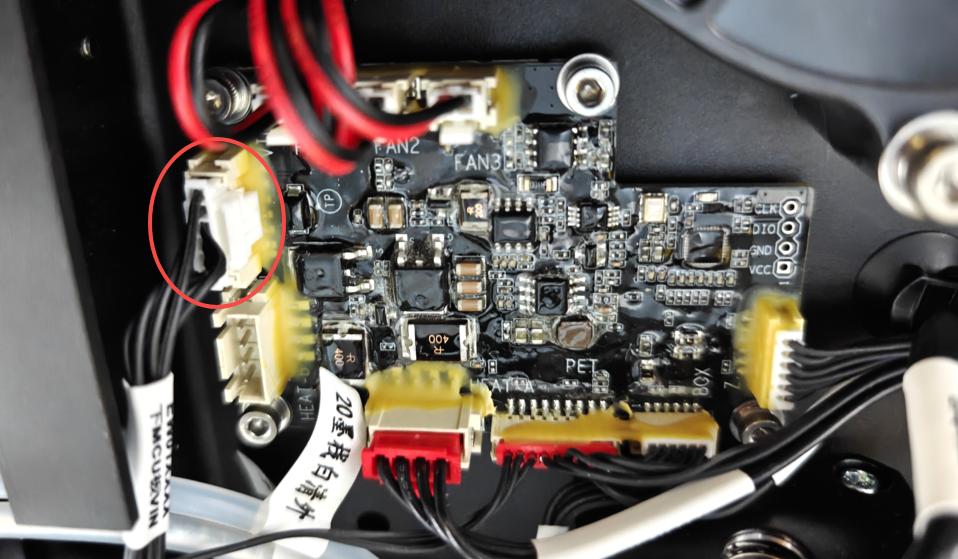
- Inspect the Lower CAN board
- Locate the Lower CAN board and its cable connection. Refer to the image below.
- Check if the cable is loose or disconnected.
- Observe the blue indicator light on the Lower CAN board:
- Blue light blinking = Power supply is normal
- No blue light = Power issue or connection problem
- Reconnect the cable firmly if it appears loose.
- Retest the System
- Reassemble the bottom panel.
- Power on the printer.
- Check if the error still appears.
Diagnosis:
- No abnormalities found → Proceed to the next step.
- Connection issues resolved but error persists → Contact customer support with diagnostic information.
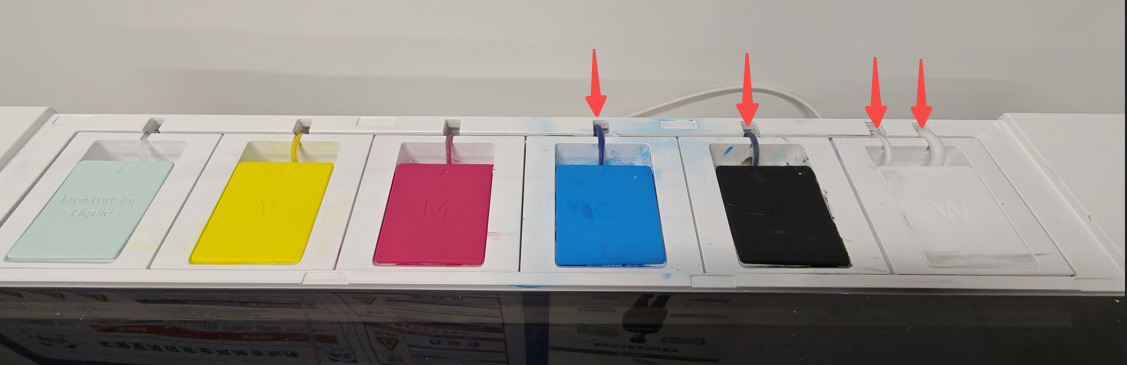
Step 4: Inspect the upper CAN board light
This check determines whether the printer's internal communication is functioning.
- Open the printer lid and look at the area near the white ink tank.
- Look for a blinking blue light on the Upper CAN board (refer to the image below).
- Observe the blue light:
- Blue light is NOT blinking → Reseat the upper CAN board cable (Refer to the instructions below).
- Blue light IS blinking → Return to the "Preliminary diagnosis: Locate the source" section to reconfirm whether disconnecting the oven cable eliminates the error. This will help re-identify the source of the problem.
Reseat the upper CAN board cable:
- Detach the ink tubes from the Blue, Black, and White ink tanks.
- Remove the Blue and Black ink tanks for better access.
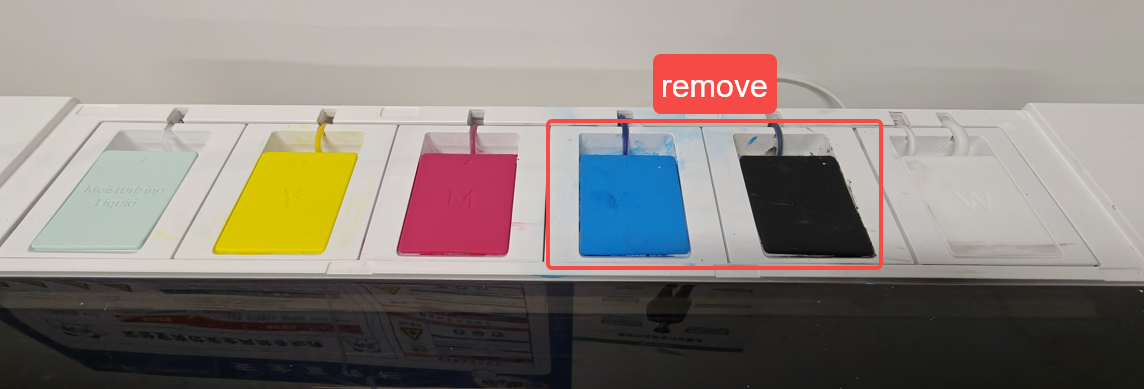
- Gently slide out the White ink tank.
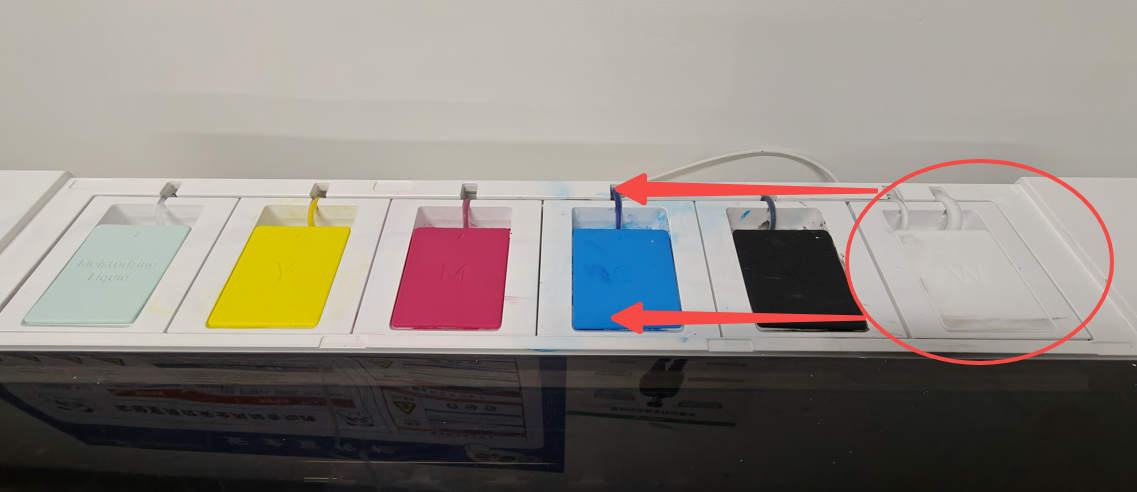
- Check if the cable connected to the Upper CAN board is secure.
Note: If access is difficult, you may need to disassemble the outer casing (refer to: Disassemble & Assemble the Casings for xTool Apparel Printer).
- Diagnosis:
- Light still does NOT blink after reconnection → Possible upper CAN board malfunction is identified. → Contact xTool Customer Service for further assistance with your findings.
Part B: Oven troubleshooting
Follow these steps if disconnecting the oven resolved the error in the Preliminary diagnosis.
Step 1: Reboot the printer
Environmental factors can sometimes cause temporary communication glitches. A full power cycle can often resolve these problems.
- Power cycle the printer:
- Unplug the power cord from the wall outlet (not from the machine).
- Wait 10 minutes before reconnecting.
- Plug the power cord back into the outlet and power on the machine.
- Test the connection:
- If the error persists, proceed to Step 2.

- If the error persists, proceed to Step 2.
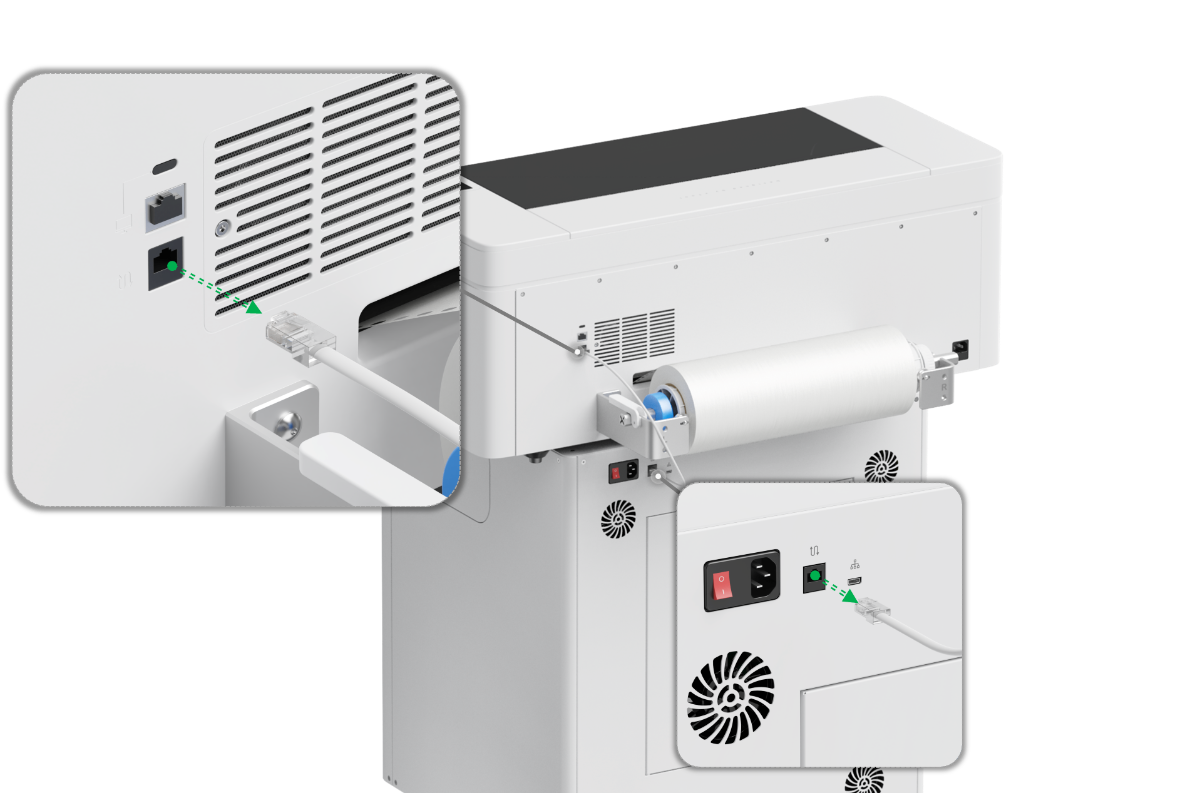
Step 2: Cross test with another data cable (Optional)
This step tests whether the data cable between the printer and oven is glitching.
Cable Specifications:
The connection between the oven and printer uses an RJ11 6-conductor cable. You can use another cable of the same specification for testing.
Recommended Cable Length: At least 1.5m for flexibility during testing (Step 3)
Procedure:
- Disconnect the original data cable between the printer and oven.
- Connect a different RJ11 6-conductor cable between the printer and oven.
- Power on both devices and test operation.
Diagnosis:
- Error does NOT appear with the new cable. → Original cable is glitching. → Contact Customer Service for a replacement cable.
- Error still appears with the new cable. → Cable is not the issue → Proceed to Step 3.
Step 3: Bypass internal oven wiring (Direct connection)
This step examines the internal connections inside the OS1 oven via direct connection.
Procedure:
- Access the Oven's Internal Components
- Use the M2.5mm Hex screwdriver to remove the screws securing the left-side panel of the oven.
- Carefully set the panel aside.
- Refer to: "Replace the Main Control Board in xTool OS1 Shaker Oven" for detailed instructions
- Connect the Data Cable Directly
- Locate the RJ11 port on the oven main control board end (inside the left panel).
- Connect the data cable directly from the printer to the oven main control board, bypassing the internal RJ11 adapter
💡 Note: Position the printer and oven on the same level surface as close as possible. The cable may not be long enough if they are too far apart.
- Test the Connection
- Power on both devices
- Check if the error still appears
- Diagnosis:
- Error does NOT appear → Internal RJ11 adapter or internal RJ11 cable inside the oven failed → Contact Customer Service for replacement parts
- Error still appears → Oven main control board port may be malfunctioning → Contact Customer Service for further diagnosis with diagnostic findings.
If the problem persists
Should the issue persist after completing the preceding steps, submit a ticket via the "Submit a Ticket" button in the "Help Ticket" section below. The standard response time for xTool Customer Service is one business day.
Include the following details to help better diagnose the problem:
1 Work log files
Please export the logs based on the software you are using.
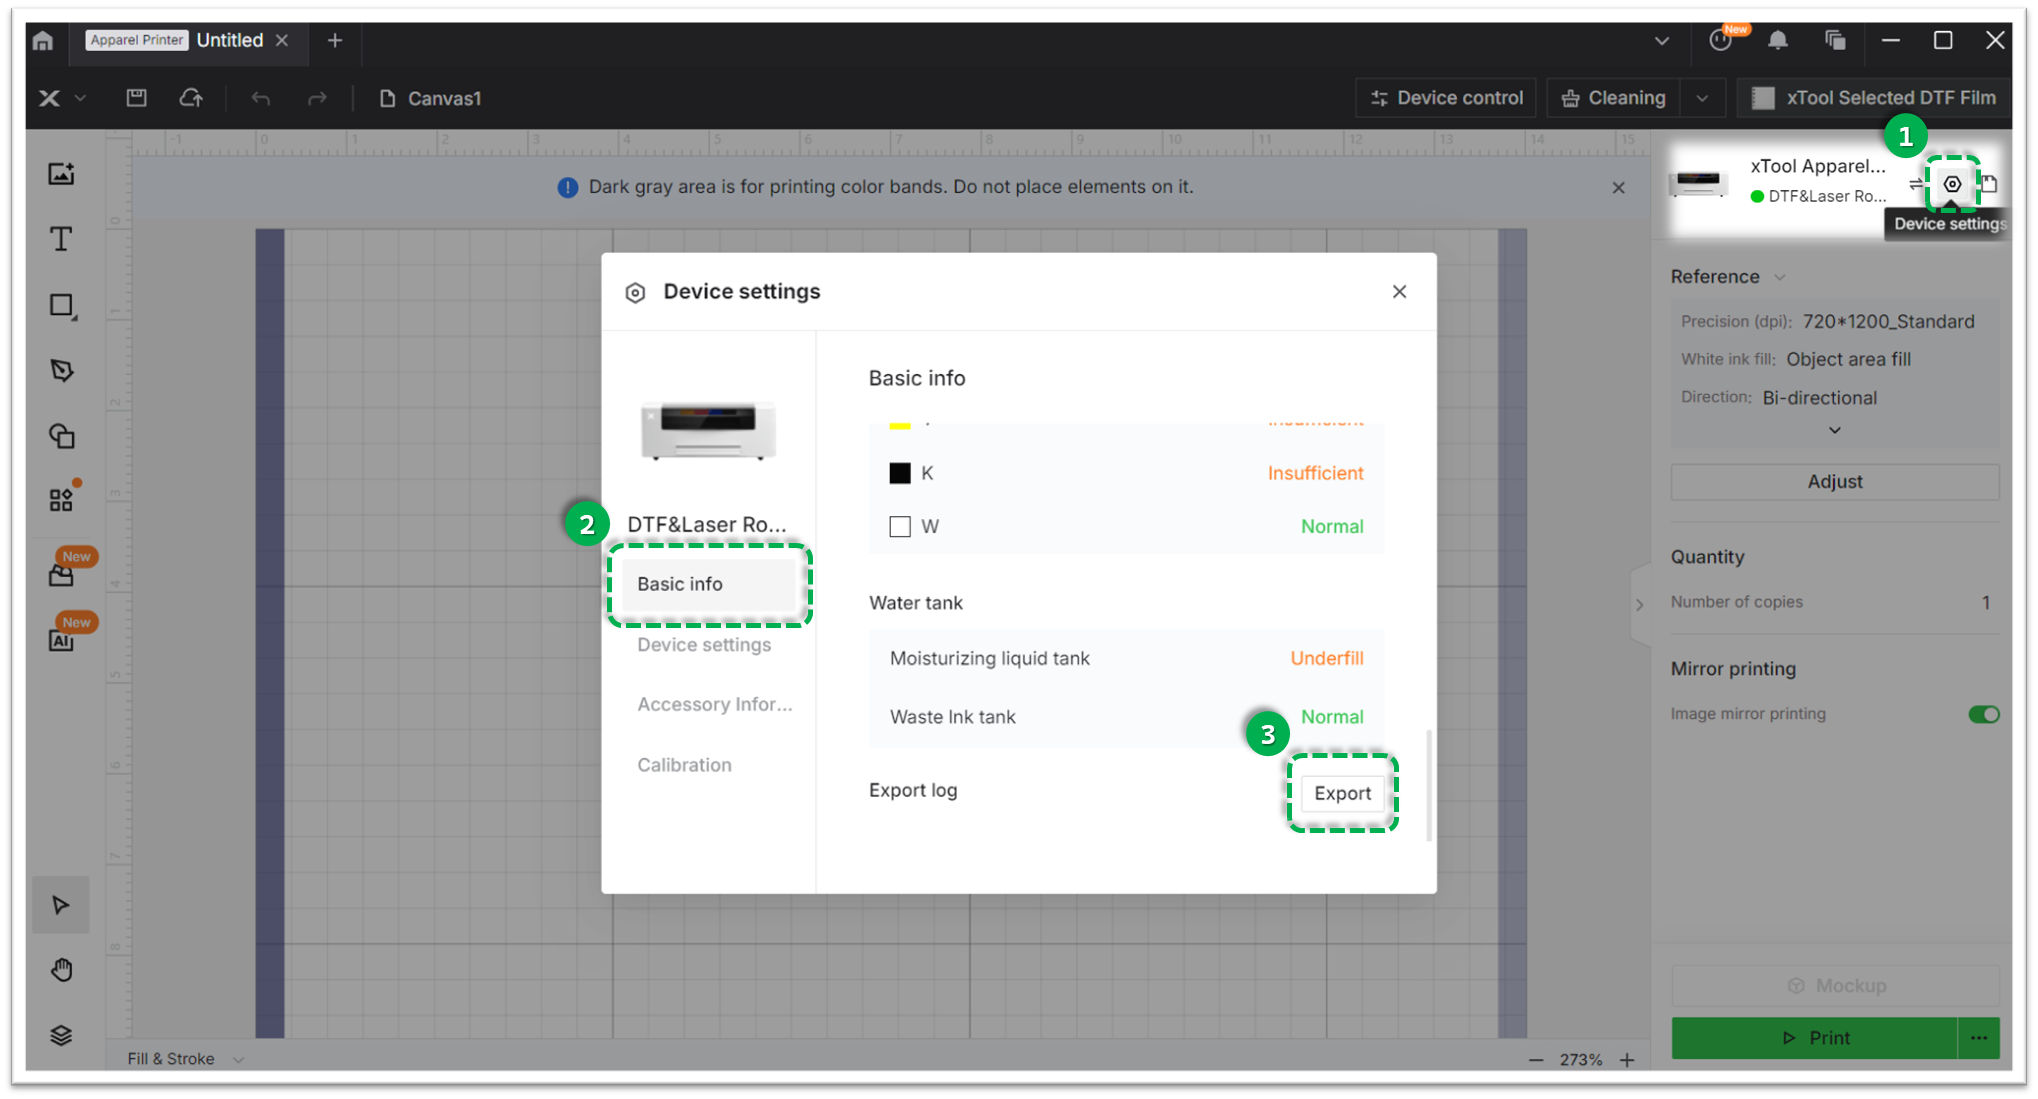
Method A: Via xTool Creative Space (XCS)
- Click the Device Settings icon (gear symbol) in the top-right corner.
- Select the Basic info tab.
- Scroll down to Export log and click Export.
- A folder will be generated. Compress (Zip) this entire folder into a single file and attach it to your ticket.
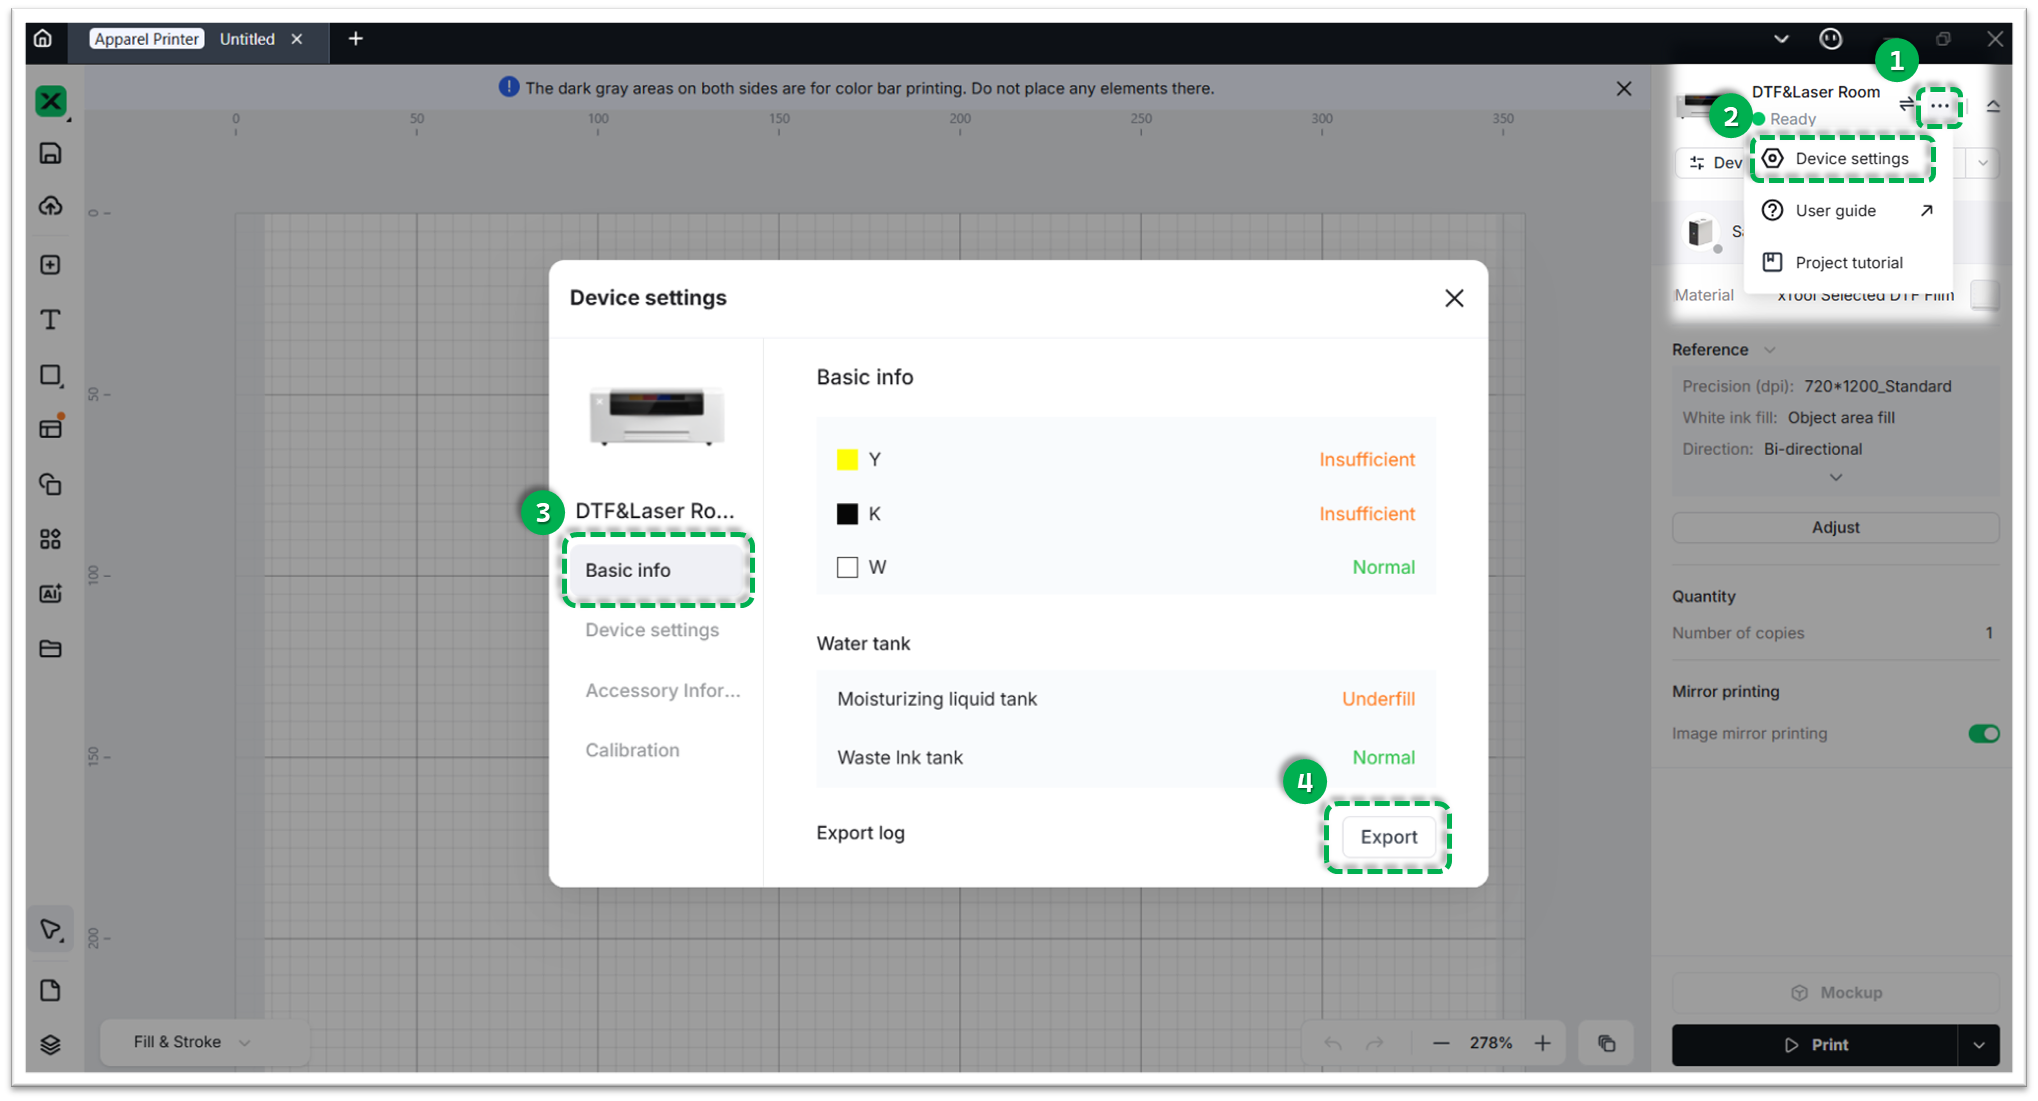
Method B: Via xTool Studio
- Click the three dots icon next to the device image.
- Select Device Settings (gear icon).
- Select the Basic info tab on the left.
- Scroll down to Export log and click Export.
- A folder will be generated. Compress (Zip) this entire folder into a single file and attach it to your ticket.
2 Serial number (SN)
Provide the SN for both your xTool Apparel Printer and xTool OS1 Oven.
3 View firmware version
Provide the firmware version currently installed on both devices.
4 Video evidence (Highly recommended):
- Any additional videos showing the issue and your troubleshooting steps where applicable.
Documentation feedback
Help improve this content by providing feedback. If this content did not meet your requirements, select "No" in the "Was this page helpful?" section below. Include specific details about what was unclear or missing in the pop-up suggestion box. Feedback submissions are reviewed by xTool technical writers to enhance future documentation.
Services & Help
Learn & Education

Copyright © 2025 xTool All Rights Reserved.