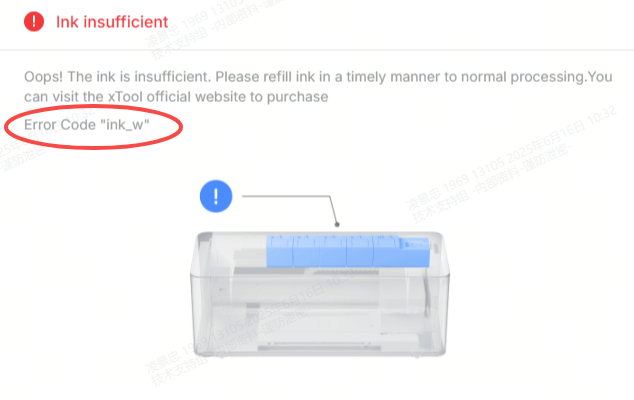
Issue description
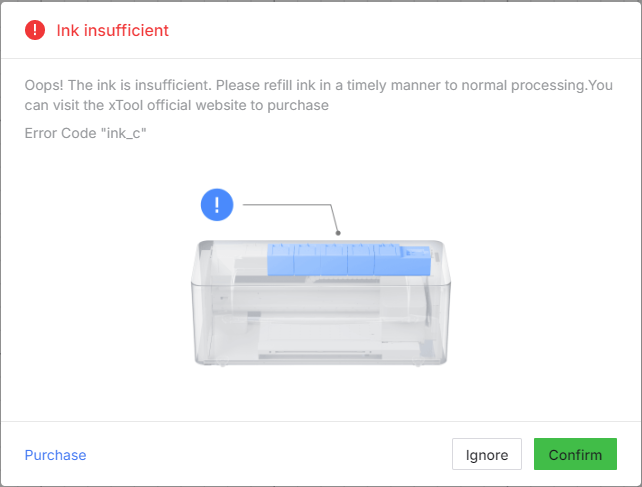
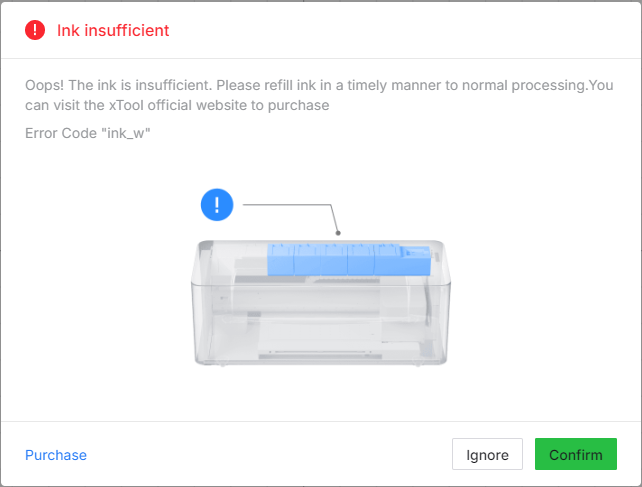
After sending a print task from xTool Creative Space (XCS) software to your xTool Apparel Printer, you may receive a pop-up error message stating "Ink insufficient". The error message is accompanied by one of the following error codes: ink_c, ink_m, ink_y, ink_k, or ink_w. These codes correspond to the CMYKW color scheme typically employed in DTF printing.
- Please consult this section for troubleshooting advice.
 |  |  |  |  |
Potential causes
- Low Ink Level: The ink level in the indicated tank is below the minimum threshold.
- Stuck Float Indicator: The float indicator within the ink tank may be stuck, preventing accurate level detection.
- Glitching Cable Connection: A connection cable linked to the ink level sensor might be loose, damaged, or experiencing glitches.
- Failed Ink Level Sensor: The specific sensor in the ink tank could be malfunctioning.
- Controller Area Network (CAN) Board Issue: In rare cases, a failure with the CAN board may be responsible.
Prerequisite
1. Identify affected ink tank
Before advancing towards the troubleshooting section below, determine which ink tank is causing the error based on the error code.
💡 Note: The letter in the error code corresponds to the specific ink color that is low or not being detected correctly.
Error code | Color | Tank location |
ink_c | Cyan | Cyan ink tank |
ink_m | Magenta | Magenta ink tank |
ink_y | Yellow | Yellow ink tank |
ink_k | Black | Black ink tank |
ink_w | White | White ink tank |
2. Check & refill ink level
- Open the printer's lid.
- Visually inspect the ink level in the specific ink tank indicated by the error code. You can observe this from the front of the printer.
- Check if the ink level is approximately below 20% of the tank capacity.
- If the ink level is below 20%:
- Refill the tank with the corresponding color ink.
- If ink levels appear to be above 20%:
- Proceed with the troubleshooting steps below based on your specific scenario.
💡 Note: The printer may continue to print if the level is slightly below 20% but will eventually stop and show this error as it gets lower.
Scenario A: CMYK ink tank error (ink_c, ink_m, ink_y, ink_k)
Step 1: Check float Indicator
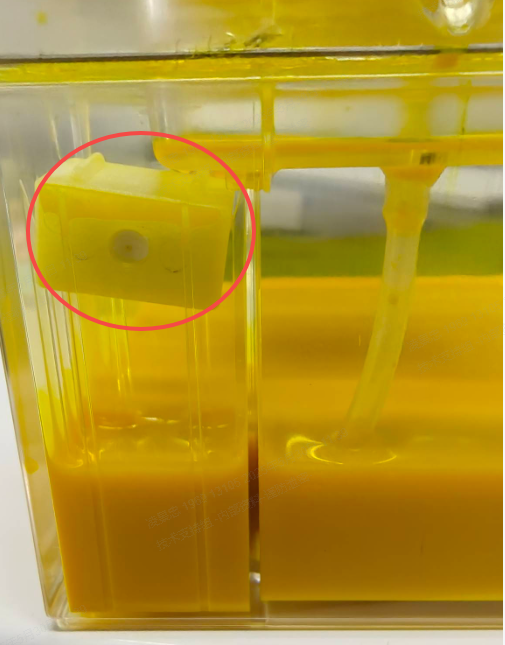
Inspect the float indicator:
- Open the ink tank corresponding to the error color.
- Observe the float indicator inside. It should be floating freely on the surface of the ink. It is possible, though rare, for the float to get stuck.
Adjust the float indicator:
⚠️ Important: Use only the non-woven cleaning swab provided by xTool, or choose non-woven cotton swabs to prevent lint residue that could affect product performance.
- If the float indicator is stuck, use the cleaning swab provided with your printer to gently adjust it.
Alternative method:
- Use a magnet to attract the float indicator and adjust its position.
- If the float indicator is severely stuck or the problem persists, replace the ink tank.
If the float indicator appears normal, proceed to Step 2
Step 2: Test ink tank sensor
- Unplug the ink tube from the top of the affected ink tank.
- Lift the ink tank out of its slot.
- Power cycle the printer: Unplug the printer's power cord from the wall socket, wait 30 seconds, and then plug it back in.
- Check the printer's status. The error for that specific color should now be gone, and the corresponding indicator light on the sensor board should be off.
- If the same error code persists OR the indicator light remains on, the sensor for that ink tank has failed and needs to be replaced.
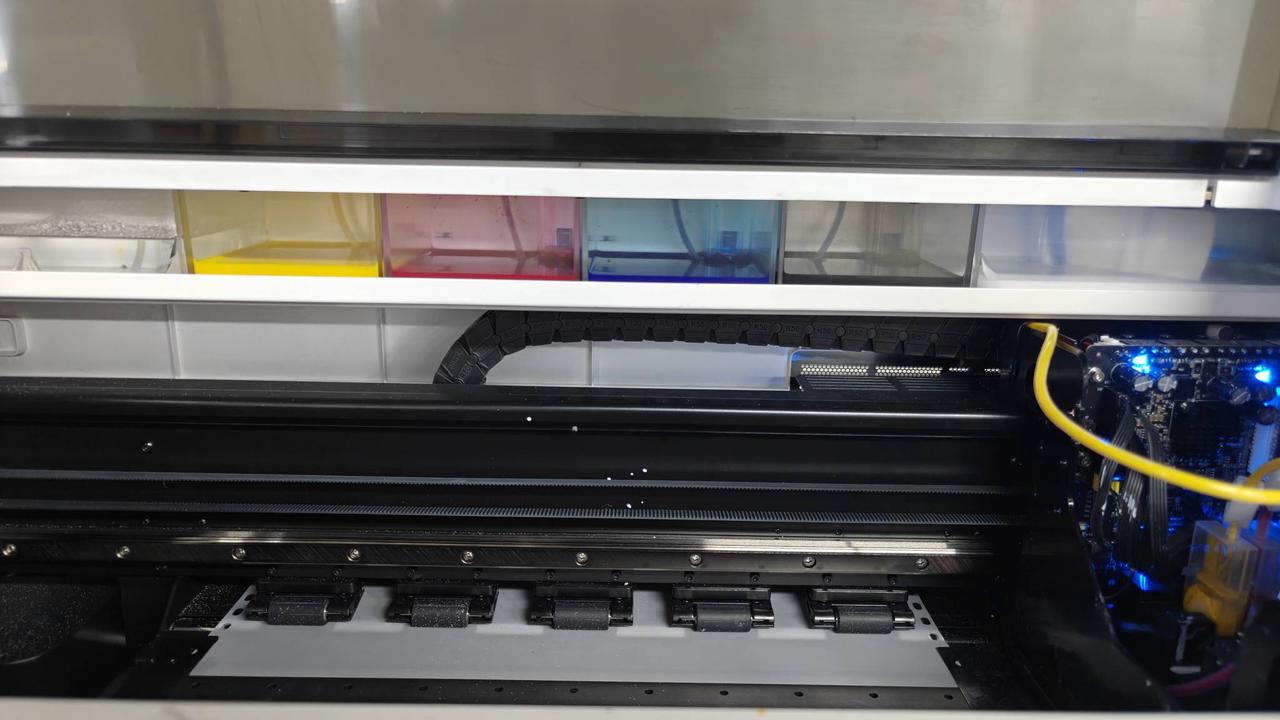
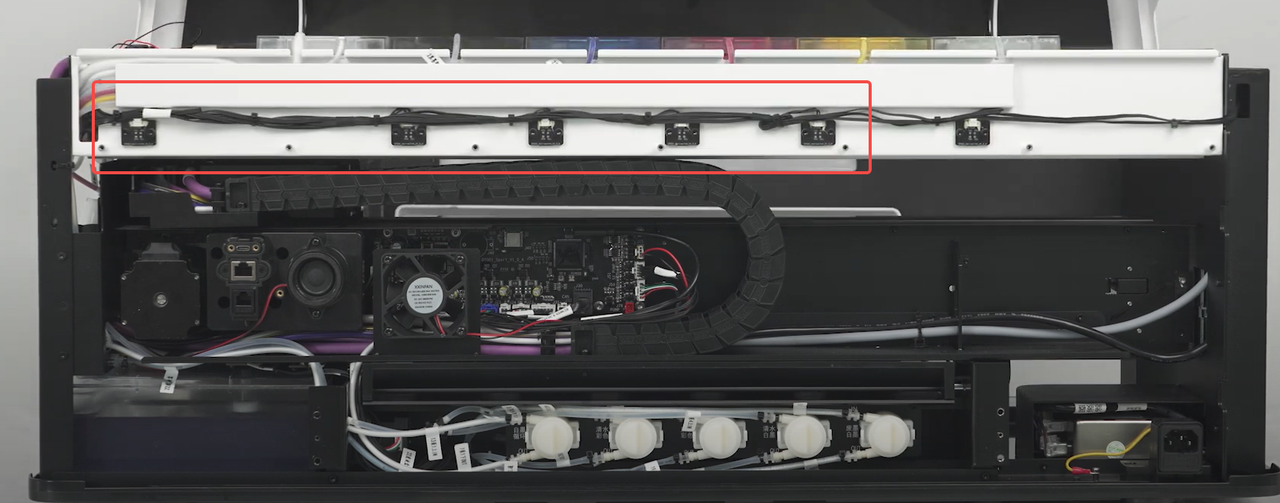
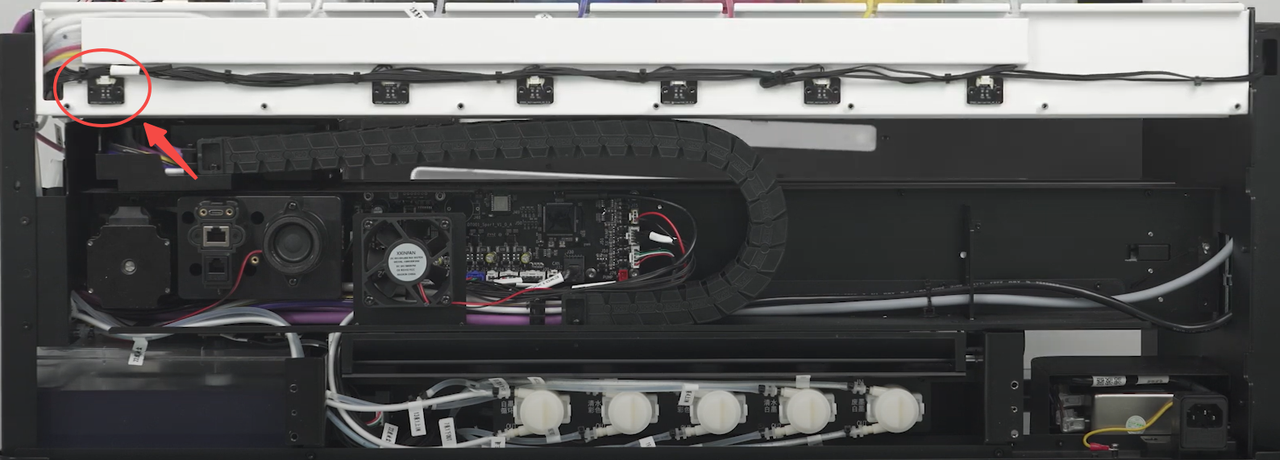
- Access the Sensor: You will need to remove the printer's casing to access the ink level sensor.
- Replace the Sensor: The sensors are arranged in sequence (typically from left to right: White, Black, Cyan, Magenta, Yellow). Replace the sensor corresponding to the error code.
- If the error continues after replacing the sensor, proceed to the next step.
Step 3: Potential CAN board (Advanced)
Advanced Intervention:
If all previous steps fail, there may be an issue with the upper Controller Area Network (CAN) board.
- This step requires advanced technical intervention. Please proceed to the "Still experiencing issue" section to contact xTool Customer Service for further diagnosis.
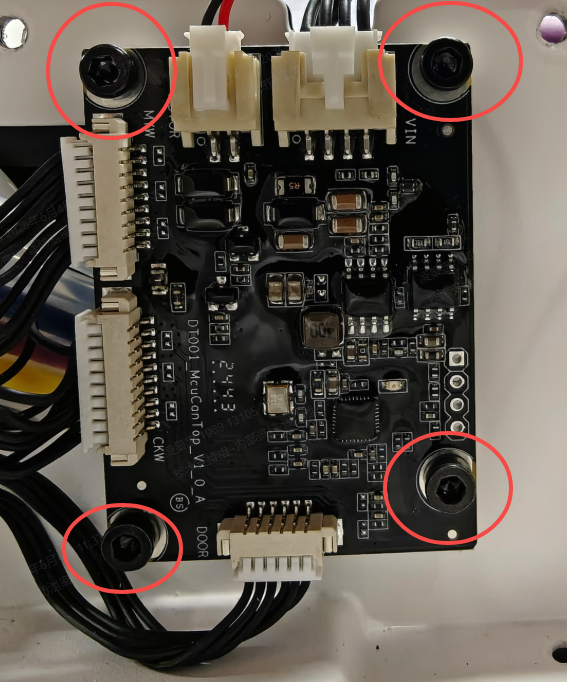
- If deemed necessary by xTool technical experts, the upper CAN board may need to be replaced. This procedure involves:
- Remove the printer casing (refer to the video in Step 2).
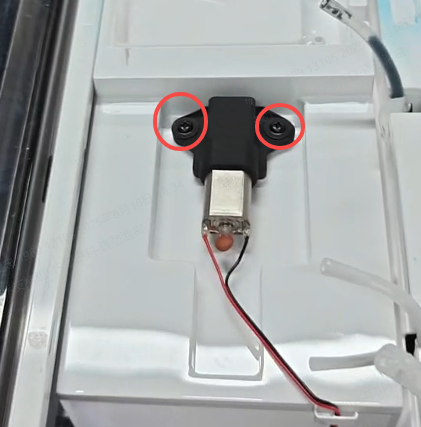
- Carefully unscrew and disconnect the white ink stirring motor to better access the CAN board.
- Replace the upper CAN board.
 |  |
Scenario B: White ink tank error (ink_w)
Step 1: Check white ink float indicator
Remove the white ink tank:
⚠️ Caution:
- The white ink stirring motor has connecting wires—DO NOT move it forcefully.
- Wear a pair of nitrile rubber gloves.
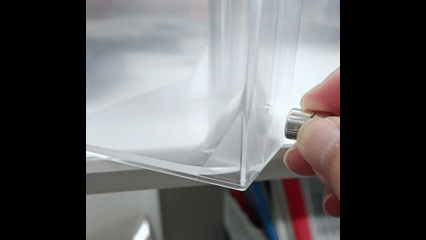
- Disconnect the four ink tubes (blue *1, black *1, white *2).
- Wrap the ink tubes with non-woven cloth to prevent ink splashing
- For visual reference, see: Unplug Ink Tubes from Ink Tanks.mp4
- Slowly slide the white ink tank out toward the left side of the machine body.
Reset and test:
- With the white ink tank moved aside, power cycle the printer (unplug from the wall socket, wait 30 seconds, then plug back in).
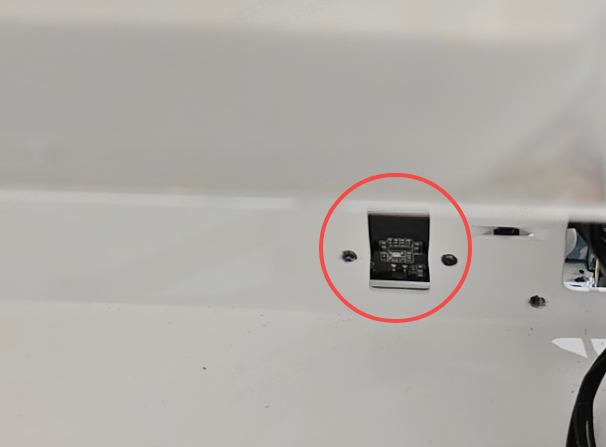
- Check if the white ink Hall sensor board indicator light is off and if the ink_w error persists.
 |  |
Diagnose the issue:
- If the error is gone and the light is off, the issue is with a stuck float. Try one of the following to resolve it:
- Gently tap the white ink tank to dislodge the float. This is often effective.
- Use a magnet on the outside of the tank to attract the float and move it into the correct position.
- If the float is severely stuck or the issue recurs frequently, the white ink tank needs to be replaced*.
- If the
ink_werror persists OR the indicator light remains on, the issue is likely with the Hall sensor board or its connection cable. Proceed to the next step.
*To request a replacement, please contact xTool Customer Service by submitting a request in the Help Ticket section below. Select Buy after-sales materials under the After-sales Issue tab to place your replacement order.

Step 2: Replace white ink tank sensor (Hall sensor board)
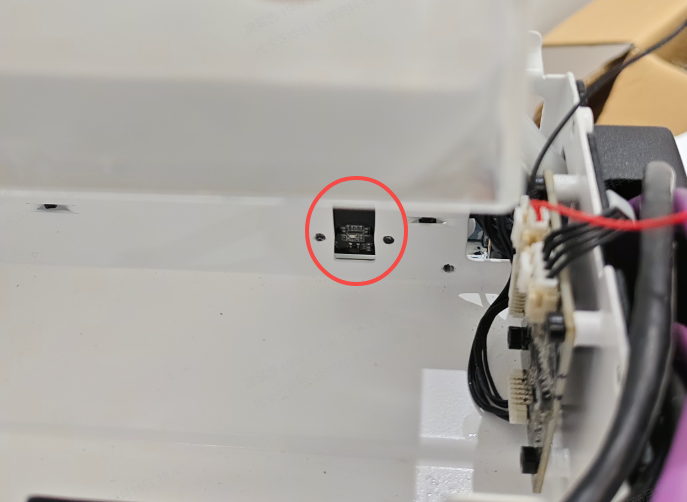
- You will need to remove the printer's outer casing to access the sensor.
- Replace the white ink tank sensor.
- If the issue is not resolved after replacing the sensor, proceed to the next step.
Step 3: Potential CAN Board Malfunction (Advanced)
If all previous steps fail, there may be an issue with the upper CAN board.
- This step requires advanced technical intervention. Please proceed to the "Still experiencing issue" section to contact xTool Customer Service for further diagnosis.
- If deemed necessary by xTool technical experts, the upper CAN board may need to be replaced. This procedure involves:
- Remove the printer casing (refer to the video in Step 2).
- Remove the black ink tank and slide the white ink tank out toward the left side of the machine body to create enough space to access the CAN board screws.
- Replace the upper CAN board.
 |  |
Still experiencing issues?
Should the issue persist after completing the preceding steps, submit a ticket via the "Submit a Ticket" button in the "Help Ticket" section below. The standard response time for xTool Customer Service is one business day.
For a prompt resolution, please include the following details:
- Issue Description: A detailed explanation of the observed problem.
- Video Evidence: Attach a video demonstrating the issue, where applicable.
- Troubleshooting Performed: Any troubleshooting steps you have already attempted, along with their results.
This information is crucial for xTool technical support engineers to provide timely assistance.
Documentation feedback
Help improve this content by providing feedback. If this content did not meet your requirements, select "No" in the "Was this page helpful?" section below. Include specific details about what was unclear or missing in the pop-up suggestion box. Feedback submissions are reviewed by xTool technical writers to enhance future documentation.
Services & Help
Learn & Education

Copyright © 2025 xTool All Rights Reserved.