Introduction
Welcome to xTool Academy! In this guide, we’re diving deep into the art of mastering laser parameter
settings. Whether you’re a novice or looking to refine your skills, understanding the relationship between material properties and laser parameters is essential. We'll explore proven universal setting formulas, advanced techniques, and unique features of the XCS system. So, let’s get started!
Understanding Material Properties
Understanding material properties is the cornerstone of setting the right laser parameters. Different materials respond differently to laser processing, and these variations necessitate adjustments in laser power, speed, and focus.
Common Materials and Their Properties
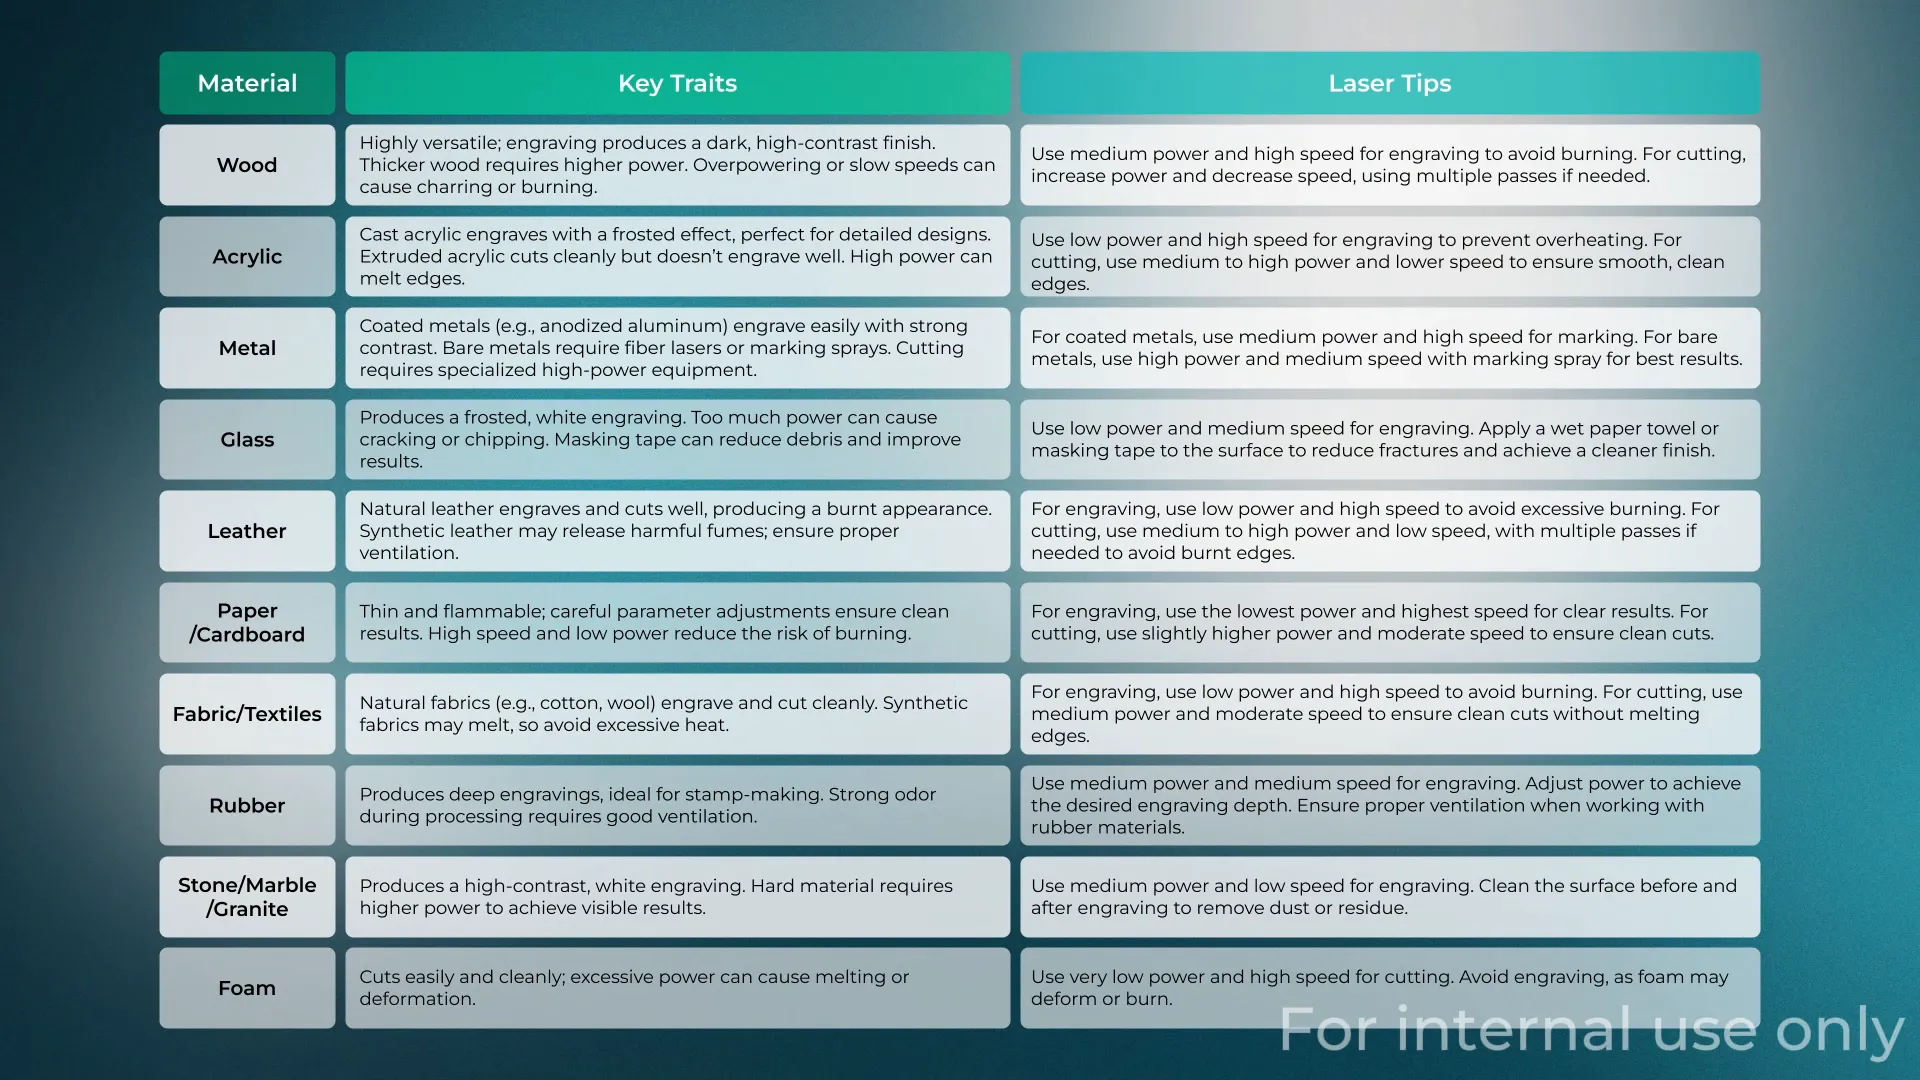
Let’s take a closer look at some common materials and how to work with them:
- Wood: A soft organic material that burns easily under high laser power. For clean cuts or engravings, use moderate power and higher speeds. Hardwoods, like oak, require more power than softwoods, like pine.
- Acrylic: This thermoplastic material melts under heat. For engraving, lower power and higher speeds yield a frosted finish. For cutting, higher power and slower speeds create smooth, polished edges.
- Metals: Metals such as stainless steel are hard and reflective. Engraving requires precise power control, while cutting demands high power and assistive gases like oxygen or nitrogen for smooth edges.
- Leather: A flexible organic material that can burn or discolor under high laser power. For engraving, lower power prevents burning, while cutting requires controlled power to avoid charred edges.
We have created a helpful table summarizing these materials and their properties. Feel free to take a screenshot for your reference!
Streamlining Your Testing Process
Have you ever found testing laser parameters to be a hassle? It can be a bit like mixing a cocktail; it takes time and patience to achieve the perfect balance. Today, we’ll share a universal formula for nearly all materials.
Key Factors Determining Laser Settings
Before we jump into the testing, we need to understand what determines the laser settings:
- The Machine: Every machine is unique. Its power output and condition significantly affect performance. A new laser will behave differently than one that's been heavily used.
- The Material: Different materials vary in thickness, density, and heat absorption, each requiring unique settings.
- Environmental Factors: High humidity can increase the moisture content of wood, affecting cutting results. Clean optics are crucial for consistent performance.
- The Processing Method: Cutting and engraving have different requirements, and complex designs may need more precise adjustments.
The Two-Step Method for Testing
Don’t worry if this seems overwhelming! You don’t need to perfect everything at once. Instead, focus on the essentials and refine as needed. Here’s our two-step method for testing:
- Achieve a 70% Result: Focus on core parameters—power and speed. Aim for a functional score of 70%. Think of this as quickly finding a combination that works.
- Optimize for 100% Result: Once you have a baseline, refine other parameters, like the number of passes, to perfect the outcome.
This approach keeps testing simple and efficient. Let’s put this method into action with a 3mm piece of basswood.

Testing Process in Action
If you’re using a new material, it’s wise to buy a little extra for testing. This way, you can find the perfect settings without stress. If it’s a familiar material, start with previous settings and tweak as necessary.
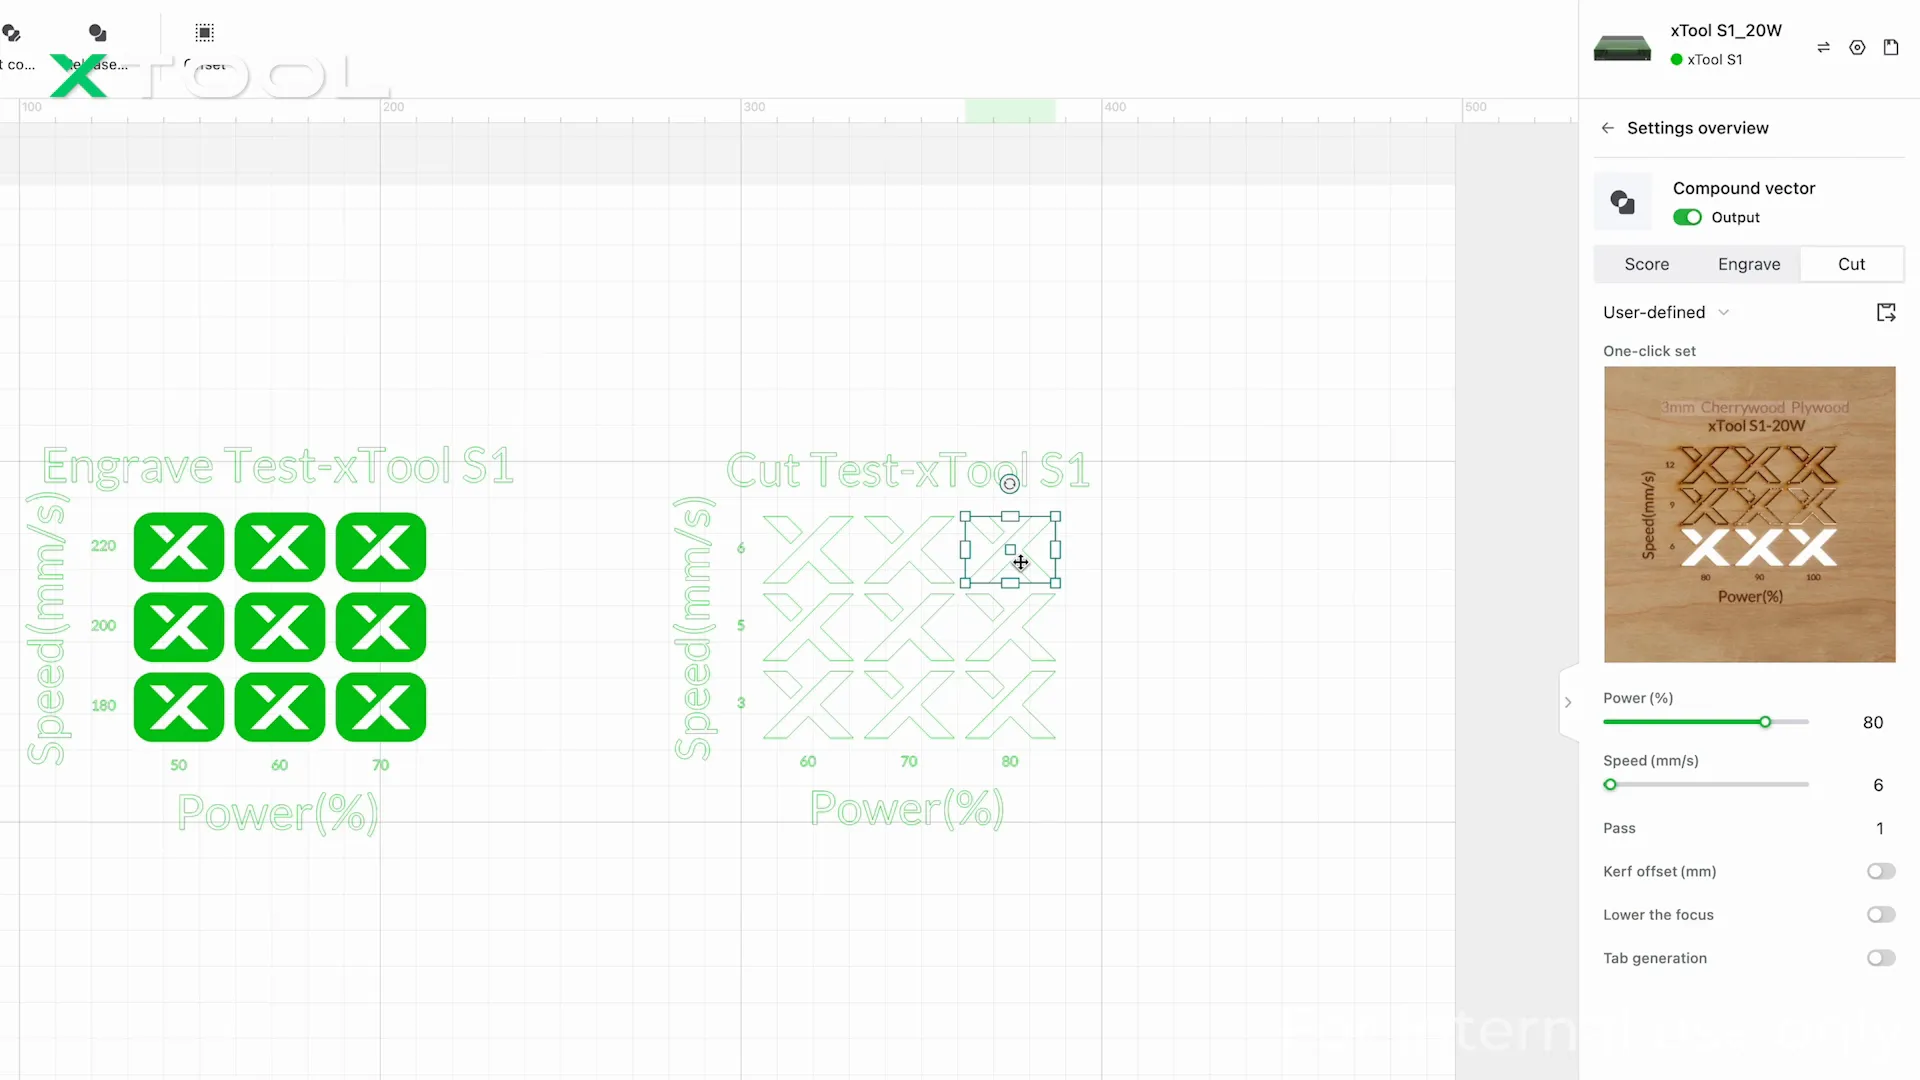
First, import your design file into XCS. In this course, we’ll test the same design for both engraving and cutting processes.
Next, check for references in the EasySet material library. Click on “User Defined Material” to access the library and search for your material—in this case, 3mm basswood.
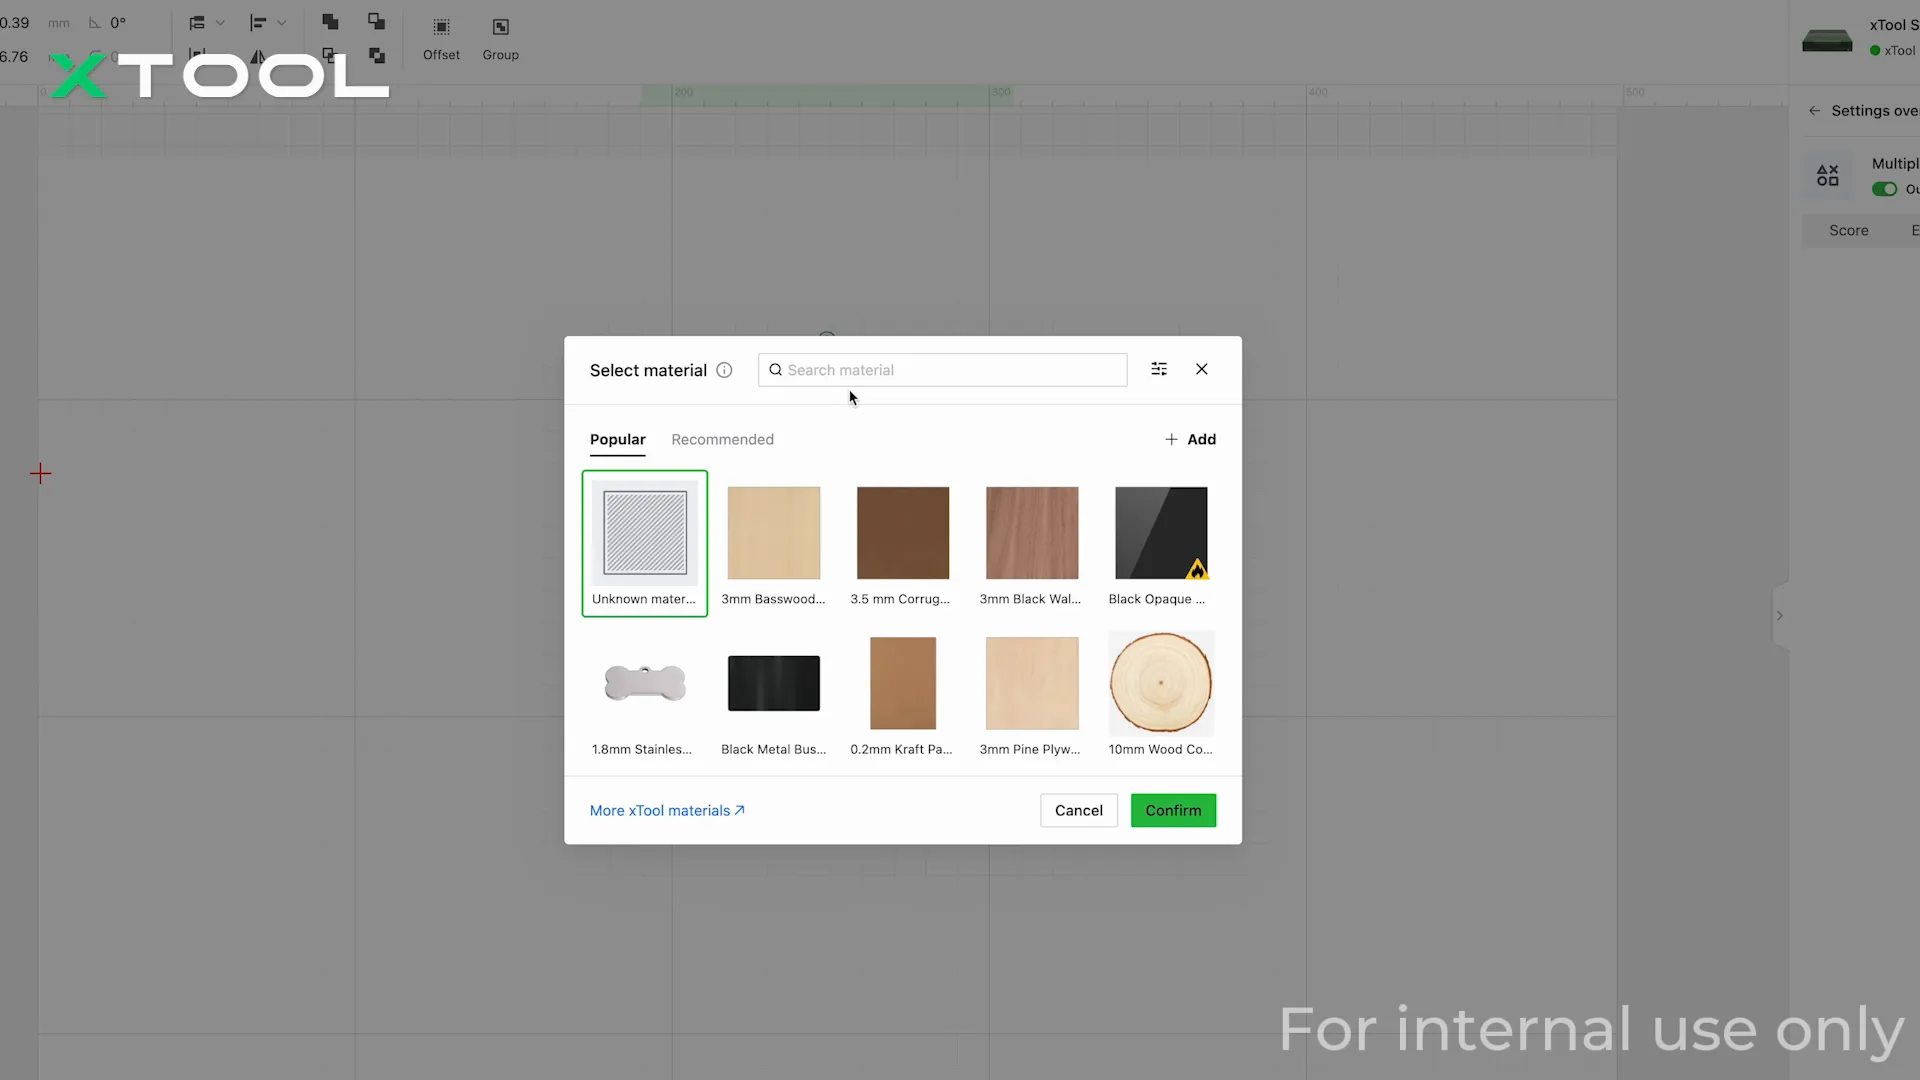
Importing Material Settings
Once you find the material, import the settings directly. Choose the appropriate setting for engraving and cutting, and document your selections with notes for future reference. We highly recommend using coordinates for clarity.
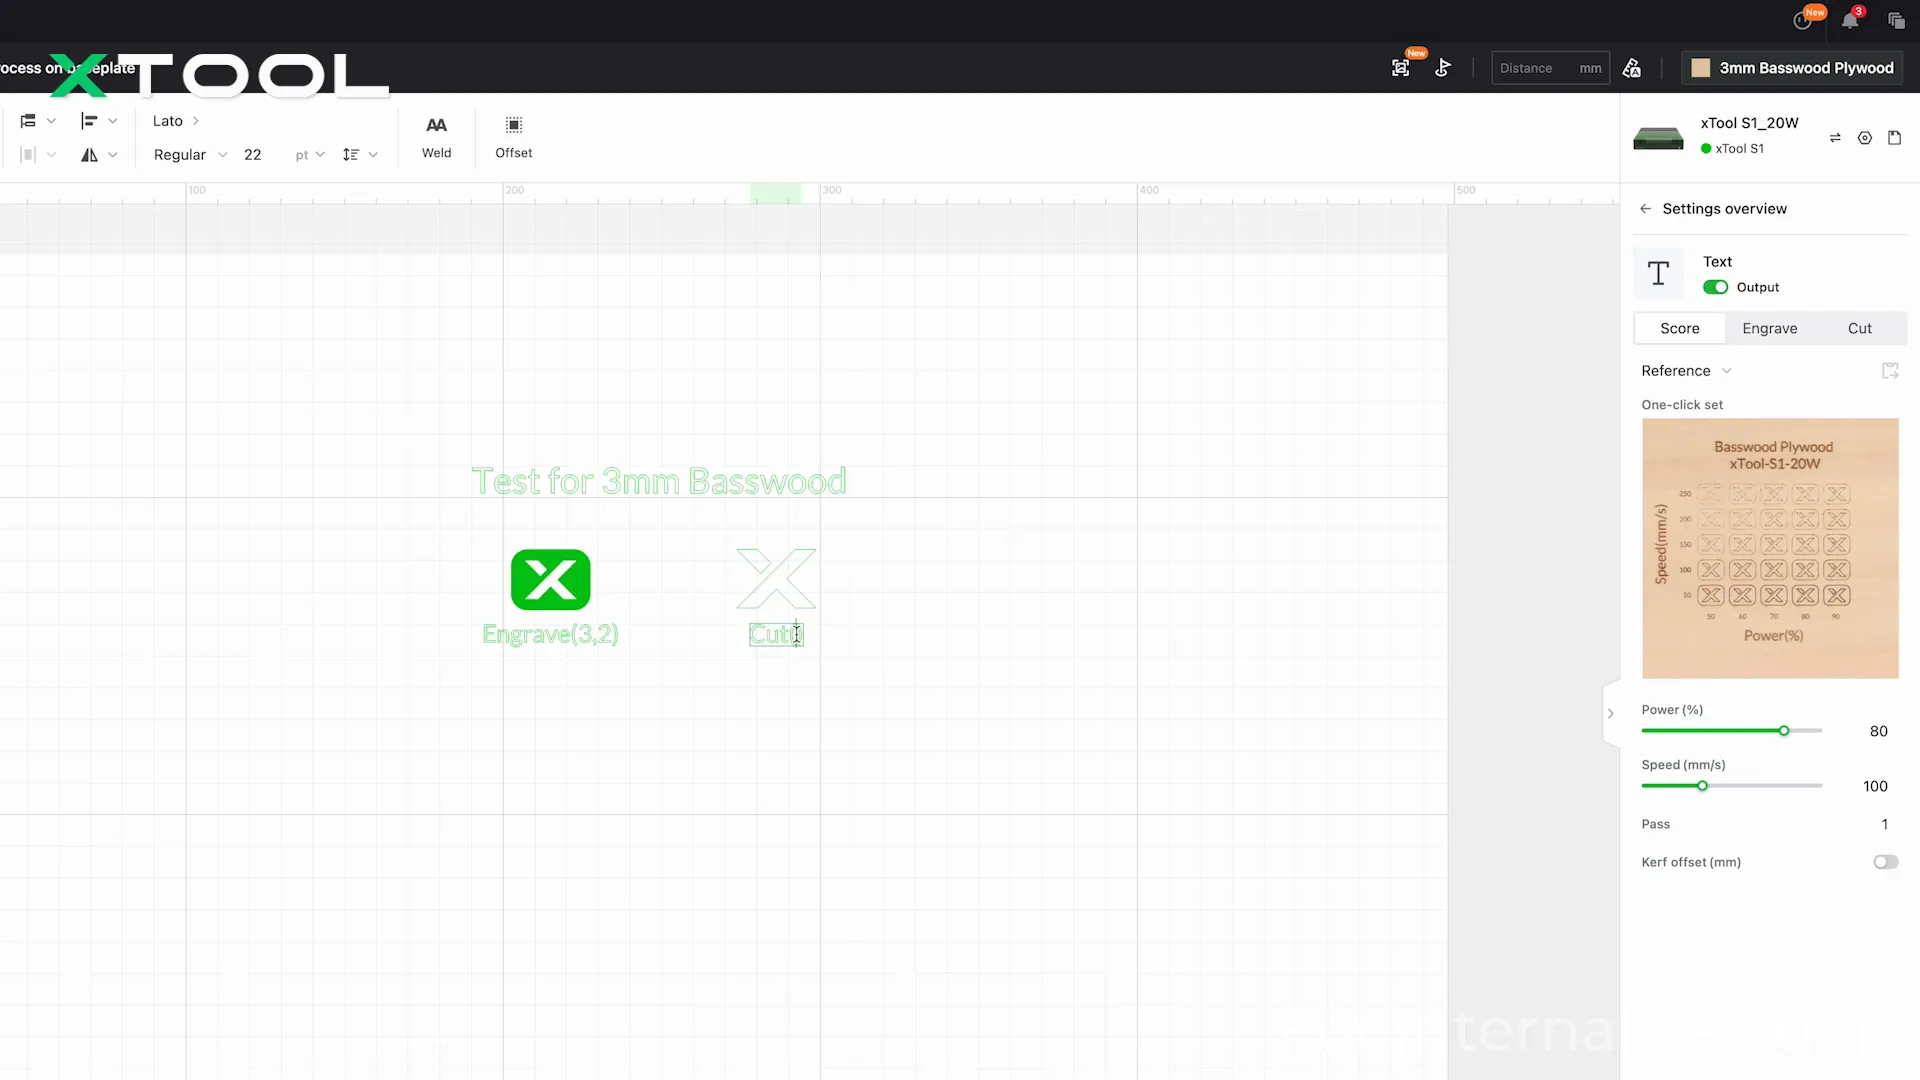
Testing Variants
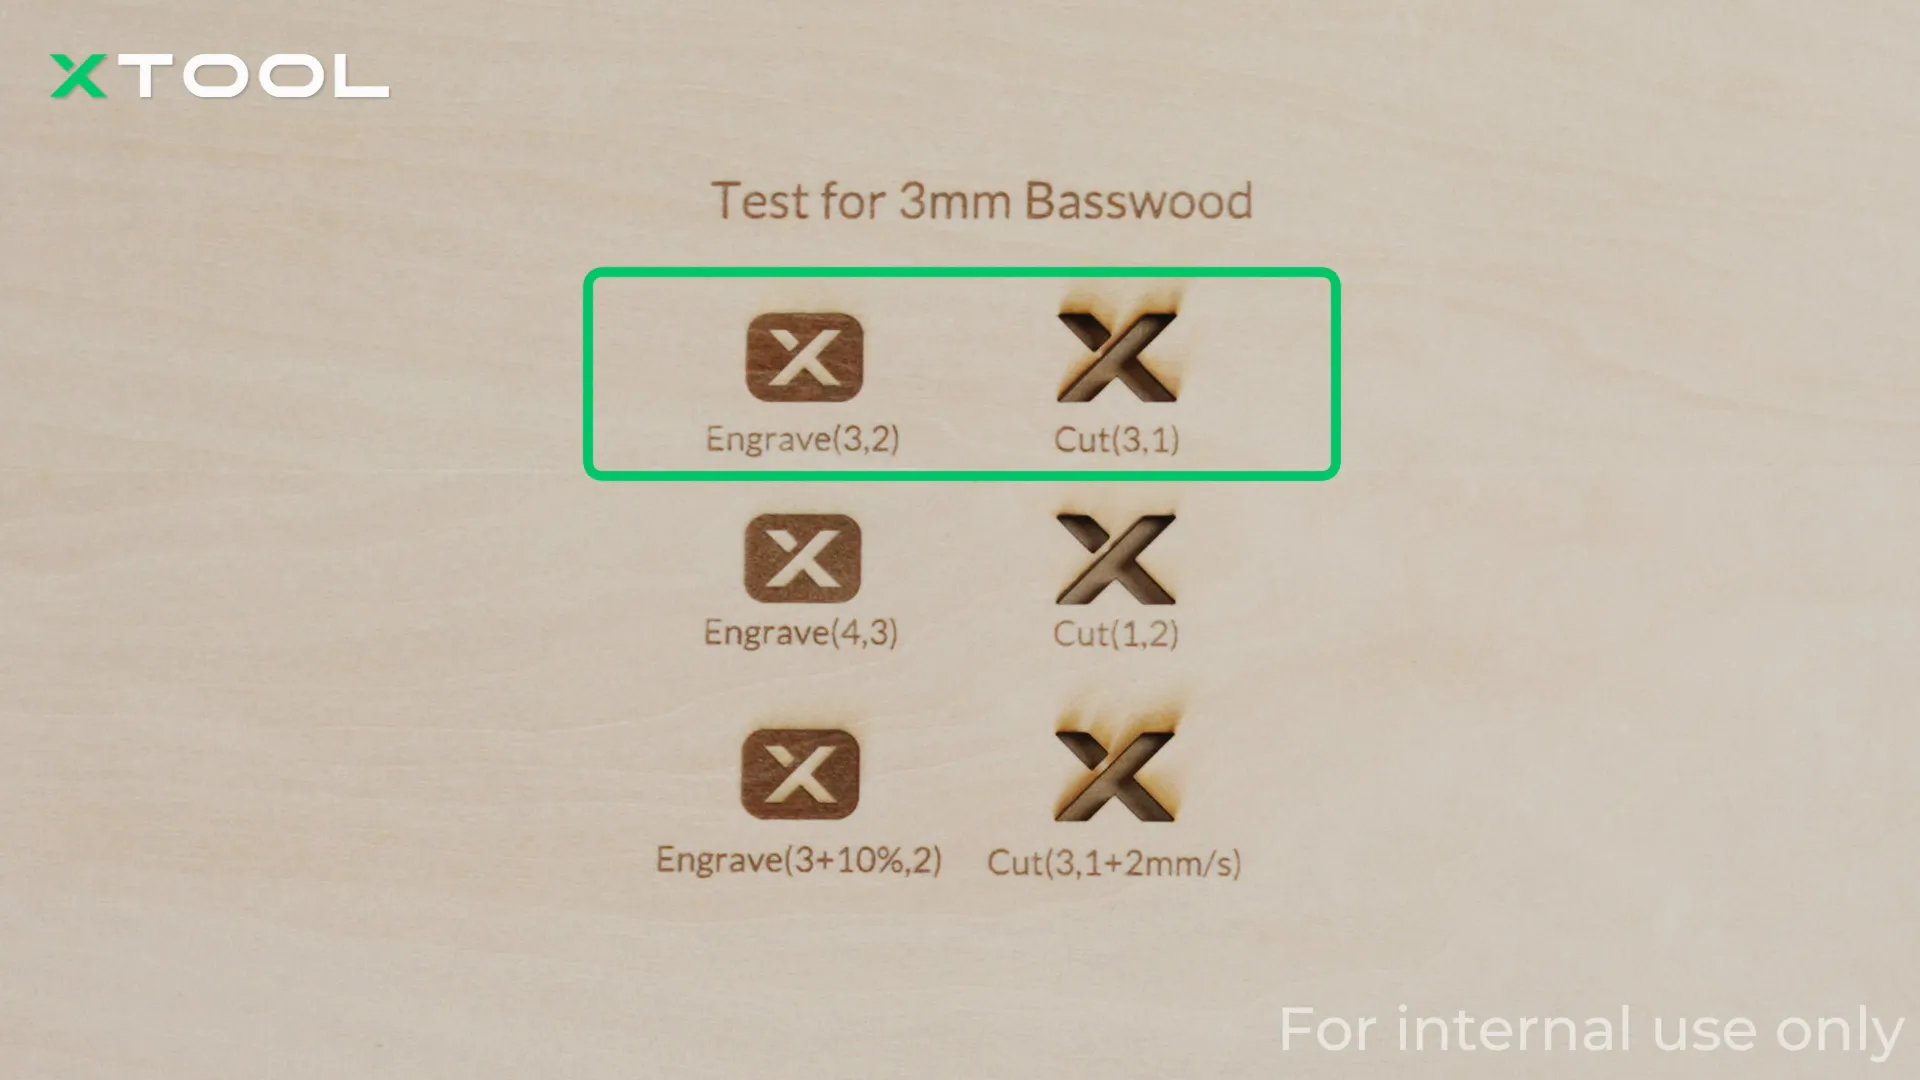
To ensure accuracy, it’s wise to test multiple settings. Create copies of the original settings and tweak them for different outcomes. Adjust power and speed for engraving and cutting to explore various results.
After processing, evaluate how everything turned out. Did the original settings work? How did the test groups perform? This step is crucial for understanding the effectiveness of your settings.
Finding Settings Manually
If you can’t find your material in the library, don’t worry! You can find the settings manually by looking for a similar material. In this case, cherrywood plywood could be a suitable alternative.
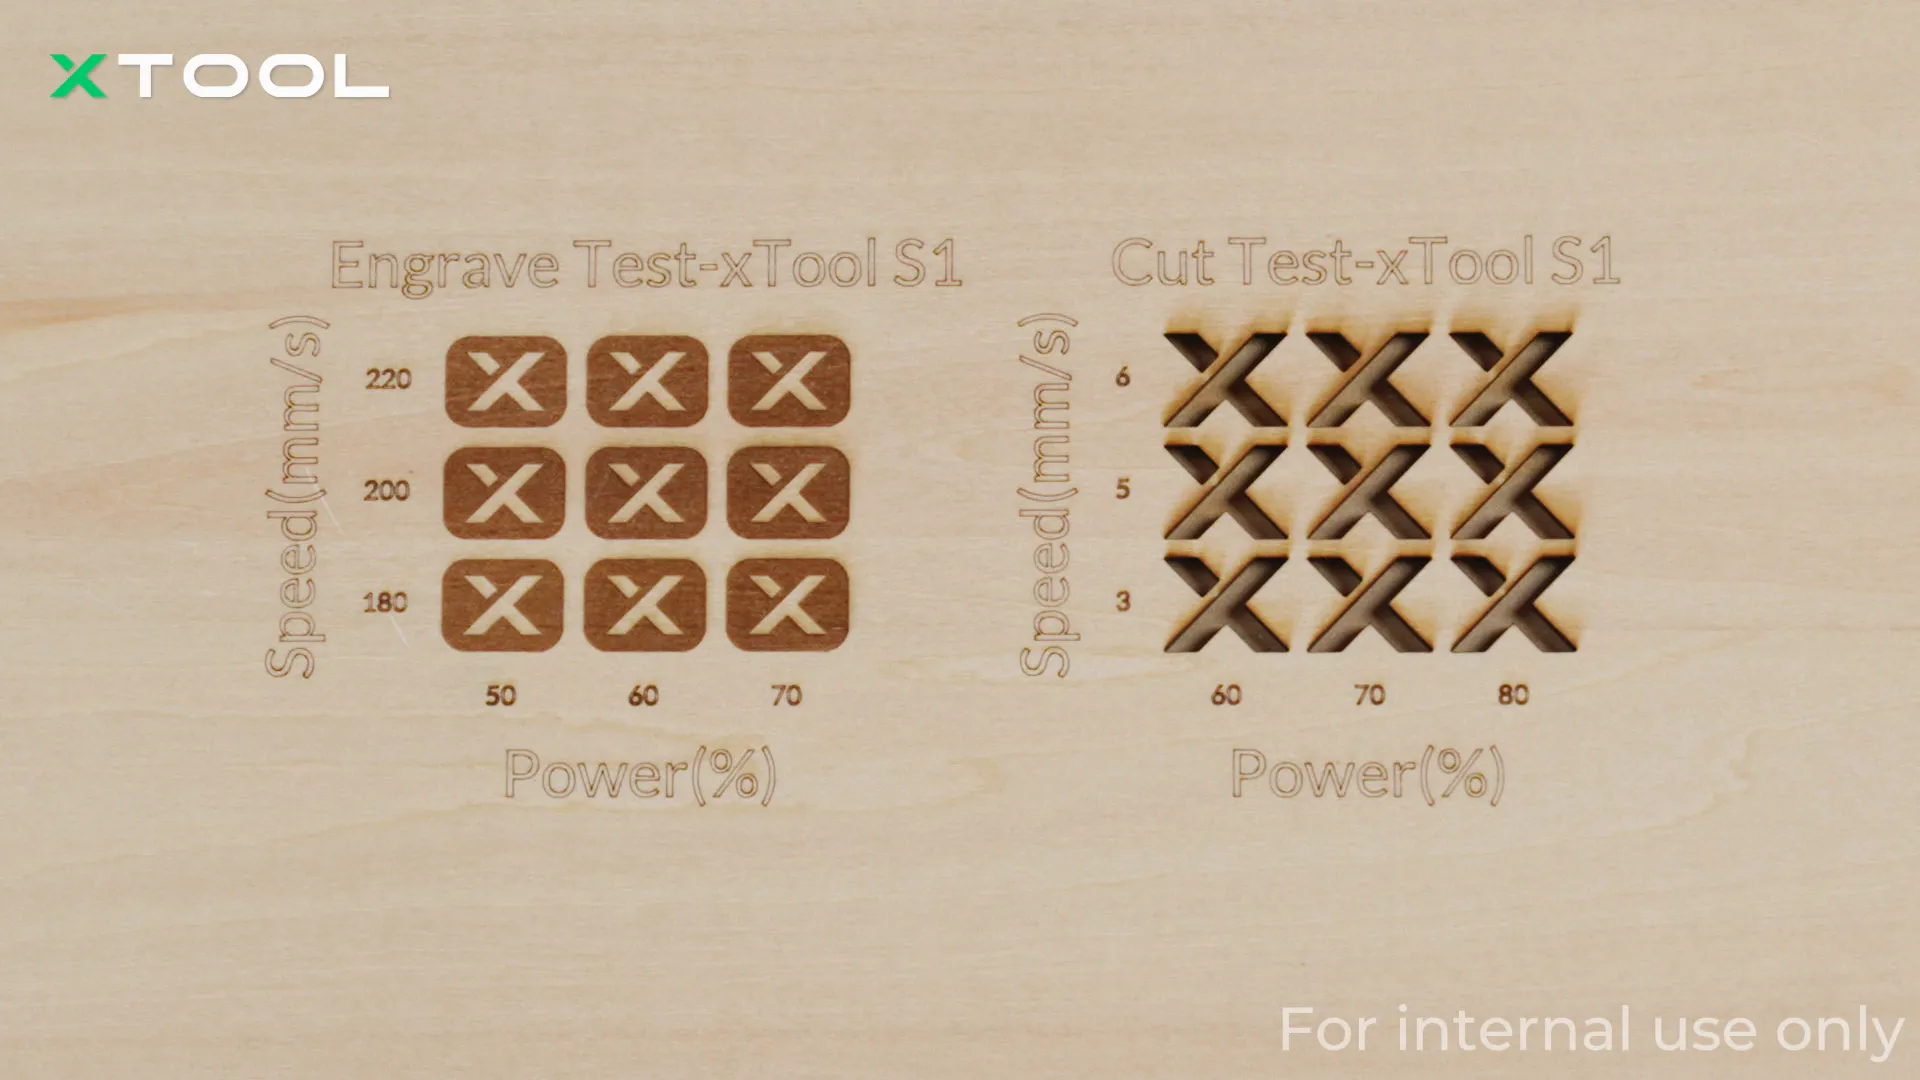
Use the material test array feature in XCS to generate a matrix of parameter combinations for power and speed. This tool allows you to set ranges and quickly test multiple combinations.
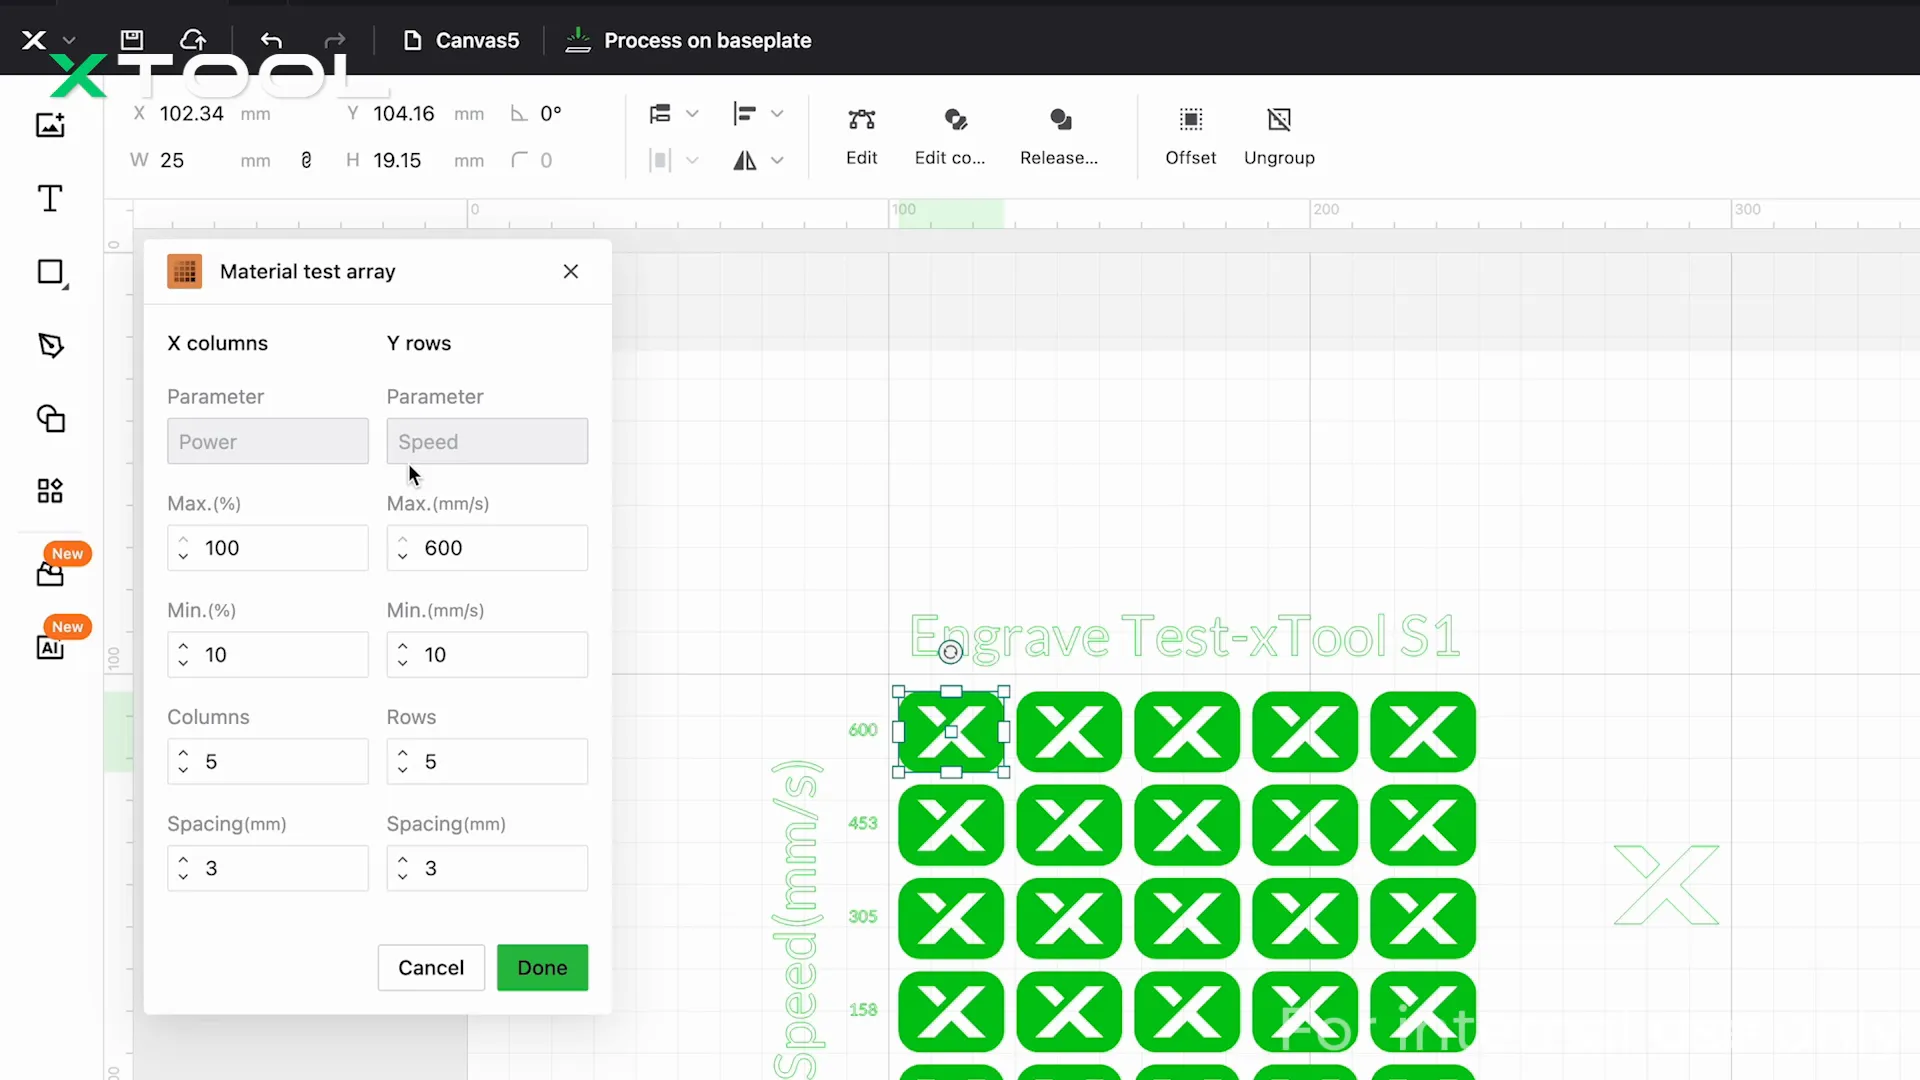
Processing and Evaluating Results
After processing the test grid, evaluate which engraving effect and cutting settings are most effective. Once you identify the best settings, be sure to save them in the material profile for future use.
Finalizing Your Settings
Now that you’ve gathered your initial results, it’s time to optimize your parameters to achieve that perfect 100%. Start by increasing power gradually, keeping adjustments within 10%. If you encounter burn marks, reduce power and focus on speed adjustments.
Through fine-tuning, you can achieve smoother edges with reduced burn marks, ensuring the highest quality results.
Recap and Handy Tips
To wrap things up, here are some key takeaways:
- Test in stages—start with a solid 70% and refine towards 100%.
- Utilize the tools available, like the EasySet material library and material test array.
- Always keep some extra material for testing to allow for experimentation.
Remember, mastering these settings is a skill that improves with practice. The more you work with different materials, the better you’ll become at achieving the perfect settings.
Common Questions and Troubleshooting
As you dive into the world of laser settings, you may encounter some common issues. Here are answers to a few frequently asked questions:
- Why isn't my material cutting all the way through? This could be due to low power or high speed. Try increasing power or slowing down the speed.
- Why are the edges burned or scorched? This often happens when power is too high or speed is too slow. Lower power or increase speed to minimize burn marks.
- Why does engraving leave burn marks? If you see burn marks during engraving, the power may be too high. Lowering power or increasing speed can help.
- How can I narrow down the material test array? Focus on the best parameter combinations from your initial tests to create a smaller matrix for further testing.
- Why do the same settings produce different results on different materials? Each material has unique characteristics that can affect results, so testing each material individually is crucial.
Conclusion
Congratulations on completing this course! You’re now equipped with the knowledge to master laser parameter settings. Fire up your XCS and bring your creative ideas to life. Happy testing!
Services & Help
Learn & Education

Copyright © 2025 xTool All Rights Reserved.