xTool OS1 Automatic Shaker Oven Unboxing and First Use
Download PDF files (multi-language)


List of items
Unbox xTool OS1 Automatic Shaker Oven Machine and check the items inside the pack. If you find items missing or broken, please contact us for after-sales support.
① xTool OS1 Automatic Shaker Oven Machine |
② Smoke exhaust pipe |
③ Power cable |
④ Data cable |
⑤ xTool Selected Apparel Printer powder |
⑥ Screw M5*50 (A spare screw is provided.) |
⑦ Double-end screwdriver |
⑧ Spanner |
⑨ Cleaning brush |
⑩ Quick start guide |
⑪ Safety instructions |
|
Note: The power cable may vary according to kits. The illustration is for reference only. | |


Meet your xTool OS1 Automatic Shaker Oven Machine


Install xTool OS1 Automatic Shaker Oven Machine and xTool Apparel Printer
1. Secure xTool OS1
When you place xTool OS1, leave at least 1 m (40 inches) of space at the back and 90 cm (35 inches) of space on both sides for daily use and maintenance.


(1) After the position of xTool OS1 is determined, unscrew the bottom nuts on the four foot cups with a spanner.

(2) Unscrew four foot cups with your hands until the foot cups touch the floor.
(3) Keep unscrewing the foot cups until the wheels are off the floor.
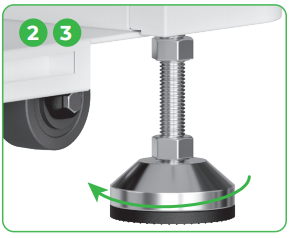
(4) Screw the upper nuts on the four foot cups with a spanner.

2. Place xTool Apparel Printer
(1) Remove the output tray from the printer.

(2) Disconnect the power supply of the printer.

(3) Move the printer and place it on xTool OS1.
💡 Pay attention: • To ensure your safety and avoid device damage, the printer should be moved by at least two adults. (The printer sold separately.) |

(4) Align the printer's delivery slot with the xTool OS1's connection slot and connect them.


3. Secure xTool Apparel Printer and xTool OS1
(1) Open the lid of the printer.

(2) Prepare two screws and a screwdriver. Install two screws in the holes, and tighten them.


4. Add the powder
(1) Press the door to open the powder bin. Hold the handle to rotate the powder bin 180° clockwise.

(2) Hold the handle and pull out the powder bin.

(3) Pour the powder into the powder bin evenly, one pack at a time. The weight of the powder should be ≤ 1 kg.

💡 Make sure there are no foreign objects in the powder bin. If there are any, remove and dispose of them promptly. |

(4) Slide the powder bin back to the device. Rotate the powder bin 180° anticlockwise to pour the powder into xTool OS1. Close the door.


5. Install the output tray

(1) Fold the output tray.

(2) Turn over the output tray and open the two stands under it.

(3) Install the output tray on the device.

6. Connect xTool OS1 to xTool SafetyPro™ AP2

💡 xTool SafetyPro™ AP2 sold separately. |

(1) Install the adapter on the pipe.

(2) Stretch the smoke exhaust pipe as long as it will go. Then, install the pipe on xTool SafetyPro™ AP2.

(3) Install the other end of the pipe to the device. Then, connect the power cable to xTool SafetyPro™ AP2.

Use xTool OS1 Automatic Shaker Oven Machine
1. Connect xTool OS1 to xTool Apparel Printer

Connect one end of the data cable to the port on the printer, and connect the other end to the data port on the shaker oven.

2. Connect to a power supply

💡 To ensure the normal functioning and maintenance of the printer, do not disconnect its power supply. |

Turn on the power switch of xTool OS1.

3. Get the software
Go to s.xtool.com/software to download and install the xTool software.

4. Connect xTool Apparel Printer to a computer

Plug the USB cable into the USB port in the printer and the computer.

For details about how to use the software to operate xTool Apparel Printer and xTool OS1, go to Operate xTool OS1 Automatic Shaker Oven Machine in xTool Software.
FAQ
1. I want to open the maintenance door. What can I do?
(1) Turn off the power switch of xTool OS1.

(2) Detach the screwdriver handle and bit. Use the narrow end of the bit.

Unscrew the screw of the maintenance door.

(3) Press the round pull and open the maintenance door.

(4) Close the maintenance door after use.

(5) Tighten the screw.

(6) Turn on the power switch.

2. How does xTool SafetyPro™ AP2 work with xTool OS1?
Go to Use xTool SafetyPro™ AP2 on xTool Software to learn more.
Services & Help
Learn & Education

Copyright © 2025 xTool All Rights Reserved.