

xTool S1 riser base is designed to raise the height of xTool S1. It supports the automatic conveyor feeder and allows xTool S1 to work with the rotary attachment. With the riser base, xTool S1 can be used in more scenarios and process materials of larger sizes.
Note: xTool S1 Riser Base Supporting Conveyor Feeder provides two color options. This article uses the black version for illustration.
Safety first (important)
Read and get familiar with all safety precautions and procedures before using the machine. Strictly follow all safety precautions. Ensure that the machine is properly assembled and is working properly.
1. Laser safety
Lasers are categorized into several different classes depending on the extent of the potential hazard associated with the laser, with Class 1 being the least dangerous and Class 4 the most dangerous. The United States Food and Drug Administration has indicated that Class 4 lasers may pose an “immediate skin hazard and eye hazard from exposure to either the direct or reflected beam; may also present a fire hazard."
xTool S1 is classified as a Class 1 laser machine containing a Class 4 working laser and a Class 1 indicator laser. When working with the riser base, however, xTool S1 should be classified as a Class 4 laser machine. Diffused laser beams may leak out from the openings when the door panels of the riser base are opened, and you may be exposed to Class 4 laser radiation. When working with the riser base, xTool S1 is intended for professional use only, and more precautions are required for safe operation.

When using xTool S1 with the riser base, follow the safety precautions:
- ONLY professionally trained personnel are allowed to use the device. A qualified Laser Safety Officer (LSO) must be designated and the device shall be operated by or under the guidance of the LSO. LSO is obliged to set up safety control mechanisms to prevent untrained persons from entering the laser radiation hazard area.
- Before using the device, complete xTool's Laser Safety Awareness Training Course and review LSO Training documents, available at xTool Creative Space (XCS) and support.xtool.com/article/1171 for more information on Class 4 lasers, their uses, and their potential hazards. In the workplace context, you shall also receive adequate Class 4 laser product safe operation training as set forth in ANSI Z136.1, which is on the responsibility of the employer to provide.
- Do not operate the device when any part of it is removed. Removing any part may expose the laser system and cause damage to the device.
- Place the baseplate at the intended level inside the riser base. Do not process a material without the baseplate.
- Keep the door panels closed unless you are to process a material that is too long for xTool S1.
- If you have to process a material with the door panels opened, wear safety goggles that can shield your eyes from 455 nm or 1064 nm laser beams (depending on the wavelength of the laser beams produced by the laser module you use). Besides, do not put your hands into the riser base during laser processing. Avoid eye or skin exposure to direct or scattered laser radiation, or you may get hurt.
- If your skin gets burned by laser beams, disinfect the skin with a povidone-iodine solution immediately and apply burn ointment to the wound. If you are severely burned, go to a hospital and see a doctor as soon as possible.
- Do not use the device in public places, or on other occasions where untrained persons or children are present.
2. Chemical safety
A high-density laser beam is used by the device to irradiate the material to be cut or engraved, so as to heat up the material surface and vaporize the material without burning. But some materials may release toxic and harmful smoke or gases at a high temperature. Therefore, precautions are required for chemical safety during material processing.

Follow the safety precautions:
- Do not engrave or cut any material that contains PVC or vinyl (processing plastics is not recommended). These materials (and other materials containing chlorine/chloride) can generate corrosive vapor that is extremely harmful to the human body and can cause damage to the device. Any damage caused by engraving or cutting any material containing PVC or vinyl is not covered by the Company's warranty.
- Do not engrave or cut any unknown materials. Vaporization or melting of many materials, which include but are not limited to PVC and polycarbonate, may release harmful smoke.
3. Fire safety
A high-density laser beam is used by the device to irradiate the material to be cut or engraved, so as to heat up the material surface and vaporize the material without burning. But most materials are inherently flammable and may be ignited to form an open flame that can burn down the device (even if it is made of flame-retardant materials) and its surroundings. Experience shows that vector cutting with a laser is most likely to produce an open flame.


Read the following warnings and suggestions carefully:
- Ensure that the workspace is well-ventilated so that the generated smoke can be discharged in time.
- Do not stack materials (especially organic ones, such as paper) around the machine. They may cause the spread of flames and increase the risk of material ignition.
- Do not leave the machine unattended when it is working. If the machine works with setting errors and is left unattended for a long period of time, or if a mechanical or electrical fault occurs, a fire may be caused.
- Clean the device regularly. Excessive accumulation of residues and chippings from cutting and engraving would increase the risk of fire. The internal working area needs to be cleaned periodically to ensure that there is no residue or chipping inside the device.
- Ensure that the area around the machine is clean without any cluttered flammable materials, explosives, or volatile solvents, such as acetone, alcohol, or gasoline.
- Keep a fire extinguisher and perform regular maintenance and inspection of it.
- When the laser machine cuts or engraves flammable materials at low speed and high power, the materials are prone to be ignited to form an open flame. If an open flame occurs, please stop processing in time.
- Place and use the device in locations where children are not likely to be present.
4. Electrical safety

Read the following warnings and suggestions carefully:
- Do not open any access panel on the device when the device is connected to the power supply. Accidental contact with the power supply may cause injury.
- Do not touch any electronic area with your hands or other tools when the machine is connected to a power supply.
5. Use and maintenance
Follow the operating principles:
- Check the machine for damage every time before you use it. Do not operate it in any way when any damage or defect is found.
- Ensure that the workspace is clean and flat.
- Do not disassemble the machine or change its structure in any way without authorization. Do not modify or decompile its operating system.
- Do not leave the device unattended during operation. Pay attention to whether it is working properly.
- Keep the inside of the machine clean. Residues and chippings accumulated during cutting and engraving are dangerous and may cause a fire. Clean the chippings and residues inside the work area regularly.
- The machine works properly at the temperature of 0°C to +35°C and can be stored properly at the temperature of –10°C to +40°C. Do not operate it at a temperature lower than 0°C.
- Cut off the power before maintaining the device.
- This product is not user-serviceable. It must be returned to the factory or repaired by authorized professionals.
- Use of controls or adjustments or performance of procedures other than those specified herein may result in hazardous radiation exposure.
6. Warning and instruction signs
On the device, the warning and instruction signs are labeled where physical injuries or damage to the machine may be caused before and/or during operation. If a sign is damaged or lost, replace it immediately. You can use the following template to print the sign you need.
.png)

.png)
Laser specifications

List of items
.png) | Left side panel |
.png) | Right side panel |
.png) | Front door panel |
.png) | Back door panel |
.png) | Light blocking strip |
.png) | Laser safety goggles |
.png) | Hex key |
.png) | Screw M3*14 |
.png) | Screw M3*20 |
.png) | Screw M3*6 |
.png) | User manual |
Meet the riser base

Assemble the riser base
(1) Assemble the riser base.


Note: Do not fully tighten the screws in the left-back and right-front corners here, so you can adjust the panels later.


(2) Remove the baseplate of xTool S1.

Note: xTool S1 is not included in the pack.


(3) Fix xTool S1 onto the riser base.


Note: Mind your hands when placing xTool S1 on the riser base.

(4) Press to open the front and back door panels, and tighten the screws in the left-back and right-front corners.


Note: Do not lift or move xTool S1 after fitting it on the riser base. If you lift or move it, the screws of the riser base may become loose and the door panels may be deformed due to the weight of the device.
(5) Stick light blocking strips to the front and back door panels.


(6) Check if the door panels can be closed in place. If you find a gap, adjust the magnetic rod of the magnetic lock.


Note: Rotate counterclockwise to extend the magnetic rod and clockwise to retract it.
Check and adjust the back door panel in a similar way.

(7) Slide the baseplate from xTool S1 into a proper level of the riser base.


Use the riser base
Process thick materials

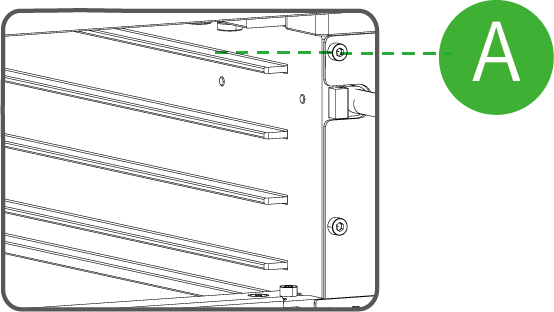
The riser base provides four levels of heights to support materials of different thickness.
| Material height (H) | Level of the riser base |
| 15.5 mm ≤ H ≤ 70.5 mm |  |
| 36.5 mm ≤ H ≤ 91.5 mm |  |
| 57.5 mm ≤ H ≤ 112.5 mm |  |
| 78.5 mm ≤ H ≤ 133.5 mm |  |
Note: If you are to use the honeycomb panel or slats, you need to subtract the height (26 mm for the honeycomb panel and 8 mm for the slats) to determine the supported material thickness.
For example, if you use the honeycomb panel at level C, the supported material thickness (H) is 31.5 mm < H ≤ 86.5 mm.
Note: For materials with a thickness of 0 mm < H ≤ 15.5 mm, you can use xTool S1 without the riser base.
Place the baseplate at a proper level based on the thickness of the material.

Process long materials
You can install xTool S1 automatic conveyor feeder on the machine to process long materials.
.png)

Note: xTool S1 automatic conveyor feeder is not included in the pack. You need to purchase it before use. For details about how to use it, see User Guide for xTool S1 Automatic Conveyor Feeder and (XCS V2.0) Use the Conveyor Feeder with xTool S1.
Process cylindrical materials
You can install rotary attachment on the machine to process cyclindrical materials.
.png)
Note: The rotary attachment is not included in the pack. You need to purchase it before use. For details about how to use it, see
xTool Rotary Attachment 2 (RA2) User Guide and (XCS V2.0) Use the Rotary Attachment with xTool S1.
- The riser base supporting conveyor feeder has four levels of height to place the baseplate. You need to determine the level to place the baseplate based on the size of the material.

The following table shows how to choose levels for different sizes of materials in different working modes.
The working mode of the rotary attachment | The material diameter | The level of the riser base |
Roller mode
| 3 mm ≤ D ≤ 60 mm |
|
4 mm ≤ D ≤ 72 mm | 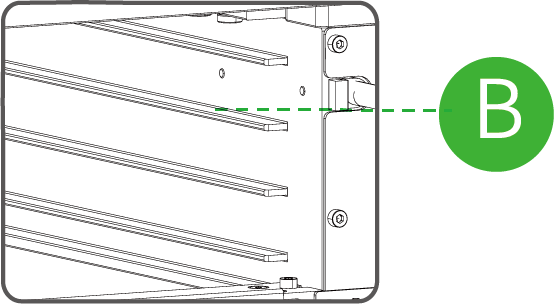 | |
20 mm ≤ D ≤ 88 mm | 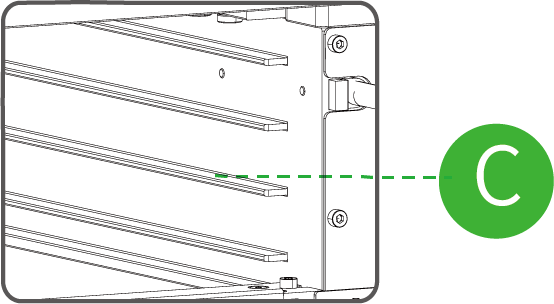 | |
50 mm ≤ D ≤ 106 mm |  | |
Chuck mode
| 4 mm ≤ D ≤ 82.2 mm |  |
14.2 mm ≤ D ≤ 100 mm | 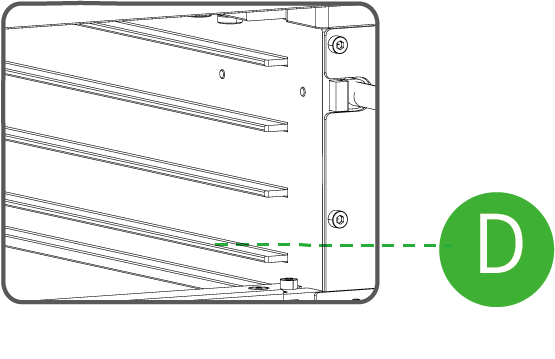 |


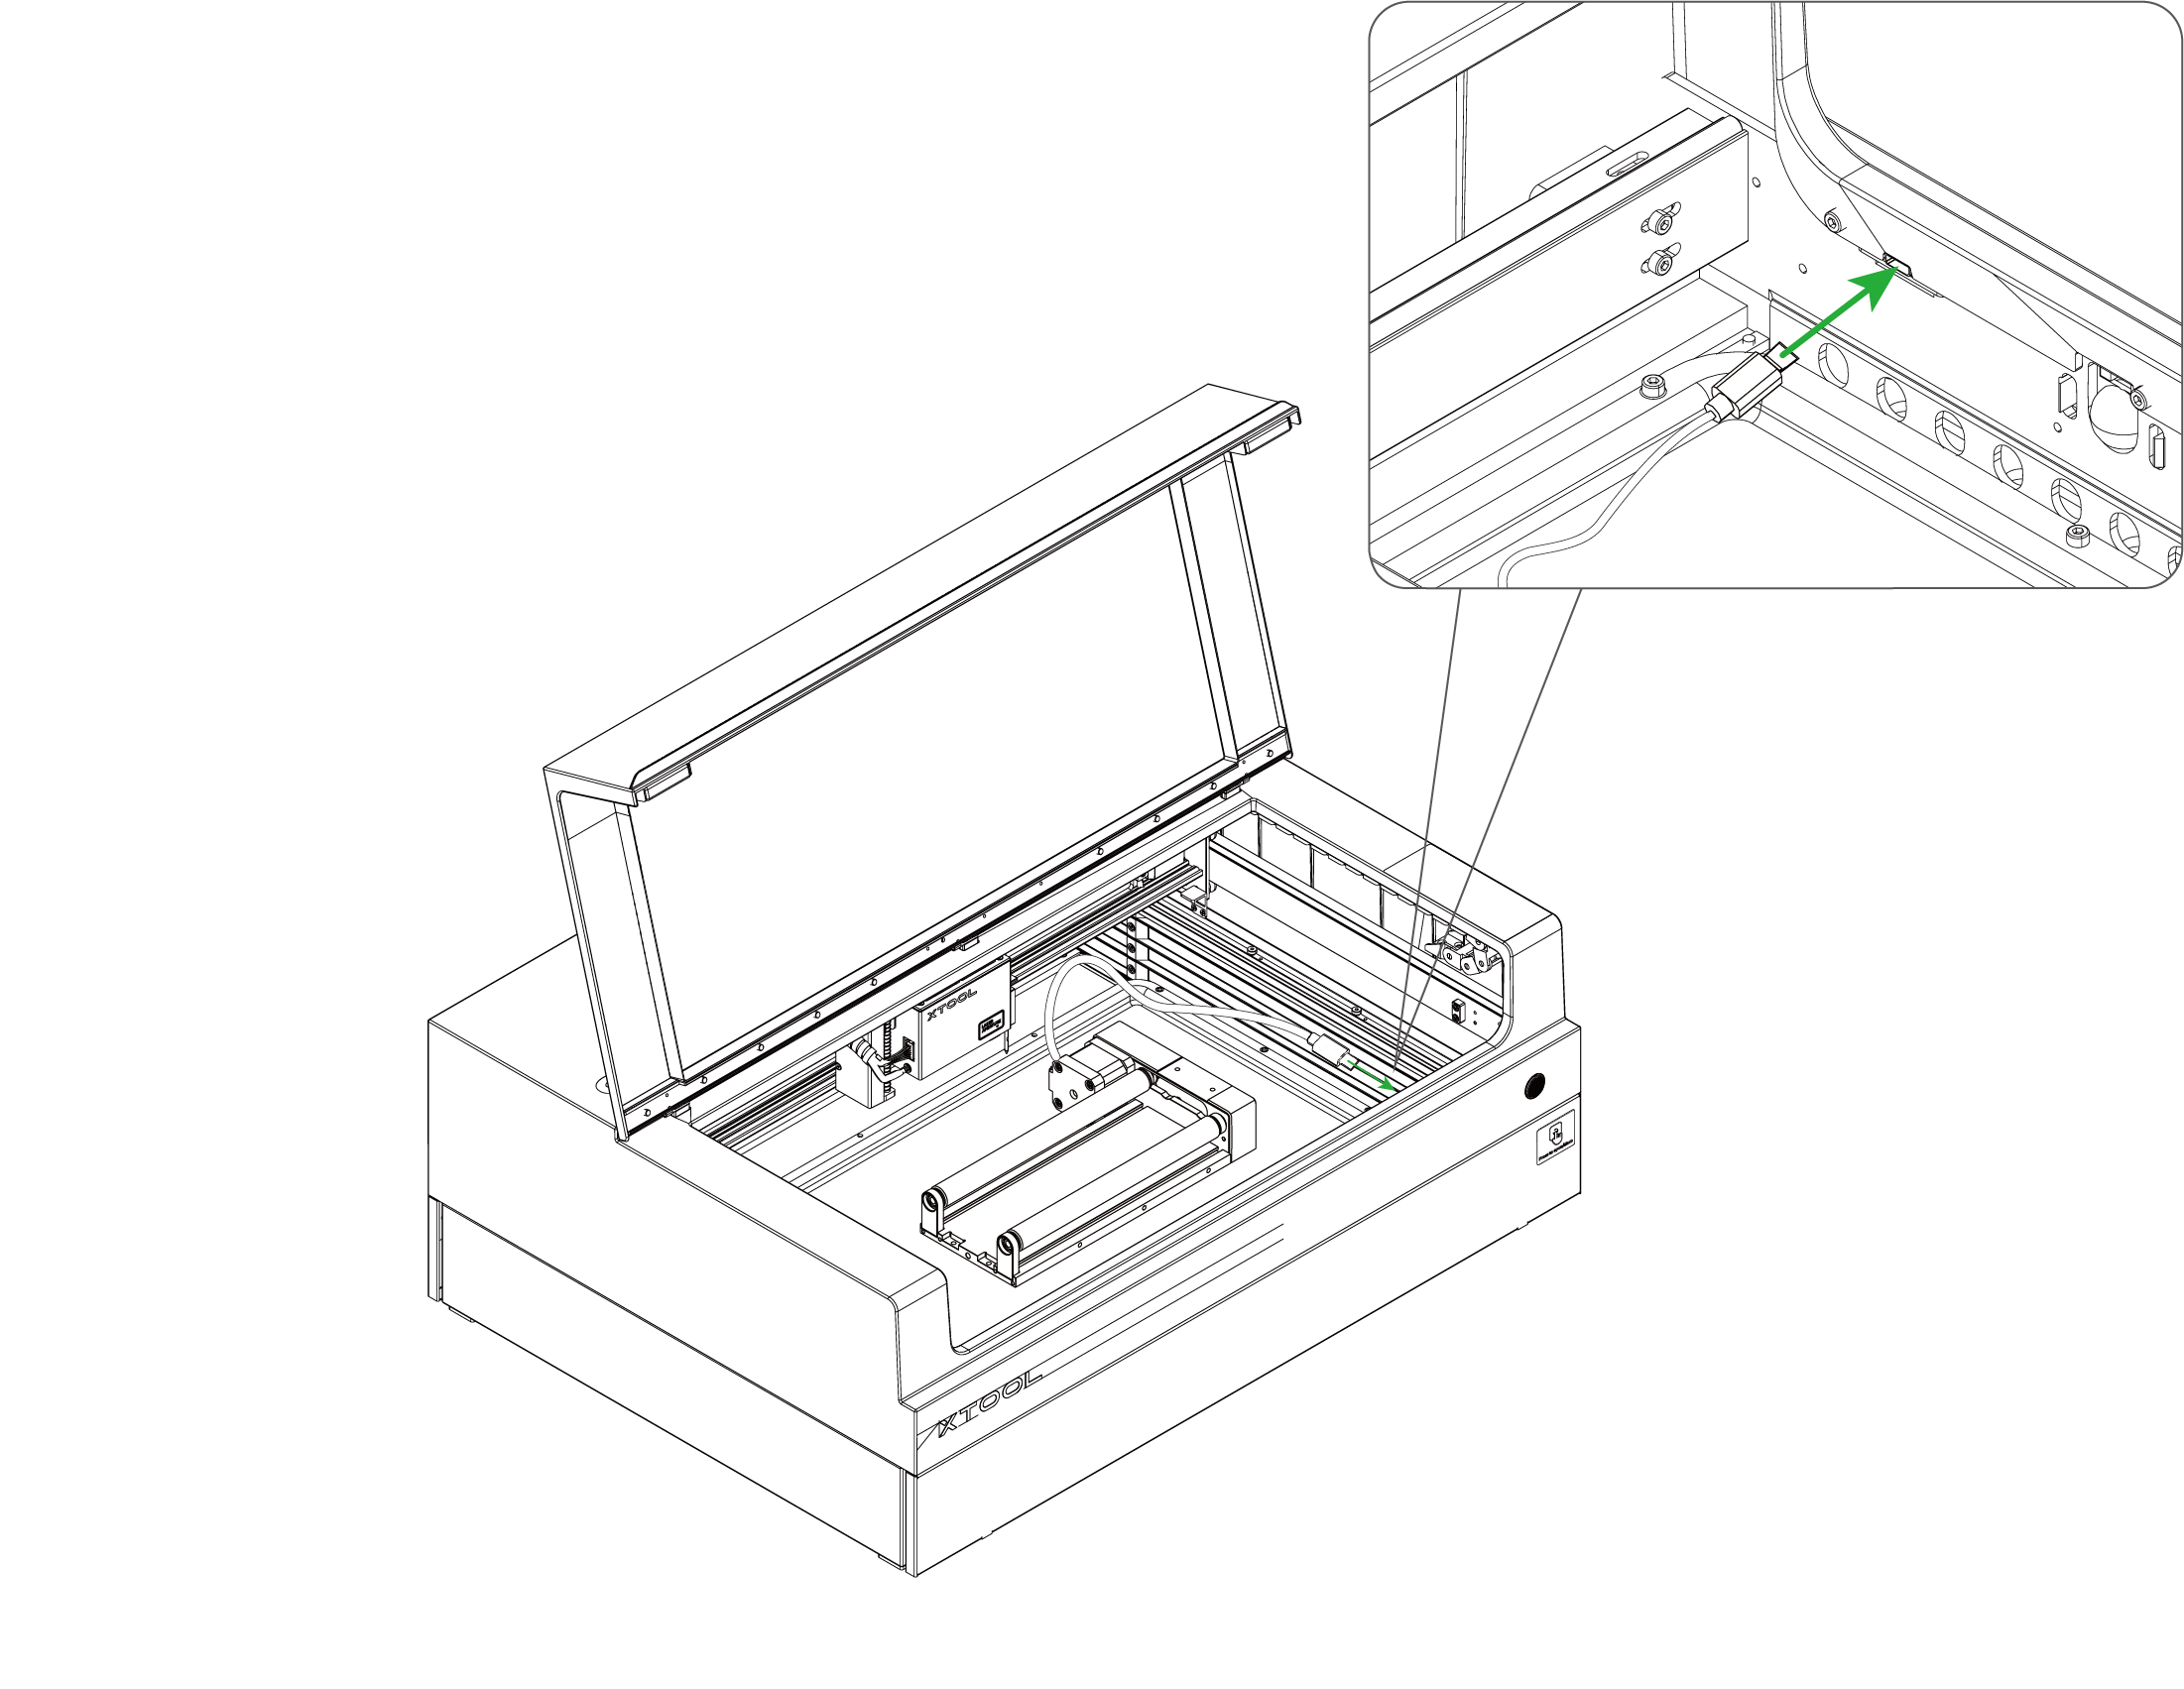
- Insert one end of the connection cable into the device connection port of the rotary attachment.
Note: If the connection cable included in the rotary attachment pack is incompatible with xTool S1, you need to purchase a compatible one.

- Place the rotary attachment with the material in the processing area of xTool S1. Ensure that the long bottom edges of the rotary attachment are parallel to the front and rear bottom edges of xTool S1.
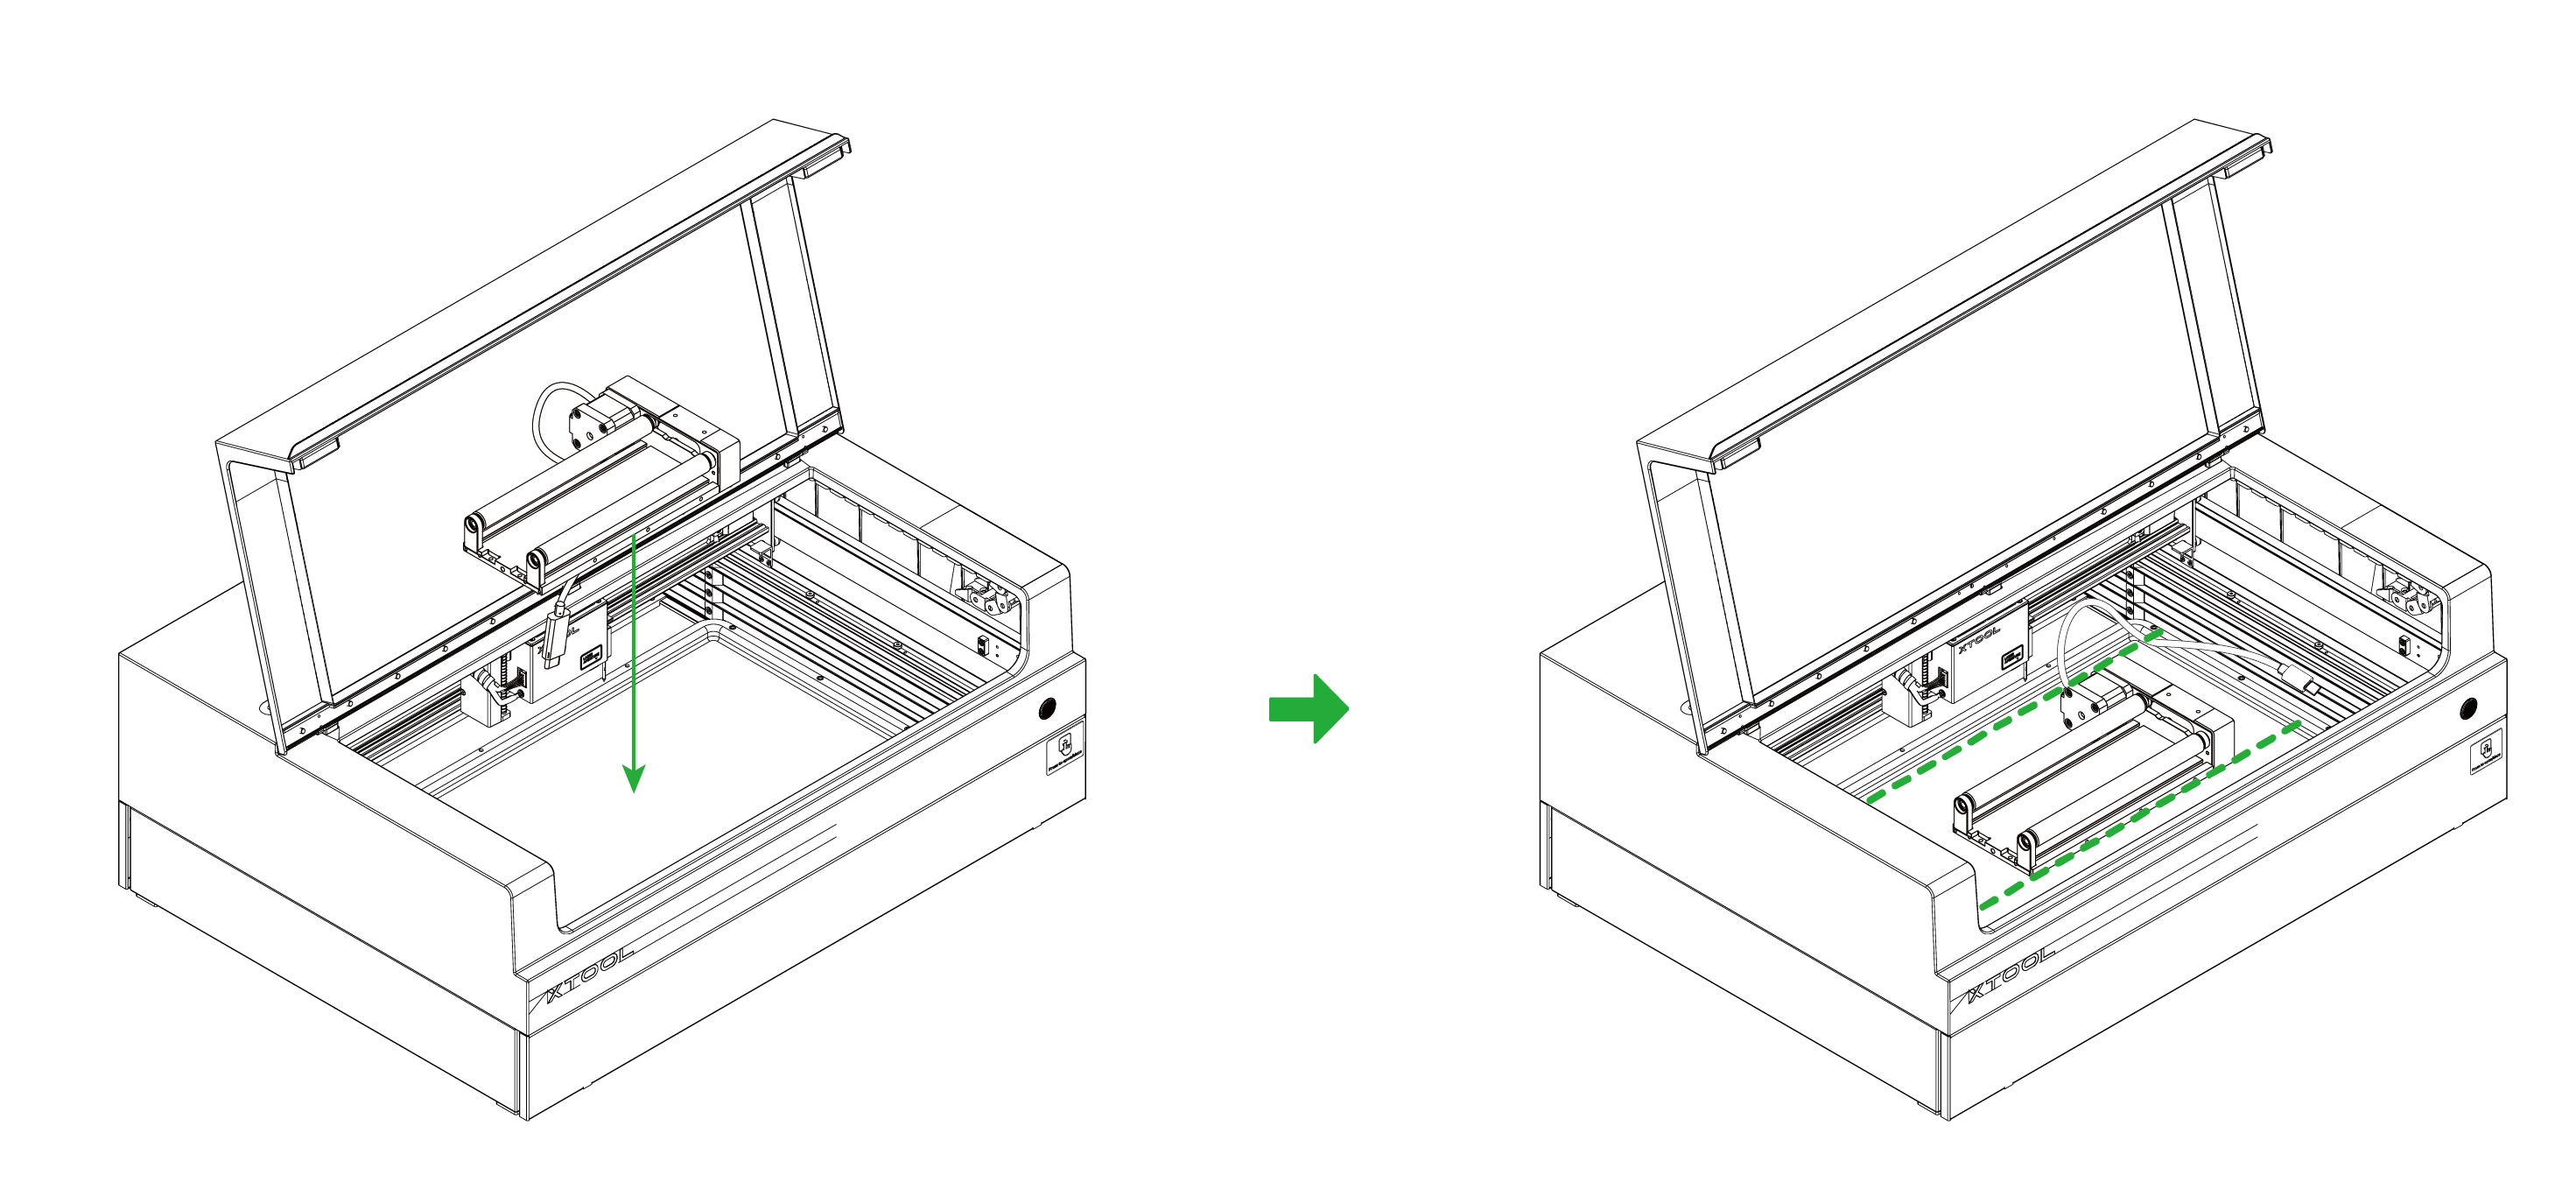
- Insert the other end of the connection cable into the extension port on the inner side of xTool S1's front panel.
Note: Turn off xTool S1 before connecting it with the rotary attachment.
Services & Help
Learn & Education

Copyright © 2025 xTool All Rights Reserved.