Screen printing mainly includes three steps: mount the screen, engrave the screen, and print the design. You can use xTool S1 to engrave the screen for printing.
Note: For more information on how to start screen printing, see Reading Guide for xTool Screen Printer.
1. Mount the screen and place it in the working area
(1) Follow the instructions in “Step-by-step Guide: (1) Mount a Screen” to mount the screen on the frame.

(2) Turn over the screen assembly, with the back of the screen facing up.
.png)
Note: To ensure a better processing effect and protect the baseplate, you are advised to make the back of the screen face up.
(3) Open the lid of xTool S1, and place the screen assembly stably on the baseplate.

Note: There is a small area on the left of the baseplate out of the reach of the laser. You are advised to place the screen assembly at the right of the center to ensure a larger processable area.
Note: If you need to engrave multiple screens for multi-color printing, you are advised to use the frame fixing piece for xTool S1. For more information on how to use a frame fixing piece and process screens for multi-color printing, see Use the Frame Fixing Piece for xTool S1 and Process Screens by Layer for Multi-Color Printing.
2. Open or create a project
You can open a project to start processing or create a new project. If you create a new project, you need to design patterns and set parameters from scratch.
Open a project

Note: The project file can contain information such as processing patterns, processing modes, and processing parameters. However, if the machine model, processing mode, or material thickness used in the project varies from the current situation, you need to reset the corresponding parameters.
Create a new project

3. Select the processing mode and material name

Note: We do not recommend you to use customized materials. Because after you choose the official coated screen, the parameters will be matched automatically and the processing effect is basically guaranteed.

Note: If you turn on Laser module position, XCS will display the position of the laser module in real time. The red cross in the canvas indicates the laser module, and the coordinates of the laser module are shown near Laser module position.

4. Set the laser focus
xTool S1 has a distance sensor, which can measure the distance between the laser module and the material surface. You can also manually measure and calculate the distance between the laser module and the material surface, and input the obtained values into XCS.
During processing, xTool S1 will perform auto-focus based on the Distance parameter.
- Auto measure
(1) Move the laser module over the material. Ensure that the locating spot falls on the surface of the material.
.png)
(2) In the top-right corner of XCS, click the Auto-measure icon  , and xTool S1 will automatically measure the distance from the laser module to the material surface.

Note: Before auto-measure, ensure that the probe of the distance sensor is not extending.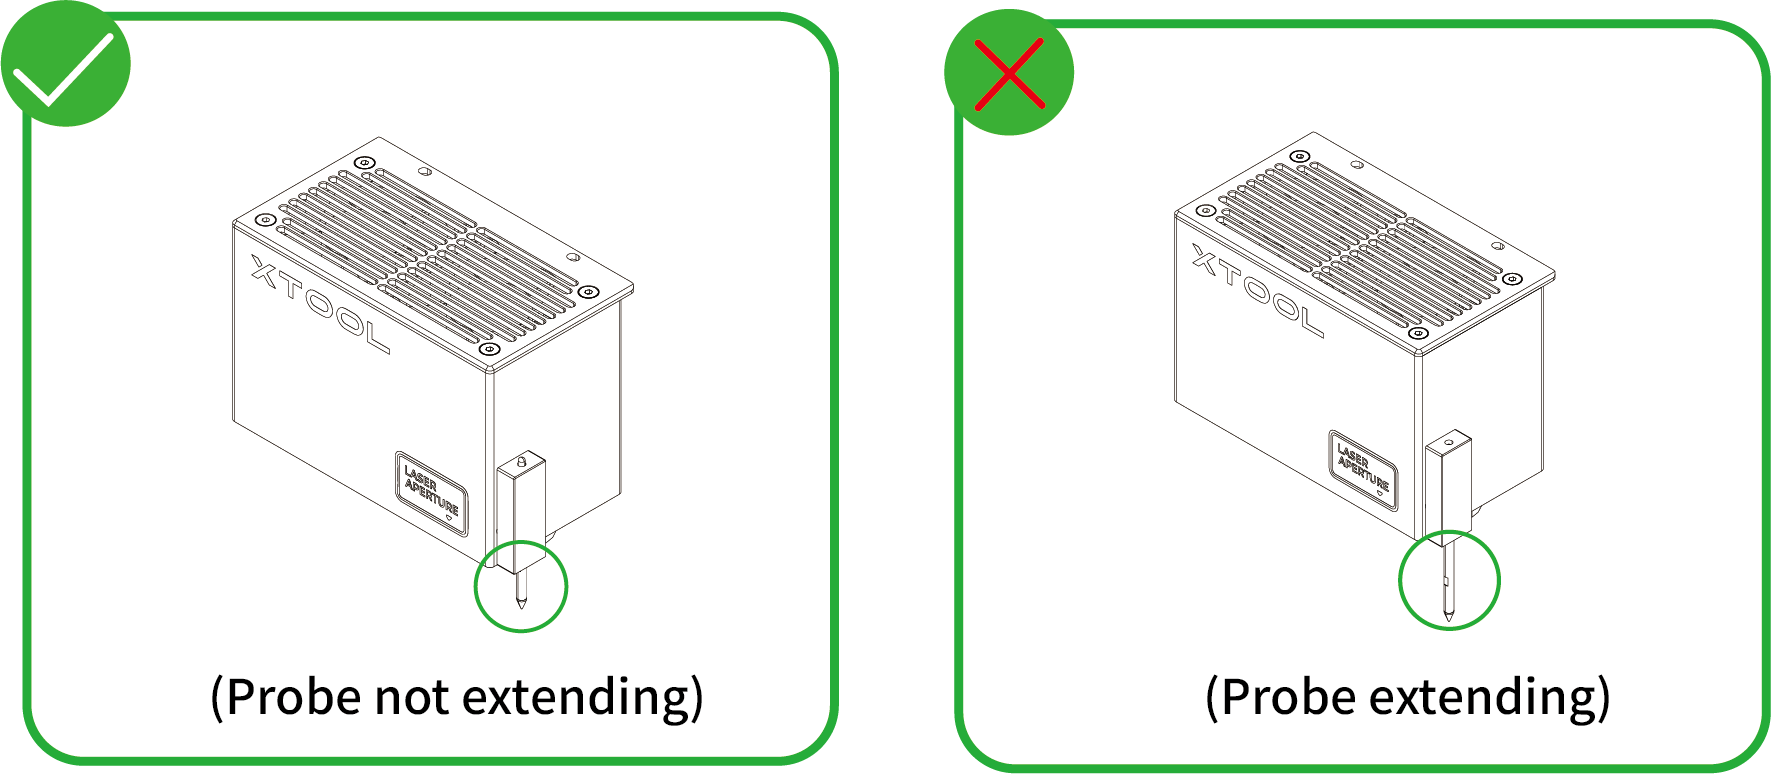
- Manual measure
(1) Use a ruler to measure the distance from the surface of the material to the top of the laser module.

(2) Subtract 100 mm (3.937 inches) from the measured value from step (1), and input the calculated value as Distance in the top-right corner of XCS.

5. Mark the position of the screen on the canvas
Note: If you use the frame fixing piece to fix the frame on the working area, you do not need to mark the processing area. Select the size of your screen, and XCS will display the best processing area on the canvas with a green rectangular.
(1) In the top-right corner of XCS, click the Mark processing area icon  .
.
(2) Select Rectangle and click Start marking.

(3) Manually move the laser module to make the red cross spot fall at the upper-left vertex of the screen, and press the button on the device to record the position. Then, move the laser module again until the red cross spot falls at the bottom-right vertex of the screen and press the button on the device.
.png)
.png)
.png)
(4) Click End marking > Done, and then the target processing area will be marked out on the canvas.

.png)

6. Design objects for processing
Note:
● If you are using the frame fixing piece, design the pattern inside the green box. The green cross represents the center of the screen.
● If you are not using the frame fixing piece, design the pattern inside the black box, which is the marked processing area.
Note: It is recommended to place the design in the center of the processing area, as the center of the screen has the best tautness for optimal engraving and printing results.
(1) Use the tools to the left side of the canvas to create objects. You can import images, insert shapes, enter text, or draw vector graphics.

Note: XCS supports importing the following image formats: SVG, DXF, JPG, JPEG, PNG, BMP, etc.
(2) Reflect the pattern horizontally or vertically.
xTool S1 will engrave on the back of the screen, so you need to reflect the pattern horizontally or vertically.
Note: You may need to rotate the pattern depending on how you will place the material to be printed.
For example, a T-shirt is usually slid onto the working platform for printing, so you need to rotate the pattern by 90 degrees. The rotating direction depends on how you place the screen assembly in the working area of xTool S1.
Note: XCS provides recommended processing parameters for coated screens, you only need to select 0.2mm Coated Screen as the material, and XCS will automatically set processing parameters for the screen.
7. Set the processing path
In the bottom-right corner of XCS, click the  icon next to Process.

(1) Setting the Scanning path for engraving, which applies only to vector engraving.
- All together: Engraves multiple objects at the same time in the set sequence and direction. The laser module travels a longer distance since it needs to travel across the empty space between each object over and over again. Therefore, the processing time is usually longer.
.png)
- One by one: Engraves objects one by one in the set sequence and direction. The laser module travels a shorter distance since it can finish engraving one object before moving to the next. Therefore, the processing time is usually shorter.
.png)
(2) Turn on or off engraving by layer.
- By layer: If this feature is turned on, xTool S1 will engrave the objects layer by layer.
- Divided into subtasks: If this feature is turned on, XCS will pause processing each time when xTool S1 finishes engraving a layer and remind you to replace the screen for the processing of next layer.
Note: If you need to engrave multiple screens for multi-colour printing, it is recommended to turn on By layer and Divided into subtasks.
(3) Set the Scanning way, which applies to vector and bitmap engraving.
- From top to bottom: Engrave a pattern from the top to the bottom.
.png)
- From bottom to top: Engraves a pattern from the bottom to the top.
.png)
8. Preview the processing area
You can preview the processing area on the material by framing. Framing means laser dots walk along the border of the processing objects on the material. Take the following steps to start framing:
(1) In the bottom-right corner of the software, click the  icon next to the Framing button to set the speed for framing.

Note: You can click the arrow buttons to control the movement of the laser module. The other three parameters allow you to configure how the laser module moves with every tap on an arrow button.
XY speed (mm/s): The moving speed of the laser module in X and Y directions.
XY distance (mm): The moving distance of the laser module with each tap on an XY arrow button.
Z distance (mm): The moving distance of the laser module with each tap on a Z arrow button.
(2) Close the lid of xTool S1, and then click Framing in the software. Press the button on xTool S1 to start framing. The laser spot will move along the boundary of the processing pattern on the material so that you can preview the processing area.

(3) After you confirm that the processing area is proper, click Framing completed in XCS. If the area is not ideal, you can adjust the material position or adjust the element positions in the software, and then preview the processing area again.

9. Start processing
Note: If you use the infrared laser module at a temperature of 10 ℃ or below, please preheat the laser module for 2 minutes to ensure better processing results.
(1) In the bottom-right corner of the software, click Process.

(2) Preview the processing pattern and path.
On the bottom-left corner, click the  button, and XCS will show you the processing path.

(3) In the upper-right corner of XCS, click Start.

(4) Close the lid of xTool S1. Then, press the button on xTool S1 to start processing.
.png)
Services & Help
Learn & Education

Copyright © 2025 xTool All Rights Reserved.