This page describes the functions and operations of xTool Creative Space (XCS) on iPad, with xTool P2 as an example device for connection and settings. The user interface of XCS may vary when XCS is connected with different machines.
Home screen

Open XCS on your iPad. The home screen of XCS includes the following sections:
- Software settings: On the top-left corner of the home screen, tap the
.png) icon to open the Settings panel. On this panel, you can select a language, check the software version and service terms, etc.
icon to open the Settings panel. On this panel, you can select a language, check the software version and service terms, etc. - xTool Passport Log in/Sign up: By signing up and logging in to xTool Passport, you can use the Cloud storage space and sync data across your PC, mobile phone, and tablet.
- Start a project: You can start a project by opening a saved project, creating a new project, taking a photo, selecting a photo from the album, etc. After completing the project editing, you can start processing with a laser.
- My projects: You can view the projects saved in XCS on your iPad. You can tap to open a project, copy, share, delete, or upload a project.
- Projects: Tap to go to xTool Projects center to view various processing projects by machine or material and get project tutorials and processing files.
- Support: Tap to go to xTool Support Center to view user guides of xTool products or get other support.
- Shop: Tap to go to xTool online store to buy the products and materials you want.
Set up the software
On the top-left corner of the home screen, tap the icon to open the Settings panel.

- Language: Sets the language of the user interface. XCS supports the following languages: English, Simplified Chinese, Traditional Chinese, German, Spanish, French, Italian, Japanese, Korean, Russian, and Ukrainian.
- Software update: Check the current software version. Tap Check for updates to see if there is a new software version. If there is a new version, you can update XCS to the latest.
- About: Tap to view the Terms of Service, Privacy Policy, and Safety Terms of the software. If the current version is not the latest, you can update the version.
Log in to xTool Passport
XCS provides the entry to xTool Passport, which is in the top-right corner of the home screen. By signing up and logging in to xTool Passport, you can use the Cloud storage space and sync data across your PC, mobile phone, and tablet.

Upload projects to the Cloud
On the home screen of XCS, you can view your local projects in My projects. To upload a project to the Cloud, tap the  icon in the bottom-right corner of the project.

To view the uploaded project, open Cloud projects by tapping the  icon on the top of XCS.

Download projects from the Cloud
(1) On the top side of of XCS, tap the icon to open the Cloud projects panel.

(2) On the project list, tap the  icon in the top-right corner of a project. Tap Download to local projects to download the project.

Start a project
To operate the laser machine with XCS for laser processing, you need to start a processing project in XCS. In the project, you need to design or import a processing pattern, and set the processing mode and other parameters. After completing editing the project, you can tap Process to start processing.
XCS provides you with various ways to start a project.
Note: For more information on how to edit a project and start processing, see the next chapter “Project editing/processing”.
Create a project
On the top side of XCS, tap the  icon to create a new blank project. In the project, you need to design patterns and set parameters from scratch.

Camera
Take a photo by using the camera of your iPad and use it as an object for processing.
(1) On the top side of XCS, tap the  icon and use the camera of your iPad to take a photo.

(2) Tap Use Photo, and the photo will be imported into a new project as a processing object.

Note: If you are not satisfied with the photo, you can tap Retake to take another photo.
Note: After importing the photo, you still need to set the processing mode and other parameters in the project before starting processing.
Album
Import a photo from your iPad's album and use it as an object for processing.
(1) On the top side of XCS, tap the  icon to open the album on your iPad.

(2) Select a photo from the album and tap it to import it into a new project as a processing object.

Note: After importing the photo, you still need to set the processing mode and other parameters in the project before starting processing.
My projects
In the My projects section, slide left or right to view the projects saved on your iPad. You can tap a project to open it.

Note: The project file can contain information such as processing patterns, processing modes, and processing parameters. However, if the machine model, processing mode, or material thickness used in the project varies from the current situation, you need to adjust the corresponding parameters.
Cloud projects
(1) On the top side of XCS, tap the  icon to open the Cloud projects panel.

(2) On the project list, tap a project to open it.

Note: The project file can contain information such as processing patterns, processing modes, and processing parameters. However, if the machine model, processing mode, or material thickness used in the project varies from the current situation, you need to adjust the corresponding parameters.
Manage projects
Manage local projects
In the My projects section, slide left or right to view the local projects.

Tap the  icon in the top-right corner of a project to reveal the menu. You can quickly copy, share, or delete the project.

Manage cloud projects
On the top side of XCS, tap the icon to open the Cloud projects panel.
Tap the icon in the top-right corner of a project to reveal the menu. You can rename, delete, or download the project.

Download and transfer projects
You can download files in XCS format from the internet and save them to your iPad. For example, you can visit the xTool Projects center (projects.xtool.com) to download XCS project files.

Note: For quick access to the xTool Projects center, tap any module in the Projects section of the XCS home screen to go to the xTool Projects center.
You can also send project files saved on other devices (e.g. computer, mobile phone) to your iPad.

Open a project file
If your project file is downloaded from the internet or transferred to your iPad from other devices, you can find this file on your iPad storage. Tap the file to open it on XCS.

Note:
- XCS only supports opening files in XCS format.
- A project file can contain information such as processing patterns, processing modes, and processing parameters. However, if the machine model, processing mode, or material thickness used in the project varies from the current situation, you need to reset the corresponding parameters.
Project editing/processing

Editor settings
In the top-right corner of XCS, tap Settings to open the editor settings panel.

- Unit
Sets the unit of measurement used in the editor. - Auto-snapping
Snaps an object to the center of the canvas when the object is moved around the center.
- Precise vector path selection
With this function turned off, you can tap anywhere inside the boundary of an object to select the object..gif)
With this function turned on, you can select a vector object only by tapping the vector path. By using this function, you can easily select your target object among multiple overlapping vector graphics..gif)
- Gesture guide
Tap View to see the gestures you can use to operate XCS on your iPad.
- Vector quality
Sets the quality of vector paths, including the following options:- Optimal (ideal for patterns larger than 20 inches and allows for an average speed)
- High (good for patterns of 10 to 20 inches and allows for a moderately faster speed)
- Medium (good for patterns smaller than 10 inches and allows for a fast speed)
Notes:
- The higher the quality, the lower the software speed. If you need to edit complicated vector paths, which may cause software lag, empty screen, or crashes, you can set the quality to Medium to improve the performance of XCS.
- In most of the cases, the differences in processing results between the Medium and High quality are not observable. The processing precision is observably reduced only when you scale a small vector path to a very large one, for example, scale a 2-inch pattern to a 20-inch one.
Design zone

- Vertical toolbar
Use tools in the vertical toolbar to add objects to the canvas. - Horizontal toolbar
Select an object and use tools in the horizontal toolbar to edit the object.
Note: If the screen of your iPad is small, you can try sliding the horizontal toolbar to see all the tools. - Canvas
The canvas maps the working area of your device and displays your design to be processed.
Note: For more information on how to design and edit elements, see the next chapter "Designing and editing".
Device connection panel
Device disconnected
If XCS is not connected with a device, the device connection panel displays the Connect device button, the device model used in the current project (in image), and the document icon.

- Connect device
Tap the Connect device button to open the Connect device window and select your device to connect.
Note: For more information on how to connect a device to XCS, see Use xTool P2 with xTool Creative Space (XCS) on Your iPad.
- Device model
For different device models, the canvas sizes and the processing parameters you can set are different.
If the current project is saved before, the device model is the same as that used when the project was saved. If the current project is a new project, the device model is the same as that used in the previous project. - Documentations
Tap the icon in the top-right corner to enter xTool Support Center and view the online instructions for the current device model.
Device connected
If XCS is connected to a device, the device connection panel displays the name of the connected device, the device image, a device setting icon, and buttons related to device operation.
Tap the  icon in the top-right corner to view the device information and set up the device.

Note: The parameters may vary according to the device you connected.
- Switch device
Tap to connect to other devices. - Basic info
Here you can see the device information such as device name, laser model, and laser safety class.
- Working info
Here you can see the working time, operating times, and standby time of the device, and you can tap Export to export the work log of the device.
- Setting
Here you can set up the device and the accessories connected to the device.
The parameters that can be set vary for different devices. For details about your device's settings, see the XCS user guide for the device.
Processing setting panel
Note: The parameters may vary for different devices.

- Processing mode
The processing mode of the device. For different processing modes, the canvas size and the parameters to set may vary.
Note: Different models of devices support different processing modes. To learn about the differences between each processing mode, you can check the instructions for the corresponding device.
- Material
Select the name of the material you use, and XCS automatically generates material thickness (performs autofocus) and sets processing parameters based on the material type.
If you cannot find the material you use in the materials list, tap +More to go to the XTOOL SELECTED material library to search among more materials.
If you can't find your material in the material list or the material library, you can select User-defined material.
Note:
- The software-generated parameters apply to xTool materials. If you are using a material that is not an xTool material, please adjust the parameters accordingly.
- If you select User-defined material, you will need to set the material thickness (for focusing) and processing parameters by yourself.
- Thickness (mm)
The thickness of the material to be processed. The device performs auto focus based on this parameter.
You can measure the thickness of the material and enter it into XCS, or you can tap to use the automatic measurement function to obtain the thickness of the material.
Note: The focusing function varies in different models of devices. Some devices use the "Distance" parameter, which is the distance from the laser to the material surface.
- Processing path
The path that the device takes to process the material.
- Auto planning: During processing, the device performs laser engraving before laser cutting. During laser engraving, the device follows the shortest path. During laser cutting, the device cuts internal objects first.
- By Layer: During processing, the device processes the elements on each layer based on the layer order you set.
Start processing
After finishing project editing, you can start processing. The operation steps are as follows:
(1) In the top-right corner of XCS, tap Process to enter the preview screen and preview the processing pattern.

Note: Some devices have the Framing function. You can tap Framing to let the laser spot move along the edge of the processing pattern, so as to preview the processing area on the surface of the material.
(2) If the processing pattern (or processing area) is not as expected, you can Tap Back to go back to the editor and adjust the processing pattern. After confirming the processing pattern (or processing area), tap Start to start processing.

(3) Read the safety instructions carefully. Press the start button on the device to start processing the material.

Designing and editing

Vertical toolbar
Image
Tap Image and select a method to import images.

● Camera: Take a picture with your iPad's camera and import it to the canvas.
● Photos: Select a picture from your iPad's album and import it to the canvas.
● Files: Select a picture from your iPad's local files and import it to the canvas.
Notes:
● Currently, XCS only supports the following image formats: JPG, JPEG, GIF, PNG, BMP, SVG, DXF, and WEBP.
● Currently, XCS cannot parse text objects in SVG files. If the imported SVG image contains text objects, please convert the text objects to vector graphic paths in the graphic design software first, and then import the SVG image into XCS.
Process bitmap image
When you select a bitmap image, the Bitmap image panel slides out from the right side of the canvas. You can use tools in the panel to further process the image.
- Filter
Select different filters to transform the image into different effects.
| Original |  |
| Grid |  |
| Sketch |  |
| Comic 1 |  |
| Comic 2 |  |
| Embossment |  |
| Black-and-white |  |
- Sharpness
Adjusts the clarity of detail in an image.
| Sharpness = 3 |  |
| Sharpness = 96 |  |
Note: When the sharpness changes, the image is converted to grayscale by default.
- Grayscale
Adjusts the range of grayscale values for the image.
The larger the grayscale range, the more shades of gray are contained in the image. The smaller the grayscale range, the fewer shades of gray are contained in the image and the more homogeneous the image.
 |  |
 |  |
The larger the grayscale value, the darker the overall color of the image; the smaller the grayscale value, the lighter the overall color of the image.
 |  |
 |  |
- Invert
Inverts the colors of a bitmap image. This function can be useful for the processing of some dark materials, such as engraving bitmap images on transparent or translucent acrylic, black slates, ruber, and mirrors. The engraving results can be improved by using this function.
XCS supports color inverting of black-and-white, grayscale, and color bitmap images, as described in the following:- Black-and-white images: White pixels are inverted into black ones, and black ones are inverted into white ones.

- Grayscale images: Light pixels are inverted into dark ones, and dark ones are inverted into light ones.

- Color images: A color image is converted into a grayscale image first, and then light pixels are inverted into dark ones, and dark ones are inverted into light ones.

- Black-and-white images: White pixels are inverted into black ones, and black ones are inverted into white ones.
Note: For an image with a transparent or translucent background, the background is not inverted, and only the colors of the pixels in the image are inverted.
Edit bitmap image
Select a bitmap image and tap Edit image in the Bitmap image panel to open the Edit image panel. You can delete parts of the image, crop the whole image, and so on.

- Magic wand: deletes the area you tap
- Fuzziness: This parameter is available only for the magic wand, indicating the range of pixel colors you delete at a time. The larger the value, the wider the color range, that is, the colors of the pixels to be deleted can be quite different; the smaller the value, the narrower the color range, that is, the colors of the pixels to be deleted are very similar.
Applications: Delete image background, Delete the color of an object

- Eraser: erases the area you pass over
- Size: This parameter is available only for the eraser, indicating the size of the eraser. The larger the value, the larger the eraser.
Example:
- Size: This parameter is available only for the eraser, indicating the size of the eraser. The larger the value, the larger the eraser.
- Crop: crops the image, keeping only the selected area
Example:
Trace bitmap image
Select a bitmap image and tap Trace image in the Bitmap image panel to open the Trace image panel. You can set the tracing parameters as needed to trace the desired image outline. The traced outline will be imported into the canvas as a vector object.

- Fuzziness threshold:
Indicates the range of pixel colors for generating vector paths.
The larger the value, the wider the color range, that is, the colors of the pixels used to generate the vector paths can be quite different. The smaller the value, the narrower the color range, that is, the colors of the pixels used to generate the vector paths are very similar. Setting range: 0–255
| Original |  |
 |  |
 |  |
- Denoising
Removes the noise of the image. Pixels with a color value lower than the one you set will not be used to generate vector paths. Setting range: 0–100
| Original |  |
 |  |
 |  |
- Smoothness
Sets the smoothness of the vector paths to be generated. The larger the value, the smoother the transition between neighboring pixels. Setting range: 0–1
| Original | |
 |  |
 |  |
- Laying by color
If you are converting an image with many details, you can enable the Layering by color function. When it is enabled, the vector paths generated are layered by color, and then you can ungroup them and edit each layer.
 |  |
 |  |
Shape
Tap Shape, and you can select shapes by category. To reveal more shape options in a category, tap the  icon in the top-right corner of the category.

Tap the shape you like to insert it into the canvas. By default, a shape is inserted into the middle of the canvas. You can manually adjust its size and position.

Text
Tap Text, XCS will insert a string of characters "HELLO" into the canvas.
Select the text, and the Text panel slides out from the right side of the canvas. You can change the words, and set the font size, typeface, style, spacing, leading, and aligning mode. In addition, you can weld the character strings in a text.
- Text
On the Text panel, tap the text box under the Text parameter to change the words.

- Size (pt)
On the Text panel, tap the text box under the Size (pt) parameter to adjust the font size.
You can also hold down the icon at the bottom-right corner of the text in the canvas and drag the icon to adjust the font size.
- Typeface
You can use xTool selected typefaces or typefaces from your local system. Scroll down on the drop-down menu and you can find the system typefaces.


- Style
Adjusts the style of the font, such as thickness, slant, and so on.

| Regular |  |
| Italic |  |
| Medium |  |
| Bold |  |
Note: Different typefaces support different styles.
- Spacing
Adjusts the horizontal spacing of the characters in the same line.

- Leading
Adjusts the vertical spacing between lines.
- Align
Set the alignment between the different lines of text.
| Align left |  |
| Align center |  |
| Align right |  |
- Operations: Weld
This function is used to unite the character strings that overlap one another partially in a text. After being welded, the text becomes vector paths and the Text panel is not displayed after you select it.
If no character strings overlap one another partially in the text, the text looks the same but becomes vector paths after you weld it, and the text setting panel is not displayed after you select it.
- Bend the text
Select the text, hold down the icon next to the text, and drag the icon to change the direction of the text.
xArt
Tap xArt to enter xArt image generator. You can generate images either by entering prompts (description words) or by uploading images and entering prompts.

Note: If you use xArt for the first time, you need to sign up for an account and get your initial points, and every time you use xArt to generate an image, a number of points are cost.
Text to image
To generate an image from text, follow the steps:
(1) Enter prompt, that is, text describing the painting you wish to generate;
(2) Select the painting style;
(3) Set the number of images to be generated and other parameters;
(4) Tap the Generate button;
(5) Select a satisfactory image from the generated results;
(6) Import the image into the canvas.

- Prompt
In the text box for Prompt, enter text to describe the image you want.

Note: You can tap the  icon in the top-right corner to generate a prompt example.
- Painting style
xArt provides you with multiple painting styles.
- Image count
Sets the number of images you want to generate. After generation, you can select an image you are most satisfied with from the result.
- Advanced (settings)
Tap the icon to unfold the advanced settings.
- Image Aspect Ratio: Sets the width and height ratio of the image(s) to generate.
- Negative Prompt: You can enter a negative prompt to describe the elements you do not want to include in the generated image(s).
- Seed: Each time you generate an image in xArt, the image is given a seed number. If you are particularly satisfied with an image, you can copy its seed number. By using the same seed with the same settings, you can generate a very similar image next time.

You can use this function when you want to modify a generated image. After you generate a satisfying image, turn on Seed, adjust your prompts, and tap Generate again. The image changes based on your prompts.


- Cfg Scale: Adjusts how much the image will be like your prompt. Higher values keep your image closer to your prompt. And lower values will make your image more creative.
Image to image
Upload an image and enter a prompt, and XCS will generate a new painting based on the original image and your text description.
With this function, you can generate a new creation based on the original picture, and you can also perform various operations on the original image, such as changing the background, modifying the style of the image, and so on.

Graffiti
Tap Graffiti to enter the Graffiti canvas. Under the canvas, you can select the pen or erase tool and adjust their sizes. You can draw freely on the canvas. Tap OK to import your drawing to the project editor, or tap Cancel to cancel the drawing and go back to the project editor.

Note: Your drawing is imported to the project editor as a vector object.
Code
You can transfer text to code in XCS. Tap Code and select a type of code. In the pop-up window, enter text and tap Save, and then the text will be transferred into code and inserted into the middle of the canvas.

- Example of QR code:

- Example of Barcode:

Note: You can only enter English characters and digits to generate a barcode.
Horizontal toolbar
Select an object in the canvas and use the tools in the horizontal toolbar to make further edits and adjustments to the object.
 | |
|
|
Note: If your iPad has a small screen, try swiping the horizontal toolbar left or right to see more tools.
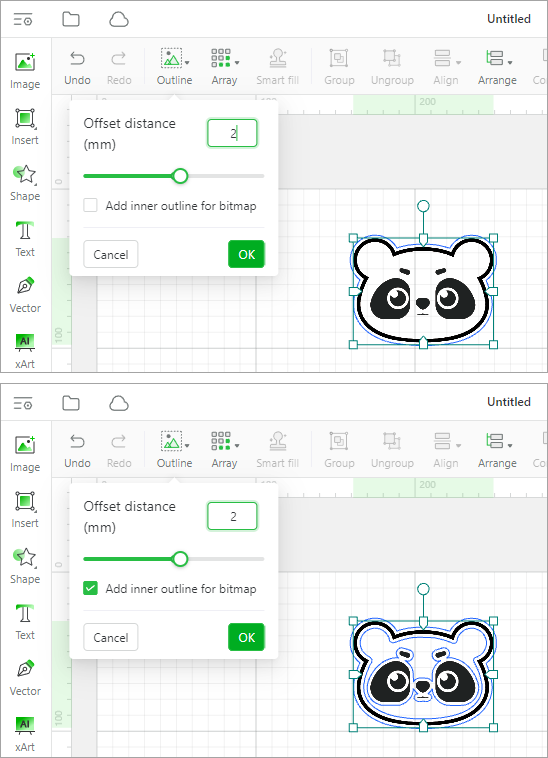
Outline
Adds an outline to the selected object. In addition to adding outlines for bitmaps, vector paths, and texts, you can add inner outlines for bitmaps with transparent backgrounds.
To add an outline for an object, select the object, tap Outline, set Offset distance, and tap OK.
- If you set an Offset distance larger than 0, you can add an outer outline to the object.

- If you set an Offset distance smaller than 0, you can add an inner outline to the object.

Note: The added outline is a separate element, and you can edit the outline individually. If you want to combine the outline with the original element, you can use the Group function.
Add inner outline for bitmap: Only available for bitmaps with transparent background. (You can see the difference in the application effect on bitmaps with an inner skeleton.)
- When Add inner outline for bitmap is unchecked, the outline is added only to the outermost layer of the image.
- When Add inner outline for bitmap is checked, outlines are added to both the outermost layer and the inner elements of the image.
Array
Creates multiple copies of an object at a time and lays them out in grid or circular mode. You can also create a material text array for an object.
Select an object, choose an array mode, and complete the settings.
Grid array

Circular array

The x and y parameters define the position of the pivot point. By default, the center of the selected object is used as the pivot point. You can change it based on your need.
Material test array
You can create a material test array by setting the number of rows and columns, maximum and minimun processing speed and power, and spacing.

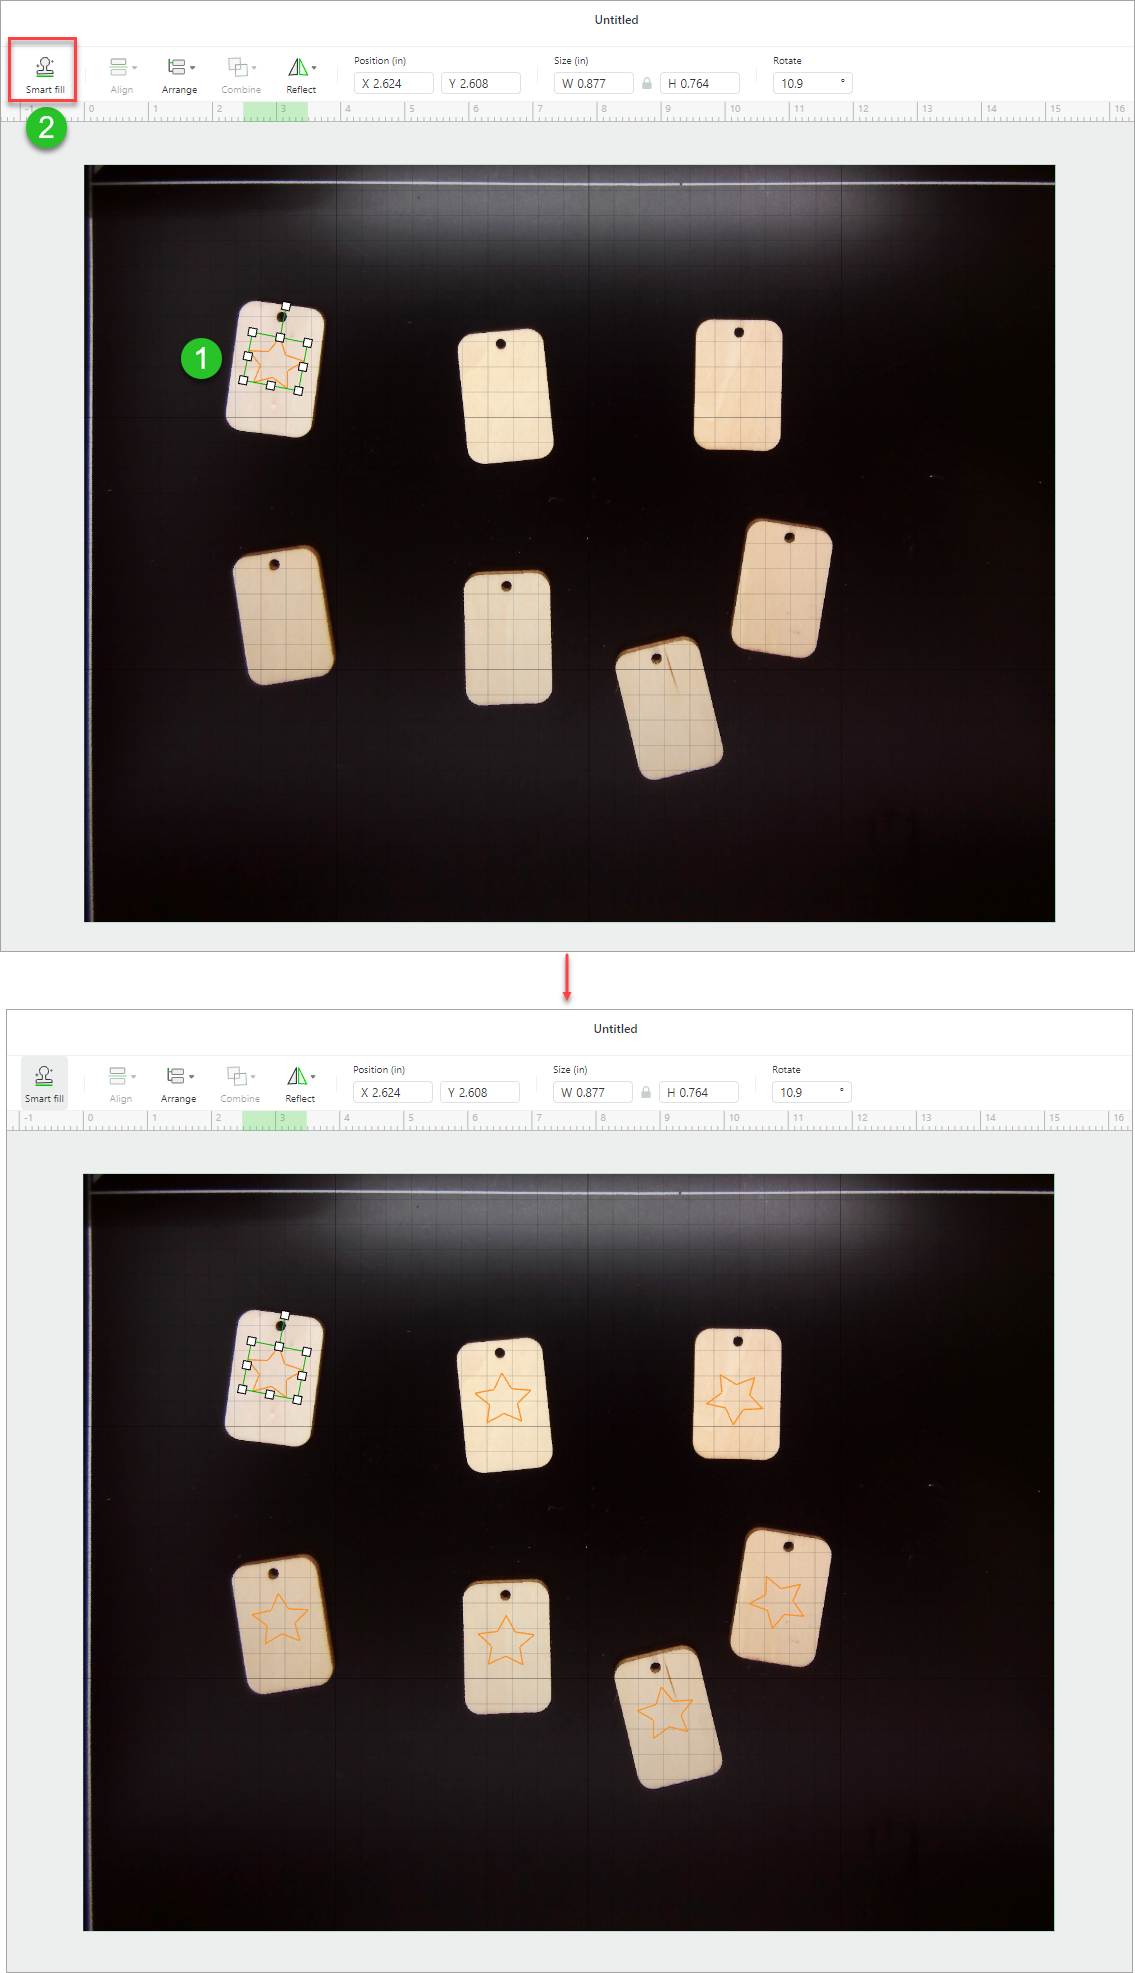
Smart fill
Duplicates an object for multiple materials, helping you process multiple materials at a time.
Edit your design for one material, and then tap Smart fill. The same design is generated for other materials.
Note: This function only works with a device that has camera.
Group
Groups two or more objects you've selected. After grouping multiple elements into one, you can move, rotate, and scale the group at a time.
Ungroup
Ungroups the objects you've grouped. After ungrouping, you can move, rotate, and scale each individual object.
Arrange
Aligns or evenly distribute two or more objects, or change the stacking order of objects.
- Aligns or evenly distribute objects
| Original |  |
| Align left |  |
| Horizonral align center | .png) |
| Align right | .png) |
| Align top | .png) |
| Vertical align center | .png) |
| Align bottom |  |
| Distribute horizontally | .png) |
| Distribute vertically | .png) |
- Change the stacking order of objects
| Original |  |
| Bring to front |  |
| Send backward |  |
| Bring forward |  |
| Send to back |  |
Combine
Combines two or more selected vectors.
| Original | .png) |
| Unite the two elements | .png) |
| Subtract the two elements | .png) |
| Unite the two elements at the overlap | .png) |
| Subtract the two elements at the overlap | .png) |
Reflect
Reflects an object horizontally or vertically.
| Original | .png) |
| Reflect horizontally | .png) |
| Reflect vertically | .png) |
Position
Displays or sets the position of an object on the canvas by the x and y coordinates. The unit can be set in the Settings for editor.
The point (0, 0) is in the upper-left corner. By default, when you insert a shape or import an image, it is positioned in the middle of the canvas.

Size
Displays or sets the size of an object. The unit can be set in the Settings for editor.

Note: The width-to-height ratio of an object is locked when you import or insert it on XCS. You can click the lock icon to unlock the ratio so that you can change the width and height of the object as you like.
Rotate
Rotates an object by angle.
A positive value indicates rotating clockwise, and a negative one indicates rotating counterclockwise.
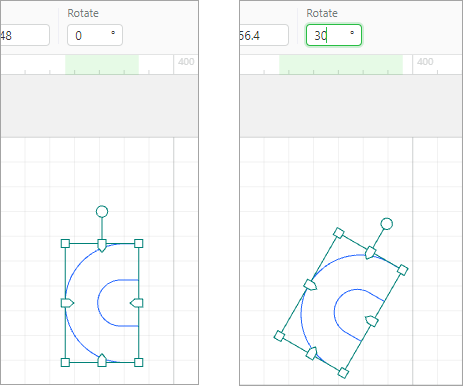
You can also select an object, hold down the  icon above the object, and drag the icon to rotate the object.

Basic editing functions
Select
Select one or more objects.
● Single Select: Tap to select one object.

● Multi-select: Hold your finger on any point in the canvas and drag to draw a rectangle. Objects that overlap with the rectangle are selected.

Move
Hold down an element and drag it to move it.

Delete
Select an element and tap the  icon in the upper left corner of the element to delete it.

Copy
Select an element and tap the  icon in the upper right corner of the element to copy it.

Note: The copied element may overlap with the original element. You can how down and drag the elements to separate them.
Scale
Select an element and drag the  icon in the lower right corner of the element to scale it up or down.

Lock the length-to-width ratio
Select an element and tap the  /
/ icon in the lower-left corner of the element to lock or unlock its length-to-width ratio.

● When the icon is displayed in the lower-left corner of the element, the length-to-width ratio of the element is locked. The length-to-width ratio of the element remains unchanged when you scale the element up or down.
● When the icon is displayed in the lower-left corner of the element, the length-to-width ratio of the element is unlocked. The length-to-width ratio of the element can be changed when you scale the element up or down.
Rotate
Select an element, hold down the icon above the element, and drag the icon to rotate the element.
Other canvas functions
Zoom the canvas
Pinch the screen with two fingers to zoom in and out.

Move the canvas
Hold down on any area of the canvas with two fingers and slide both fingers at the same time to move the canvas.

Undo/Redo
At the bottom-left corner of the screen, tap .png) to undo the previous action. The button is grayed out if there is no previous action. Tap
to undo the previous action. The button is grayed out if there is no previous action. Tap .png) to redo the action that is canceled by undo. The button is grayed out if there is no action canceled by undo.
to redo the action that is canceled by undo. The button is grayed out if there is no action canceled by undo.

Shift layers
In the lower-left corner of the canvas, you can view the layers in the canvas. When you tap a layer, all elements within that layer will be selected.

Processing parameters
Select one or more objects in the canvas, and set processing parameters for the selected object(s) in the Object setting panel on the left side of XCS.

Notes:
● You need to set parameters for every object. A missed object may fail to be processed.
● The parameters that can be set for bitmap objects and vector objects are different. You can select multiple objects of the same type and set parameters for them at once.
General parameters
Object type
After you select an object, the Object setting panel shows the object type.

Output
Sets whether an object is to be processed. If you choose Output, the selected object(s) will be processed and have an output; if you choose Ignore, the selected object(s) will not be processed.

Processing types
For bitmap objects, the processing type can only be set to Engrave; for vector objects, the processing type can be set to Score, Engrave, or Cut. Different processing types include different processing parameters.


● Bitmap-Engrave: engraves bitmap images on the material.
● Vector-Score: engraves only the outline of the vector object(s).
● Vector-Engrave: engraves the entire surface area of the vector object(s).
● Vector-Cut: cuts along the outlines of the vector object(s).
Note: Engraving processes the surface of the material, leaving a mark on the surface. Cutting cuts into the interior and can cut through the material.
Setting
You can use the XCS-recommended settings or the settings saved before, or you can set all the parameters manually.

Note:
- If you have selected a material from the XCS material list or the Select material library, XCS automatically generates recommended parameters for you. You can select Reference to use the recommended parameters.
- If you have selected User-defined material, no recommended parameters are available.
To save settings, you can tap the  icon after you have set all the parameters.

Power
Sets the power for engraving or cutting. 100% indicates the maximum laser power.

Speed
Sets the speed at which engraving or cutting is to be performed.
During laser engraving, the higher the speed, the lighter the engraving marks; the lower the speed, the darker the engraving marks.
During laser cutting, the larger the speed, the shallower the cutting depth; the smaller the speed, the deeper the cutting depth.

Pass
Sets the number of processing times.
During laser engraving, the more processing passes, the darker the engraving marks.
During laser cutting, the more processing passes, the deeper the cutting depth.

Engraving-specific parameters
Bitmap mode, Lines per cm, and Engraving mode are engraving-specific parameters. Besides, the Lines per cm and Engraving mode parameters can be used for bitmap engraving and vector engraving, while the Bitmap mode parameter is only used for bitmap engraving.
Bitmap mode
XCS provides multiple bitmap modes, including grayscale, Bayer, Floyd, Stucki, Atkinson, Jarvis, and Sierra. The default mode is grayscale.
With the other settings unchanged, the output of an image on a wooden board varies according to image mode, as shown in the following figure.

- Grayscale
Transforms an image into the grayscale mode. A grayscale image has pixels that are formed by the shade of gray between black and white, which may be the darkest one in black or the brightest one in white. The darker the grayscale pixel, the deeper the engraving. - Jarvis
Jarvis is a dithering mode that provides a softer transition between pixels than Floyd mode and renders good results on almost all images. - Bayer
Looks like adding a special grid mosaic filter to an image. - Floyd
Dithers the image by using the Floyd algorithm that diffuses the error to neighboring pixels. The dithering is extremely subtle, resulting in a fine, less distorted, and detailed image. It is recommended for highly detailed images but not for images with monochrome. - Stucki
Stucki is a dithering mode that processes slightly faster than Jarvis mode and produces a cleaner and sharper image. - Atkinson
Dithers is a similar algorithm to Jarvis and Sierra that preserves details well. But we do not recommend using it in a very dark or bright environment, where exposure may occur. - Sierra
Sierra dithers based on Jarvis mode and they process with similar results on images. But the sharpness of Sierra is higher.
Lines per cm
Sets the number of lines in one centimeter. This parameter determines the resolution of the image to be engraved.

Engraving mode
Sets the bi-directional or uni-directional engraving mode for bitmaps and filled vector paths.
- Bi-directional: The laser module emits light beams when it moves both from left to right and from right to left. Compared to the uni-directional mode, it takes less time to process a material. Due to backlashes, however, the processed patterns, especially the edges of the patterns, are not as clear as those processed in uni-directional mode.
- Uni-directional: The laser module emits light beams only when it moves from left to right. Compared to the bi-directional mode, it takes more time to process a material, but the processed patterns are clearer.
Specific parameters for xTool F1 bitmap engraving
Since xTool F1 uses a galvanometer laser to engrave bitmaps dot by dot, xTool F1 bitmap engraving uses special engraving parameters: Dot duration, Power range, and DPI.
Dot duration
The amount of time the laser spends on engraving each dot. The larger the dot duration, the longer the overall processing time and the darker the engraving marks.

Power rang
The power range that the laser uses for engraving.

- The greater the power range, the more color shades the engraved image contains and the clearer the image. The smaller the power range, the smaller the difference in the image color and the more monotonous the image looks.
- The higher the overall power range, the darker the engraving marks; the lower the overall power range, the lighter the engraving marks.
DPI
xTool F1 engraves bitmaps by dots. The DPI parameter can be used to set the number of dots per inch; DPI affects the resolution of the engraved image.

