
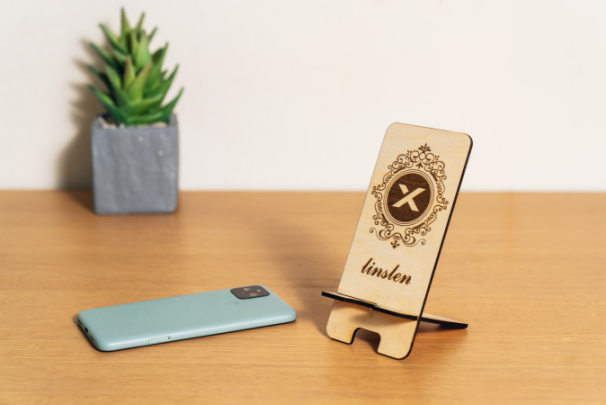
This article will step you through the whole process of laser creation, from device connection to material processing. In this article, you can get detailed instructions on how to use xTool S1 to make a phone holder, as well as ready-made project files to download. You can also find more project files for different creations using different materials at the end of this article.
Now, get yourself ready, and let's begin creation!
Note: xTool S1 is delivered with a material pack. You can conduct the example projects with the materials in the pack.
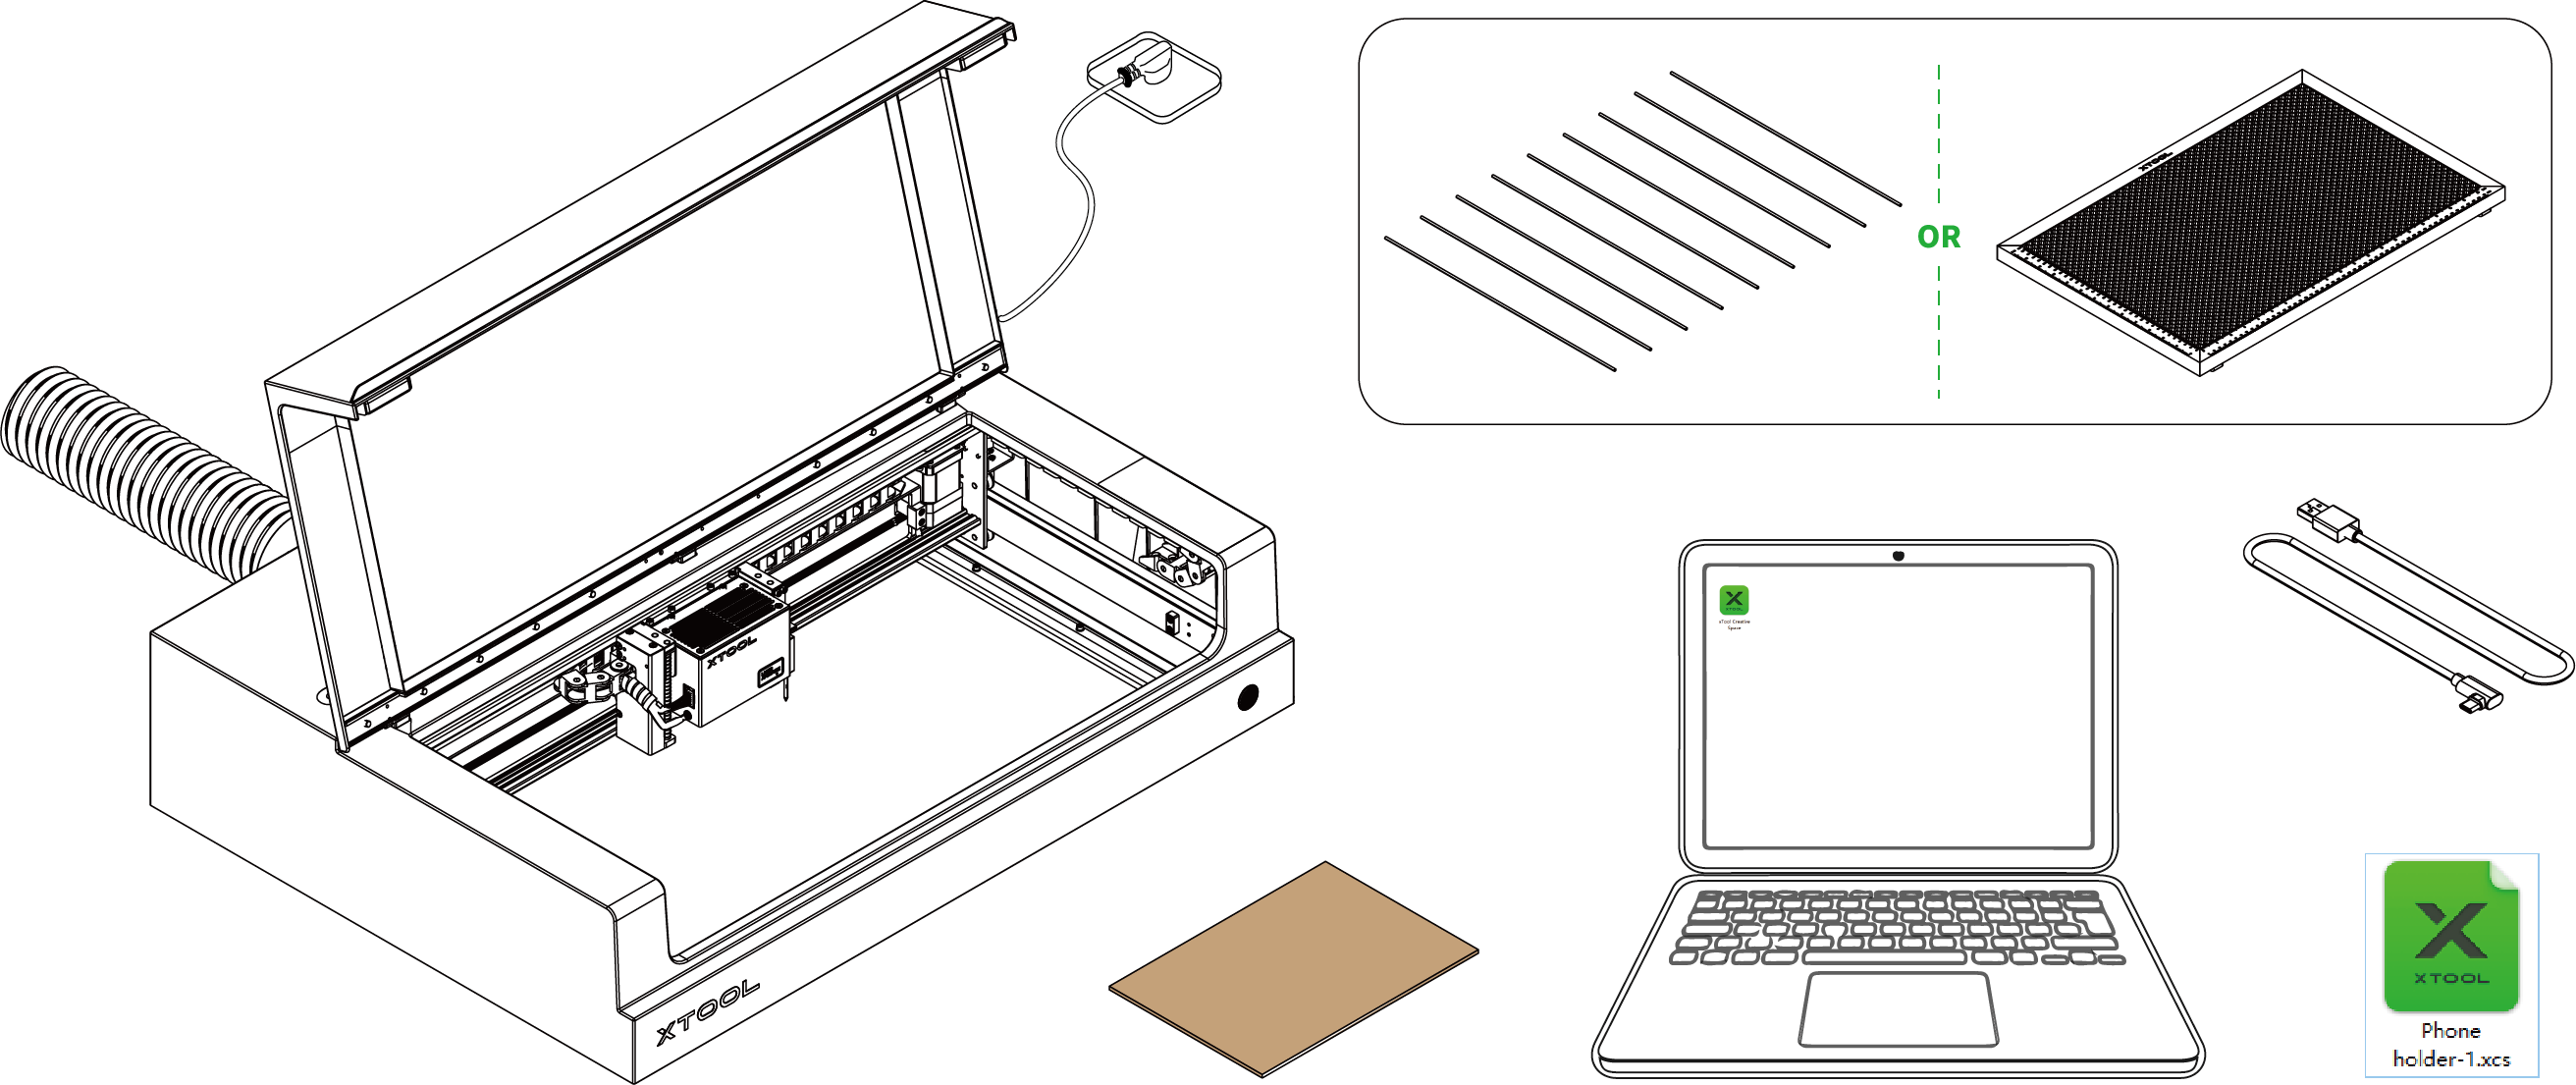
What you need
- An xTool S1
Get your xTool S1 ready following the instructions in "Preparations Before Using xTool S1". - A honeycomb panel (or a set of slats)
Using the honeycomb panel or slats can reduce the burned area on the back of the material as well as protect the baseplate during laser cutting. - A computer
Download and install xTool Creative Space (XCS) to your computer. - A USB cable (included in the pack of xTool S1)
- A basswood sheet A5 (included in the material pack of xTool S1)
- The project file “Phone holder-1.xcs”
Make your own phone holder
Step 1: Open the project file
(1) Download the project file based on the power of the laser module.
Download links:
(2) Open XCS on your computer. In the top-right corner of the XCS, click Open from computer > select the file you have downloaded > click Open.


Step 2: Connect xTool S1 with XCS
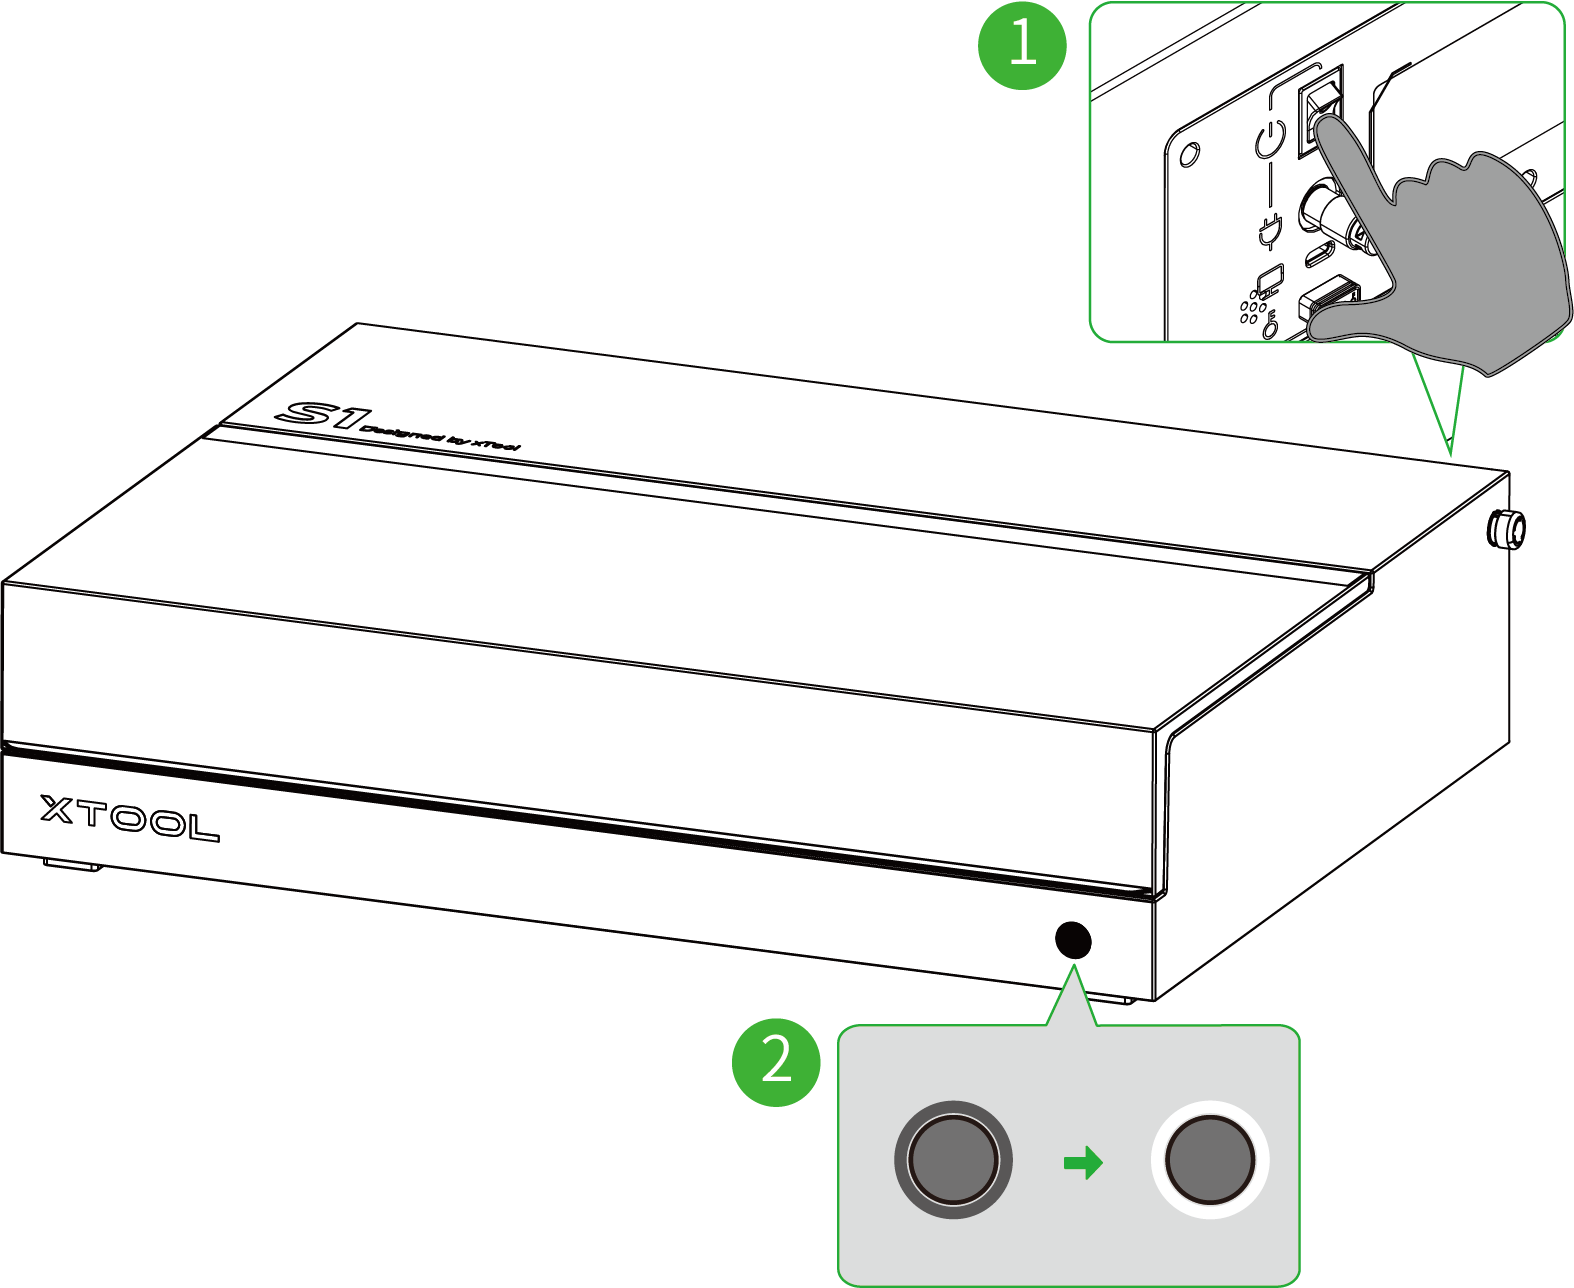
(1) Turn on xTool S1. Wait until the annular indicator lights up.
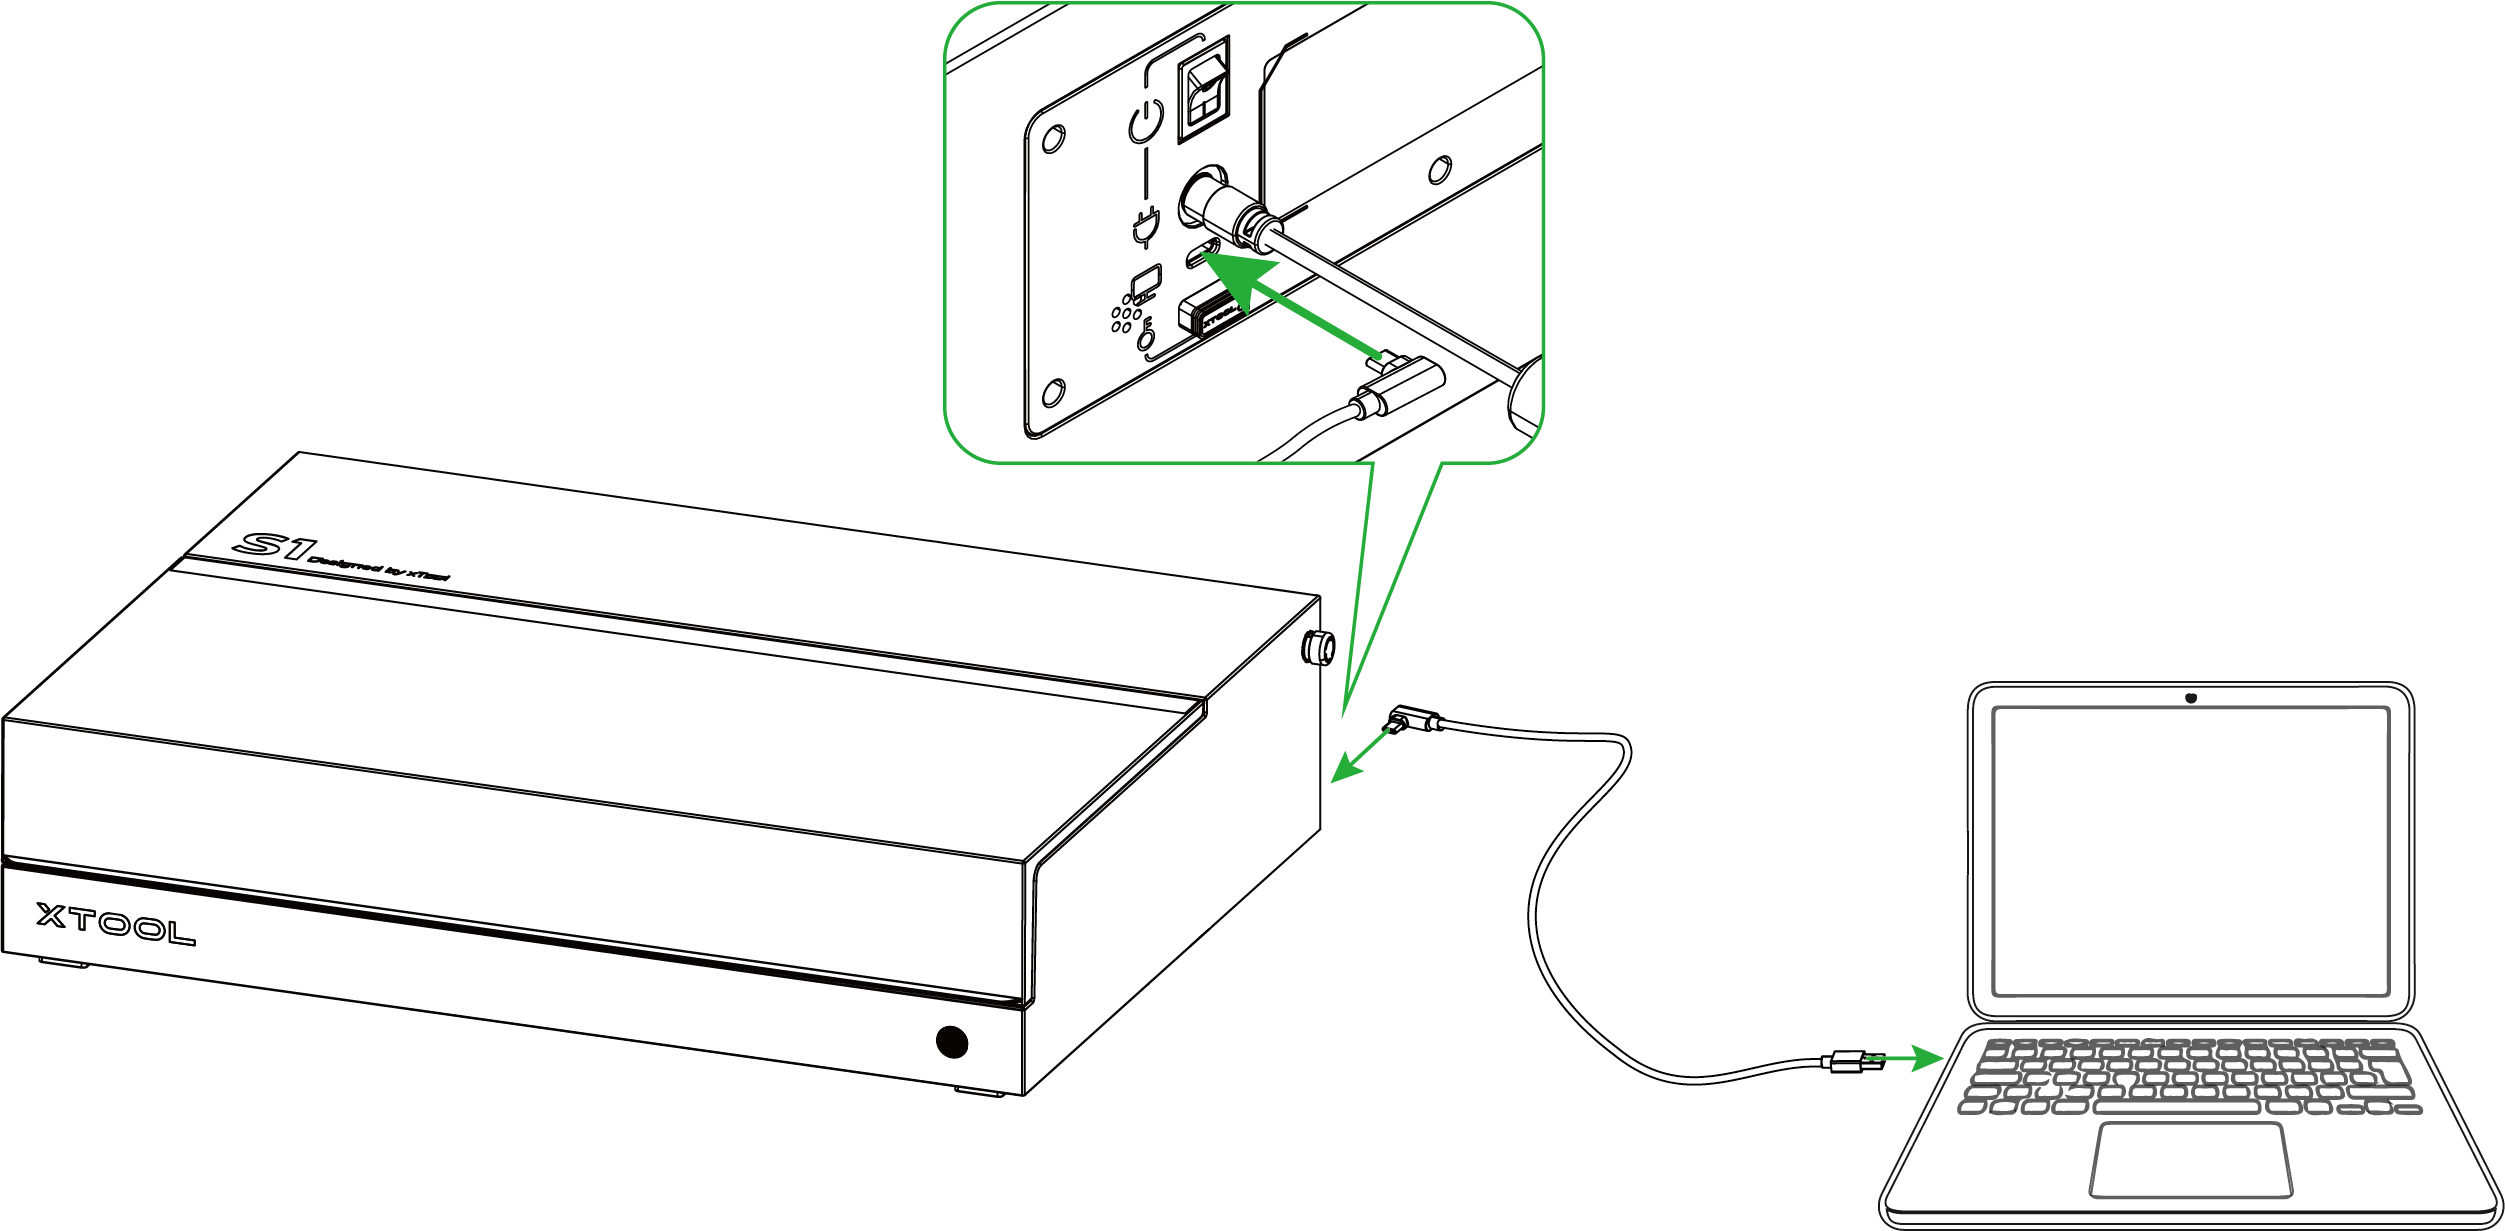
(2) Connect xTool S1 to your computer by using the USB cable.
(4) In the top-right corner of the project editing page, click the  icon > Connect device.

(5) On the pop-up window, click the name of your device to connect to it.
.png)
Note: After the device is connected, you can configure Wi-Fi for the device. This way, you can connect xTool S1 to XCS through Wi-Fi next time.
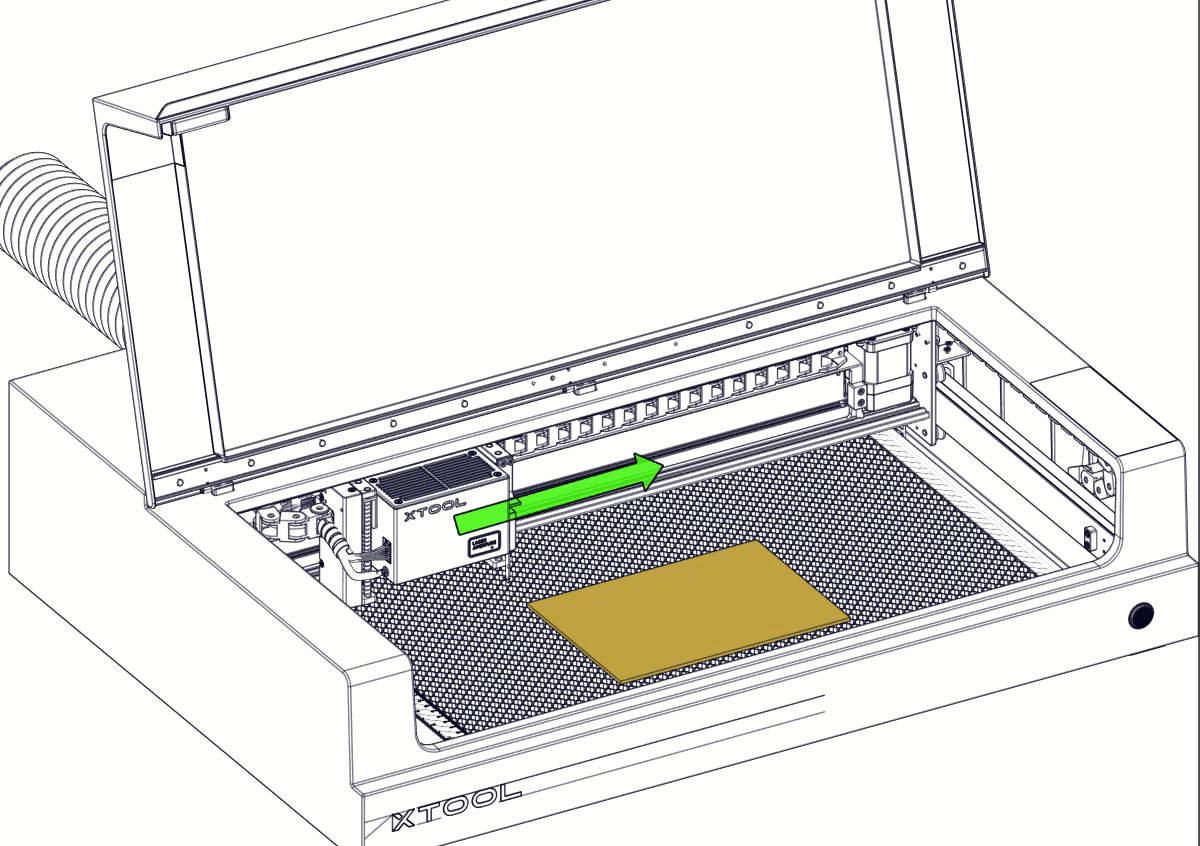
Step 3: Place the material
(1) Place the honeycomb panel on the baseplate of xTool S1 and move it to the right against the inner side of xTool S1.
Note: You can also use the slat set as an alternative to the honeycomb panel.
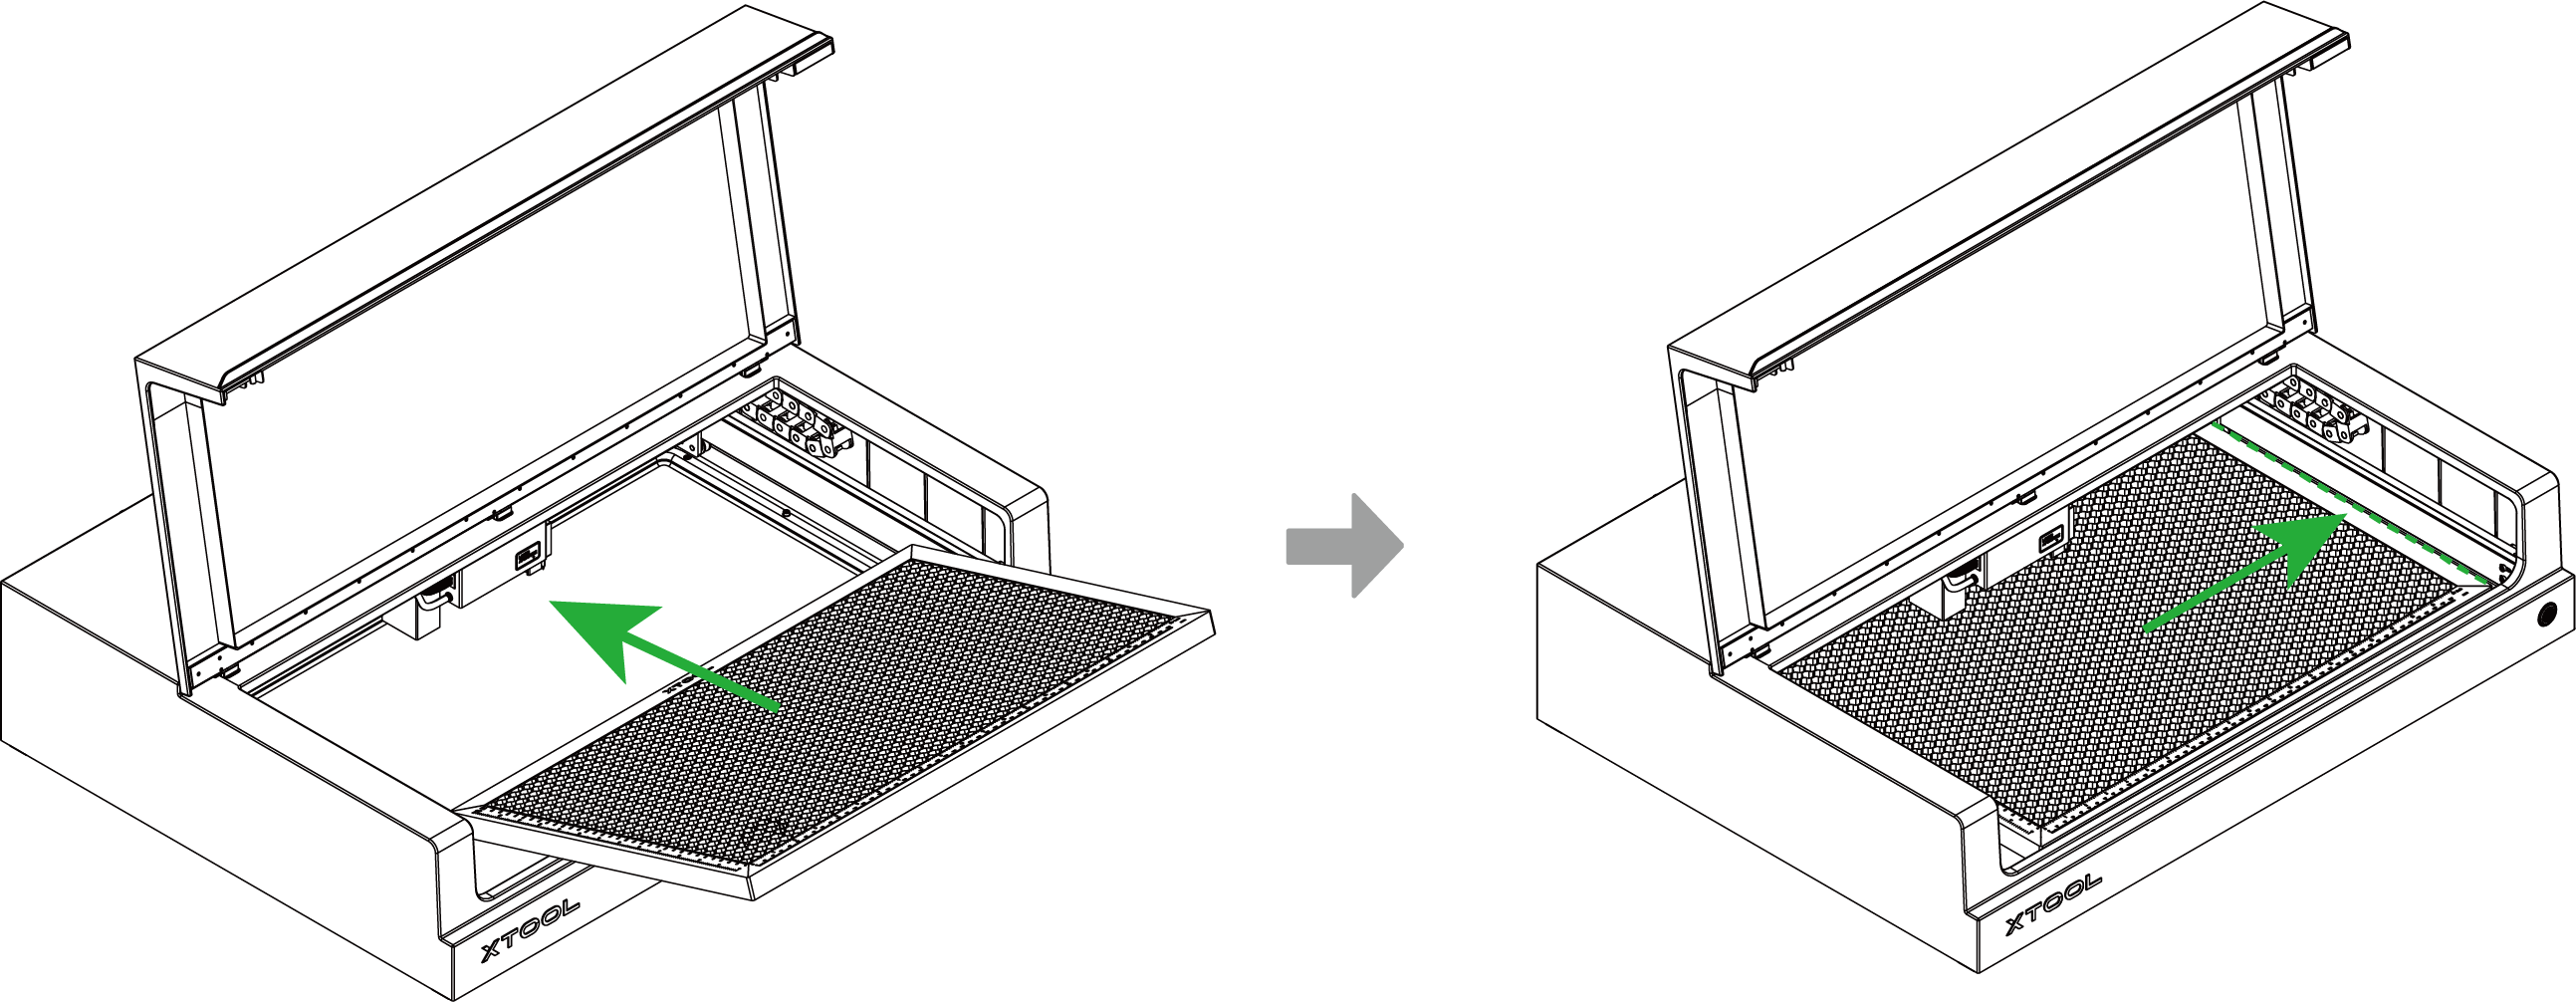
(2) Place the A5 basswood sheet on the honeycomb panel.

Step 4: Set the focus
(1) Move the laser module to where the basswood sheet is placed. Ensure that the light spot falls on the surface of the basswood sheet.
(2) In the top-right corner of XCS, click the Auto-measure icon  , and xTool S1 will automatically measure the distance from the laser module to the material surface.


Note: Before auto-measure, ensure that the probe of the distance sensor is not extending.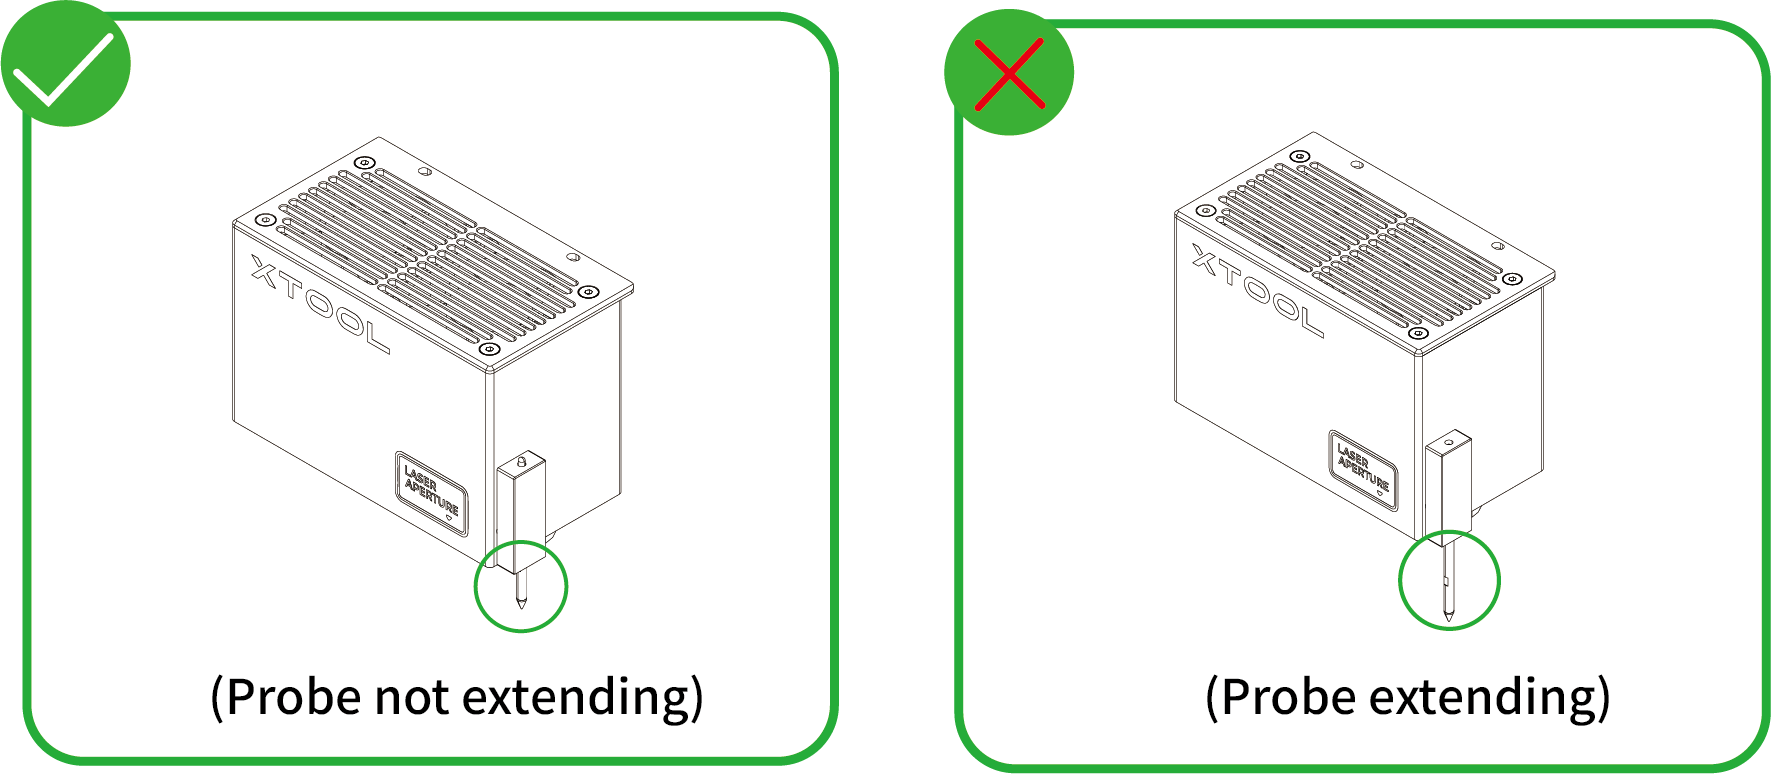
Step 5: Mark the target processing area on the canvas
(1) In the top-right corner of XCS, click the Mark processing area icon  .
.

(2) Select Rectangle, and click Start marking.

(3) Move the laser module to make the light spot fall at the upper left vertex of the target processing area, and press the button on the device to record the position. Then, repeat the same steps to record the bottom right vertex of the target processing area.

(4) Click End marking > Done, and then the target processing area will be marked out on the canvas.


Step 6: Adjust and preview the actual processing area on the material
(1) Select all the elements on the canvas and drag them to the inside of the target processing area.

(2) In the bottom-right corner of the software, click the  icon next to the Framing button to set the speed for framing.

(3) Close the lid of xTool S1, and then click Framing in the software. Press the button on xTool S1 to start framing. The laser spot will move along the boundary of the processing pattern on the material so that you can preview the processing area.

(4) After you confirm that the processing area is proper, click Framing completed in XCS. If the area is not ideal, you can adjust the material position or adjust the element positions in the software, and then preview the processing area again.

Step 7: Start processing
(1) In the bottom-right corner of the software, click Go to process.

(2) Preview the processing pattern and path.
On the bottom-left corner, click the  button, and XCS will show you the processing path.

(3) In the upper-right corner of XCS, click Start.

(4) Close the lid of xTool S1. Then, press the button on xTool S1 to start processing.

(5) After xTool S1 finishes the processing task, detach the cutting pieces from the basswood sheet. Then, assemble the pieces into a phone holder.
More example projects
Download the project files you like and use the materials required to create more works.
Tips: You can also click this links to download all the project files at once: (All) xTool S1 project files.rar
Output | Material | Project file (10 W) | Project file (20 W) | Project file (40 W) |
|  Basswood A5 | 1. Phone holder-1 10W.xcs | 1. Phone holder-1 20W.xcs | 1. Phone holder-1 40W.xcs |
 | 2. Phone holder-2 10W.xcs | 2. Phone holder-2 20W.xcs | 2. Phone holder-2 40W.xcs | |
 | 3. Phone holder-3 10W.xcs | 3. Phone holder-3 20W.xcs | 3. Phone holder-3 40W.xcs | |
 |  Alumina sheet-yellow | 4. Name card 10W.xcs | 4. Name card 20W.xcs | 4. Name card 20W.xcs |
 |  Alumina sheet-black | 4. Name card 10W.xcs | 4. Name card 20W.xcs | 4. Name card 40W.xcs |

