Introduction

xTool S1 automatic conveyor feeder is designed for xTool S1 to feed materials in conveying mode, enabling xTool S1 to process long materials and allowing you to create larger and cool works.
Supported material size

Maximum material size (L × W × H) | 1070 mm × 545 mm × 14 mm |
Minimum Material Width | 65 mm |
Maximum processing area (L × W) | 820 mm × 470 mm |
Note: If you need to process longer materials, you can buy additional conveyor rails.
Notes
xTool S1 automatic conveyor feeder needs to be used together with xTool S1 and the riser base supporting conveyor feeder.
Safety first (important)
Read and get familiar with all safety precautions and measures before using this product. Strictly follow all safety precautions. Ensure that this product is properly assembled and is working properly.
Follow the operating principles:
■ Turn off xTool S1 before connecting it to the conveyor feeder, or the motor driver chip may be damaged.
■ Check the product for damage every time before you use it. Do not operate it in any way when any damage or defect is found.
■ Before you use the conveyor feeder, arrange the connection cables, power cables, and other items that may block the feeding of materials.
■ Do not leave the device unattended during operation. Pay attention to whether it is working properly.
■ Keep the inside of the machine clean. Residues and chippings accumulated during cutting and engraving are dangerous and may cause a fire. Clean the chippings and residues inside the work area regularly.
■ Do not engrave or cut any material that contains PVC or vinyl (processing plastics is not recommended). These materials (and other materials containing chlorine/chloride) can generate corrosive vapor that is extremely harmful to the human body and can cause damage to the device. Any damage caused by engraving or cutting any material containing PVC or vinyl is not covered by the Company's warranty.
■ Do not engrave or cut any unknown materials. Vaporization or melting of many materials, which include but are not limited to PVC and polycarbonate, may release harmful smoke.
■ If a fire occurs during processing, take good care of yourself. For a small flame, you can wait for it to go off; for a larger fire, please keep a safe distance and use a fire extinguisher to put it out.
■ The product works properly at the temperature of 0°C to 35°C and can be stored properly at the temperature of 0°C to 45°C. Do not operate it at a temperature lower than 0°C.
List of items
| Conveyor feeder |
| Conveyor rail |
| Conveyor rail riser |
| Short rail |
| Cable clamp |
| Material pressing rod |
| Cable tie |
| Cable tie holder |
| Screw M3*8 |
| Screw M4*6 |
| Screw M4*12 |
| Hex key |
| User manual |


Meet your conveyor feeder

Assemble the conveyor feeder
1. Install the main unit of the conveyor feeder

Note: Ensure that xTool S1 is fit on the riser base supporting conveyor feeder.
(1) Press to open the front and rear door panels of the riser base. Ensure that the base plate of the xTool S1 is placed on the D level of the riser base.

(2) Insert the conveyor feeder into the front door of the riser base. Align the screw holes on the two tabs of the conveyor feeder with those on the riser base.

(3) Tighten the screws on the left first, and then tighten those on the right.

2. Install the front conveyor rails

(1) Insert the foot of the conveyor rail riser into the groove of the conveyor rail, aligning with the second roller on the conveyor rail. Tighten the screw to secure the conveyor rail riser.

(2) Assemble another conveyor rail in the same way as step (1).

(3) Insert the ends of the conveyor rails into the groove on the front side of the conveyor feeder and move them inwards from both sides.

(4) Adjust the distance between the conveyor rails according to the width of the material to be processed. Then, tighten the screws to fix the conveyor rails.

3. Install the rear conveyor rails

(1) Insert the foot of the conveyor rail riser into the groove of the conveyor rail, making the conveyor rail riser sit between the third and fourth roller on the conveyor rail. Tighten the screw to secure the conveyor rail riser.

(2) Slide the end of the conveyor rail into the groove of the short rail. Tighten the screw to connect the two parts.

(3) Follow the same way in steps (1) and (2) to assemble another conveyor rail.

(4) Install the conveyor rails from the back door of the riser base. Insert the ends of the conveyor rails into the groove on the inner side of the conveyor feeder and move them inwards from both sides.

(5) Align the rear conveyor rails with the front conveyor rails. Then, tighten the screws to fix the conveyor rails.

4. Fix and connect the motor cable

Note: Turn off xTool S1 before connecting it to the conveyor feeder. Otherwise, the motor driver chip may be damaged.
(1) Stick two cable clamps to the inner side of the machine as shown.

(2) Fix the motor cable into the cable clamps and connect the end of the cable to the extension port on the inner side of xTool S1's front panel.

5. Organize the cables on the back

(1) Stick a cable tie holder to the back of xTool S1 as shown.

(2) Feed the cable tie through the cable tie holder. Then, collect all the cables and tubes to where the cable tie holder is stuck and tie them with the cable tie.
Note: By organizing and fixing the cables and tubes, you can prevent them from impeding the material-conveying process.

Use the conveyor feeder
Cautions
- Ensure that you use flat materials without warping edges.
- Ensure that the part, of a material, hung in the air is no longer than 300 mm. If the material is too long, you can buy additional conveyor rails.
- Adjust the distance between the rails according to the width of the material to be processed. To prevent material distortion and pattern deformation, ensure that each part of the material is pressed as evenly as possible.
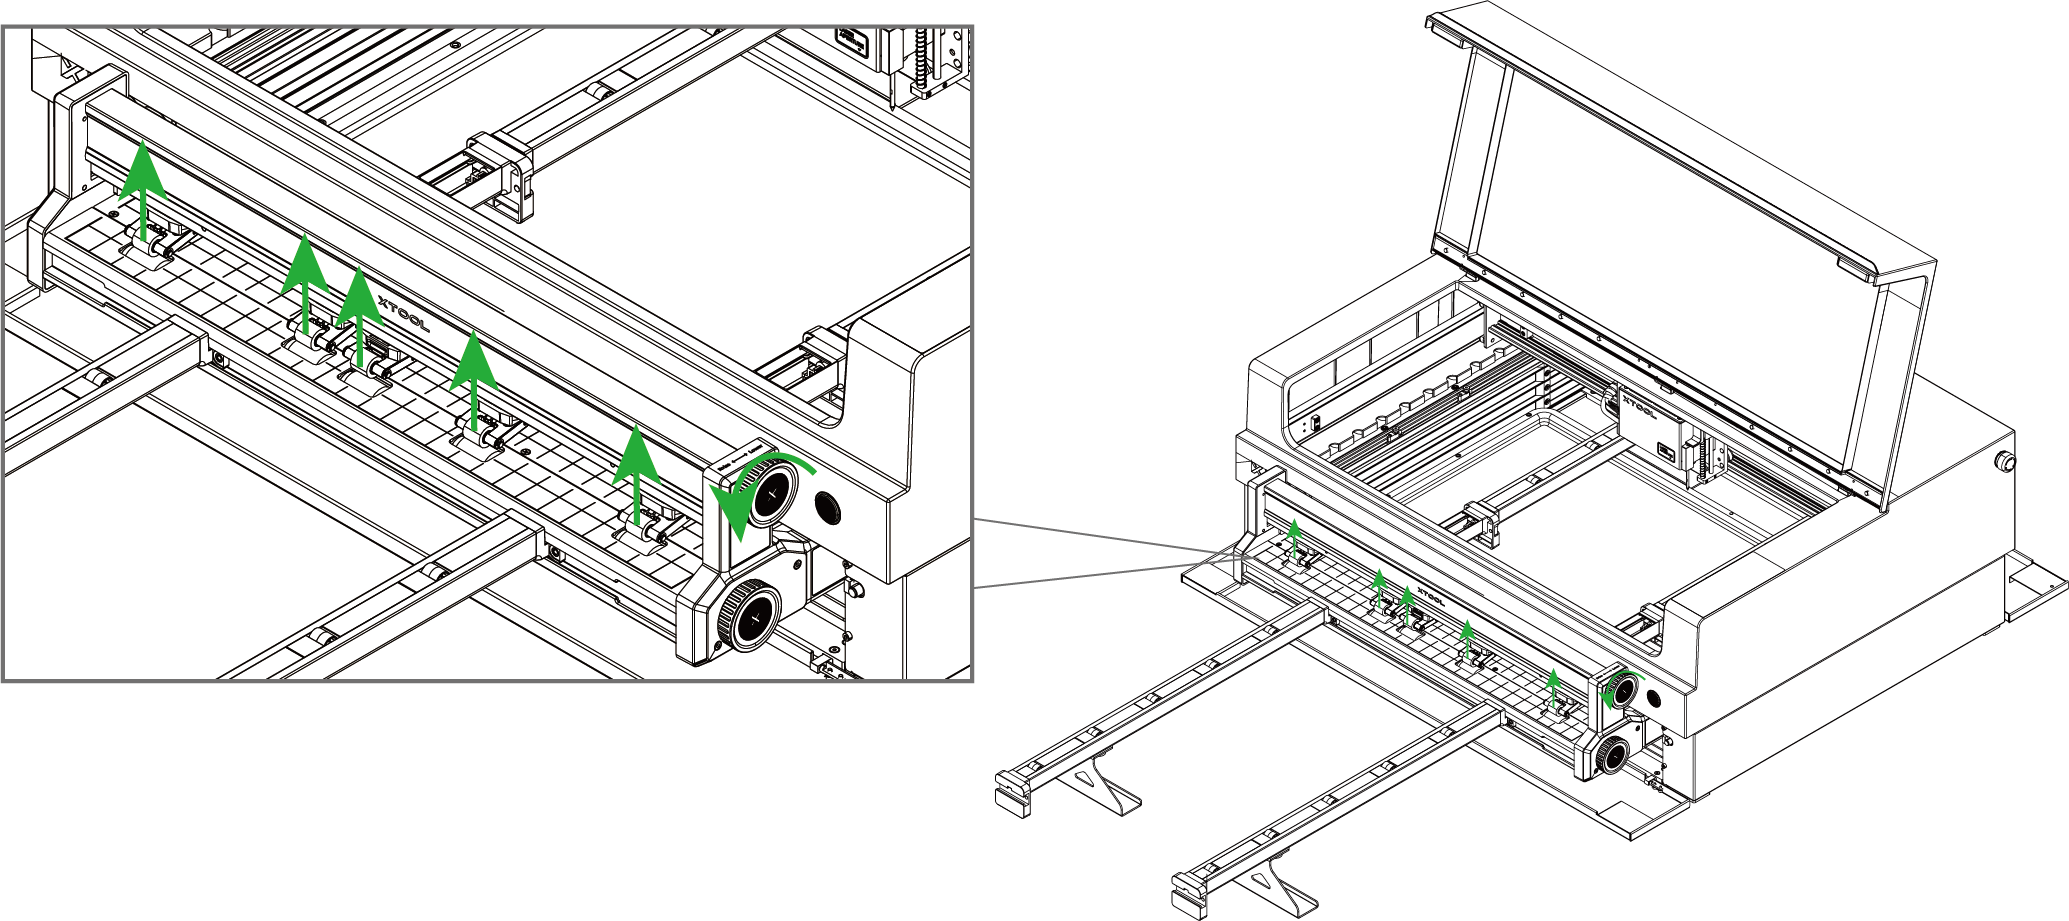
Process hard materials
- Turn the upper knob counterclockwise to raise the pinch rollers.
- Feed the material into the conveyor feeder. Align the material with the grids on the conveyor feeder. Ensure that the side edges of the material do not intersect the pinch rollers.

Note:
(1) To prevent the processed patterns from skewing, align the material with the grids on the conveyor feeder.
(2) To prevent position deviation of the material during processing, ensure that the material fully covers the lower pinch rollers.
(3) When using xTool S1 with the conveyor feeder, the laser module processes materials only above the short rails. The processing position is shown in the following picture.

- Turn the upper knob clockwise to lower the pinch rollers to press the material in place.

Note:
- For how to set a proper pressure level, refer to "Appendix ––Pressure levels recommended for common materials."
- Do not set the pressure of the pinch rollers too high, or the conveyor feeder may fail to work properly.
You can rotate the lower knob to slightly adjust the position of the material if needed.

Process flexible and thin materials

To process a flexible and thin material (such as kraft paper), use the material pressing rod instead of the conveyor rails.

Note: Ensure that the material can freely spread on both sides of the conveyor feeder.
Process soft and thick materials
When you process a soft and thick sheet (such as cork board and EVA foam board), stick PET tape on its back before processing. The processing method is the same as the hard materials.

Note 1: PET tape is not included in the pack.
Note 2: Soft materials are still easy to distort and may not be accurately conveyed.
Maintenance
If there are many residues under the pinch rollers (such as wood chips), you can turn over the conveyor feeder, and clean the pinch rollers with a brush while turning the knob.

Appendix - Pressure levels recommended for common materials
The color you see in the pressure level window indicates the pressure level.

The pressure levels recommended in the following table are for reference only. Set the pressure level for your materials as required.
Material name | Thickness | Pressure level |
Plywood | 3 mm |
|
Plywood | 6 mm |
|
Plywood | 9 mm |
|
Plywood | 14 mm |
|
Acrylic | 3 mm |
|
Acrylic | 7 mm |
|
Acrylic | 12 mm |
|
Fiberboard | 3 mm |
|
Fiberboard | 6 mm |
|
EVA board | 5 mm |
|
EVA board | 10 mm |
|
Felt board | 5 mm |
|
Felt board | 9 mm |
|
Cork board | 5 mm |
|
Cork board | 12 mm |
|


